

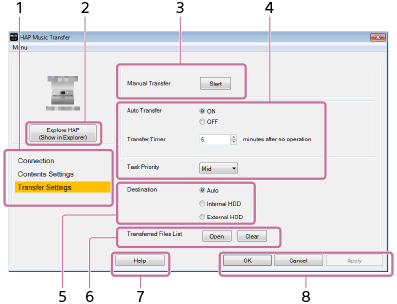
Descriptions and functions of the Transfer Settings window
You can select the transfer method (manual/automatic), the hard disk drive on the HDD AUDIO PLAYER for the music files to be transferred to and check the transfer history in the Transfer Settings window.
-
Menu window selection area
Select which window to display.
Menu items are highlighted according to the selected window. -
Explore HAP
The Explorer window (for Windows) or the Finder (for Mac) opens and displays the content stored in the hard disk drive of the HDD AUDIO PLAYER.
- Manual transfer operation area
Set [Manual Transfer] to [Start] to immediately start transferring music files.
When the transfer starts, the progress bar, total number of files to be transferred and number of transferred files appear on the screen. -
Automatic transfer setup area
Set [Auto Transfer] to [ON] and set the desired time in the [Transfer Timer] parameter.
If your computer is not operated for the amount of time set in [Transfer Timer], HAP Music Transfer starts transferring music files to the HDD AUDIO PLAYER automatically.
[Task Priority] sets the priority for the HAP Music Transfer process within the software/hardware processes performed automatically by your computer. (This function is available for Windows only.)
-
Hard disk drive selection area
Select [Destination] to select the hard disk drive on the HDD AUDIO PLAYER. Select the destination from [Auto], [Internal HDD], or [External HDD].
If you select [Auto], the music files are transferred to the internal hard disk drive first, and then are automatically transferred to the external hard disk drive when the internal hard disk drive becomes full.
-
Transfer history confirmation area
Select [Open] from [Transferred Files List] to check the transfer history of the music files transferred to the currently selected HDD AUDIO PLAYER.
You can erase the history by selecting [Clear]. When the transfer history is erased, all files that are included in the folders you select will be transferred to the HDD AUDIO PLAYER the next time the application transfers music files.
Erase the transfer history when you want to transfer all music files again.
-
Help
Opens the web browser and displays the website which links to the HAP Music Transfer Help. Select the HAP Music Transfer Help.
-
Operation buttons
Windows:
- [OK]: Enters the settings and closes the window.
- [Cancel]: Cancels the settings made on the screen and closes the window.
- [Apply]: Enters the settings. The window remains open.
Mac:
- [Apply]: Enters the settings. The window remains open.
- [Close]: Enters the settings and closes the window.
- [Quit]: Enters the settings and quits HAP Music Transfer.