How to use
About this camera
Names of parts
- Names of parts (ILCE-QX1) [1]
- Names of parts (Lens E PZ 16-50mm F3.5-5.6 OSS) [2]
- Names of parts (DSC-QX30) [3]
Before Use
Charging the battery pack
Supplying power
Inserting a memory card
Installing PlayMemories Mobile
Connecting the camera and the smartphone via Wi-Fi
- Connecting the camera and an Android smartphone via Wi-Fi [9]
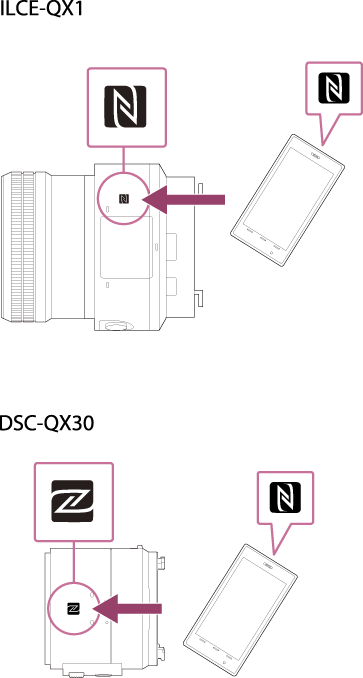
- Connecting the camera and an NFC-enabled Android smartphone via Wi-Fi [10]
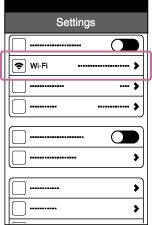
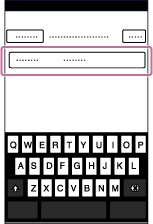
- Connecting the camera and an iPhone via Wi-Fi [11]
Connecting the camera and the Live-View Remote (sold separately) via Wi-Fi
- Connecting the Live-View Remote (sold separately) and one camera via Wi-Fi [12]
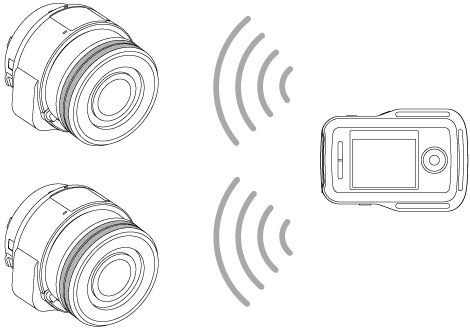
- Connecting the Live-View Remote (sold separately) and two or more cameras via Wi-Fi [13]
Attaching the camera to a smartphone
Shooting
Basic shooting method
- Shooting still images [16]
- Shooting continuously [17]
- Shooting movies [18]
- Zooming [19]
- Using flash (ILCE-QX1 only) [20]
- Adjusting AF (auto focus) with one touch. Shooting an AF adjusted still image with one touch (Touch Shutter) [21]
- Scene Recognition [22]
Shooting settings
- Self-Timer [23]
- Cont. Shooting Settings [24]
- Continuous Shooting Speed (DSC-QX30 only) [25]
- Zoom Setting [26]
- Selecting the still image size and aspect ratio [27]
- Selecting the still image quality [28]
- Selecting the size of the review image [29]
- Recording Mode (movie) (DSC-QX30 only) [30]
- White Balance [31]
- EV [32]
- ISO [33]
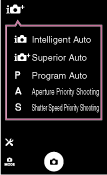
- Exposure Mode [34]
- Aperture Priority Shooting [35]
- Shutter Speed Priority Shooting [36]
- Grid Line [37]
- Mirror Mode (Taking self portraits) [38]
- Focus Mode (ILCE-QX1 only) [39]
- Lock-on AF [40]
- Touch Shutter [41]
- Flash (ILCE-QX1 only) [42]
- Review Image [43]
- Save Options [44]
- Beep of the camera [45]
- Wi-Fi setting [46]
Transferring images taken with the camera
Transferring images to the smartphone
Playing a movie on a smartphone
Deleting images in the camera
Transferring images to a computer by USB connection
Initializing/Formatting
Initializing the settings
Formatting a memory card
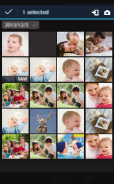
Information that appears on the screen
Display panel of the camera
Screen of the smartphone
Precautions/About this camera
Precautions
- Precautions [56]
- Battery pack [57]
- Charging the battery pack [58]
- Memory card [59]
- About adjusting the date and time [60]
On cleaning
Number of still images
Recordable time of movies
Battery life that can be used
- Battery life and number of images that can be recorded (ILCE-QX1) [66]
- Battery life and number of images that can be recorded (DSC-QX30) [67]
Specifications
Information
Trademarks
License
Troubleshooting
About this camera
Power supply
Shooting
- Why can't I record images? [74]
- Why can't I use flash? (ILCE-QX1 only) [75]
- Why can't I shoot images continuously? [76]
- Why can't I record movies? [77]
- Why can't I activate Digital zoom? [78]
- Why can't I use one-touch AF? [79]
PlayMemories Mobile
Wi-Fi connection
- Why can't I connect via Wi-Fi? [80]
- Why can't I connect with NFC? [81]
- I’ve forgotten the password. Where can I find out what it is? [82]
Shooting/transferring
- Why are movies not transferred to my smartphone? [83]
- Why is the live view image not displayed smoothly on my smartphone? [84]
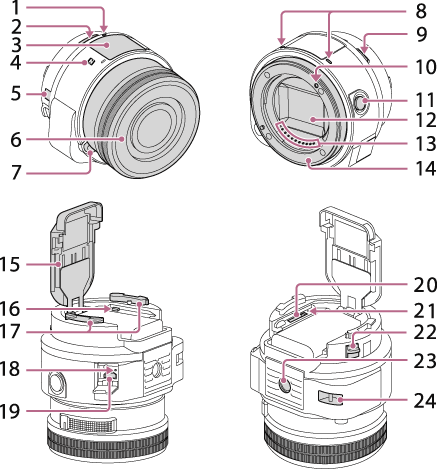
[1] How to useAbout this cameraNames of partsNames of parts (ILCE-QX1)
In this Help Guide, instructions for models with the lens supplied and not supplied are described.
The model name depends on whether the lens is supplied or not. They are as follows:
ILCE-QX1
-
Supplied Lens: none
ILCE-QX1L
-
Supplied lens: E16-50mm
The explanations for ILCE-QX1 and ILCE-QX1L are indicated with "ILCE-QX1" unless separate explanations are required for each model.
-
Power/Charge/Movie lamp
Green: Power on
Orange: Charging
Red: Recording a movie
- Power button
- Flash
 (N Mark)
- Touch the mark when you connect the camera to a smartphone equipped with the NFC function.
- NFC (Near Field Communication) is an international standard of the short-range wireless communication technology.
- Display panel
 : Indicates memory card not inserted
  : Indicates remaining battery capacity
 : Indicates the Wi-Fi setting
 Single Connection (Default setting)
 Multi Connection
 No indication (Wi-Fi Off)
- Lens for E-mount cameras (E PZ 16-50mm F3.5-5.6 OSS)
Supplied only with ILCE-QX1L (Lens supplied kit)
- Lens release button
- Microphone
 (Flash pop-up) button
- Mounting index
- Shutter button
- Image sensor (*)
- Lens contacts (*)
- Mount
- Battery cover
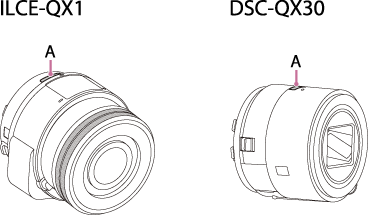
- The password and SSID required for Wi-Fi connection are printed on the inside of the camera’s battery cover.
- Wi-Fi button
- Attachment part
- RESET button
- Multi terminal
- Supports Micro USB compatible device.
- Memory card slot
- Access lamp
- Removal lever
- Tripod socket hole
- Use a tripod with a screw less than 5.5 mm (7/32 inches) long. Otherwise, you cannot firmly secure the camera, and damage to the camera may occur.
- Hook for the wrist strap
* Do not touch this part directly.
Hint
Attach the strap and place your hand through the loop to prevent the camera from damage by being dropped.
- Maximum weight the strap can hold: 850 g (1 lb 14 oz)
[2] How to useAbout this cameraNames of partsNames of parts (Lens E PZ 16-50mm F3.5-5.6 OSS)
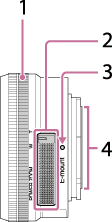
- Zooming/Focusing ring
- Zooming lever
- Mounting index
- Lens contacts (*)
* Do not touch this part directly.
Attaching the lens
- Remove the lens caps on the front and rear of the lens and the body cap of the camera.
- Align the white marks (
 ) on the lens and camera, push the lens lightly towards the camera and slowly turn the lens clockwise until it clicks into the locked position.
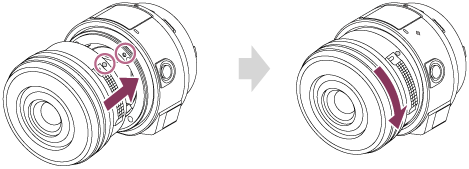
- When attaching the lens, do not press the lens release button.
- Be sure to put the lens on straight.
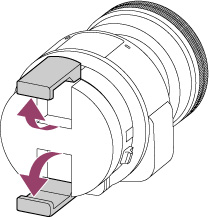
Removing the lens
- While pressing down the lens release button, turn the lens counterclockwise to remove.

- Turn off the camera and make sure that the lens is retracted before removing it.
[3] How to useAbout this cameraNames of partsNames of parts (DSC-QX30)

- Power button
- Microphone
- Lens
- Removal lever
- Access lamp
- Multi terminal
- Supports Micro USB compatible device.
- RESET button
- Memory card slot
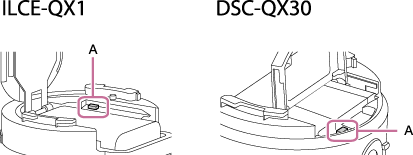
- (N Mark)
- Touch the mark when you connect the camera to a smartphone equipped with the NFC function.
- NFC (Near Field Communication) is an international standard of the short-range wireless communication technology.
- Power/Charge/Movie lamp
Green: Power on
Orange: Charging
Red: Recording a movie
- Zoom lever
- Shutter button
- Attachment part
- Display panel
: Indicates memory card not inserted : Indicates remaining battery capacity: Indicates the Wi-Fi setting
- Single Connection (Default setting)
- Multi Connection
- No indication (Wi-Fi Off)
- Battery cover
- The password and SSID required for Wi-Fi connection are printed on the inside of the camera’s battery cover.
- Wi-Fi button
- Tripod socket hole
- Use a tripod with a screw less than 5.5 mm (7/32 inches) long. Otherwise, you cannot firmly secure the camera, and damage to the camera may occur.
- Hook for the wrist strap
Hint
Attach the strap and place your hand through the loop to prevent the camera from damage by being dropped.

[4] How to useBefore UseCharging the battery packCharging the battery pack
Charges the battery pack when it is in the camera.
- Turn off the power of the camera.
- Insert the battery pack in the camera.
How to open the battery cover of the ILCE-QX1:
Slide the lever in the [1] direction and hold it there.
Pull the cover in the [2] direction.
Open the cover in the [3] direction.
How to open the battery cover of the DSC-QX30:
Pull the cover in the [1] direction.
Open the cover in the [2] direction.

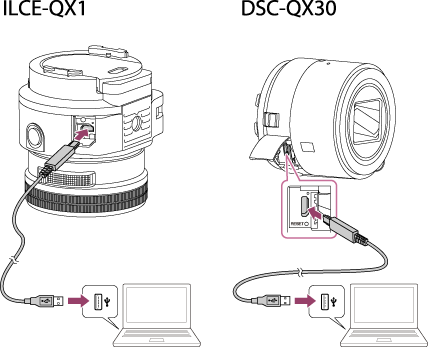
- Connect the multi terminal of the camera to a USB port of your computer, using the micro USB cable (supplied).
Charge lamp
Lit: Charging
Off: Charging finished
Flashing: Charging error, or charging paused temporarily due to charging outside appropriate temperature range
If you do not have a computer, use the AC adaptor AC-UD10 (sold separately).
Charging time (Full charge)
The charging time using the micro USB cable (supplied) is as follows:
ILCE-QX1: Approximately 310 minutes
DSC-QX30: Approximately 115 minutes
The above charging time applies when charging a fully depleted battery pack at a temperature of 25°C (77°F). Charging may take longer depending on conditions of use and circumstances.
Note
-
Note the following points when charging:
- Turn off the power of the camera before charging. Charging is not possible when you connect the computer while the camera is turned on.
- If the camera is connected to a laptop computer that is not connected to a power source, the laptop battery level decreases. Do not charge for an extended period of time.
- Do not turn on/off or restart the computer, or wake the computer to resume from sleep mode when a USB connection has been established between the computer and the camera. The camera may cause a malfunction. Before turning on/off, or restarting the computer or waking the computer from sleep mode, disconnect the camera and the computer.
- No guarantees are made for charging using a custom-built computer or a modified computer.
Hint
- When the Charge lamp flashes and charging is not finished, remove and re-insert the battery pack.
[5] How to useBefore UseSupplying powerSupplying power
By supplying power from a computer or AC adaptor (sold separately), you can use the camera while saving power.
You can shoot while charging when the ILCE-QX1 is supplied with power from the AC-PW20 AC Adaptor (sold separately), or the DSC-QX30 is supplied with power from the AC-UD10 AC Adaptor (sold separately).
When supplying power from a computer, you can transfer images in the memory card of the camera to a computer through the Mass Storage.
Note
- The battery remaining indicator on the display panel of the camera will disappear.
- While the camera is turned off, the battery pack is charged.
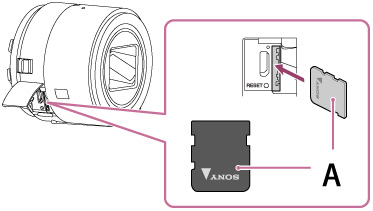
[6] How to useBefore UseInserting a memory cardInserting a memory card
You can shoot images after inserting a memory card in the camera.
- Open the cover and insert a microSD memory card or Memory Stick Micro (M2) media.
ILCE-QX1
microSD memory card
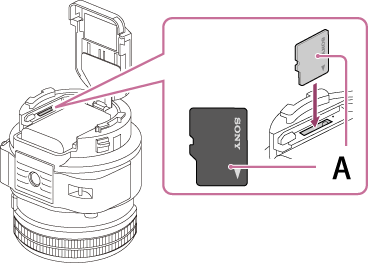
Memory Stick Micro media
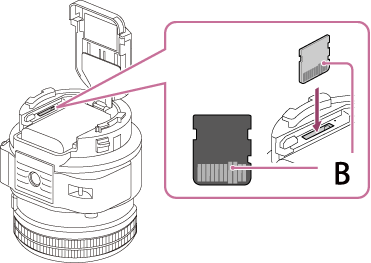
A: Printed side
B: Terminal side
DSC-QX30
microSD memory card
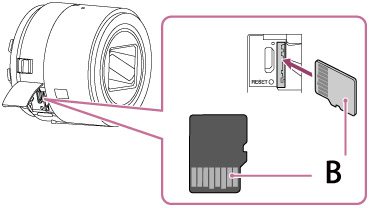
Memory Stick Micro media
A: Printed side
B: Terminal side
- Close the cover.
- Before removing the memory card, make sure that the access lamp is off, then press the memory card.
Note
- If (indicates memory card not inserted) appears on the display panel of the camera, or the power lamp flashes red, the memory card is inserted upside down or the other way around. Insert it in the correct direction.
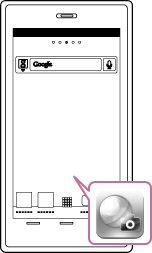
[7] How to useBefore UseInstalling PlayMemories MobileInstalling to an Android smartphone
Install PlayMemories Mobile to a smartphone in order to make a Wi-Fi connection with the camera.
- Install PlayMemories Mobile from Google Play.

Note
- Operation of PlayMemories Mobile with all smartphones and tablets is not assured.
- Operation methods and display screens for a smartphone or PlayMemories Mobile are subject to change without notice by future upgrades.
Hint
- For more information, refer to the following website.
[8] How to useBefore UseInstalling PlayMemories MobileInstalling to an iPhone
Install PlayMemories Mobile to an iPhone in order to make a Wi-Fi connection with the camera.
- Install PlayMemories Mobile from App Store.

Note
- Operation of PlayMemories Mobile with all smartphones and tablets is not assured.
- Operation methods and display screens for a smartphone or PlayMemories Mobile are subject to change without notice by future upgrades.
Hint
- For more information, refer to the following website.
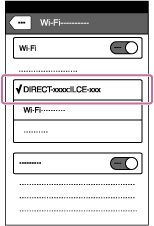
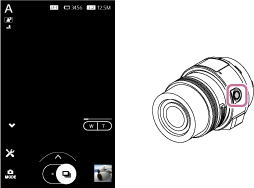
[9] How to useBefore UseConnecting the camera and the smartphone via Wi-FiConnecting the camera and an Android smartphone via Wi-Fi
Connects the camera and Android smartphone via Wi-Fi.
- Turn on the power of the camera.
A: Power button
- Start PlayMemories Mobile on the smartphone.
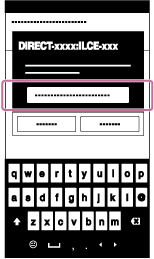
- Select the SSID printed on the label on the inside of the camera's battery cover.

- Input the password, as printed on the same label (first time only).
Note
- Make sure that the Wi-Fi setting of the camera is set to (Single Connection).
[10] How to useBefore UseConnecting the camera and the smartphone via Wi-FiConnecting the camera and an NFC-enabled Android smartphone via Wi-Fi
Connects the camera and Android smartphone with one-touch, using NFC functions.
- Select [Settings] on the smartphone, then select [More…] to check that [NFC] is enabled.
- Touch the N mark of the smartphone to (N Mark) of the camera.
Powered on: Continue to touch (1-2 seconds) without moving the smartphone until PlayMemories Mobile starts up.
Powered off: Continue to touch without moving the smartphone until the camera turns on (ILCE-QX1) or the lens of the camera extends (DSC-QX30).
Note
- Cancel sleep and the screen lock of the smartphone in advance.
- Make sure that the Wi-Fi setting of the camera is set to (Single Connection).
- If there is no N mark on the smartphone, refer to the manual of the smartphone.
- If the camera and a smartphone cannot be connected by NFC, see "Connecting the camera and an Android smartphone via Wi-Fi" and connect them without using NFC.
Hint
- If you touch the N Mark of an NFC-enabled Android smartphone that is not installed with PlayMemories Mobile against the (N Mark) of the camera, the smartphone’s browser will start and display the PlayMemories Mobile download page of the application store.
[11] How to useBefore UseConnecting the camera and the smartphone via Wi-FiConnecting the camera and an iPhone via Wi-Fi
Connects the camera and iPhone via Wi-Fi.
- Turn on the power of the camera.
A: Power button
- On the smartphone, select [Settings].
- Select [Wi-Fi].
- Select the SSID printed on the label on the inside of the camera's battery cover.

- Input the password, as printed on the same label (first time only).
- Confirm the connection to the SSID of the camera.
- Go back to the Home screen, then start PlayMemories Mobile.

Note
- Make sure that the Wi-Fi setting of the camera is set to (Single Connection).
- To terminate the Wi-Fi connection, make sure you do not only terminate PlayMemories Mobile but also turn off the power of the camera.
If you terminate PlayMemories Mobile only, the Wi-Fi connection remains.
[12] How to useBefore UseConnecting the camera and the Live-View Remote (sold separately) via Wi-FiConnecting the Live-View Remote (sold separately) and one camera via Wi-Fi
You can connect a camera to the Live-View Remote via Wi-Fi.
- Turn on the power of the Live-View Remote and set its connection setting to [SINGLE connection] from the Network Settings.
For details on operation, refer to the operating guide of the Live-View Remote.
- Turn on the power of the camera.
- Press the Wi-Fi button (A) of the camera and select (Single Connection).

- Select the SSID of the camera displayed on the Live-View Remote.
- While the connection confirmation beep is emitted, press and hold the Wi-Fi button of the camera.
Registration is complete when the camera emits the connection completion beep.
An image is displayed on the Live-View Remote when the connection is established.
Note
- Step 5 is required only when registering the first time.
[13] How to useBefore UseConnecting the camera and the Live-View Remote (sold separately) via Wi-FiConnecting the Live-View Remote (sold separately) and two or more cameras via Wi-Fi
You can connect a maximum of five cameras to the Live-View Remote and operate all cameras simultaneously.
- Turn on the power of the Live-View Remote and set its connection setting to [MULTI connection] from the Network Settings, and set it to the registration standby mode in the MENU screen.
For details on operation, refer to the operating guide of the Live-View Remote.
- Turn on the power of the camera.
- Press the Wi-Fi button (A) of the camera and select (Multi Connection).
- Press and hold the Wi-Fi button for 2 seconds or more.
Registration is complete when the camera emits the connection confirmation beep.
An image is displayed on the Live-View Remote when the connection is established.
Note
- Step 4 is required only when registering the first time.
- The camera should only be connected to a smartphone or a Live-View Remote via Wi-Fi and not other Wi-Fi access points. If you choose to connect the camera to other Wi-Fi access points, then you do so at your own risk as by doing so the camera may be subject to unauthorized access and any content communicated may be at risk of interception.
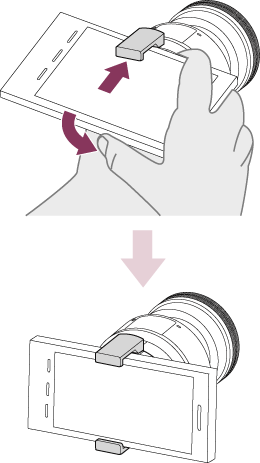
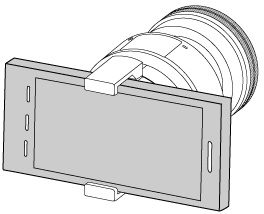
[14] How to useBefore UseAttaching the camera to a smartphoneAttaching the camera to a smartphone
Attaches a smartphone after fixing the camera to the smartphone attachment (supplied).
- Fix the attachment to the camera.
Align the white mark (
 ) of the camera with the white mark ( ) of the attachment, then rotate the attachment until its LOCK position aligns with the white mark ( ) of the camera.
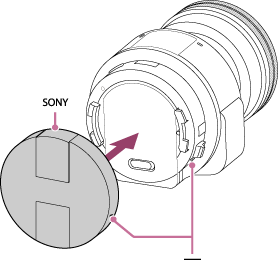
- Open the clamps of the attachment.
- Extend the clamps and attach to a smartphone.
When attaching the camera to a smartphone, do not hold the smartphone only. The attachment may fall off the smartphone. Hold the camera body and the lens (ILCE-QX1), or hold the camera (DSC-QX30).
To remove the smartphone, extend the clamps of the attachment as you did when attaching, and remove. It is not recommended that you pull out the smartphone by sliding it to the side, since the rubber part of the attachment clamps may be damaged.
Note
- Make sure no buttons are caught when the smartphone is attached.
- Make sure no fingers are caught when the smartphone is attached.
- Do not swing the camera around with a smartphone attached to it, as the smartphone may slip out of the attachment.
- Support the camera body and the lens (ILCE-QX1), or support the camera (DSC-QX30) when shooting. The attachment may fall off the smartphone if you hold the smartphone only, especially when a heavy lens is attached to the ILCE-QX1.
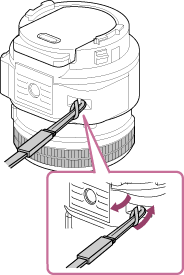
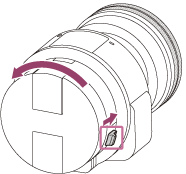
[15] How to useBefore UseAttaching the camera to a smartphoneRemoving the smartphone attachment (supplied)
Removes the smartphone attachment after using the camera.
- Slide the removal lever to the lens
side and rotate the attachment.
[16] How to useShootingBasic shooting methodShooting still images
Shoots still images.
In the default setting, [2M] images are transmitted automatically to the smartphone, and a review screen is displayed on the smartphone. Images are saved in the memory card of the camera in the image size set in [Still Image Size] .
- Connect the camera and the smartphone via Wi-Fi.
- Press the shutter button of the camera or tap the shutter button of the smartphone.

Note
- When you use the shutter button of the camera, press it halfway to focus on the subject, then press it fully to shoot an image. A beep sounds when focus is achieved with the shutter button halfway down.
[17] How to useShootingBasic shooting methodShooting continuously
You can shoot still images continuously while pressing down the shutter button or by sliding the shutter button displayed on the smartphone. After shooting, continuously shot still images are displayed in a thumbnail list, from which you can select and transfer desired still images.
- Confirm that the memory card is inserted in the camera.
- Connect the camera and the smartphone via Wi-Fi, then tap
 (Settings).
The setting screen is displayed.
- [Cont. Shooting Settings]
 desired mode
 - Press and hold the shutter button of the camera, or slide the shutter button to the left on the smartphone to shoot still images.
- Release the shutter button of the camera, or slide the shutter button to the right on the smartphone after sliding it to the left end.
- Still images shot continuously are displayed.
- Select desired still images, then tap
 (Copy) to save.
Note
- Continuous shooting cannot be performed if no memory card is inserted in the camera.
- Up to 10 still images can be shot continuously on the DSC-QX30.
[18] How to useShootingBasic shooting methodShooting movies
Shoots MP4 movies.
- Confirm that the memory card is inserted in the camera.
- Connect the camera and the smartphone via Wi-Fi.
- Orient the smartphone horizontally.
- Tap the still image/movie switching button (A) to switch to movie mode.

- Press the shutter button of the camera, or tap the
 (Movie) button of the smartphone.

- Press the shutter button of the camera, or tap the
 (Movie) button of the smartphone again to stop recording the movie.
Note
- Movies are not transferred automatically. Transfer the movie to your smartphone after recording.
- You cannot record movies if no memory card is inserted in the camera.
- If you shoot a movie with the camera rotated from the position set up in step 3, the recorded movie may be displayed inclined.
[19] How to useShootingBasic shooting methodZooming
Shoots enlarged images with zoom.
The maximum zoom factor of the ILCE-QX1 depends on the attached lens. The maximum zoom factor of the DSC-QX30 is 30x.
- Connect the camera and the smartphone via Wi-Fi.
- Zoom with the zoom lever of the lens (ILCE-QX1), or zoom with the zoom lever of the camera or the zoom button of the smartphone (DSC-QX30).
Hint
- The high-magnification Clear image zoom function magnifies images up to a high zoom factor with image processing that has less image quality deterioration. It can be selected from [Zoom Setting].
- When [Focus Mode] is set to [AF-S], you can also zoom by turning the zooming/focusing ring (ILCE-QX1 only).

[20] How to useShootingBasic shooting methodUsing flash (ILCE-QX1 only)
In dark environments, use the flash to light up the subject while shooting and to prevent camera-shake. When shooting against the sun, use the flash to lighten the image of the backlit subject.
- Press the (Flash pop-up) button to pop up the flash.
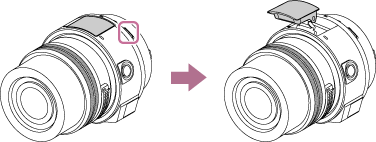
- Press the shutter button fully down.
When you do not use the flash
When not using the flash, press it back into the camera body.
Note
- When not using the flash, press it back into the camera body.
- You cannot use the flash when recording movies.
- If you let the flash strobe when it has not fully risen, a malfunction may occur.
- When using the flash to take self portraits, be careful not to look directly into the flash as the flash strobes at close range.
- When shooting with the flash and the zoom is set to W, the shadow of the lens may appear on the screen, depending on the shooting conditions. If this happens, move away from the subject or set the zoom to T, and shoot with the flash again.
[21] How to useShootingBasic shooting methodAdjusting AF (auto focus) with one touch. Shooting an AF adjusted still image with one touch (Touch Shutter)
If you tap the live view image displayed on the smartphone, the camera automatically focuses on the tapped area, or automatically shoots a still image.
- Connect the camera and the smartphone via Wi-Fi.
- Tap the point you want to focus on.
If you tap another point before shooting, the camera refocuses on that point.

- If you touch the One-touch AF release button (
 ), focus will be canceled.
 - When [Touch Shutter] is set to [On] on the menu, the camera automatically shoots a still image after focusing is achieved.
- If you touch the One-touch AF release button (
Note
-
One-touch AF cannot be used in the following settings:
- Movie mode
- [Focus Mode] is set to [MF] (ILCE-QX1 only)
- When a mount adaptor is used and the [Focus Mode] is set to [Phase detection AF] or [MF]
- While using one-touch AF, only the shutter button is effective. If you would like to perform other operations, cancel one-touch AF.
-
One-touch AF is released if either of the following operations is performed:
- Shooting still images
- Zooming
Hint
- The AF frame display varies depending on the scene the camera recognized.
[22] How to useShootingBasic shooting methodScene Recognition
The camera automatically recognizes the shooting scene and conditions and makes the appropriate settings for shooting. Icons for recognized scenes and conditions will be displayed on the smartphone.
The position of an icon depends on whether the camera recognizes a scene or a condition. If the camera recognizes a scene, one of icons such as  (Portrait),
  (Infant),
  (Night Portrait),
  (Night Scene),
  (Backlight Portrait),
  (Backlight),
  (Landscape),
  (Macro),
  (Low Light),
  (Spotlight) is displayed on the first line. If the camera recognizes a condition, either the
  (Tripod) or
  (Move)* icon is displayed on the second line. The camera may recognize both the scene and condition, or just one.
*When [Superior Auto] is set,  (Move (Bright)) and
  (Move (Dark)) are recognized. When you record movies,
  (Walk) is recognized (DSC-QX30 only).
Note
- Scene Recognition is effective only when [Intelligent Auto] or [Superior Auto] is set.
- These scenes may not be recognized depending on the situation.
[23] How to useShootingShooting settings Self-Timer
You can shoot using the self-timer.
- Connect the camera and the smartphone via Wi-Fi, then tap (Settings).
The setting screen is displayed.
- [Self-Timer]desired mode
Menu items
Off: Does not use the self-timer.
2sec: Sets the self-timer to a 2-second delay.
10sec: Sets the self-timer to a 10-second delay.
- Press the shutter button of the camera or tap the shutter button of the smartphone.
Note
- You cannot record movies using the self-timer.
- If you tap the shutter button of the smartphone in step 3, this button cannot be used to cancel the self-timer.
- The self-timer function is active until it is canceled. Set the self-timer to [Off] after use.
[24] How to useShootingShooting settingsCont. Shooting Settings
Sets how images are shot continuously.
- Connect the camera and the smartphone via Wi-Fi, then tap (Settings).
The setting screen is displayed.
- [Cont. Shooting Settings] desired mode
Menu Items
 Single Shooting (Default setting): Shoots a single image. Normal shooting mode.
 Cont. Shooting (ILCE-QX1 only): Shoots images continuously while the shutter button of the camera is pressed or the shutter button of the smartphone is slid to the left.
Cont. Shooting (finite) (DSC-QX30 only): Shoots continuously up to 10 images while the shutter button of the camera is pressed or the shutter button of the smartphone is slid to the left.
 Spd Priority Cont.(ILCE-QX1 only): Shoots images continuously at a faster rate while the shutter button of the camera is pressed or the shutter button of the smartphone is slid to the left.
Note
- Continuous shooting cannot be performed if no memory card is inserted in the camera.
- The shooting speed of [Spd Priority Cont.] is estimated using our criteria. The speed of continuous shooting may be slower, depending on shooting conditions (Image size or ISO setting).
- In [Spd Priority Cont.], an image of each frame is immediately displayed between continuous shooting frames.
- When self-timer is set to [2sec] or [10sec], [Cont. Shooting Settings] is set to [Single Shooting]. When [Cont. Shooting Settings] is set to a setting other than [Single Shooting], self-timer is set to [Off].
[25] How to useShootingShooting settingsContinuous Shooting Speed (DSC-QX30 only)
Sets the continuous shooting speed.
- Connect the camera and the smartphone via Wi-Fi, then tap (Settings).
The setting screen is displayed.
- [Continuous Shooting Speed] desired mode
Menu Items
Hi (Default setting): Sets the continuous shooting speed to a maximum of approximately 10 frames per second.
Low: Sets the continuous shooting speed to a maximum of approximately 2 frames per second.
Note
- You can select the [Continuous Shooting Speed] only when the [Cont. Shooting Settings] is set to a [Cont. Shooting].
[26] How to useShootingShooting settingsZoom Setting
Sets the zoom setting of the camera.
- Connect the camera and the smartphone via Wi-Fi, then tap (Settings).
The setting screen is displayed.
- [Zoom Setting] desired mode
Menu Items
Optical zoom only (Default setting): Optical zoom is activated.
On:ClearImage Zoom:Even if the zoom range of the optical zoom is exceeded, the camera magnifies images within the range in which image quality does not deteriorate significantly.
Note
- Set [Optical zoom only] if you want to magnify images within the range in which image quality does not deteriorate.
- When you use a zoom function exceeding the optical zoom factor, the [Focus Area] setting is disabled and the focus area frame is shown by dotted lines. The AF operates with priority on and around the center area.
[27] How to useShootingShooting settingsSelecting the still image size and aspect ratio
Sets the image size and aspect ratio of the still image to be saved in a memory card inserted in the camera.
The larger the image size, the more detail will be reproduced when the image is printed on large-format paper. The smaller the image size, the more images can be recorded.
- Connect the camera and the smartphone via Wi-Fi, then tap (Settings).
The setting screen is displayed.
- [Still Image Size]desired mode
Menu items
ILCE-QX1:
Image size when [Aspect Ratio] is 3:2
20M 5456×3632 pixels (Default setting)
10M 3872×2576 pixels
5.0M 2736×1824 pixels
Image size when [Aspect Ratio] is 16:9
17M 5456×3064 pixels
8.4M 3872×2176 pixels
4.2M 2736×1536 pixels
DSC-QX30:
Image size when [Aspect Ratio] is 3:2
18M 5184×3456 pixels
8.9M 3648×2432 pixels
4.5M 2592×1728 pixels
Image size when [Aspect Ratio] is 4:3
20M 5184×3888 pixels (Default setting)
10M 3648×2736 pixels
5.0M 2592×1944 pixels
0.3M 640×480 pixels
Image size when [Aspect Ratio] is [16:9]
15M 5184×2920 pixels
7.5M 3648×2056 pixels
2.1M 1920×1080 pixels
Image size when [Aspect Ratio] is 1:1
15M 3888×3888 pixels
7.5M 2736×2736 pixels
3.7M 1920×1920 pixels
[28] How to useShootingShooting settingsSelecting the still image quality
Sets the image quality of the still image to be saved in a memory card inserted in the camera.
- Connect the camera and the smartphone via Wi-Fi, then tap (Settings).
The setting screen is displayed.
- [Quality]desired mode
Menu Items
RAW & JPEG*: File format: RAW (Records using the RAW compression format.) + JPEG
A RAW image and a JPEG image are created at the same time. This is suitable when you need 2 image files, a JPEG for viewing, and a RAW for editing. JPEG images are recorded in [Fine] image quality.
Fine: File format: JPEG
The image is compressed in the JPEG format when recorded.
Standard (Default setting): File format: JPEG
The image is compressed in the JPEG format when recorded. Since the compression rate of [Standard] is higher than that of [Fine], the file size of [Standard] is smaller than that of [Fine]. This will allow more files to be recorded on 1 memory card, but the image quality will be lower.
*Available only on the ILCE-QX1
Using Image Data Converter
With Image Data Converter, you can do the following:
- You can play back and edit images recorded in RAW format with various corrections, such as tone curve and sharpness.
Image Data Converter support page (English only)
Note
- If images are not to be modified using your computer, we recommend that you record images in JPEG format.
- Review images of RAW format images recorded with [Quality] set to [RAW & JPEG] cannot be transferred to a smartphone (ILCE-QX1 only).
[29] How to useShootingShooting settingsSelecting the size of the review image
Selects the size at which the image is transferred to the smartphone when shooting.
- Connect the camera and the smartphone via Wi-Fi, then tap (Settings).
The setting screen is displayed.
- [Size of Review Image]desired mode
Menu items
2M (Default setting): Reduces the size to [2M] for transfer.
Original: Keeps the original recorded size.
Note
- [Original] can be selected when a memory card is inserted in the camera.
[30] How to useShootingShooting settings Recording Mode (movie) (DSC-QX30 only)
Selects the image size, frame rate, and image quality for movie recording.
- Connect the camera and the smartphone via Wi-Fi, then tap the still image/movie switching button (A) to switch to movie mode.
- Tap (Settings).
The setting screen is displayed.
- [Recording Mode]desired mode
Menu items
PS: Records high image quality movies of 1920×1080 (60p).
HQ (default setting): Records standard image quality movies of 1920×1080 (30p).
[31] How to useShootingShooting settings White Balance
Adjusts color tones according to the surrounding light conditions.
- Connect the camera and the smartphone via Wi-Fi, then tap (Settings).
The setting screen is displayed.
- [White Balance]desired mode
Menu items
 (Auto WB)(Default setting): Adjusts the white balance automatically so that the colors appear natural.
 (Daylight): Adjusts for outdoors conditions on a fine day.
 (Shade)*: Adjusts for a shady location.
 (Cloudy): Adjusts for a cloudy sky.
 (Incandescent): Adjusts for places under incandescent lamp, or under bright lighting, such as in
a photo studio.
(Incandescent): Adjusts for places under incandescent lamp, or under bright lighting, such as in
a photo studio.
 (Fluor.: Warm White) *: Adjusts for warm white fluorescent lighting.
 (Fluor.: Cool White): Adjusts for cool white fluorescent lighting.
 (Fluor.: Day White): Adjusts for day white fluorescent lighting.
 (Fluor.: Daylight): Adjusts for daylight fluorescent lighting.
(Flash)*: Adjusts for flash light.
 (Color Temp.)*: Adjusts for the color temperature of the light source. Increase the value to get a more reddish color tone, and decrease the value to get a more bluish color tone.
* ILCE-QX1 only
Note
- You cannot set the white balance when [Intelligent Auto] or [Superior Auto] is set.
[32] How to useShootingShooting settings EV
Adjusts the exposure manually.
- Connect the camera and the smartphone via Wi-Fi.
- Tap
 to display the setting screen.
- Tap the EV value and select a desired value.

ILCE-QX1: Adjusts the exposure manually in a range of –3.0 EV to +3.0 EV.
DSC-QX30: Adjusts the exposure manually in a range of –2.0 EV to +2.0 EV.
Note
- You cannot set the EV value when [Intelligent Auto] or [Superior Auto] is set.
- The EV value you can see on the screen when shooting is from -2.0 EV to +2.0 EV. If you set the value outside of that range, the brightness on the screen will not change while shooting, but will be reflected in the recorded image.
Hint
A: Overexposure (too much light)
B: Correct exposure
C: Underexposure (too little light)
- When the image shot is overexposed, adjust [EV] to the minus side.
- When the image shot is underexposed, adjust [EV] to the plus side.
[33] How to useShootingShooting settingsISO
Adjusts the ISO manually.
- Connect the camera and the smartphone via Wi-Fi.
- Tap to display the setting screen.
- Tap the ISO value and select a desired value.

ILCE-QX1: Auto/100-16000
DSC-QX30: Auto/80-3200
Note
-
You cannot set the ISO value when [Intelligent Auto] or [Superior Auto] is set.
[34] How to useShootingShooting settings Exposure Mode
You can select the Exposure Mode based on condition and objective.
- Connect the camera and the smartphone via Wi-Fi, then tap
 (Exposure Mode).
The Exposure Mode selecting screen is displayed.
- Select the desired mode.
Menu items
(Intelligent Auto): Shoots still images with the settings adjusted automatically.
 (Superior Auto): Shoots still images in higher quality than with Intelligent Auto mode.
 (Program Auto): Shoots with automatic exposure (shutter speed and aperture (F) value). You can adjust the EV value and white balance.
 (Aperture Priority Shooting): Shoots with the aperture manually adjusted for focus range and degree of background defocus. You can adjust the EV value and white balance.
 (Shutter Speed Priority Shooting): Shoots with setting the shutter speed manually. You can adjust the EV value and white balance.
Note
-
When [Intelligent Auto] or [Superior Auto] is set, you cannot change the following settings.
- EV
- White Balance
- ISO
- In [Superior Auto] mode, it takes some time to record an image, because the camera overlays images to create a high-quality image with less subject blur and noise.
[35] How to useShootingShooting settings Aperture Priority Shooting
You can adjust the focus range or degree of background defocus by manually setting the aperture (F value).
- Connect the camera and the smartphone via Wi-Fi.
- Tap to display the setting screen.
- Tap the aperture (F value) and select a desired value.

ILCE-QX1:
- Setting a smaller aperture value: The subject is in focus, but objects in front of and beyond the subject are blurred.
- Setting a larger aperture value: The subject and its foreground and background are all in focus.
DSC-QX30:
- Selects an aperture (F value) from F3.5 to F8.0.
Note
- This setting is available only when [Exposure Mode] is set to (Aperture Priority Shooting).
- When you adjust the zoom to the T side, the maximum aperture (minimum F value) will increase.
[36] How to useShootingShooting settingsShutter Speed Priority Shooting
A moving subject can be depicted in freeze-frame or with traces of motion, for example, by selecting a suitable shutter speed.
- Connect the camera and the smartphone via Wi-Fi.
- Tap to display the setting screen.

- Tap the shutter speed value and select a desired value.

Select a shutter speed value from 1/4000 second – 30 seconds (ILCE-QX1).
Select a shutter speed value from 1/1600 second – 30 seconds (DSC-QX30).
Note
-
This setting is available only when [Exposure Mode] is set to
(Shutter Speed Priority Shooting).
[37] How to useShootingShooting settings Grid Line
Sets whether the grid line is displayed or not. The grid line will help you to adjust the composition of images.
-
Connect the camera and the smartphone via Wi-Fi, then tap (Settings).
The setting screen is displayed.
-
[Grid Line]desired mode
Menu items
Rule of 3rds Grid: Place main subjects close to one of the grid lines that divide the image into three for a well-balanced composition.
Square Grid: Square grids make it easier to confirm the horizontal level of your composition. This is suitable to determine the quality of the composition when shooting landscape, close-up, or duplicated images.
Diag. + Square Grid: Place the subject on the diagonal line to express an uplifting and powerful feeling.
Off (default setting): Does not display the grid line.
[38] How to useShootingShooting settingsMirror Mode (Taking self portraits)
A mirror-reversed image can be displayed when shooting. This is useful when you take self-portraits.
- Connect the camera and the smartphone via Wi-Fi, then tap (Settings).
The setting screen is displayed.
- [Mirror Mode]desired mode
Menu items
On: Displays the image flipped horizontally.
Off (Default setting): Displays the image not flipped horizontally.
Note
- The mirror mode function is active until it is canceled. Set the mirror mode to [Off] after use.
- Although the image is displayed flipped horizontally, the actual recorded image is not flipped.
[39] How to useShootingShooting settingsFocus Mode (ILCE-QX1 only)
Selects the focus method to suit the movement of the subject.
- Connect the camera and the smartphone via Wi-Fi, then tap (Settings).
The setting screen is displayed.
- [Focus Mode]desired mode
Menu items
AF-S (Default setting when shooting still images): When the subject is in focus, the focus is fixed. You can select AF-S only when shooting still images.
AF-C (Default setting when shooting movies): Continues to focus on a moving subject. You can select AF-C only when recording movies.
MF: Turns the zooming/focusing ring to adjust the focus manually.
Note
- The zoom operation works by turning the zooming/focusing ring when AF-S or AF-C is selected.
[40] How to useShootingShooting settingsLock-on AF
Selects the setting for Lock-on AF
By activating Lock-on AF, the camera tracks the touched subject and enables you to keep focusing on it.
- Connect the camera and the smartphone via Wi-Fi, then tap (Settings).
The setting screen is displayed.
- [Lock-on AF]desired mode
Menu Items
Off (Default setting): Disables Lock-on AF.
On: Enables Lock-on AF.
Note
- You cannot use the touch shutter when Lock-on AF is enabled.
[41] How to useShootingShooting settingsTouch Shutter
Selects the setting for the touch shutter.
By activating the touch shutter, the camera automatically focuses on the tapped area and shoots a still image.
- Connect the camera and the smartphone via Wi-Fi, then tap (Settings).
The setting screen is displayed.
- [Touch Shutter]desired mode
Menu Items
On: Use the touch shutter
Off (Default setting): Does not use the touch shutter
Note
- When a Mount Adaptor (sold separately) that enables the use of the A-mount lens (sold separately) is attached to the camera, Touch Shutter cannot be used.
- When the continuous shooting setting is set to a setting other than single shooting, the Touch Shutter cannot be used.
[42] How to useShootingShooting settingsFlash (ILCE-QX1 only)
You can set the flash mode.
- Connect the camera and the smartphone via Wi-Fi, then tap (Settings).
The setting screen is displayed.
- Press the (Flash pop-up) button to pop up the flash.
- [Flash]desired mode
Menu Items
Off: The flash does not operate.
Auto: The flash works in dark environments or when shooting towards bright light.
On: The flash works every time you trigger the shutter.
Slow Synchro: The flash works every time you trigger the shutter. Slow sync shooting allows you to shoot a clear image of both the subject and the background by slowing the shutter speed.
Rear Sync.: The flash works right before the exposure is completed every time you trigger the shutter. Rear sync shooting allows you to shoot a natural image of the trail of a moving subject such as a moving car or a walking person.
Note
- You can set the flash mode when the flash has been popped up.
- Available flash mode depends on the shooting mode.
[43] How to useShootingShooting settingsReview Image
Selects whether or not to display the review image on the smartphone after shooting.
- Connect the camera and the smartphone via Wi-Fi, then tap (Settings).
The setting screen is displayed.
- [Review Image]desired mode
Menu items
On: Displays a review image.
2sec (Default setting): Displays a review image for 2 seconds.
Off: Does not display a review image.
[44] How to useShootingShooting settingsSave Options
Selects whether or not to save an image reviewed on the smartphone after the shooting.
- Connect the camera and the smartphone via Wi-Fi, then tap (Settings).
The setting screen is displayed.
- [Save Options]desired mode
Menu items
On (Default setting): Saves images reviewed on the smartphone.
Off: Does not save images reviewed on the smartphone.
[45] How to useShootingShooting settingsBeep of the camera
You can select the operation sounds of the camera.
- Connect the camera and the smartphone via Wi-Fi, then tap (Settings).
The setting screen is displayed.
- [Beep of Connected Device]desired mode
Menu items
Shutter: Turns on the shutter sound only when you press the shutter button (DSC-QX30 only).
On (Default setting): Turns on the beep/shutter sound when you operate shooting/press the shutter button.
Off: Turns off the beep/shutter sound.
[46] How to useShootingShooting settingsWi-Fi setting
The Wi-Fi setting of the camera to connect the Live-View Remote (sold separately) can be switched by pressing the Wi-Fi button found by opening the battery cover.
Menu Items
Single Connection (Default setting): Operates one camera using the Live-View Remote or a smartphone.
Multi Connection: Operates two or more cameras using the Live-View Remote.
Wi-Fi Off (No indication): Does not use the Live-View Remote or a smartphone to operate the camera.
Note
- Select (Single Connection) to operate the camera using a smartphone.
- A maximum of 5 cameras can be connected when (Multi Connection) is selected.
[47] How to useTransferring images taken with the cameraTransferring images to the smartphoneCopying/sharing images to an Android smartphone
Transfer the images in a memory card of the camera to an Android smartphone.
- Connect the camera and the smartphone via Wi-Fi, then tap (Settings).
The setting screen is displayed.
- Select [See In-Camera Images].
- Select the date of the image(s) you want to copy.
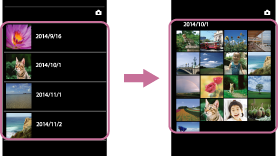
If you want to change the image size, tap
 or [Copy Image Size] and select the desired image size.
 - Tap and select [Select Items to copy] from the displayed menu, then tap images you want to copy to display a
 mark on them.
 - Tap (Copy).
Hint
- Tap
 to return to shooting standby.
 - You can upload images to the network service by selecting [Select Items to share] in step 4 and then tapping
 (Share).
 - You can transfer RAW format images by selecting [Original] in [Copy Image Size], and [RAW] in [Copy Image Quality] on the menu.
[48] How to useTransferring images taken with the cameraTransferring images to the smartphoneCopying images to an iPhone
Transfer the images in a memory card of the camera to an iPhone.
- Connect the camera and the smartphone via Wi-Fi, then tap (Settings).
The setting screen is displayed.
- Select [See In-Camera Images].
- Select the date of the image(s) you want to copy.
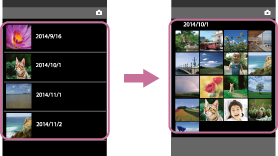
If you want to change the image size, tap Setting
[Copy Image Size] and select the desired image size. - Select (Copy), then tap images you want to copy to display a mark on them.
- Tap [Copy].
Hint
- Tap to return to shooting standby.
[49] How to useTransferring images taken with the cameraPlaying a movie on a smartphonePlaying a movie on a smartphone
Recorded movies can be played back on a smartphone.
- Connect the camera and the smartphone via Wi-Fi, then tap (Settings).
The setting screen is displayed.
- Select [See In-Camera Images].
- Select the date of the image(s) you want to play.
- Select a movie you want to play back.
The elapsed playback time and total length of the movie are displayed during playback.
Operations available during playback
 Play: Plays back a movie.
 Pause: Pauses movie playback.
Note
- Sound is not output during playback.
[50] How to useTransferring images taken with the cameraDeleting images in the cameraDeleting images in the camera
You can select and delete unnecessary images.
- Connect the camera and the smartphone via Wi-Fi, then tap (Settings).
The setting screen is displayed.
- Select [See In-Camera Images].
- Select the date of the image(s) you want to delete.
- Tap and select [Select Items to delete] from the displayed menu (for iPhone, tap
 ), then tap images you want to delete to display a mark on them.
 - Tap (Delete).
Note
- To delete all images, format the memory card.
[51] How to useTransferring images taken with the cameraTransferring images to a computer by USB connectionTransferring images to a computer by USB connection
Transfer the images in a memory card to a computer by USB connection.
- Turn on the power of the camera.
- Connect the multi terminal of the camera to a USB port of your computer, using the micro USB cable (supplied).
- When the AutoPlay wizard of PlayMemories Home appears, click [Import].
Images are saved on the computer.
Note
- When the camera is connected in Mass Storage mode, you cannot connect via Wi-Fi.
Hint
- For details on PlayMemories Home functions, see the Help of PlayMemories Home.
- Download the image management software PlayMemories Home from the following URL.

[52] How to useInitializing/FormattingInitializing the settingsInitializing the settings
You can initialize the settings to the default setting.
- Turn on the power of the camera.
- Press the RESET button of the camera.

Note
- The camera restarts when the RESET button is pressed.
[53] How to useInitializing/FormattingFormatting a memory cardFormatting a memory card
Formats the memory card in the camera.
- Connect the camera and the smartphone via Wi-Fi, then tap (Settings).
The setting screen is displayed.
- Tap [Format] [OK]
Note
- Formatting will delete all data, which cannot be restored.
[54] How to useInformation that appears on the screenDisplay panel of the cameraDisplay panel of the camera
Describes the icons displayed on the display panel of the camera.
- Memory card warning
- Memory card is not inserted (lit)
- Memory card full capacity (lit)
- Memory card error (flashing):
- A memory card which cannot be used in the camera is inserted.
- The terminals of the memory card are dirty.
- The memory card is damaged.
- The memory card is inserted in the wrong direction.
- Battery remaining indicator

As battery power is depleted, the indicator will change following the sequence in the above image.
- Wi-Fi setting indicator
- The Wi-Fi setting is set to Single Connection.
- The Wi-Fi setting is set to Multi Connection.
- The Wi-Fi setting is set to Wi-Fi Off.
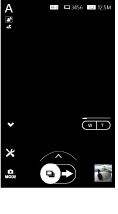
[55] How to useInformation that appears on the screenScreen of the smartphoneScreen of the smartphone
Describes the buttons and icons that appear on the screen of a smartphone connected to the camera via Wi-Fi.
- Switching exposure modes
- Scene Recognition
- White Balance
- Focus Mode
- Memory Card
- Number of recordable images
- Still image size
- Self-Timer
- Flash
- One-touch AF
- Mirror Mode
- Review Image
- Exposure setting button
- Shutter button
- Zoom
- Switching between still image/movie
- Shutter speed/Aperture value/EV/ISO value
- Disp. Button
- Reduces buttons and icons displayed on the smartphone for easier viewing.
- Settings
Note
- The display screen or operating method for the application is subject to change without notice by future upgrades.
[56] How to usePrecautions/About this cameraPrecautionsPrecautions
On database files
When you insert a memory card without a database file into the camera and turn on the power, part of the memory card capacity is used to automatically create a database file. It may take some time until you can perform the next operation.
If a database file error occurs, import all the images to a computer, then format the memory card.
Notes on shooting
- Before you start recording, make a trial recording to make sure that the camera is working correctly.
- The camera is neither dust-proof, nor splash-proof, nor waterproof.
- Avoid exposing the camera to water. If water enters inside the camera, a malfunction may occur. In some cases, the camera cannot be repaired.
- Do not aim the camera at the sun or other bright light. It may cause the malfunction of the camera.
- Do not use the camera near a location that generates strong radio waves or emits radiation. Otherwise, the camera may not properly record images.
- Do not shake or strike the camera. It may cause a malfunction and you may not be able to record images. Furthermore, the recording media may become unusable or image data may be damaged.
- When the battery level becomes low, the lens might stop moving. Insert a charged battery pack and turn on the camera again.
Do not use/store the camera in the following places
- In an extremely hot, cold or humid place
In places such as in a car parked in the sun, the camera body may become deformed and this may cause a malfunction.
- Storing under direct sunlight and near a heater
The camera body may become discolored or deformed, and this may cause a malfunction.
- In a location subject to rocking vibration
- Near strongly magnetic place
- In sandy or dusty places
Be careful not to let sand or dust get into the camera. This may cause the camera to malfunction, and in some cases this malfunction cannot be repaired.
On a genuine Sony accessories
If you use accessories other than genuine Sony products, it may cause a malfunction.
Note on disposal/transfer of the camera
To protect personal data, perform the following when disposing of or transferring the camera.
- Reset all camera settings by pressing RESET button.
On carrying
Do not sit down in a chair or other place with the camera in the back pocket of your trousers or skirt, as this may cause malfunction or damage the camera.
On operating temperatures
Your camera is designed for use under the temperatures between 0°C and 40°C (32°F and 104°F). Shooting in extremely cold or hot places that exceed this range is not recommended.
On moisture condensation
- If the camera is brought directly from a cold to a warm location, moisture may condense inside or outside the camera. This moisture condensation may cause a malfunction of the camera.
- If moisture condensation occurs, turn off the camera and wait about an hour for the moisture to evaporate. Note that if you attempt to shoot with moisture remaining inside the lens, you will be unable to record clear images.
On image data compatibility
- The camera conforms with DCF (Design rule for Camera File system) universal standards established by JEITA (Japan Electronics and Information Technology Industries Association).
- Sony does not guarantee that other equipment will play back images recorded with the camera.
Notes on the lens
- Exposing the lens to direct sunlight for long periods may cause a malfunction. Exercise caution when placing the product outdoors or near a window.
- Be careful not to bump the lens, and be careful not to apply force to it.
Notes on the flash
- Do not cover the flash with your fingers.
- Do not carry the product by the flash unit, or use excessive strength on it.
- If water, dust or sand gets into the open flash unit, it may cause a malfunction.
- Be sure to keep your fingers out of the way when you press the flash unit down.
Note on wireless LAN
We assume no responsibility whatsoever for any damage caused by unauthorized access to, or unauthorized use of, destinations loaded on the camera, resulting from loss or theft.
Warning on copyright
Television programs, films, videotapes, and other materials may be copyrighted. Unauthorized recording of such materials may be contrary to the provisions of the copyright laws.
[57] How to usePrecautions/About this cameraPrecautionsBattery pack
Compatible battery pack
- The ILCE-QX1 can use the NP-FW50 (supplied) battery pack.
- The DSC-QX30 can use the NP-BN (supplied) and NP-BN1 (sold separately) battery packs.
On charging the battery pack
- Charge the battery pack (supplied) before using the camera for the first time.
- You can charge the battery pack even if it is not completely discharged. In addition, even if the battery pack is not fully charged, you can use the partially charged capacity of the battery pack as is.
- We recommend charging the battery pack in an ambient temperature of between 10°C to 30°C (50°F to 86°F). The battery pack may not be effectively charged in temperatures outside this range.
Effective use of the battery pack
- Battery performance decreases in low temperature surroundings. So in cold places, the operational time of the battery pack is shorter. We recommend to ensure longer battery pack use: Put the battery pack in a pocket close to your body to warm it up, and insert it in the camera immediately before you start shooting. (If there are any metal objects such as keys in your pocket, be aware of short-circuits.)
- The battery pack will run out quickly if you use the zoom frequently.
- We recommend having spare battery packs handy for two times or three times the expected shooting time, and making trial shots before taking the actual shots.
- Do not expose the battery pack to water. The battery pack is not water-resistant.
- Do not leave the battery pack in extremely hot places, such as in a car or under direct sunlight.
- You may not be able to turn on the camera or the battery pack may not be effectively charged if the terminal section of the battery is dirty. In this case, wipe any dust off lightly using a soft cloth or a cotton swab to clean the battery.
How to store the battery pack
- Fully discharge the battery pack before storing and store the camera in a cool, dry place. To maintain the battery pack’s function, charge the battery pack and then fully discharge it in the camera at least once a year while storing.
- To prevent staining the terminal, short-circuiting, etc., be sure to use a plastic bag, etc. to keep away from metal materials when carrying or storing.
On battery life
- The battery life is limited. Battery capacity decreases over time and through repeated use. If the available time of the battery is shortened significantly, it is probably time to replace it with a new one.
- The battery life varies according to how it is stored and the operating conditions and environment in which each battery pack is used.
[58] How to usePrecautions/About this cameraPrecautionsCharging the battery pack
- If the Charge lamp of the camera flashes during charging, remove the battery pack being charged, and then insert the same battery pack into the camera securely again. If the Charge lamp flashes again, this may indicate a battery error or that a battery pack other than the specified type has been inserted. Check that the battery pack is the specified type.
If the battery pack is the specified type, remove the battery pack, replace it with a new or different one and check that the battery is charged correctly. If the battery is charged correctly, a battery error may have occurred.
- If the Charge lamp flashes, this indicates that charging has stopped temporarily and is on standby. When the temperature returns to the appropriate range, charging resumes and the Charge lamp lights up again. We recommend charging the battery pack in an ambient temperature of between 10°C to 30°C (50°F to 86°F).
[59] How to usePrecautions/About this cameraPrecautionsMemory card
Memory card
Memory cards that can be used in the camera are listed below.
(A):
microSD memory card
microSDHC memory card
microSDXC memory card
(B):
Memory Stick Micro media
Memory Stick Micro (Mark2) media
In this manual, memory cards in group (A) are referred to as microSD memory card, and in group (B), Memory Stick Micro media.
- Memory Stick Micro media of up to 16 GB and microSD memory cards of up to 64 GB have been tested and proven to operate with your camera.
Note
- To ensure stable operation of the memory card, we recommend that you use this camera to format any memory card being used with this camera for the first time. Note that formatting will erase all data recorded on the memory card. This data cannot be restored. Be sure to back up any important data to a PC or other storage location.
- If you repeatedly record/delete images over a long period of time, fragmentation of data may occur on the memory card and movies may not be recorded properly. In such a case, save your images to a PC or other storage location, then [Format].
- A memory card formatted with a computer is not guaranteed to operate with the camera.
- Data read/write speeds differ depending on the combination of the memory card and the equipment used.
- Data may be corrupted in the following cases:
- When the memory card is removed or the camera is turned off during a read or write operations
- When the memory card is used in locations subject to static electricity or electrical noise
- We recommend backing up important data.
- Do not attach a label on the memory card itself nor on a memory card adaptor.
- Do not touch the terminal section of the memory card with your hand or a metal object.
- Do not strike, bend or drop the memory card.
- Do not disassemble or modify the memory card.
- Do not expose the memory card to water.
- Do not leave the memory card within the reach of small children. They might accidentally swallow it.
- Insert a memory card that fits the memory card slot size. Otherwise, it will cause a malfunction.
- Do not use or store the memory card under the following conditions:
- High temperature locations such as the hot interior of a car parked in direct sunlight
- Locations exposed to direct sunlight
- Humid locations or locations with corrosive substances present
Memory Stick media
The types of Memory Stick media that can be used with the camera are listed below. However, proper operation cannot be guaranteed for all Memory Stick media functions.
Memory Stick Micro media
Memory Stick Micro (Mark2) media
Above are Memory Stick Micro media with MagicGate. MagicGate is copyright protection technology that uses encryption technology. Data recording that requires MagicGate functions cannot be performed with the camera.
[60] How to usePrecautions/About this cameraPrecautionsAbout adjusting the date and time
There is no date and time setting function in the camera. After connecting to a smartphone via Wi-Fi, the date and time information will be set to the same as that of the smartphone automatically when PlayMemories Mobile starts up.
Note
- If you remove the battery, the date and time information on the camera will be reset.
[61] How to usePrecautions/About this cameraOn cleaningOn cleaning
Cleaning the lens and flash
Wipe the lens and flash with a soft cloth to remove fingerprints, dust, etc.
Cleaning the lens
- Do not use a cleaning solution containing organic solvents, such as thinner or benzine.
- When cleaning the lens surface, remove dust with a commercially-available blower. If dust sticks to the surface, wipe it off with a soft cloth or tissue paper slightly moistened with lens cleaning solution. Wipe in a spiral pattern starting from the center of the lens. Do not spray lens cleaning solution directly onto the lens surface.
Cleaning the flash (ILCE-QX1)
Clean the flash surface before use. The heat of the flash emission may cause dirt on the flash surface to start smoking or burning. Wipe the flash surface with a soft cloth to remove dirt, dust, etc.
Cleaning the inside of the E-mount (ILCE-QX1)
Do not touch the parts of the product inside the lens mount, such as a lens signal contact. To clean inside the lens mount, use a commercially-available blower* to blow any dust off.
* Do not use a spray-type blower as doing so may cause a malfunction.
Cleaning the camera surface
Clean the camera surface with a soft cloth slightly moistened with water, then wipe the surface with a dry cloth. To prevent damage to the finish or casing:
- Do not expose the camera to chemical products such as thinner, benzine, alcohol, disposable cloths, insect repellent, sunscreen or insecticide.
- Do not touch the camera with any of the above on your hand.
- Do not leave the camera in contact with rubber or vinyl for a long time.
[62] How to usePrecautions/About this cameraNumber of still imagesNumber of still images (ILCE-QX1)
Maximum number of still images that can be recorded on a memory card in the camera.
The number of still images may vary depending on the shooting conditions and the memory card.
When [Still Image Size] is set to [3:2 20M] and [Still Image Quality] is set to [RAW & JPEG].
2 GB: 65
4 GB: 125
8 GB: 260
16 GB: 520
32 GB: 1050
64 GB: 2100
When [Still Image Size] is set to [3:2 20M] and [Still Image Quality] is set to [Fine].
2 GB: 240
4 GB: 485
8 GB: 980
16 GB: 1950
32 GB: 3900
64 GB: 7800
Note
- Even if the number of remaining shootable images is greater than 9,999, the “>9999” indicator appears.
[63] How to usePrecautions/About this cameraNumber of still imagesNumber of still images (DSC-QX30)
Maximum number of still images that can be recorded on a memory card in the camera.
The number of still images may vary depending on the shooting conditions and the memory card.
When [Still Image Size] is set to [4:3 20M] and [Still Image Quality] is set to [Fine].
2 GB: 200
4 GB: 400
8 GB: 810
16 GB: 1600
32 GB: 3250
64 GB: 6500
Note
- Even if the number of remaining shootable images is greater than 9,999, the “>9999” indicator appears.
[64] How to usePrecautions/About this cameraRecordable time of moviesRecordable time of movies (ILCE-QX1)
Approximate maximum movie times (total of all movie files) that can be recorded on a memory card in the camera. (h (hour), m (minute))
The recordable time may vary depending on the shooting conditions and the memory card.
2 GB: 15 m
4 GB: 30 m
8 GB: 1 h
16 GB: 2 h 5 m
32 GB: 4 h 10 m
64 GB: 8 h 25 m
Continuous shooting is possible for approximately 29 minutes (limited by product specifications).
[65] How to usePrecautions/About this cameraRecordable time of moviesRecordable time of movies (DSC-QX30)
Approximate maximum movie times (total of all movie files) that can be recorded on a memory card in the camera. (h (hour), m (minute))
The recordable time may vary depending on the shooting conditions and the memory card.
PS (1920x1080 60p)
2 GB: 9 m
4 GB: 15 m
8 GB: 35 m
16 GB: 1 h 20 m
32 GB: 2 h 40 m
64 GB: 5 h 20 m
HQ (1920x1080 30p)
2 GB: 15 m
4 GB: 30 m
8 GB: 1 h
16 GB: 2 h 5 m
32 GB: 4 h 10 m
64 GB: 8 h 25 m
Continuous shooting is possible for approximately 29 minutes per shoot (limited by product specifications). When the recording mode setting is set to PS, continuous shooting is possible for approximately 15 minutes (limited by the 4 GB file size restriction).
[66] How to usePrecautions/About this cameraBattery life that can be usedBattery life and number of images that can be recorded (ILCE-QX1)
The battery life of use/number of images which can be recorded with the charged battery (supplied).
Shooting still images: Approx. 440 images
Typical movie shooting: Approx. 95 min.
Continuous movie shooting: Approx. 150 min.
(when using the E16-50 mm power zoom lens)
Note
- The number of images is an approximate number when shooting with a fully charged battery pack. The number may be less depending on the circumstances.
- The number of images is when shooting under the following conditions:
- Using Sony microSD memory card (sold separately).
- Temperature of 25°C (77°F).
- The number of still images that can be recorded is based on the CIPA standard, and is for shooting under the following conditions. (CIPA: Camera & Imaging Products Association)
- Shooting once every 30 seconds.
- The zoom is switched alternately between the W and T ends.
- The flash strobes once every two times.
- The power turns on and off once every ten times.
- The maximum movie time that can be recorded is based on the CIPA standard, shooting under the following conditions.
- Typical movie shooting: repeating shooting start/stop, zooming, and turning the power on/off.
- Continuous movie shooting: If continuous shooting reaches the limit (29 minutes), shooting will be restarted. Other operations, such as zooming, are not performed.
- The above number varies depending on the type of smartphone and how it is used.
[67] How to usePrecautions/About this cameraBattery life that can be usedBattery life and number of images that can be recorded (DSC-QX30)
The battery life of use/number of images which can be recorded with the charged battery (supplied).
Shooting still images: Approx. 200 images
Typical movie shooting: Approx. 25 min.
Continuous movie shooting: Approx. 45 min.
Note
- The number of images is an approximate number when shooting with a fully charged battery pack. The number may be less depending on the circumstances.
- The number of images is when shooting under the following conditions:
- Using Sony microSD memory card (sold separately).
- Temperature of 25°C (77°F).
- The number of still images that can be recorded is based on the CIPA standard, and is for shooting under the following conditions. (CIPA: Camera & Imaging Products Association)
- Shooting once every 30 seconds.
- The zoom is switched alternately between the W and T ends.
- The power turns on and off once every ten times.
- The maximum movie time that can be recorded is based on the CIPA standard, shooting under the following conditions.
- Recording mode setting: HQ
- Typical movie shooting: repeating shooting start/stop, zooming, and turning the power on/off.
- Continuous movie shooting: If continuous shooting reaches the limit (29 minutes), shooting will be restarted. Other operations, such as zooming, are not performed.
- The above number varies depending on the type of smartphone and how it is used.
[68] How to usePrecautions/About this cameraSpecificationsSpecifications (ILCE-QX1)
System
Image device: APS-C size (23.2 x 15.4 mm), Exmor APS HD CMOS sensor
Total pixel number of camera: Approx. 20.4 Megapixels
Effective pixel number of camera: Approx.20.1 Megapixels
SteadyShot: Optical (with the supplied lens)
Exposure control: Automatic exposure, Aperture priority, Shutter Speed Priority
White balance: Automatic, Daylight, Shade, Cloudy, Incandescent, Fluorescent (Warm White/Cool White/Day White/Daylight), Flash, Color temperature
File format:
- Still images: JPEG (DCF, Exif, MPF Baseline) compliant, RAW (Sony ARW 2.3 Format)
- Movies (MP4 format):
- Video: MPEG-4 AVC/H.264
- Audio: MPEG-4 AAC-LC 2ch
Recording media: Memory Stick Micro media, microSD memory cards
Input and Output connectors
Multi Terminal*: USB communication
USB communication: Hi-Speed USB (USB 2.0)
* Supports Micro USB compatible device.
Power, general
Power: Rechargeable battery pack NP-FW50, 7.2 V
Power consumption (during shooting): Approx. 2.2 W
Operating temperature: 0 °C to 40 °C (32 °F to 104 °F)
Storage temperature: –20 °C to +60 °C (–4 °F to +140 °F)
Dimensions (CIPA compliant): 74.0 mm × 69.5 mm × 52.5 mm (3 inches × 2 3/4 inches × 2 1/8 inches) (W/H/D)
Mass (CIPA compliant): Approx. 216 g (7.6 oz) (including NP-FW50 battery pack, Memory Stick Micro media)/Approx. 158 g (5.6 oz) (camera only)
Microphone: Stereo
Speaker: Monaural
Exif Print: Compatible
PRINT Image Matching III: Compatible
Wireless LAN
Supported standard: IEEE 802.11 b/g/n
Frequency: 2.4GHz
Supported security protocols: WPA-PSK/WPA2-PSK
NFC: NFC Forum Type 3 Tag compliant
Rechargeable battery pack NP-FW50
Battery type: Lithium-ion battery
Maximum voltage: DC 8.4 V
Nominal voltage: DC 7.2 V
Maximum charge voltage: DC 8.4 V
Maximum charge current: 1.02 A
Capacity:
- typical: 7.7 Wh (1 080 mAh)
- minimum: 7.3 Wh (1 020 mAh)
Lens E PZ 16-50mm F3.5-5.6 OSS (SELP1650)
Equivalent 35mm-format focal length*1: 24 mm-75 mm
Lens groups-elements: 8-9
Angle of view*1: 83°-32°
Minimum focus*2: 0.25 m-0.3 m (0.82 feet -1 feet)
Maximum magnifications: X 0.215
Minimum f-stop: f/22-f/36
Filter diameter: 40.5 mm
Dimensions (maximum diameter × height): Approx. 64.7 mm×29.9 mm (2 5/8 inch×1 3/16 inch)
Mass: Approx. 116 g (4.1 oz)
Shake compensation function: Yes
*1 The values shown above for equivalent 35mm-format focal length and angle of view are for Interchangeable Lens Cameras equipped with an APS-C sized image sensor.
*2 Minimum focus is the shortest distance from the image sensor to the subject.
- Depending on the lens mechanism, the focal length may change with any change in shooting distance. The focal lengths given above assume the lens is focused at infinity.
Design and specifications are subject to change without notice.
[69] How to usePrecautions/About this cameraSpecificationsSpecifications (DSC-QX30)
System
Image device: 7.82mm (1/2.3 type) Exmor R CMOS sensor
Total pixel number of camera: Approx. 21.1 Megapixels
Effective pixel number of camera: Approx. 20.4 Megapixels
Lens: Sony G 30× zoom lens, f = 4.3 mm – 129 mm (24 mm – 720 mm (35 mm film equivalent when the image size is 4:3)) F3.5 (W) – F6.3 (T)
- While shooting movies (16:9): 26.5 mm – 1080 mm
SteadyShot: Optical
Exposure control: Automatic exposure, Aperture priority, Shutter Speed Priority
White balance: Automatic, Daylight, Cloudy, Incandescent, Fluorescent (Cool White/Day White/Daylight)
File format:
- Still images: JPEG (DCF, Exif, MPF Baseline) compliant
- Movies (MP4 format):
- Video: MPEG-4 AVC/H.264
- Audio: MPEG-4 AAC-LC 2ch
Recording media: Memory Stick Micro media, microSD memory cards
Input and Output connectors
Multi Terminal*: USB communication
USB communication: Hi-Speed USB (USB 2.0)
* Supports Micro USB compatible device.
Power, general
Power: Rechargeable battery pack NP-BN, 3.6 V
Power consumption (during shooting): Approx. 1.4 W
Operating temperature: 0 °C to 40 °C (32 °F to 104 °F)
Storage temperature: –20 °C to +60 °C (–4 °F to +140 °F)
Dimensions (CIPA compliant): 68.4 mm × 65.1 mm × 57.6 mm (2 3/4 inches × 2 5/8 inches × 2 3/8 inches) (W/H/D)
Mass (CIPA compliant): Approx. 193 g (6.8 oz) (including NP-BN battery pack, Memory Stick Micro media)/Approx. 178 g (6.3 oz) (camera only)
Microphone: Stereo
Speaker: Monaural
Exif Print: Compatible
PRINT Image Matching III: Compatible
Wireless LAN
Supported standard: IEEE 802.11 b/g/n
Frequency: 2.4GHz
Supported security protocols: WPA-PSK/WPA2-PSK
NFC: NFC Forum Type 3 Tag compliant
Rechargeable battery pack NP-BN
Battery type: Lithium-ion battery
Maximum voltage: DC 4.2 V
Nominal voltage: DC 3.6 V
Maximum charge voltage: DC 4.2 V
Maximum charge current: 0.9 A
Capacity:
- typical: 2.3 Wh (630 mAh)
- minimum: 2.2 Wh (600 mAh)
Design and specifications are subject to change without notice.
[70] How to useInformationTrademarksTrademarks
 ,
,  , Cyber-shot, Memory Stick,
  , Memory Stick Micro,
  , PlayMemories Home, PlayMemories Home logo, PlayMemories Mobile, PlayMemories Mobile logo are trademarks or registered trademarks of Sony Corporation.
- Microsoft, Windows, DirectX and Windows Vista are either registered trademarks or trademarks of Microsoft Corporation in the United States and/or other countries.
- Mac and Mac OS are trademarks or registered trademarks of Apple Inc. in the United States and/or other countries.
- iOS is a trademark or registered trademark of Cisco System Inc.
- Intel, Pentium and Intel Core are trademarks or registered trademarks of Intel Corporation.
- microSDXC logo is a trademark of SD-3C, LLC.
- Android, Google Play are trademarks or registered trademarks of Google Inc.
- Wi-Fi, the Wi-Fi logo, Wi-Fi PROTECTED SET-UP are trademarks or registered trademarks of the Wi-Fi Alliance.
- The N Mark is a trademark or registered trademark of NFC Forum, Inc. in the United States and in other countries.
- "
 " and "PlayStation" are registered trademarks of Sony Computer Entertainment Inc.
 - In addition, system and product names used in this manual are, in general, trademarks or registered trademarks of their respective developers or manufacturers. However, the ™ or ® marks are not used in all cases in this manual.

- Add further enjoyment with your PlayStation 3 by downloading the application for PlayStation 3 from PlayStation Store (where available.)
- The application for PlayStation 3 requires PlayStation Network account and application download. Accessible in areas where the PlayStation Store is available.
[71] How to useInformationLicenseLicense
Notes on the License
This camera comes with software that are used based on licensing agreements with the owners of that software. Based on requests by the owners of copyright of these software applications, we have an obligation to inform you of the following. Please read the following sections.
Licenses (in English) are recorded in the internal memory of your camera. Establish a Mass Storage connection between the camera and a computer to read licenses in the "PMHOME" - "LICENSE" folder.
THIS PRODUCT IS LICENSED UNDER THE AVC PATENT PORTFOLIO LICENSE FOR THE PERSONAL USE OF A CONSUMER OR OTHER USES IN WHICH IT DOES NOT RECEIVE REMUNERATION TO
(i) ENCODE VIDEO IN COMPLIANCE WITH THE AVC STANDARD ("AVC VIDEO") AND/OR
(ii) DECODE AVC VIDEO THAT WAS ENCODED BY A CONSUMER ENGAGED IN A PERSONAL ACTIVITY AND/OR WAS OBTAINED FROM A VIDEO PROVIDER LICENSED TO PROVIDE AVC VIDEO.
NO LICENSE IS GRANTED OR SHALL BE IMPLIED FOR ANY OTHER USE.
ADDITIONAL INFORMATION MAY BE OBTAINED FROM MPEG LA, L.L.C. SEE
On GNU GPL/LGPL applied software
The software that is eligible for the following GNU General Public License (hereinafter referred to as "GPL") or GNU Lesser General Public License (hereinafter referred to as "LGPL") are included in the camera.
This informs you that you have a right to have access to, modify, and redistribute source code for these software programs under the conditions of the supplied GPL/LGPL.
Source code is provided on the web. Use the following URL to download it.
http://www.sony.net/Products/Linux/
We would prefer you do not contact us about the contents of source code.
Licenses (in English) are recorded in the internal memory of your camera. Establish a Mass Storage connection between the camera and a computer to read licenses in the "PMHOME" - "LICENSE" folder.
[72] TroubleshootingAbout this cameraPower supplyWhy doesn’t the camera charge?
- Charge the battery with the power of the camera turned off.
- If you are using the AC adaptor (sold separately), reconnect it as follows.
- Connect the micro USB cable (supplied) to the multi terminal of the camera.
- Connect the micro USB cable to the AC adaptor.
- Connect the AC adaptor to the wall outlet (wall socket).
[73] TroubleshootingAbout this cameraPower supplyWhy is the power lamp flashing green?
- Battery power is insufficient. Charge the battery.
[74] TroubleshootingAbout this cameraShootingWhy can't I record images?
- The memory card may not be recognized correctly if it is inserted at a slant, or in the wrong direction. Remove it once, confirm the orientation of the memory card, and insert it correctly.
- You cannot record images while charging the flash.
- [Self-Timer] is working.
[75] TroubleshootingAbout this cameraShootingWhy can't I use flash? (ILCE-QX1 only)
- Press the (Flash pop-up) button to pop up the flash.
- You cannot use the flash in the following situations:
- (Night Scene) is selected in (Superior Auto).
- During movie recording.
[76] TroubleshootingAbout this cameraShootingWhy can't I shoot images continuously?
- Images cannot be shoot continuously if a memory card is not inserted in the camera. Insert a memory card.
- The memory card is full. Delete unnecessary images.
- The battery level is low. Insert a charged battery pack.
[77] TroubleshootingAbout this cameraShootingWhy can't I record movies?
- Movies cannot be recorded if a memory card is not inserted in the camera. Insert a memory card.
[78] TroubleshootingAbout this cameraShootingWhy can't I activate Digital zoom?
- There is no digital zoom function in the camera.
[79] TroubleshootingAbout this cameraShootingWhy can't I use one-touch AF?
- One-touch AF may not react near the outer edge of the screen.
- Focusing on a subject with low contrast may not be possible.
[80] TroubleshootingPlayMemories MobileWi-Fi connectionWhy can't I connect via Wi-Fi?
- Install the newest "PlayMemories Mobile" from below website.
[81] TroubleshootingPlayMemories MobileWi-Fi connectionWhy can't I connect with NFC?
- If the power of the camera is turned off, continue to touch without moving the smartphone until the lens of the camera extends. If the power of the camera is turned on, continue to touch (1-2 seconds) without moving the smartphone, until PlayMemories Mobile starts up.
- If the smartphone is in a case, remove the case.
- Check that the NFC function of the smartphone is enabled. For details, refer to the instruction manual of the smartphone.
[82] TroubleshootingPlayMemories MobileWi-Fi connectionI’ve forgotten the password. Where can I find out what it is?
- The SSID and password are printed on the label on the inside of the camera's battery cover.
- Connect the camera and a computer with the micro USB cable (supplied), then select [Computer][PMHOME][WIFI_INF.TXT] of [INFO]. The SSID and password are also displayed.
[83] TroubleshootingPlayMemories MobileShooting/transferringWhy are movies not transferred to my smartphone?
- Movies are not transferred automatically. Select (Settings)[See In-Camera Images], then select movies to transfer to the smartphone.
[84] TroubleshootingPlayMemories MobileShooting/transferringWhy is the live view image not displayed smoothly on my smartphone?
- Depending on the performance of the smartphone, or the reception environment, the image may not be displayed smoothly.