- Top Page
- >
- Keypad/Parts & Controls
- >
- NSZ-GT1
NSZ-GT1
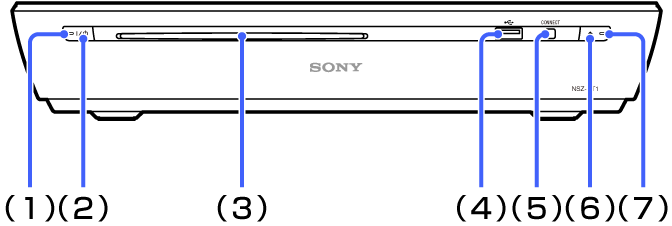
Front
-
(1) Power indicator
-
- Red:
- Standby
-
- Green:
- Power on
-
-
(2)
 (on/standby) button
Press to turn the unit on or set to standby mode.
-
(3) Disc slot
Insert a disc.
-
(4)
 (USB) jack
Connect a USB device.
-
(5) CONNECT button
Press for two seconds or more to pair with the Keypad.
-
(6)
 (EJECT) button
Press to eject the disc.
-
(7) Disc loading indicator
-
- On:
- Inserted
-
- Blinking:
- Loading
-
- Off:
- No disc
-
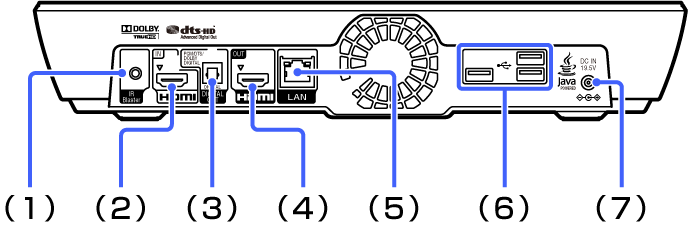
Rear
-
(1) IR Blaster jack
Connect the IR Blaster cable to control other devices.
-
(2) HDMI IN jack
Connect an HDMI cable.
HDMI (High-Definition Multimedia Interface) provides an uncompressed all-digital audio/video interface between the TV and any HDMI-equipment.
See HDMI settings. -
(3) DIGITAL AUDIO OUT (OPTICAL) jack
Connect a digital optical cable.
When connecting digital audio equipment such as AV Receiver that is PCM/Dolby Digital compatible, you can enjoy high quality sound. -
(4) HDMI OUT jack
Connect an HDMI cable to the TV.
-
(5) LAN terminal
Connect a network cable to use the wired network.
-
(6)
(USB) jackConnect a USB device.
-
(7) DC IN jack
Connect the AC adapter and AC power cord to the AC power source.