How to Use
Getting started
Before first use
Features
Parts and controls
Supplied accessories
Charging the headset
- System requirements for battery charge using USB [7]
- Charging the headset [8]
- Available operating time [9]
- Checking the remaining battery charge [10]
Making connections
BLUETOOTH connection
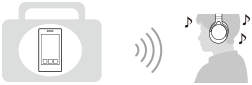
- What you can do with the BLUETOOTH function [11]
- How to make a wireless connection to BLUETOOTH devices [12]
One-touch connection (NFC) compatible Android devices
- One-touch connection (NFC) with a smartphone (Android 4.1 or later) [13]
- One-touch connection (NFC) with a smartphone (Android 2.3.3 or later, and less than Android 4.1) [14]
- Disconnecting the smartphone by one touch (NFC) [15]
- Switching the device by one touch (NFC) [16]
Android devices not compatible with one-touch connection (NFC)
- Pairing and connecting with an Android smartphone [17]
- Connecting to a paired Android smartphone [18]
iPhone (iOS devices)
Other BLUETOOTH devices
- Pairing and connecting with other BLUETOOTH devices [21]
- Connecting to a paired BLUETOOTH device [22]
Multi point connection
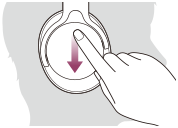
- Connecting the headset to both a music player and a smartphone or mobile phone [23]
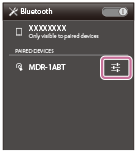
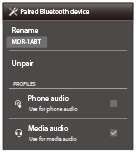
- Connecting the headset to 2 Android smartphones [24]
- Connecting the headset to an Android smartphone and an iPhone [25]
Headphone cable connection
Listening to music
Listening to music via a BLUETOOTH connection
- Listening to music from a device connected via BLUETOOTH [27]
- Controlling the audio device (BLUETOOTH connection) [28]
- Disconnecting BLUETOOTH connection (after use) [29]
Supported codecs
Making phone calls
Making phone calls
- Receiving a call [31]
- Making a call [32]
- Functions for a phone call [33]
- Disconnecting BLUETOOTH connection (after use) [34]
Important information
Precautions
Trademarks
Support website
Troubleshooting
Troubleshooting
Troubleshooting
Power
Charging
- Charging cannot be done. [41]
- Charging time is too long. [42]
- The headset cannot be recognized by a computer. [43]
- The remaining battery charge of the headset is not displayed on the screen of an iPhone, iPad, or iPod touch. [44]
Sound
- No sound [45]
- Low sound level [46]
- Low sound quality [47]
- Sound skips frequently during playback. [48]
Pairing
One-touch connection (NFC)
BLUETOOTH connection
- Unable to make a BLUETOOTH connection [51]
- Distorted sound [52]
- The BLUETOOTH wireless communication range is short, or the sound skips. [53]
- The headset does not operate properly. [54]
Phone calls
Resetting or initializing the headset
[1] How to UseGetting startedBefore first useRead this first
In addition to this Help Guide, read the printed manuals supplied: “Quick Start Guide” and “Reference Guide.”
-
Quick Start Guide
This covers initial settings and basic operations.
-
Reference Guide
This includes information about using your headset safely, and specifications of your headset.
-
For information about the customer support Web site, access:
About battery charging
Charge the headset before you use it for the first time.
[2] How to UseGetting startedFeaturesWhat you can do with the headset
- 40 mm HD driver unit that supports High-Resolution Audio (with wired operation using the supplied headphone cable)
- Wireless music playback
-
Touch sensor control panel for easy operation (*)
You will no longer be able to use the touch sensor if the unit is turned off. The touch sensor function is effective only with a BLUETOOTH connection.
- SBC/AAC/aptX/LDAC Codec
-
DSEE (**)
This function offers natural sound with a spacious feel by restoring high-frequency range sound.
- Clear voice hands-free calling with built-in microphone
- Approximate 30 hours play time with 4 hours charging
- One-touch connection (NFC)
-
Ergonomic earpads
The earpads are manufactured by draping, which allows ergonomic design to fit the head and makes use of the flexibility of urethane. Improvement of the fit prevents sound leaking and delivers powerful lows.
- A headphone cable is included for use as wired headphones if the battery runs out.
* Available with BLUETOOTH connection only
** Available with BLUETOOTH connection only (except for LDAC codec)
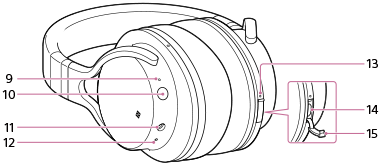
[3] How to UseGetting startedParts and controlsLocation and function of parts

-
Slider
Slide to adjust the length of the headband.
 left unit
-
RESET button
Resets and turns off the headset.
-
Built-in antenna
The BLUETOOTH antenna is built into the headset.
- N-Mark
- Headband
 right unit
- Touch sensor
-
Indicator (blue/red)
Lights up in red or blue to indicate the power or communication status of the headset.
- POWER button
-
INPUT jack
Connect a music player, etc. to this jack by using the supplied headphone cable. Make sure that you insert the plug of the music player until it clicks. Otherwise, you may not hear the sound normally.
-
Microphone
Picks up the sound of your voice when talking on the phone.
-
Indicator (red)
Lights up during charging.
-
Micro-USB port
Connect a computer to this port with the supplied micro-USB cable to charge the headset.
- Micro-USB port cover
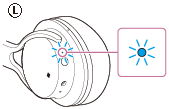
[4] How to UseGetting startedParts and controlsBLUETOOTH function indicator
The indicator flashes in red or blue to indicate the BLUETOOTH connection status.
○: Turns on in blue/●: Turns on in red/-: Turns off
-
Pairing mode
○ ● ○ ● ○ ● ○ ● ○ ● ○ ●...
-
Connectable
○ - - ○ - - ○ - - ○ - - ○ - - ○ - - ○ - - ○...
-
Connecting
○ ○ - ○ ○ - ○ ○ - ○ ○ - ○ ○ - ○ ○ - ○ ○...
-
Connected (HFP/HSP or A2DP)
○ - - - - - - - - - ○ - - - - - - - - -...
-
Connected (HFP/HSP and A2DP)
○ - ○ - - - - - - - ○ - ○ - - - - - - -...
-
Playing music or during a call (HFP/HSP or A2DP)
○ ○ - - - - - - - - ○ ○ - - - - - - - -...
-
Playing music or during a call (HFP/HSP and A2DP)
○ ○ ○ - - - - - - - ○ ○ ○ - - - - - - -...
-
Incoming call
○ ○ ○ ○ ○ ○ ○ ○ ○ ○ ○...
Hint
- When the remaining battery charge becomes low, the indicator turns from blue to red, except for pairing mode.
[5] How to UseGetting startedSupplied accessoriesList of the included items
After opening the package, check that all items in the list are included in the package. If items are missing, contact your dealer.
Numbers in ( ) indicate the item amount.
Wireless Stereo Headset (1)
Carrying pouch (1)

Micro-USB cable (approx. 50 cm (19 3/4 in.)) (1)
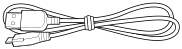

Reference Guide (1)
Quick Start Guide (1)
Other documents (1 set) (*)
* May not be supplied in some countries or regions.
[6] How to UseGetting startedSupplied accessoriesAbout the supplied manuals
The following three manuals come with the headset.
Help Guide (this data)

Operation manual on the Web, which can be accessed by a PC or smartphone, provides the detailed information on how to use the headset and troubleshooting, etc.
Quick Start Guide (enclosed paper)

Provides basic information on how to connect or use the headset.
Reference Guide (enclosed paper)
Provides precautions and specifications.
[7] How to UseGetting startedCharging the headsetSystem requirements for battery charge using USB
The headset contains a lithium ion rechargeable battery, which should be charged before using the headset for the first time.
Personal Computer with pre-installed with any of the following operating systems and USB port:
-
When using Windows®
Windows® 8.1 / Windows® 8.1 Pro
Windows® 8 / Windows® 8 Pro
Windows® 7 Home Basic / Home Premium / Professional / Ultimate
Windows Vista® (Service Pack 2 or later) Home Basic / Home Premium / Business / Ultimate
-
When using Mac
Mac OS X (version 10.3 or later)
Note
- Sony does not guarantee proper operation in all system environments.
- When using Windows 8.1 update using Windows Update.
[8] How to UseGetting startedCharging the headsetCharging the headset
The headset contains a lithium ion rechargeable battery. Charge the headset using the supplied micro-USB cable.
- Connect the supplied micro-USB cable to the headset, and then connect the other end to a booted computer.
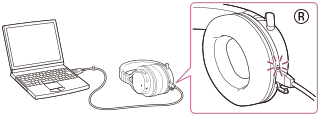
- Make sure that the indicator (red) lights up.
- Charging is completed in about 4 hours (*) and the indicator (red) goes off automatically.
* Time required for charging the empty battery to its full capacity.
Note
- If the headset detects a problem while charging due to following causes, the indicator (red) may turn off, although charging is not complete. In this case, charge again within the charging temperature range. If the problem persists, consult your nearest Sony dealer.
- Ambient temperature exceeds the charging temperature range of 5 °C – 35 °C (41 °F - 95 °F).
- There is a problem with the battery.
- If the headset is not used for a long time, the indicator (red) may not light up when you connect the micro-USB cable to charge the headset. In this case, do not disconnect the micro-USB cable from the headset: wait a few minutes until the indicator (red) lights up.
- If the headset is not used for a long time, the battery may be quickly depleted, however, after a few recharges, the battery life will improve.
- If you store the headset for a long time, charge the battery to its full capacity once every 6 months to avoid over discharge.
- If the headset is not used for a long time, it may take longer to charge the battery.
- If the life of the built-in rechargeable battery drops significantly, the battery should be replaced. Consult your nearest Sony dealer for replacement of the rechargeable battery.
- Avoid exposure to temperature extremes, direct sunlight, moisture, sand, dust or mechanical shock. Never leave the headset in a car parked in the sun.
- If the computer enters into hibernation mode while connected to the headset, charging will not be completed properly. Check the setting of the computer before charging. The indicator (red) will go off automatically if the computer enters into hibernation mode. Charge the headset again in this case.
- Use the supplied micro-USB cable only, and connect directly to a computer. Charging will not be completed properly by an indirect connection, such as via a USB hub.
Hint
- You can use the headset by connecting the supplied headphone cable, even while charging the headset.
- If charging starts while the headset is turned on, the headset will turn off automatically.
[9] How to UseGetting startedCharging the headsetAvailable operating time
The available operating time of the headset on fully-charged battery are as follows:
- Music playback time: Max. 30 hours (SBC/AAC)/Max. 28 hours (aptX/LDAC)
- Communication time: Max. 26 hours
- Standby time: Max. 200 hours
The headset can be used for about 8 hours after 1 hour charging.
Note
- Usage hours may be shorter depending on the Codec and the conditions of use.
[10] How to UseGetting startedCharging the headsetChecking the remaining battery charge
You can check the remaining battery charge of the rechargeable battery.
When you turn on the headset by pressing the POWER button, the indicator (red) flashes. You can check the remaining battery charge by the number of times the indicator (red) flashes.
You can also check the remaining battery charge when the headset is turned on. Pressing the POWER button will cause the indicator to flash and show the remaining battery charge.
3 times: High
2 times: Medium
1 time: Low (needs to charge)
When the battery is almost empty
The indicator turns red. When the battery becomes empty, the headset sounds a warning beep and turns off automatically.
When you are using an iPhone, iPad, or iPod touch
When the headset is connected to an iPhone, iPad, or iPod touch (iOS 5.0 or later) that supports HFP (Hands-free Profile), it will show an icon that indicates the remaining battery charge of the headset on the screen.
Compatible devices
iPhone, iPad, or iPod touch (iOS 5.0 or later) supporting Hands-free Profile (HFP)
iOS 7.X / 8.X

iOS 5.X / 6.X
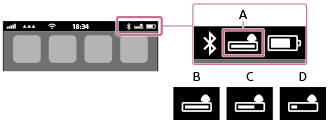
A: Remaining battery charge of the headset
B: High
C: Medium
D: Low (needs to charge)
Note
- If you connect the headset to an iPhone, iPad or iPod touch with “Media audio” (A2DP) only in a multi point connection, the remaining battery charge will not be displayed correctly.
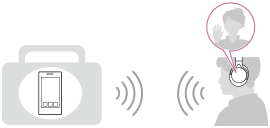
[11] How to UseMaking connectionsBLUETOOTH connectionWhat you can do with the BLUETOOTH function
The headset uses BLUETOOTH wireless technology, allowing you to listen to music or make phone calls wirelessly.
Listening to music
You can receive audio signals from a smartphone, mobile phone, or music player to enjoy music wirelessly.
Talking on the phone
You can make and receive a call with your hands free, while leaving your smartphone or mobile phone in your bag or pocket.
[12] How to UseMaking connectionsBLUETOOTH connectionHow to make a wireless connection to BLUETOOTH devices
You can enjoy music and hands-free calling with the headset wirelessly by using your device’s BLUETOOTH function.
How to connect devices via the BLUETOOTH function differs depending on whether or not the device supports one-touch connection (NFC).
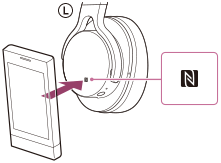
Connecting the headset to a device that supports one-touch connection (NFC)
By touching the headset to an NFC-compatible smartphone, the headset turns on automatically and then makes a BLUETOOTH connection. Touching the headset to the smartphone again will disconnect the connection.
Compatible smartphones
NFC-compatible smartphones with Android 2.3.3 or later installed (excluding Android 3.x)
NFC
NFC (Near Field Communication) is a technology enabling short-range wireless communication between various devices, such as smartphones and IC tags. Thanks to the NFC function, data communication - for example, BLUETOOTH pairing - can be achieved easily by simply touching NFC-compatible devices together (i.e., at the N-Mark symbol or location designated on each device).
Connecting to a device that does not support one-touch connection (NFC)
Pairing with a BLUETOOTH device
Pairing is the process required to create a link between BLUETOOTH devices to allow wireless connection.
You must pair a device with the headset before you start using the headset.
Connecting the headset to a paired device
Once BLUETOOTH devices are paired, there is no need to pair them again. Connect a device already paired by the method that applies for that device.
[13] How to UseMaking connectionsOne-touch connection (NFC) compatible Android devicesOne-touch connection (NFC) with a smartphone (Android 4.1 or later)
By touching the headset with a smartphone, the headset turns on automatically and then pairs and makes a BLUETOOTH connection.
- Compatible smartphones
- NFC-compatible smartphones installed with Android 4.1 or later
- NFC
- NFC (Near Field Communication) is a technology enabling short-range wireless communication between various devices, such as smartphones and IC tags. Thanks to the NFC function, data communication - for example, BLUETOOTH pairing - can be achieved easily by simply touching NFC-compatible devices together (i.e., at the N-Mark symbol or location designated on each device).
- Unlock the screen of the smartphone.
- Set the NFC function of the smartphone to on.
- Touch the headset with the smartphone.
- Confirm that the screen of the smartphone is unlocked.
- Touch the smartphone on the N-Mark of the headset. Keep touching the headset with the smartphone until the smartphone reacts.
- Refer to the operating instructions of the smartphone for the designated location to be touched on the smartphone.
Follow the on-screen instructions to complete the pairing and connection.
When the headset is connected with the smartphone, the blue indicator starts flashing slowly.

- To disconnect, touch the smartphone again.
- To connect a paired smartphone, perform steps 2 and 3.
Hint
- If you cannot connect the headset, try the following.
- Unlock the screen of the smartphone, and move the smartphone slowly over the N-Mark of the headset.
- If the smartphone is in a case, remove the case.
- If you touch an NFC-compatible smartphone with the headset, the smartphone terminates BLUETOOTH connection with any current device, and connects to the headset (One-touch connection switching).
[14] How to UseMaking connectionsOne-touch connection (NFC) compatible Android devicesOne-touch connection (NFC) with a smartphone (Android 2.3.3 or later, and less than Android 4.1)
By touching the headset with a smartphone, the headset turns on automatically and then pairs and makes a BLUETOOTH connection.
- Compatible smartphones
- NFC-compatible smartphones with Android 2.3.3 up to Android 4.0.4 (excluding Android 3.x)
- NFC
- NFC (Near Field Communication) is a technology enabling short-range wireless communication between various devices, such as smartphones and IC tags. Thanks to the NFC function, data communication - for example, BLUETOOTH pairing - can be achieved easily by simply touching NFC-compatible devices together (i.e., at the N-Mark symbol or location designated on each device).
- Unlock the screen of the smartphone.
- Set the NFC function of the smartphone to on.
- Download and install the app “NFC Easy Connect.”
If you have already downloaded the app, proceed to step 4.
“NFC Easy Connect” is a free Android app you can download from Google Play™.
Download the app by searching for “NFC Easy Connect” or access it by using the two-dimensional code. Fees may be charged for downloading the app.
Access the following Web site:
https://play.google.com/store/apps/details?id=com.sony.easyconnect
The App may not be available in some countries and/or regions.
Use a two-dimensional code reader app.

- Start the app “NFC Easy Connect” on the smartphone.
Make sure that the app screen is displayed on the smartphone.
- Touch the headset with the smartphone.
- Confirm that the screen of the smartphone is unlocked.
- Touch the smartphone on the N-Mark of the headset. Keep touching the headset with the smartphone until the smartphone reacts.
- Refer to the operating instructions of the smartphone for the designated location to be touched on the smartphone.
Follow the on-screen instructions to complete the pairing and connection.
When the headset is connected with the smartphone, the blue indicator starts flashing slowly.
- To disconnect, touch the smartphone again.
- To connect a paired smartphone, perform steps 4 and 5.
Hint
- If you cannot connect the headset, try the following.
- Start the app “NFC Easy Connect” on the smartphone, and move the smartphone slowly over the N-Mark of the headset.
- If the smartphone is in a case, remove the case.
- Make sure that the app “NFC Easy Connect” screen is displayed on the smartphone.
- If you touch an NFC-compatible smartphone with the headset, the smartphone terminates BLUETOOTH connection with any current device, and connects to the headset (One-touch connection switching).
[15] How to UseMaking connectionsOne-touch connection (NFC) compatible Android devicesDisconnecting the smartphone by one touch (NFC)
You can disconnect the headset from the connected smartphone by touching the headset with it.
- Unlock the screen of the smartphone.
If you installed the app “NFC Easy Connect” in the smartphone, start the app “NFC Easy Connect.”
- Touch the headset with the smartphone.
Touch the smartphone on the N-Mark of the headset.
Note
- After the headset is disconnected from the smartphone, if no operation is performed for about 5 minutes, the headset turns off automatically. To turn off the headset before that, press and hold the POWER button for about 2 seconds. The indicator (blue) goes off and the headset turns off.
[16] How to UseMaking connectionsOne-touch connection (NFC) compatible Android devicesSwitching the device by one touch (NFC)
- When the headset is connected with a BLUETOOTH device, if you touch an NFC-compatible smartphone on the headset, the headset is connected with the smartphone that touched on the headset most recently (One-touch connection switching). However, if you are talking on a BLUETOOTH mobile phone connected to the headset, you cannot switch the BLUETOOTH connection by one touch.
- When the headset is connected with an NFC-compatible smartphone, if you touch the smartphone on another NFC-compatible BLUETOOTH headset or BLUETOOTH speaker, the smartphone disconnects from the headset, and connects to the BLUETOOTH device it touched.
Note
- Unlock the screen of the smartphone beforehand.
- If you installed the app “NFC Easy Connect” in the smartphone, start the app “NFC Easy Connect.”
[17] How to UseMaking connectionsAndroid devices not compatible with one-touch connection (NFC)Pairing and connecting with an Android smartphone
Pairing is the process required to create a link between BLUETOOTH devices to allow wireless connection.
You must pair a device with the headset to be able to make a BLUETOOTH connection for the first time.
Before you start pairing operation, make sure that:
- The smartphone is placed within 1 m (3 feet) of the headset.
- The headset is charged sufficiently.
- The operating instructions of the smartphone is on hand.
- Enter pairing mode on this headset.
When you pair the headset with a device for the first time after you bought it, or after you initialized the headset (the headset has no pairing information), press and hold the POWER button for about 2 seconds when the headset is turned off. The headset enters pairing mode automatically.
When you pair a 2nd or subsequent device (the headset has pairing information for other devices), press and hold the POWER button for about 7 seconds.
Make sure that the indicator flashes blue and red alternately after you release the button.
- Unlock the screen of the Android smartphone.
- Search for this headset on the smartphone.
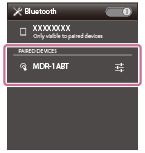
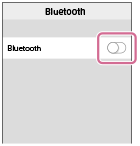
- Select [Setting] - [Bluetooth].
- Touch [
 ] next to [Bluetooth].
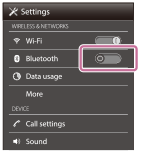
- Touch [Bluetooth].
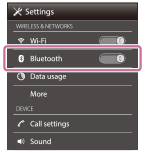
- Touch [Search for devices].
- Touch [MDR-1ABT].
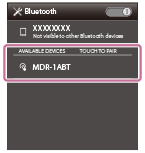
If passkey (*) input is required on the display of the smartphone, input “0000.”
The headset and the smartphone are paired with each other and connected.
If they are not connected, see “Connecting to a paired Android smartphone.”
If [MDR-1ABT] does not appear on the display, try again from step 3.
* A Passkey may be called a “Passcode,” a “PIN code,” or a “Password.”
Note
- If pairing is not established within about 5 minutes, pairing mode will be canceled and the headset will turn off. In this case, start over from step 1.
- Once BLUETOOTH devices are paired, there is no need to pair them again, except in the following cases:
- Pairing information has been deleted after repair, etc.
- The headset is already paired with 8 devices and another device is to be paired.
The headset can be paired with up to 8 devices. If a new device is paired after 8 devices are already paired, the paired device with the oldest connection time is replaced by the new one. - When the pairing information for the headset has been deleted from the BLUETOOTH device.
- When the headset is initialized, all pairing information is deleted.
In this case, delete the pairing information of the headset from the BLUETOOTH device, and then pair them again.
- The headset can be paired with multiple devices, but can only play music from one paired device at a time.
Hint
- The above procedure is an example. For details, refer to the operating instructions supplied with your Android smartphone.
- To delete all pairing information, see “Initializing the headset to restore factory settings.”
[18] How to UseMaking connectionsAndroid devices not compatible with one-touch connection (NFC)Connecting to a paired Android smartphone
- Unlock the screen of the Android smartphone.
- Turn on the headset.
Press and hold the POWER button for about 2 seconds.
Make sure that the indicator (blue) flashes after you release the button.
Check the connection status on the Android smartphone. If not connected, proceed to step 3.
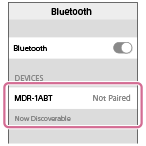
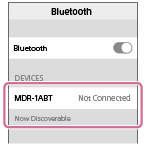
- Search for this headset on the smartphone.
- Select [Setting] - [Bluetooth].
- Touch [] next to [Bluetooth].
- Touch [Bluetooth].
- Touch [MDR-1ABT].
Hint
- The above procedure is an example. For details, refer to the operating instructions supplied with your smartphone.
- If the smartphone was connected with the headset the last time, an HFP/HSP connection is made when you turn on the headset. While the headset is on, you can make an A2DP connection (music playback) by double-tapping the center of the touch sensor lightly (about 0.4-second interval).
Note
- If the headset tries to make a connection with a previously connected BLUETOOTH device, you may not be able to connect to the device you want to. If connection fails, terminate the BLUETOOTH connection from the device that was previously connected.
[19] How to UseMaking connectionsiPhone (iOS devices)Pairing and connecting with an iPhone
Pairing is the process required to create a link between BLUETOOTH devices to allow wireless connection.
You must pair a device with the headset to be able to make a BLUETOOTH connection for the first time.
Before you start pairing operation, make sure that:
- The iPhone is placed within 1 m (3 feet) of the headset.
- The headset is charged sufficiently.
- The operating instructions of the iPhone is on hand.
- Enter pairing mode on this headset.
When you pair the headset with a device for the first time after you bought it, or after you initialized the headset (the headset has no pairing information), press and hold the POWER button for about 2 seconds when the headset is turned off. The headset enters pairing mode automatically.
When you pair a 2nd or subsequent device (the headset has pairing information for other devices), press and hold the POWER button for about 7 seconds.
Make sure that the indicator flashes blue and red alternately after you release the button.
- Unlock the screen of the iPhone.
- Select the BLUETOOTH setting on the iPhone.
- Select [Settings].
- Touch [Bluetooth].

- Touch [
 ] to change it to [
 ].
].
- Touch [MDR-1ABT].
If passkey (*) input is required on the display of the iPhone, input “0000.”
The headset and the iPhone are paired with each other and connected.
If they are not connected, see “Connecting to a paired iPhone.”
If [MDR-1ABT] does not appear on the display, try again from step 3.
* A Passkey may be called a “Passcode,” a “PIN code,” or a “Password.”
Note
- If pairing is not established within about 5 minutes, pairing mode will be canceled and the headset will turn off. In this case, start over from step 1.
- Once BLUETOOTH devices are paired, there is no need to pair them again, except in the following cases:
- Pairing information has been deleted after repair, etc.
-
The headset is already paired with 8 devices and another device is to be paired.
The headset can be paired with up to 8 devices. If a new device is paired after 8 devices are already paired, the paired device with the oldest connection time is replaced by the new one.
- When the pairing information for the headset has been deleted from the BLUETOOTH device.
- When the headset is initialized, all pairing information is deleted.
In this case, delete the pairing information of the headset from the BLUETOOTH device, and then pair them again.
- If the pairing information was deleted by initializing the headset, etc., delete from your iPhone the pairing information for the headset, and then pair them again.
- The headset can be paired with multiple devices, but can only play music from one paired device at a time.
Hint
- The above procedure is an example. For details, refer to the operating instructions supplied with your iPhone.
- To delete all pairing information, see “Initializing the headset to restore factory settings.”
[20] How to UseMaking connectionsiPhone (iOS devices)Connecting to a paired iPhone
- Unlock the screen of the iPhone.
- Turn on the headset.
Press and hold the POWER button for about 2 seconds.
Make sure that the indicator (blue) flashes after you release the button.
Check the connection status on the iPhone. If not connected, proceed to step 3.
- Search for this headset on the iPhone.
- Select [Settings].
- Touch [Bluetooth].
- Touch [] to change it to [].
- Touch [MDR-1ABT].
Hint
- The above procedure is an example. For details, refer to the operating instructions supplied with your iPhone.
- If the iPhone was connected with the headset the last time, an HFP/HSP connection is made when you turn on the headset. While the headset is on, you can make an A2DP connection (music playback) by double-tapping the center of the touch sensor lightly (about 0.4-second interval).
Note
- If the headset tries to make a connection with a previously connected BLUETOOTH device, you may not be able to connect to the device you want to. If connection fails, terminate the BLUETOOTH connection from the device that was previously connected.
[21] How to UseMaking connectionsOther BLUETOOTH devicesPairing and connecting with other BLUETOOTH devices
Pairing is the process required to create a link between BLUETOOTH devices to allow wireless connection.
You must pair a device with the headset to be able to make a BLUETOOTH connection for the first time.
Before you start pairing operation, make sure that:
- The BLUETOOTH device is placed within 1 m (3 feet) of the headset.
- The headset is charged sufficiently.
- The operating instructions of the BLUETOOTH device is on hand.
- Enter pairing mode on this headset.
When you pair the headset with a device for the first time after you bought it, or after you initialized the headset (the headset has no pairing information), press and hold the POWER button for about 2 seconds when the headset is turned off. The headset enters pairing mode automatically.
When you pair a 2nd or subsequent device (the headset has pairing information for other devices), press and hold the POWER button for about 7 seconds.
Make sure that the indicator flashes blue and red alternately after you release the button.
- Perform the pairing procedure on the BLUETOOTH device to search for this headset.
[MDR-1ABT] will be displayed on the list of detected devices on the screen of the BLUETOOTH device. If not displayed, repeat from step 1.
- Select [MDR-1ABT].
If passkey (*) input is required on the display of the BLUETOOTH device, input “0000.”
* A Passkey may be called a “Passcode,” a “PIN code,” or a “Password.”
- Make the BLUETOOTH connection from the BLUETOOTH device.
Depending on the BLUETOOTH device, the headset may be connected with the device automatically as soon as they are paired.
Note
- If pairing is not established within about 5 minutes, pairing mode will be canceled and the headset will turn off. In this case, start over from step 1.
- When pairing with a BLUETOOTH device that cannot display a list of detected devices or that has no display, you may pair the device by setting both the headset and the BLUETOOTH device to pairing mode. At this time, if passkey is set other than “0000” on the BLUETOOTH device, pairing cannot be done with the headset.
- Once BLUETOOTH devices are paired, there is no need to pair them again, except in the following cases:
- Pairing information has been deleted after repair, etc.
-
The headset is already paired with 8 devices and another device is to be paired.
The headset can be paired with up to 8 devices. If a new device is paired after 8 devices are already paired, the paired device with the oldest connection time is replaced by the new one.
- When the pairing information for the headset has been deleted from the BLUETOOTH device.
-
When the headset is initialized, all pairing information is deleted.
In this case, delete the pairing information of the headset from the BLUETOOTH device, and then pair them again.
- The headset can be paired with multiple devices, but can only play music from one paired device at a time.
Hint
- The above procedure is an example. For details, refer to the operating instructions supplied with your BLUETOOTH device.
- To delete all pairing information, see “Initializing the headset to restore factory settings.”
[22] How to UseMaking connectionsOther BLUETOOTH devicesConnecting to a paired BLUETOOTH device
- Turn on the headset.
Press and hold the POWER button for about 2 seconds.
Make sure that the indicator (blue) flashes after you release the button.
Check the connection status on the BLUETOOTH device. If not connected, proceed to step 2.
- Make the BLUETOOTH connection from the BLUETOOTH device.
For details, refer to the operating instructions supplied with your BLUETOOTH device.
Hint
- The above procedure is an example. For details, refer to the operating instructions supplied with your BLUETOOTH device.
- If the BLUETOOTH device was connected with the headset the last time, an HFP/HSP connection is made when you turn on the headset. While the headset is on, you can make an A2DP connection (music playback) by double-tapping the center of the touch sensor lightly (about 0.4-second interval).
Note
- If the headset tries to make a connection with a previously connected BLUETOOTH device, you may not be able to connect to the device you want to. If connection fails, terminate the BLUETOOTH connection from the device that was previously connected.
[23] How to UseMaking connectionsMulti point connectionConnecting the headset to both a music player and a smartphone or mobile phone
To use a BLUETOOTH music player for listening to music and a BLUETOOTH smartphone for making phone calls, the headset needs to be connected with each device with a BLUETOOTH connection.
- Pair the headset with BLUETOOTH devices, respectively.
- Make an A2DP BLUETOOTH connection between the headset and the BLUETOOTH music player.
- Make an HFP or HSP BLUETOOTH connection between the headset and the BLUETOOTH smartphone or mobile phone.
Note
- If the smartphone or mobile phone was connected with the headset the last time, an HFP or HSP connection is made automatically when you turn on the headset. At the same time, an A2DP connection may also be made automatically. If this happens, disconnect the headset from the smartphone or mobile phone once using the phone, then connect the devices again by repeating the process from step 2.
[24] How to UseMaking connectionsMulti point connectionConnecting the headset to 2 Android smartphones
When you connect the headset to a smartphone, usually the music playback function and the phone call function are both connected automatically.
To make a multi point connection with 2 smartphones separately, one for listening to music and the other for making phone calls, change the settings of the smartphones so that only one of the functions is connected for each smartphone.
- Pair the headset with both smartphones, respectively.
- Use one of the smartphones to establish a BLUETOOTH connection with the headset.
- On the smartphone connected to the headset, uncheck either [Phone audio] (HFP) or [Media audio] (A2DP).
Example: To connect “Media audio” (A2DP) only
Touch [Settings] - [Bluetooth] - the setting icon next to [MDR-1ABT].
On the [Paired Bluetooth device] screen, uncheck [Phone audio].
- Terminate the BLUETOOTH connection of the smartphone.
- Use the other smartphone to establish a BLUETOOTH connection to the headset.
- In the same way, uncheck the function that you did not uncheck in step 3.
- Use the first smartphone to establish a BLUETOOTH connection again.
Both smartphones are connected to the headset with only one function enabled.
Hint
- The above procedure is an example. For details, refer to the operating instructions supplied with your Android smartphones.
[25] How to UseMaking connectionsMulti point connectionConnecting the headset to an Android smartphone and an iPhone
When you connect the headset to a smartphone, usually the music playback function and the phone call function are both connected automatically. To make a multi point connection using an Android smartphone and an iPhone separately for listening to music and making phone calls, change the settings on the Android smartphone so that only one of the functions is connected. Connect the Android smartphone first, and then connect the iPhone.
You cannot set the iPhone to connect one function only.
- Pair the headset with both Android smartphone and iPhone, respectively.
- Use the Android smartphone to establish a BLUETOOTH connection with the headset.
- On the Android smartphone connected to the headset, uncheck either [Phone audio] (HFP) or [Media audio] (A2DP).
Example: To connect “Media audio” (A2DP) only
Touch [Settings] - [Bluetooth] - the setting icon next to [MDR-1ABT].
On the [Paired Bluetooth device] screen, uncheck [Phone audio].
- Use the iPhone to establish a BLUETOOTH connection to the headset.
The iPhone is connected to the headset with both functions, but you can only use the function that you unchecked in step 3.
Hint
- The above procedure is an example. For details, refer to the operating instructions supplied with your Android smartphone.
Note
- If you connect an Android smartphone with [Phone audio] (HFP), the remaining battery charge of the headset will not be displayed correctly on an iPhone.
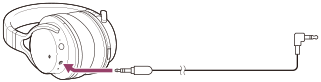
[26] How to UseMaking connectionsHeadphone cable connectionUsing the supplied headphone cable
You can use the headset as ordinary wired headphones by connecting a device via the supplied headphone cable. The headset can be charged while in use.
- Connect a playback device to the INPUT jack with the supplied headphone cable.
If you connect the headphone cable when the headset is on, the headset turns off automatically.
Note
- Make sure you connect the L-shaped plug to the playback device.
- Use the supplied headphone cable only.
- Make sure you insert the plug firmly.
- The BLUETOOTH function cannot be used.
- The touch sensor cannot be used.
Hint
- When an incoming call arrives, a ring tone will be heard via the headphones. Answer the call using your smartphone or mobile phone, and talk using the microphone of the phone. You can hear the voice of the caller from the headphones.
- If you disconnect the headphone cable from the smartphone or mobile phone, you can talk using the microphone and speaker of the phone.
[27] How to UseListening to musicListening to music via a BLUETOOTH connectionListening to music from a device connected via BLUETOOTH
You can enjoy listening to music and basic remote control operation of a BLUETOOTH device via a BLUETOOTH connection. The BLUETOOTH device is required to support the following BLUETOOTH profiles.
- A2DP (Advanced Audio Distribution Profile):
enables you to enjoy high-quality audio content wirelessly. - AVRCP (Audio Video Remote Control Profile):
enables you to adjust volume, etc.
The operation may vary depending on the BLUETOOTH device. Refer to the operating instructions supplied with your BLUETOOTH device.
- Connect the headset to a BLUETOOTH device.
- Wear the headset.
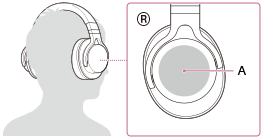
Adjust the length of the headband.
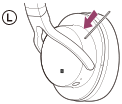
Put the headset with
indication on your left ear and indication on your right ear. The unit of the headset has a tactile dot.Be careful not to come in contact with the touch sensor when you wear the headset.
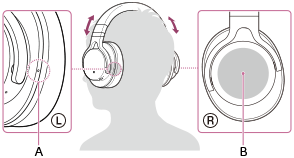
A: Tactile dot
B: Touch sensor
- Play back music or video on the BLUETOOTH device.
Adjust the volume on the BLUETOOTH device.
-
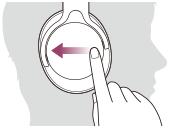
Control the volume by operating the touch sensor.
- To increase the volume: Swipe up repeatedly until the volume reaches the desired level.

- To decrease the volume: Swipe down repeatedly until the volume reaches the desired level.
- If you hold your finger to the touch sensor after swiping up or down, the volume continues to change.
- To increase the volume: Swipe up repeatedly until the volume reaches the desired level.
Note
- If the communication condition is poor, the BLUETOOTH device may react incorrectly to the operation on the headset.
Hint
- The headset supports SCMS-T content protection. You can enjoy music, etc., from a device such as a mobile phone or portable TV that supports SCMS-T content protection.
- Depending on the BLUETOOTH device, it may be necessary to adjust the volume or set the audio output setting on the BLUETOOTH device.
[28] How to UseListening to musicListening to music via a BLUETOOTH connectionControlling the audio device (BLUETOOTH connection)
If the BLUETOOTH device supports AVRCP, you can control it by the headset. The functions available may vary depending on the BLUETOOTH device. Refer to the operating instructions supplied with your BLUETOOTH device.
The touch sensor works as follows according to how you operate the touch sensor.
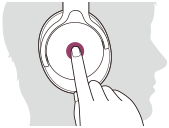
Play/Pause: Double-tap lightly (about 0.4-second interval).
Stop: Hold your finger to the touch sensor until the playback stops (about 3 seconds or more).
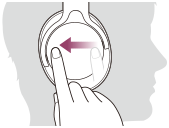
Next track: Swipe forward.
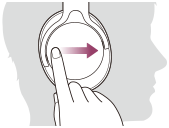
Previous track: Swipe backward.
Fast-forward: Swipe forward a little and hold. (It takes a while until fast-forwarding starts.) Release at the desired playback point.

Fast-reverse: Swipe backward a little and hold. (It takes a while until fast-reversing starts.) Release at the desired playback point.
- To increase the volume: Swipe up repeatedly until the volume reaches the desired level.
- To decrease the volume: Swipe down repeatedly until the volume reaches the desired level.
- If you hold your finger to the touch sensor after swiping up or down, the volume continues to change.
Note
- If the communication condition is poor, the BLUETOOTH device may react incorrectly to the operation on the headset.
- The available functions may vary depending on the BLUETOOTH device. When you operate as illustrated above, it may operate differently or may not work at all.
[29] How to UseListening to musicListening to music via a BLUETOOTH connectionDisconnecting BLUETOOTH connection (after use)
When you finish playing music with the BLUETOOTH device, perform any of the following operations to terminate the BLUETOOTH connection.
- If using a device that supports one-touch connection (NFC), touch the device to the headset again.
- If using a device that does not support one-touch connection (NFC), operate from the BLUETOOTH device.
- Press and hold the POWER button on the headset for about 2 seconds to turn off the headset.
- Turn off the BLUETOOTH device.
Hint
- When you finish playing music, the BLUETOOTH connection may terminate automatically, depending on the BLUETOOTH device.
[30] How to UseListening to musicSupported codecsSupported codecs
A codec is an audio coding algorithm used when transmitting sound via a BLUETOOTH connection.
The headset supports the following 4 codecs for music playback via an A2DP connection: SBC, AAC, aptX, and LDAC.
-
SBC
This is an abbreviation for Subband Codec.
This is the standard audio coding technology used by BLUETOOTH devices.
All BLUETOOTH devices support SBC.
-
AAC
This is an abbreviation for Advanced Audio Coding.
AAC is mainly used by Apple products such as iPhones, and it provides higher sound quality than that of SBC.
-
aptX
This is an audio coding technology developed by CSR plc.
aptX is used by some Android smartphones, and it provides a lower compression rate and higher sound quality than that of SBC.
-
LDAC
LDAC is an audio coding technology developed by Sony that enables the transmission of High-Resolution (Hi-Res) Audio content, even over a BLUETOOTH connection.
Unlike other BLUETOOTH compatible coding technologies such as SBC, it operates without any down-conversion of the Hi-Res Audio content (*), and allows approximately three times more data (**) than those other technologies to be transmitted over a BLUETOOTH wireless network with unprecedented sound quality, by means of efficient coding and optimized packetization.
* excluding DSD format contents
** in comparison with SBC when the bitrate of 990 kbps (96/48 kHz) or 909 kbps (88.2/44.1 kHz) is selected
When music in one of the above codecs is transmitted from a connected device, the headset switches to that codec automatically and plays back the music in the same codec.
However, depending on the device to be connected with the headset, you may need to set the device beforehand to listen to music in a different codec on the headset, even if the device supports a codec of higher sound quality than SBC.
Refer to the operating instructions supplied with the device regarding setting the codec.
[31] How to UseMaking phone callsMaking phone callsReceiving a call
You can enjoy a hands-free call with a smartphone or mobile phone that supports the BLUETOOTH profile HFP (Hands-free Profile) or HSP (Headset Profile), via a BLUETOOTH connection.
- If your smartphone or mobile phone supports both HFP and HSP, set it to HFP.
- Operations may vary depending on the smartphone or mobile phone. Refer to the operating instructions supplied with your smartphone or mobile phone.
Ring tone
When an incoming call arrives, a ring tone will be heard from the headset.
You will hear either of following ring tones, depending on your smartphone or mobile phone.
- Ring tone set on the headset
- Ring tone set on the smartphone or mobile phone
- Ring tone set on the smartphone or mobile phone only for a BLUETOOTH connection
- Connect the headset to a smartphone or mobile phone beforehand.
-
When you hear a ring tone, double-tap the touch sensor lightly and receive the call.
When an incoming call arrives even while you are listening to music, playback pauses and a ring tone will be heard from the headset.
Double-tap lightly (about 0.4-second interval).
If no ring tone is heard via the headset
- The headset may not be connected with the smartphone or mobile phone with HFP or HSP. Check the connection status on the smartphone or mobile phone.
- If playback does not pause automatically, operate the headset to pause playback.
-
Control the volume by operating the touch sensor.
- To increase the volume: Swipe up repeatedly until the volume reaches the desired level.
- To decrease the volume: Swipe down repeatedly until the volume reaches the desired level.
- If you hold your finger to the touch sensor after swiping up or down, the volume continues to change.
- To increase the volume: Swipe up repeatedly until the volume reaches the desired level.
-
To end the call, double-tap the touch sensor lightly again.
If you received a call during music playback, music playback resumes automatically.
Note
- Depending on the smartphone or mobile phone, playback may not resume automatically even if you finish the call.
- Use a smartphone or mobile phone at least 50 cm (19 3/4 in.) away from the headset. Noise may result if the headset and the smartphone or mobile phone are too close.
Hint
- Some smartphones or mobile phones by default receive calls with the phone instead of the headset. With an HFP or HSP connection, switch the call device to the headset by holding your finger to the touch sensor until the device is switched or by using your smartphone or mobile phone.
- If you adjust the volume on the headset when not talking, the music playback volume is adjusted.
- Volume during a call and volume during music playback can be adjusted independently. Changing call volume does not change the volume of music playback, and vice versa.
[32] How to UseMaking phone callsMaking phone callsMaking a call
You can enjoy a hands-free call with a smartphone or mobile phone that supports the BLUETOOTH profile HFP (Hands-free Profile) or HSP (Headset Profile), via a BLUETOOTH connection.
- If your smartphone or mobile phone supports both HFP and HSP, set it to HFP.
- Operations may vary depending on the smartphone or mobile phone. Refer to the operating instructions supplied with your smartphone or mobile phone.
- Connect the headset to a smartphone or mobile phone beforehand.
- Operate your smartphone or mobile phone to make a call.
When you make a call, the dial tone is heard from the headset.
If you make a call while you are listening to music, playback pauses.
If no dial tone is heard via the headset, switch the call device to the headset using your smartphone or mobile phone or by holding your finger to the touch sensor until the device is switched.
A: Touch sensor -
Control the volume by operating the touch sensor.
- To increase the volume: Swipe up repeatedly until the volume reaches the desired level.
- To decrease the volume: Swipe down repeatedly until the volume reaches the desired level.
- If you hold your finger to the touch sensor after swiping up or down, the volume continues to change.
- To increase the volume: Swipe up repeatedly until the volume reaches the desired level.
-
To end the call, double-tap the touch sensor lightly again.
If you made a call during music playback, music playback resumes automatically.
Note
- Use a smartphone or mobile phone at least 50 cm (19 3/4 in.) away from the headset. Noise may result if the headset and the smartphone or mobile phone are too close.
Hint
- If you adjust the volume on the headset when not talking, the playback volume is adjusted.
- Volume for a call and listening to music can be adjusted independently. Even if you change the volume while playing back music, the volume of a call does not change.
[33] How to UseMaking phone callsMaking phone callsFunctions for a phone call
The available functions may vary depending on the profile supported by your smartphone or mobile phone. Even if the profile is the same, functions may vary depending on the smartphone or mobile phone.
Refer to the operating instructions supplied with your smartphone or mobile phone.
Supported profile: HFP
Outgoing call
- Double-tap the touch sensor lightly (about 0.4-second interval) to cancel an outgoing call.
- Hold your finger to the touch sensor until the call device is switched between the headset and the smartphone or mobile phone.
Incoming call
- Double-tap the touch sensor lightly to answer a call.
- Hold your finger to the touch sensor to reject a call.
During call
- Double-tap the touch sensor lightly to finish a call.
- Hold your finger to the touch sensor until the call device is switched between the headset and the smartphone or mobile phone.
Supported profile: HSP
Outgoing call
- Double-tap the touch sensor lightly to cancel an outgoing call. (*)
Incoming call
- Double-tap the touch sensor lightly to answer a call.
During call
- Double-tap the touch sensor lightly to finish a call. (*)
* Some devices may not support this function.
[34] How to UseMaking phone callsMaking phone callsDisconnecting BLUETOOTH connection (after use)
When you finish playing music with the BLUETOOTH device, perform any of the following operations to terminate the BLUETOOTH connection.
- If using a device that supports one-touch connection (NFC), touch the device to the headset again.
- If using a device that does not support one-touch connection (NFC), operate from the BLUETOOTH device.
- Press and hold the POWER button on the headset for about 2 seconds to turn off the headset.
- Turn off the BLUETOOTH device.
Hint
- When you finish playing music, the BLUETOOTH connection may terminate automatically, depending on the BLUETOOTH device.
[35] How to UseImportant informationPrecautionsPrecautions
Note on static electricity
- Static electricity accumulated in the body may cause mild tingling in your ears. To minimize the effect, wear clothes made from natural materials.
Others
- If you paste stickers, etc. on the touch sensor, the touch sensor may not operate correctly.
- Do not place this headset in a place exposed to humidity, dust, soot or steam, or subject to direct sunlight. Do not leave the headset in a car for a long time. It may cause a malfunction.
- Using the BLUETOOTH device may not function on mobile phones, depending on radio wave conditions and location where the device is being used.
- Listening with this headset at high volume may affect your hearing. For traffic safety, do not use this headset while driving or cycling.
- Do not use the headset in places where it would be dangerous if you are unable to hear ambient sound, such as at railroad crossings, train station platforms, pedestrian crossings, and construction sites.
- Do not put weight or pressure on this headset as it may cause the headset to deform during long storage.
- Do not subject the headset to excessive shock.
- Clean the headset with a soft dry cloth.
- Do not expose the headset to water. The headset is not waterproof. Remember to follow the precautions below.
- Be careful not to drop the headset into a sink or other container filled with water.
- Do not use the headset in humid locations or bad weather, such as in the rain or snow.
- Do not get the headset wet. If you touch the headset with wet hands, or put the headset in a damp article of clothing, the headset may get wet and this may cause a malfunction of the headset.
- If you experience discomfort after using the BLUETOOTH device, stop using the BLUETOOTH device immediately. Should any problem persist, consult your nearest Sony dealer.
- The earpads may deteriorate due to long-term storage or use.
- Optional replacement earpads can be ordered from your nearest Sony dealer.
- If you have any questions or problems concerning this headset that are not covered in this manual, please consult your nearest Sony dealer.
[36] How to UseImportant informationPrecautionsWhat is BLUETOOTH wireless technology?
BLUETOOTH wireless technology is a short-range wireless technology that enables wireless data communication between digital devices, such as a computer and digital camera. BLUETOOTH wireless technology operates within a range of about 10 m (30 feet).
Connecting two devices as necessary is common, but some devices can be connected to multiple devices at the same time.
You do not need to use a cable for connection, nor is it necessary for the devices to face one another, such is the case with infrared technology. For example, you can use such a device in a bag or pocket.
BLUETOOTH is an international standard supported by thousands of companies worldwide.
Communication system and compatible BLUETOOTH profiles of the unit
Profile is standardization of the function for each BLUETOOTH device specification. The unit supports the following BLUETOOTH version and profiles:
Communication system:
BLUETOOTH Specification Ver. 3.0
Compatible BLUETOOTH profiles:
- A2DP (Advanced Audio Distribution Profile): Transmitting or receiving audio content of high-quality.
- AVRCP (Audio Video Remote Control Profile): Controlling A/V equipment; pausing, stopping, starting playback, etc.
- HSP (Headset Profile)(*): Talking on the phone/Operating the phone.
- HFP (Hands-free Profile)(*): Talking on the phone/Operating the phone by hands-free.
* When you use a BLUETOOTH mobile phone supported by both HFP (Hands-free Profile) and HSP (Headset Profile), set it to HFP.
Maximum communication range
Use the devices within a range of about 10 m (30 feet) of line of sight.
Maximum communication range may shorten under the following conditions.
- There is an obstacle such as a person, metal, or wall between this unit and the BLUETOOTH device.
- A Wi-Fi device is in use near this unit.
- A microwave oven is in use near this unit.
- A device that generates electromagnetic radiation is in use near this unit.
Interference from other devices
Because BLUETOOTH uses 2.4 GHz, the same frequency as some Wi-Fi (IEEE802.11b/g/n), a Wi-Fi device used nearby may cause interference: resulting in noise, an invalid connection, or deterioration of communication speed. In such a case, perform the following.
- Use this unit at least 10 m (30 feet) away from the Wi-Fi device.
- If this unit is used within 10 m (30 feet) of a Wi-Fi device, turn off the Wi-Fi device.
- Bring the headset and the BLUETOOTH device closer together.
Interference to other devices
Microwaves emitting from a BLUETOOTH device may affect the operation of electronic medical devices. Turn off this unit and other BLUETOOTH devices in the following locations, as it may cause an accident.
- where inflammable gas is present, in a hospital, train, airplane, or a gas station
- near automatic doors or a fire alarm
Note
- To be able to use the BLUETOOTH function, the BLUETOOTH device to be connected requires the same profile as this unit. Note also that even if the same profile exists, devices may vary in function depending on their specifications.
- Due to the characteristic of BLUETOOTH wireless technology, the sound played on this unit is slightly delayed from the sound played on the BLUETOOTH device during talking on the telephone or listening to the music.
- This unit supports security capabilities that comply with the BLUETOOTH standard to provide a secure connection when the BLUETOOTH wireless technology is used, but security may not be enough depending on the setting. Be careful when communicating using BLUETOOTH wireless technology.
- We do not take any responsibility for the leakage of information during BLUETOOTH communication.
- A device featuring the BLUETOOTH function is required to conform to the BLUETOOTH standard specified by Bluetooth SIG, Inc. and be authenticated. Even if the connected device conforms to the above mentioned BLUETOOTH standard, some devices may not be connected or work correctly, depending on the features or specifications of the device.
- Noise or sound skips may occur depending on the BLUETOOTH device connected with this unit, the communication environment or the usage environment.
[37] How to UseImportant informationTrademarksTrademarks
- The BLUETOOTH word mark and logos are owned by the Bluetooth SIG, Inc. and any use of such marks by Sony Corporation is under license.
- The N-Mark is a trademark or registered trademark of NFC Forum, Inc. in the United States and in other countries.
- Android and Google Play are trademarks of Google Inc.
- iPad, iPhone, iPod touch are trademarks of Apple Inc., registered in the U.S. and other countries.
- Microsoft, Windows and Windows Vista are registered trademarks or trademarks of Microsoft Corporation in the United States and/or other countries.
- Mac and Mac OS are trademarks of Apple Inc., registered in the U.S. and other countries.
- The aptX® mark and the aptX logo are trade marks of CSR plc or one of its group companies and may be registered in one or more jurisdictions.
- The LDAC name and logo is a trademark of Sony Corporation.
Other trademarks and trade names are those of their respective owners.
[38] How to UseImportant informationSupport websiteCustomer support websites
Please access the following support home page to get the support information about your headset:
For customers in the U.S.A:
For customers in Canada:
For customers in Latin America:
For customers in European countries:
For customers in other countries/regions:
[39] TroubleshootingTroubleshootingTroubleshootingWhat can I do to solve a problem?
If the headset does not function as expected, try the following steps to resolve the issue.
- Find the symptoms of the issue in this Help Guide, and try any corrective actions listed.
- Connect the headset to a computer to charge the battery.
You may be able to resolve some issues by charging the battery. - Reset the headset.
- Initialize the headset.
This operation resets volume settings, etc., and deletes all pairing information. - Look up information on the issue on the customer support website.
If the operations above do not work, consult your nearest Sony dealer.
[40] TroubleshootingTroubleshootingPowerThe headset is not turned on.
- Charge the battery of the headset.
- The headset cannot be turned on while charging the battery. Remove the micro-USB cable from the headset, and then turn on the headset again.
[41] TroubleshootingTroubleshootingChargingCharging cannot be done.
- Check that you are using the micro-USB cable supplied.
- Check that the micro-USB cable is connected to the headset and the computer firmly.
- Check that the computer is turned on.
- Check that the computer is not in standby, sleep or hibernation mode.
[42] TroubleshootingTroubleshootingChargingCharging time is too long.
- Check that the headset and the computer are directly connected, not via a USB hub.
[43] TroubleshootingTroubleshootingChargingThe headset cannot be recognized by a computer.
- The micro-USB cable is not connected properly to the USB port of the computer. Connect the micro-USB cable again.
- Check that the headset and the computer are directly connected, not via a USB hub.
- A problem may have occurred with the connected USB port of the computer. Connect to another USB port if it is available.
- Try the USB connection procedure again in cases other than those stated above.
- Check that you are using the micro-USB cable supplied.
[44] TroubleshootingTroubleshootingChargingThe remaining battery charge of the headset is not displayed on the screen of an iPhone, iPad, or iPod touch.
- The remaining battery charge is shown only on the screen of an iPhone, iPad, or iPod touch (iOS 5.0 or later) that supports HFP (Hands-free Profile).
- Make sure that the iPhone, iPad or iPod touch is connected with HFP (Hands-free Profile). Otherwise, the remaining battery charge will not be displayed correctly.
[45] TroubleshootingTroubleshootingSoundNo sound
- Check that both the headset and the connected device (i.e., smartphone) are turned on.
- An A2DP BLUETOOTH connection is not made between the headset and the BLUETOOTH device. Use the BLUETOOTH device and make an A2DP BLUETOOTH connection.
- Turn up the volume of the headset and the connected device (i.e., smartphone).
- Check that the connected device is playing back.
- If you are connecting a computer to the headset, make sure the audio output setting of the computer is set for a BLUETOOTH device.
- Pair the headset and the BLUETOOTH device again.
- Check that the headphone cable is connected firmly.
[46] TroubleshootingTroubleshootingSoundLow sound level
- Turn up the volume of the headset and the connected device.
[47] TroubleshootingTroubleshootingSoundLow sound quality
- Turn down the volume of the connected device.
- Keep the headset away from a microwave oven, Wi-Fi device, etc.
- Bring the headset and the BLUETOOTH device closer together. Remove any obstacles between the headset and the BLUETOOTH device.
- Keep the headset away from a TV.
- Switch the BLUETOOTH connection to A2DP by operating the BLUETOOTH device when HFP or HSP is set.
- If you connect a device with a built-in radio or tuner to the headset, broadcasts may not be received, or sensitivity may be reduced. Locate the headset farther away from the device and check that you can listen to the broadcasts satisfactorily.
- If you have previously connected the headset to this BLUETOOTH device, only an HFP/HSP BLUETOOTH connection may be made when the headset is turned on. If this happens, use the BLUETOOTH device and make an A2DP BLUETOOTH connection.
-
When you listen to music from a computer on the headset, sound quality may be poor for the first few seconds after a connection is made. This is caused by the computer transmitting music at sound quality for communications at first, and it is not a malfunction.
If the sound quality does not improve after a few seconds, double-tap the touch sensor lightly (about 0.4-second interval) of the headset. Or, operate the computer to make an A2DP connection. Refer to the operating instructions supplied with your computer for computer operation.
[48] TroubleshootingTroubleshootingSoundSound skips frequently during playback.
-
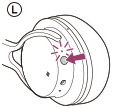
Remove any obstacles between the antenna of the BLUETOOTH device to be connected and the built-in antenna of the headset. The antenna of the headset is built into the part shown in the dotted line below.
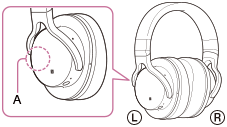
A: Location of the built-in antenna
- BLUETOOTH communications may be disabled, or noise or audio dropout may occur under the following conditions.
- There is a human body between the headset and the BLUETOOTH device. This situation may be improved by placing the BLUETOOTH device facing the antenna of the headset.
- There is an obstacle, such as metal or wall, between the headset and the BLUETOOTH device.
- A device using 2.4 GHz frequency, such as a Wi-Fi device, cordless telephone, or microwave oven, is in use near this headset.
- The situation may be improved by changing the wireless playback quality settings or fixing the wireless playback mode to SBC on the transmitting device. For details, refer to the operating instructions supplied with the transmitting device.
[49] TroubleshootingTroubleshootingPairingPairing cannot be done.
- Bring the headset and the BLUETOOTH device within 1 m (3 feet) from each other.
- When you turn on the headset for the first time after purchasing, initializing, or repairing it, the headset enters pairing mode automatically. Pair the headset with a BLUETOOTH device. When you want to pair a 2nd or subsequent device, press and hold the POWER button of the headset for about 7 seconds to enter pairing mode.
- When you pair the headset with devices again after initializing or repairing the headset, information for pairing with the headset remaining on the iPhone or other device may prevent you from pairing them successfully. In this case, delete the pairing information of the headset from the device, and then pair them again.
[50] TroubleshootingTroubleshootingOne-touch connection (NFC)Unable to connect the headset to a BLUETOOTH device with one-touch connection (NFC)
- Keep the smartphone close to the headset until the smartphone reacts. If you fail to connect, move the smartphone slowly on the N-Mark of the headset.
- Check that the NFC function of the smartphone is set to on.
- If the smartphone is in a case, remove it.
- NFC reception sensitivity varies depending on the device. If you repeatedly fail to connect the headset with a smartphone by one touch, connect it to the headset by on-screen operation on the smartphone.
- You cannot make a one-touch connection (NFC) while charging the battery because the headset cannot be turned on. Finish charging first, and then make the one-touch connection (NFC).
- You cannot make a one-touch connection (NFC) when the headphone cable is connected to the INPUT jack. Remove the headphone cable from the headset.
[51] TroubleshootingTroubleshootingBLUETOOTH connectionUnable to make a BLUETOOTH connection
- Check that the headset is turned on.
- Check that the BLUETOOTH device is turned on and the BLUETOOTH function is on.
- Connection with the BLUETOOTH device may not be memorized on the headset. Make a BLUETOOTH connection from the BLUETOOTH device to the headset soon after pairing is complete.
- The BLUETOOTH device is in sleep mode.
- The BLUETOOTH connection is terminated. Make the BLUETOOTH connection again.
[52] TroubleshootingTroubleshootingBLUETOOTH connectionDistorted sound
- Keep the headset away from a microwave oven, Wi-Fi device, etc.
[53] TroubleshootingTroubleshootingBLUETOOTH connectionThe BLUETOOTH wireless communication range is short, or the sound skips.
- Remove any obstacles between the antenna of the BLUETOOTH device to be connected and the built-in antenna of the headset. The antenna of the headset is built into the part shown in the dotted line below.
A: Location of the built-in antenna
- BLUETOOTH communications may be disabled, or noise or audio dropout may occur under the following conditions.
- There is a human body between the headset and the BLUETOOTH device. This situation may be improved by placing the BLUETOOTH device facing the antenna of the headset.
- There is an obstacle, such as metal or wall, between the headset and the BLUETOOTH device.
- A device using 2.4 GHz frequency, such as a Wi-Fi device, cordless telephone, or microwave oven, is in use near this headset.
- The situation may be improved by changing the wireless playback quality settings or fixing the wireless playback mode to SBC on the transmitting device. For details, refer to the operating instructions supplied with the transmitting device.
[54] TroubleshootingTroubleshootingBLUETOOTH connectionThe headset does not operate properly.
- Reset the headset. Pairing information is not deleted by this operation.
- If you cannot use the headset even after resetting it, initialize the headset.
[55] TroubleshootingTroubleshootingPhone callsNo voice from callers
- Check that both the headset and the connected device (i.e., smartphone) are turned on.
- Turn up the volume of the headset and the connected device (i.e., smartphone).
- Check that output of the BLUETOOTH device is set for the headset.
- Select an HFP or HSP BLUETOOTH connection by operating the BLUETOOTH device.
- If you are listening to music using the headset, stop playback, double-tap the touch sensor lightly and talk.
[56] TroubleshootingTroubleshootingPhone callsLow voice from callers
- Turn up the volume of the headset and the connected device.
[57] TroubleshootingTroubleshootingResetting or initializing the headsetResetting the headset
If the headset cannot be turned on, or if it cannot be operated even when it is turned on, push the RESET button with a pointed object. The headset is reset, and turns off when it was on.
If the headset does not operate correctly even after resetting, initialize the headset to restore factory settings.
[58] TroubleshootingTroubleshootingResetting or initializing the headsetInitializing the headset to restore factory settings
Turn off the headset, then press and hold the RESET button for more than 15 seconds.
The indicator (blue) flashes 4 times, and the headset is reset to the factory settings. All pairing information is deleted.
If the headset does not operate correctly even after initializing, consult your nearest Sony dealer.