

Welcome
Congratulations on the purchase of this VAIO computer.
This User Guide - Introduction Version provides you with limited information about your VAIO computer.
To update this file to the complete version of the User Guide, see Updating the User Guide to the Latest Version for more information.
Your VAIO computer may not support touch screen operations depending on the model you purchased. In such a case, use a mouse or a touch pad for computer operations.
Content in this guide is subject to change without notice.
Read This First
Updating the User Guide to the Latest Version
By updating this User Guide - Introduction Version through the Internet, you can get the complete version of the User Guide with detailed information on your VAIO computer.
Once the User Guide is updated to the complete version, you can access it anytime even if you are offline.
With the complete version of the User Guide, you can view information about:
-
Parts description
-
Feature and operating instructions
-
Precautions
-
Troubleshooting information
-
Windows basic operations
To update the User Guide to the complete version
-
Connect your VAIO computer to the Internet.
-
Exit this User Guide - Introduction Version.
After a while, the User Guide - Introduction Version will be updated to the latest complete version of the User Guide automatically.
Hint
-
It may take some time to complete the update.
-
If the User Guide - Introduction Version is not updated, start VAIO Update and find the User Guide to download it manually.
-
The User Guide is displayed on VAIO Care.
To view help files for Windows OS and app operations
When you have trouble operating your VAIO computer, try referring to Windows Help and Support or help files included with your apps.
To access Windows Help and Support, open the charms and enter "Help and Support" in the search box.
Connecting to the Internet
You will need to connect your VAIO computer to the Internet before updating to the complete version of the User Guide.
Before connecting to the Internet
Before using the Internet, you will need to sign up with an Internet Service Provider (ISP) and set up devices required for connecting your VAIO computer to the Internet.
The following types of Internet connection services may be available from your ISP:
-
Fiber to the Home (FTTH)
-
Digital Subscriber Line (DSL)
-
Cable modem
-
Satellite
-
Dial-up
For more information on devices required for Internet access and how to connect your VAIO computer to the Internet, ask your ISP.
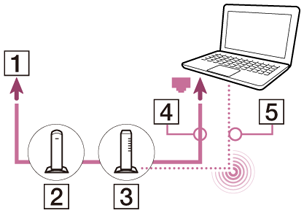
The following is one of the Internet connection methods as an example.
-
Internet
-
Modem
-
Router/access point
-
LAN cable (not supplied)
-
Wi-Fi(R) (Wireless LAN)
To use the Wi-Fi network
-
Open the charms and select the
 Settings charm.
 -
Select
 (the network icon).
 -
Select your desired network (SSID) from the list and Connect.
Note
-
For detailed information on network settings and devices, refer to the information from your Internet Service Provider (ISP) or the manuals that came with your network devices.
To use the network (LAN) (LAN port equipped models)
You can connect your VAIO computer to networks with a LAN cable. Connect one end of a LAN cable to the LAN port on the computer and the other end to your network. For detailed settings and devices required for LAN access, ask your network administrator.
Note
-
The connection, setting method, or required devices may vary depending on your network environment.
Updating Your VAIO Computer
Be sure to update your VAIO computer to enhance the computer's efficiency, security, and functionality.
Note
-
Your VAIO computer must be connected to the Internet to download the updates.
To use Windows Update
Windows Update enables you to make your VAIO computer more stable.
-
Open the charms and select the
 Search charm.
 -
Enter "Windows Update" in the search box to search Windows Update.
-
Select Windows Update from the list.
-
Follow the on-screen instructions to complete the updates.
To use VAIO Update
VAIO Update automatically notifies you of new updates available on the Internet then downloads and installs them on your VAIO computer.
-
Open the charms and select the
Search charm. -
Enter "VAIO Update" in the search box to search VAIO Update.
-
Select VAIO Update from the list.
-
Follow the on-screen instructions to complete the updates.
To update the antivirus app
The antivirus app helps protect your VAIO computer against security threats by keeping the app current with the latest updates. You can download and install the updates from the website of the manufacturer.
-
Open the charms and select the
Search charm. -
Enter the antivirus app name in the search box to search the app.
-
Select the antivirus app from the list.
-
Follow the on-screen instructions to complete the updates.
Solving Problems on Your VAIO Computer Using VAIO Care
With VAIO Care, you can regularly conduct performance checks and system tune-ups on your VAIO computer to keep it running at optimum level. Start VAIO Care whenever a problem arises. VAIO Care will provide appropriate measures and support information to solve the problem.
To start VAIO Care
Press the ASSIST button while Windows is running.
Below is an example of a screenshot in English.
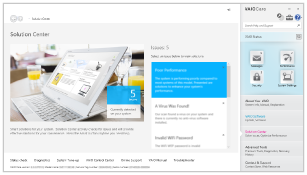
* Design and content of the screen are subject to change.
Hint
-
Alternatively, search for VAIO Care (Desktop) on the
Search charm to start VAIO Care. -
Refer to the help file included with VAIO Care for more information.
-
Pressing the ASSIST button while your VAIO computer is off displays the VAIO Care (Rescue Mode) screen. In this screen, you can start the recovery process of the computer in case of emergency, for example, when Windows does not start.
Finding Support Information
The Sony online support website provides instant access to information on commonly encountered problems. You can find support information such as the support website URL in Contact & Support on VAIO Care or the supplied Quick Start Guide.
Windows : How to Start
About the Start Screen and Menu
You can add shortcuts to apps, the desktop, and websites that you use the most.
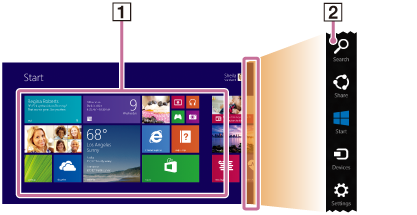
Overview
-
Tiles
Select a tile to start an app and personalize the Start screen by adding and rearranging tiles.
-
Charms
Search for apps and files, share content, play content on other devices or print, and set up your VAIO computer.
To open the Start screen
Touch operation (Touch screen equipped models)
Open the charms, then tap the Start charm.
Mouse/Touch pad operation
Open the charms, then click theStart charm.
Keyboard operation
Press the (Windows) key.
Hint
-
On the desktop, you can open the Start screen by selecting
 (Start) in the lower left corner.
Opening the Charms
You can open the charms to search for apps and files, share content, play content on other devices or print, and set up your VAIO computer.
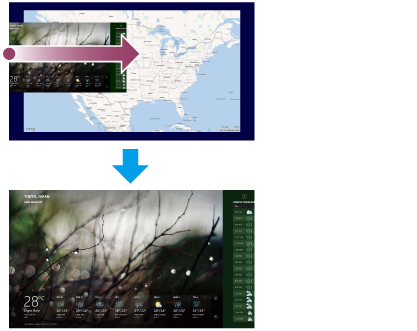
Touch operation (Touch screen equipped models)
Swipe in from the right edge.
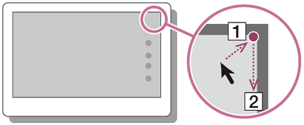
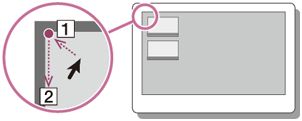
Mouse/Touch pad operation
Point to the upper-right corner ( ), then move downward (
 ).
).
With a touch pad, you can also swipe in from the right edge.
Keyboard operation
Press the(Windows) key and the C key at the same time.

Opening the App List
You can open the list of the installed apps (the Apps screen) on your VAIO computer.
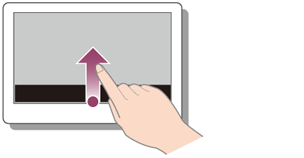
Touch operation (Touch screen equipped models)
Swipe up on the Start screen.
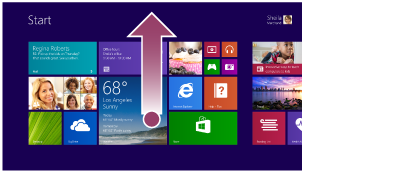
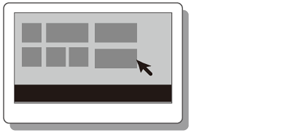
Mouse/Touch pad operation
Click the icon at the lower-left of the Start screen.
Hint
-
It is useful to pin the apps that you use the most to the Start screen. To pin the apps, right-click an app icon on the Apps screen and select the pin icon on the menu that appears on the bottom of the screen.
-
You can search apps from the search box on the upper-right corner of the Apps screen. When you have installed many apps, it is useful to search from the search box.
Starting Apps
You can start apps by following these steps.
-
Open the Start screen or the Apps screen.
-
Select your desired app.

Hint
-
It is useful to pin the apps that you use the most to the Start screen. To pin the apps, right-click an app icon on the Apps screen and select the pin icon on the menu that appears on the bottom of the screen.
-
You can search apps from the search box on the upper-right corner of the Apps screen. When you have installed many apps, it is useful to search from the search box.
Searching Content
With theSearch charm, you can search files, settings, or web content.
To open the charms, see Opening the Charms.
-
Enter a keyword (e.g. Windows) in the search box.
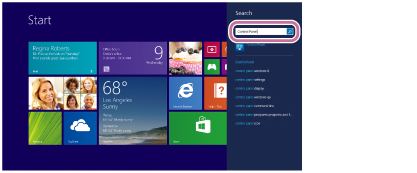
-
Select your desired icon or file from the search result.
Hint
-
You can select the search target to narrow the search result.
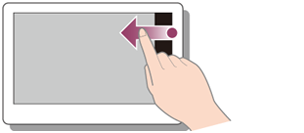
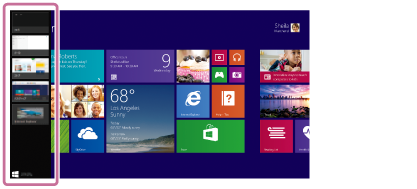
Viewing Running Apps
You can view running apps by displaying the list on the Start screen.
Touch operation (Touch screen equipped models)
Swipe in from the left edge until a small app icon appears, then drag the icon back towards the left edge.

Mouse/Touch pad operation
Point to the upper-left corner (), then move downward ().
Keyboard operation
Press the(Windows) key and the Tab key at the same time.

Switching Apps
You can switch between apps that are currently running.
Touch operation (Touch screen equipped models)
Display currently running apps, touch and swipe in your desired app icon from the left edge.
Mouse/Touch pad operation
Display currently running apps and drag your desired app icon from the left edge to the center.
Opening the App Menu
Many apps have app menus that you can use to control your app. Follow the instructions below to open the app menu.
Touch operation (Touch screen equipped models)
Swipe up from the bottom edge.
Mouse/Touch pad operation
When an app is open, right-click anywhere on the screen. On a touch pad, click the bottom-right corner.
Keyboard operation
Press the(Windows) key and the Z key at the same time.

Hint
-
Open the app menu when an app is displayed on the computer screen.
-
App commands vary depending on the app that is currently displayed on the computer screen.
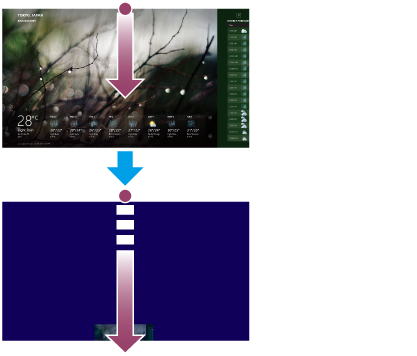
Closing Apps
You can close currently running apps by following the instruction below.
Touch operation (Touch screen equipped models)
-
When an app is open, point to the top-center of the screen.
-
Drag the app to the bottom of the screen until the app disappears from the screen.
Mouse/Touch pad operation
-
When an app is open, move the cursor to the top-center of the screen until the hand icon appears.
-
Drag the app to the bottom of the screen until the app disappears from the screen.
Keyboard operation
Press the Alt key and the F4 key at the same time.
Installing Apps from Windows Store
You can install apps from Windows Store.
You will need a Microsoft account to use certain apps or services, including Windows Store.
On how to create and what you can do with the Microsoft account, refer to Windows Help and Support.
-
Connect to the Internet.
-
Open the Start screen and select the Store tile.

-
Find an app to install.
-
Follow the on-screen instructions to install the app.
After the installation is complete, the app icon appears on the Apps screen. To open the Apps screen, see Opening the App List.
Hint
-
It is useful to pin the apps that you use the most to the Start screen. To pin the apps, right-click an app icon on the Apps screen and select the pin icon on the menu that appears on the bottom of the screen.
Opening Control Panel
You can open Control Panel by following these steps.
-
Open the Apps screen.
-
Select Control Panel.
Opening Windows Help and Support
You can open Windows Help and Support by following these steps.
-
Open the Apps screen.
-
Select Help and Support.
Starting Help+Tips
You can start Help+Tips that explains the Windows 8 basic operations.
-
Open the Apps screen.
-
Select Help+Tips.
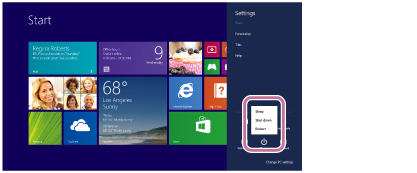
Entering Sleep Mode, Shutting Down, or Restarting
You can place your VAIO computer into Sleep mode or shut down/restart the computer by following these steps.
-
Open the charms and select the
Settings charm. -
Select
 Power and Sleep, Shut down, or Restart.
Switching User Accounts
You can switch to another user account by following these steps.
-
Open the Start screen and select an account name at the upper-right corner of the computer screen.
-
Select your desired account name.
Hint
-
To create a new user account, you need to sign in as an administrator. Then, open the charms and select the
Settings charm. Select Change PC settings in the lower right corner, and select Accounts and Other accounts in the left pane.
Opening the Desktop
You can access the desktop from a tile, just like an app. Open the desktop by following the instruction below.
-
Open the Start screen and select the Desktop tile.
About User Account Types
There are two types of user accounts available in Windows 8: a local account and a Microsoft account.
Local account
A local account is a user name and password that you set on your VAIO computer. Because one local account is expected to be used for a single computer, you cannot share the same account on multiple computers.
Hint
-
Setting a local account password is optional. If you forget your local account password, recover your VAIO computer.
Microsoft account
A Microsoft account is an email address and password that you use to sign in to Microsoft services. Because a Microsoft account can be set for each user, you can share the same account on multiple computers. To download apps from Windows Store, you need to switch from a local account to a Microsoft account.
Hint
-
Setting a Microsoft account password is required. If you forget your Microsoft account password, contact Microsoft support services.
Switching from a Local Account to a Microsoft Account
In Windows 8, you can switch between a local account and a Microsoft account.
By switching from a local account to a Microsoft account, you can download apps from Windows Store.
To create or switch to a Microsoft account, follow these steps.
-
Open the charms and select the Settings charm.
-
Select Change PC settings in the lower right corner.
-
Select Accounts and Your account in the left pane of the PC settings screen.
-
Select Connect to a Microsoft account.
-
Follow the on-screen instructions.
Hint
-
To switch to a local account, select Disconnect in step 4 instead of Connect to a Microsoft account.
-
If you forget your Microsoft account password, contact Microsoft support services.
Trademarks
-
SONY and the SONY logo are registered trademarks of Sony Corporation.
-
VAIO, the VAIO logo, and other Sony product or service names are trademarks or registered trademarks of Sony Corporation or any of its affiliates.
-
Windows and the Windows logo are either registered trademarks or trademarks of Microsoft Corporation in the United States and/or other countries.
-
Wi-Fi is a trademark or registered trademark of Wi-Fi Alliance.
-
All other names of system, products, and services are trademarks of their respective owners.
-
In the manual, the TM or (R) marks are not specified.
About the International ENERGY STAR(R) Program

The following information is applicable to ENERGY STAR qualified/certified products only.
ENERGY STAR logos are attached or electronically displayed on the following locations of ENERGY STAR qualified/certified products.
-
The top or the front of the product or Control Panel
-
The product packaging
To confirm the ENERGY STAR logo on the computer screen, open Control Panel, select System and Security and System. To open Control Panel, see Opening Control Panel.
As an ENERGY STAR Partner, Sony confirmed that this product meets the ENERGY STAR standards for energy efficiency.
The International ENERGY STAR Office Equipment Program is an international program that promotes energy saving through the use of energy efficient computers and office equipment. The program supports the development and dissemination of products with functions that effectively reduce energy consumption to contribute to cost savings and reduction of environmental burdens.
For detailed information on the ENERGY STAR Program, visit the following websites:
-
http://www.eu-energystar.org/ (Europe)
This computer is designed in compliance with the ENERGY STAR standards and delivered with the following power saving settings that apply to the computer running on AC power:
-
The LCD backlight is turned off automatically after no more than 15 minutes of inactivity.
-
The computer enters Sleep mode automatically after no more than 30 minutes of inactivity.
Press the (Power) button to bring the computer back into Normal mode.