- Top Page >
- Using Other Devices >
- HDMI connection
HDMI connection
Making a Connection
Connect an audio system (e.g. home theatre system) with HDMI output to the TV, using an HDMI cable.
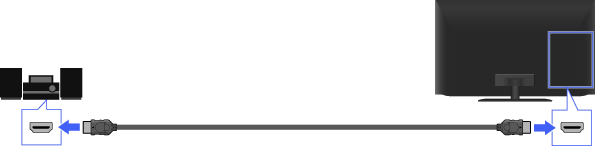
Audio system
TV
HDMI cable (not supplied) *
* Be sure to use an authorised HDMI cable bearing the HDMI logo.
Tips
- When connecting a digital audio system that is compatible with “Control for HDMI” (“BRAVIA” Sync) and Audio Return Channel (ARC) technology, connect to HDMI IN 1 with an HDMI cable. However, if connecting a system that is not compatible with “Control for HDMI” or Audio Return Channel, an additional audio connection via DIGITAL AUDIO OUT (OPTICAL) is necessary.
Steps
After making a connection, press the HOME button, then select
 [Settings] at the bottom of the screen using the
  /
/ buttons.
Select
 [Sound] using the
  /
/ buttons, then press the
  button.
Select [Speakers] using the
/ buttons, then press the button.Select [Audio System] using the
/ buttons, then press the button.
The connected audio system is turned on automatically. The volume can be controlled using the TV’s remote.
To return to the last viewed source, press the HOME button twice.
Tips
- If you connect a device that is compatible with “Control for HDMI,” you can control it by simply using the TV’s remote.
Notes
- You need to configure the [Digital Audio Out] settings according to your audio system.
Jump to the page
