Creating a picture-in-picture effect
The Picture in Picture effect allows you to resize and position clips for picture-in-picture compositing.
Creating the inner picture
-
Create two tracks in your project. For more information, see "Adding tracks to a project."
-
Add clips to your tracks:
-
The top track will contain the smaller, inner picture.
-
The bottom track will contain the background clip.
For more information, see "Adding media and creating clips."
-
-
Click the top track to select it.
-
Click the Track button
 below the timeline and choose Picture in Picture. The controls for the Picture in Picture plug-in are displayed in the Track Inspector.
Editing picture in picture settings
-
Select the track that contains the top clip.
-
Click the Inspector button to show the Inspector pane.
-
In the Inspector, select the Track tab to view and edit settings for the Picture in Picture plug-in. Use the Picture in Picture plug-in to adjust the size and position of the top clip.
For more information, see "Using the Track Inspector."
Item
Description
Location
The drop-down list displays the current position of the video in the frame. Click to display an edit control you can use to position your video.
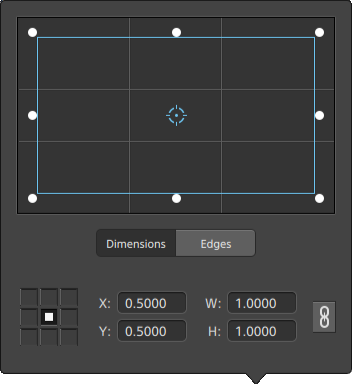 -
-Adjusting box position
Drag the point in the edit control to set the position of your video in the frame. Double-click the point to reset it.
When you type values in the Dimensions tab, you can set an anchor point and specify the position of the box using X/Y coordinates. For example, click the top-right corner of the anchor control and use the coordinates 0.5000, 0.5000 to move the top-right corner of the box to the center of the control.
Adjusting box dimensions
You can drag the corners of the rectangle in the edit control or type values in the W and H edit boxes to set the size of the frame.
When you type values in the Dimensions tab, you can set the size of the box using W/H dimensions. Click the Lock button
 to preserve the aspect ratio of the box so changing the width or height will automatically update the other value,
Adjusting box edges
You can drag the edges of the rectangle in the edit control or type values in the Edges tab to specify the position for each edge of the box.
Drag a corner of the rectangle to preserve aspect ratio while resizing.
Hold Shift while dragging the corners of the rectangle to resize and adjust aspect ratio.
Hold Alt (Windows) or Option (macOS) to resize the rectangle from the center.
Hold Ctrl (Windows) or ⌘ (macOS) to adjust the controls in fine increments.
When a corner is selected, you can use the arrow keys to adjust the selected corner, or press Ctrl (Windows) or ⌘ (macOS) + the arrow keys to adjust in fine increments.
Drag the edges of the rectangle to resize the rectangle.
Drag an edge of the rectangle to preserve aspect ratio while resizing.
Hold Shift while dragging an edge to resize and adjust aspect ratio.
Hold Alt (Windows) or Option (macOS) to resize the rectangle from the center.
Hold Ctrl (Windows) or ⌘ (macOS) to adjust the controls in fine increments.
Drag the center of the rectangle to move without resizing, or double-click the point to reset it.
Hold Shift while dragging to constrain to horizontal/vertical/45-degree movement.
Hold Ctrl (Windows) or ⌘ (macOS) to adjust the controls in fine increments.
When the rectangle is selected, you can copy the position of the rectangle to paste to another clip.
Rotation
Type a value in the box or drag the slider to rotate the video in the frame.
Flip horizontal
Click to invert the video horizontally.
Flip vertical
Click to invert the video vertically.
Opacity
Type a value in the box or drag the slider to adjust the opacity of the top image. As you decrease the opacity, video from lower tracks will show through the foreground.
Shadow
Type
Choose a setting from the drop-down list if you want to display a shadow over or behind the foreground image.
Offset
The drop-down list displays the current position of the shadow relative to the foreground image. Click to display an edit control you can use to position your shadow.
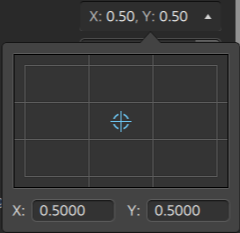 -
-You can drag the point in the edit control or type values in the X and Y boxes to set the position of your shadow in the frame. Double-click the point to reset it.
Hold Ctrl (Windows) or ⌘ (macOS) to adjust the point in fine increments.
Rotation
Type a value in the box or drag the slider to rotate the shadow in the frame.
Scale
Type a value in the box or drag the slider to adjust the size of the shadow.
Blur
Type a value in the box or drag the slider to feather the edges of the shadow.
Opacity
Type a value in the box or drag the slider to adjust the opacity of the shadow. As you decrease the opacity, video from lower tracks will show through the foreground.
Glow
Type
Choose a setting from the drop-down list if you want to display a glow effect over or behind the foreground image.
Amount
Type a value in the box or drag the slider to adjust the size of the glow effect.
Color/Second color
Click the color sample to display a color picker, where you can choose a color or type color values to set the shadow color. You can also adjust the transparency (alpha value) of the shadow.