How to Use
Getting Started
Customer Registration Website
Before Use
Enjoying Using Your Walkman
Parts and Controls
Power/Charging
- Turning the power on [10]
- Turning the power off [11]
- Using the HOLD switch [12]
- Charging the battery [13]
- Charging in the battery care mode [14]
- Extending the battery life [15]
- Notes on charging the battery [16]
Initial Settings
- Selecting the display language [17]
- Setting the date and time [18]
- Setting the date display format [19]
- Setting the time display format [20]
- Formatting a microSD card [21]
Basic Operations
microSD Card
- Inserting a microSD card [22]
- Removing a microSD card [23]
- Selecting the memory to use [24]
- Formatting a microSD card [25]
- Notes on microSD cards [26]
Home Menu/Option Menu
- Home menu [27]
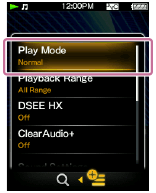
- How to use the Home menu [28]
- How to use the option menu [29]
- List of icons displayed in the information area [30]
Connecting Your Walkman to Your Computer
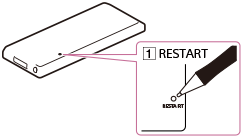
Initializing/Updating
- Restarting your Walkman [33]
- Resetting to the factory settings [34]
- Formatting memory [35]
- Updating the system software of your Walkman [36]
- Displaying your Walkman information [37]
Using the Contents
Transferring/Deleting Content
Operation Flow for Transferring Content to Your Walkman
Installing Media Go
Installing Content Transfer
Importing Content to the Software
- Importing and transferring content from media using Media Go [46]
- Importing content on your Windows computer into Media Go [47]
- Importing podcasts into Media Go [48]
Transferring Content to Your Walkman
- Transferring content using Media Go [49]
- Transferring iTunes content using Media Go [50]
- Transferring content using Content Transfer [51]
- Transferring content using Explorer [52]
- Transferring content using the Finder [53]
- Notes for transferring content such as music from your computer [54]
Deleting Content from Your Walkman
- Deleting content from your Walkman using Media Go [55]
- Deleting content from your Walkman using Content Transfer [56]
- Deleting content received from a Bluetooth connection [57]
- Deleting content from your Walkman using Explorer [58]
- Deleting content from your Walkman using the Finder [59]
Operating with Media Go
- Playing live albums with no gaps in between songs [60]
- Deleting content imported to Media Go [61]
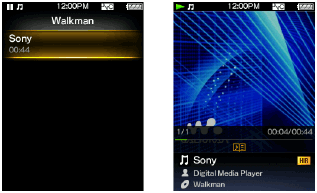
- Inputting the lyrics information using Media Go [62]
Music
Playing Music
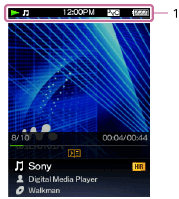
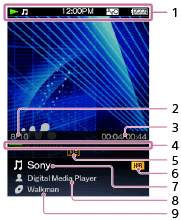
- Preparing music [63]
- Playing music [64]
- Browsing the music list screen [65]
- Volume operation (Only for countries/areas complying with European and Korean Directives) [66]
- Browsing the music playback screen [67]
- Music playback operations [68]
- Searching for songs [69]
- Playing playlist songs [70]
- Choosing an album from the cover art images [71]
Deleting Songs
Using Bookmarks
- What is the bookmark function? [73]
- Adding a song to a bookmark list [74]
- Changing the default bookmark list [75]
- Changing the order of bookmarked songs [76]
- Removing songs from a bookmark list [77]
Displaying Lyrics
- What is the Display Lyrics function? [78]
- Adding lyrics to songs [79]
- Making lyrics information in a text file [80]
- Displaying lyrics [81]
SensMe™ Channels
- What is SensMe™ Channels? [82]
- Playing songs using SensMe™ Channels [83]
- Analyzing songs on your Walkman [84]
Music Settings
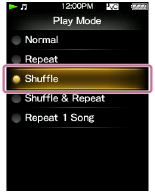
- Shuffle playback [85]
- Repeat playback [86]
- Setting the playback range [87]
- Upscaling compressed audio to quality almost that of High-Resolution Audio [88]
- Enjoying various sound quality [89]
- Setting the sound quality easily with a single operation [90]
- Customizing sound quality settings [91]
- Presetting your equalizer settings [92]
- Moderating the differences in volume level between songs [93]
- Optimizing the sound characteristics [94]
- Selecting the album display format [95]
Photos/Videos/Podcasts
Viewing Photos
- Preparing photos [96]
- Viewing photos [97]
- Browsing the photo screen [98]
- Operations on the photo screen [99]
- Deleting photos [100]
Watching Videos
- Preparing videos [101]
- Watching videos [102]
- Browsing the video playback screen [103]
- Operations on the video playback screen [104]
- Searching for videos [105]
- Browsing scenes from thumbnails [106]
- Deleting videos [107]
Playing Podcasts
- What is a podcast? [108]
- Preparing podcasts [109]
- Playing podcasts [110]
- Browsing the podcast playback screen [111]
- Operations for audio podcast playback [112]
- Operations for video podcast playback [113]
- Deleting podcast episodes [114]
Photo Settings
Video Settings
- Displaying a video to match the screen size [116]
- Playing only the sound of a video [117]
- Playing videos continually [118]
- Changing the order of videos [119]
FM Radio
Listening to FM Radio
- Listening to FM radio [120]
- Browsing the FM radio screen [121]
- FM radio operations [122]
- Presetting broadcast stations automatically [123]
- Presetting broadcast stations manually [124]
- Deleting preset broadcast stations [125]
FM Radio Settings
microSD Card
microSD Card
- Inserting a microSD card [128]
- Removing a microSD card [129]
- Selecting the memory to use [130]
- Formatting a microSD card [131]
- Notes on microSD cards [132]
Noise Canceling
Using the Noise Canceling Function
- What is noise canceling? [133]
- Noise canceling compatible headphones [134]
- Selecting headphones [135]
- Using noise canceling [136]
- Reducing noise to create a quiet environment [137]
- Notes for using the noise canceling function [138]
Noise Canceling Settings
Bluetooth
What Is the Bluetooth Function?
- What is the Bluetooth function? [141]
- What can your Walkman do with the Bluetooth function? [142]
- What is pairing? [143]
Connecting with Bluetooth Audio Devices
- Steps to use Bluetooth connection [144]
- Pairing and connecting with a Bluetooth audio device [145]
- Connecting with a paired Bluetooth audio device [146]
- Making a Bluetooth connection using the NFC function [147]
- Disconnecting a Bluetooth audio device [148]
Listening to Sound Using a Bluetooth Audio Device
Sending/Receiving Content via a Bluetooth Connection
- Steps to transfer content via a Bluetooth connection [150]
- Sending content via a Bluetooth connection [151]
- Receiving content via a Bluetooth connection [152]
- Playing content received via a Bluetooth connection [153]
- Deleting content received via a Bluetooth connection [154]
- Entering a passkey to make a Bluetooth connection [155]
Information of Bluetooth Audio Devices
- Displaying the pairing information of Bluetooth audio devices [156]
- Deleting the pairing information of Bluetooth audio devices [157]
Bluetooth Settings
- Setting automatic Bluetooth connection at startup [158]
- Setting wireless playback quality [159]
- Setting sound effects during a Bluetooth connection [160]
- Displaying Bluetooth information on your Walkman [161]
Notes on the Bluetooth Function
NFC
What Is the NFC Function?
Connecting with One Touch (NFC)
Settings
Music Settings
- Shuffle playback [165]
- Repeat playback [166]
- Setting the playback range [167]
- Upscaling compressed audio to quality almost that of High-Resolution Audio [168]
- Setting the sound quality easily with a single operation [169]
- Customizing sound quality settings [170]
- Presetting your equalizer settings [171]
- Moderating the differences in volume level between songs [172]
- Changing the default bookmark list [173]
- Selecting the album display format [174]
- Displaying lyrics [175]
Photo Settings
Video Settings
- Displaying a video to match the screen size [177]
- Playing only the sound of a video [178]
- Playing videos continually [179]
- Changing the order of videos [180]
FM Radio Settings
Noise Canceling Settings
Bluetooth Settings
- Setting automatic Bluetooth connection at startup [185]
- Setting wireless playback quality [186]
- Setting sound effects during a Bluetooth connection [187]
- Displaying Bluetooth information on your Walkman [188]
- Deleting content received via a Bluetooth connection [189]
Alarm/Sleep Timer Settings
- Setting the alarm to on/off [190]
- Setting the alarm time [191]
- Setting a song as the alarm sound [192]
- Setting the sleep timer [193]
Selecting Headphones
Common Settings
- Displaying your Walkman information [196]
- Limiting the volume [197]
- Setting the operation sound [198]
- Setting the screen off timer [199]
- Adjusting the screen brightness [200]
- Setting a photo as wallpaper [201]
- Setting the date and time [202]
- Setting the date display format [203]
- Setting the time display format [204]
- Charging in the battery care mode [205]
- Resetting to the factory settings [206]
- Formatting memory [207]
- Rebuilding the library manually [208]
- Using USB connection mode [209]
Language Settings
Announcement
Precautions
- Notes on handling your Walkman [211]
- Notes on headphones [212]
- Notes on the software [213]
- Maintenance of your Walkman [214]
Customer Support Website
Specifications
Specifications
- Specifications [216]
- Battery life [217]
- Maximum recordable number of songs and time (Approx.) [218]
- Maximum recordable time of videos (Approx.) [219]
- Supported formats [220]
- System requirements [221]
- Contents [222]
Troubleshooting
Troubleshooting
What Can I Do to Solve a Problem?
Q&A
Operation
- Your Walkman does not operate or the power does not turn on. [225]
- Your Walkman does not work properly. [226]
- Your Walkman power turns off or on automatically. [227]
- You want your Walkman screen to stay on longer before it turns off automatically. [228]
- The date and time have been reset. [229]
- A drink (water, coffee, etc.) was spilled on your Walkman, or the Walkman was washed in the washing machine. [230]
- The earbuds supplied with the headphones are missing. [231]
- You want to back up the content such as music stored on your Walkman. [232]
- You want to find the product name (model name) of your Walkman. [233]
- An alarm (beep) is heard and the message [Check the volume level] is displayed. [234]
Sound
- There is no sound. [235]
- Content such as music suddenly stops during playback. [236]
- Noise is generated. [237]
- Volume cannot be turned up, or the volume remains low when the playback volume is turned up. [238]
- Sound can only be heard from one side of the headphones. [239]
- Sound is interrupted or skips. [240]
- Sound is interrupted between songs. [241]
- The sound effect settings do not seem to have any effect. [242]
Power
- You cannot charge your Walkman. [243]
- How long is the life of the built-in rechargeable battery? [244]
- The rechargeable battery needs to be replaced. [245]
- The battery life is short. [246]
- How long is the standard battery duration? [247]
- How long does it take to charge the battery? [248]
- The battery runs out fast when you turn on the battery care mode. [249]
Connection to a Computer
- The computer does not recognize your Walkman. [250]
- The computer does not recognize a microSD card inserted in your Walkman. [251]
- Even if you use “Safely Remove Hardware” on the computer, [Connected USB (Storage in use: system storage)] or [Connected USB (Storage in use: SD card)] remains displayed on your Walkman screen. [252]
- You cannot install software to your computer. [253]
- The progress bar on the install screen does not proceed while installing the software. [254]
- Your Walkman is not recognized by Media Go. [255]
- Content such as music cannot be transferred from the computer to your Walkman. [256]
Displaying/Playing/Deleting Content
- You cannot play content such as music transferred to your Walkman. [257]
- Songs are not played back in the expected order. [258]
- Content such as music suddenly stops during playback. [259]
- Playback progresses to the next album when repeat playback is set. [260]
- Songs are only played within a limited range such as within one album. [261]
- You cannot stop playback. [262]
- Songs are not displayed in the order they were transferred in. [263]
- Sound is interrupted between songs. [264]
- The content such as music is displayed repeatedly. [265]
- The same song is displayed repeatedly in an album. [266]
- Thumbnails such as cover art are not displayed. [267]
- Lyrics are not displayed. [268]
- [ □ ] is displayed in the screen. [269]
- [Unknown] is displayed for the album name or artist name. [270]
- You cannot delete content such as music using the Walkman functions. [271]
- You cannot play a podcast episode. [272]
- You cannot continually play podcast episodes. [273]
- You cannot register podcasts to a bookmark list. [274]
- You cannot find your desired channel. [275]
- [Morning] is always displayed for the time-based channel. [276]
- Unsuitable songs for selected time-based channels are played. [277]
- Audio podcasts are not played by SensMe™ Channels. [278]
FM Radio
- You cannot hear FM radio broadcasts. [279]
- There is a lot of noise in an FM radio broadcast and the sound quality is poor. [280]
Bluetooth
- Pairing cannot be done. [281]
- You cannot connect via the Bluetooth function. [282]
- The screen to enter the passkey appears when pairing with a Bluetooth device. [283]
- You cannot hear sound from the Bluetooth audio device. [284]
- You cannot operate your Walkman from a Bluetooth audio device. [285]
- Sound skips or noise is generated during a Bluetooth connection. [286]
- Sound effects do not seem to have any effect when listening to sound via a Bluetooth audio device. [287]
- Video sound is delayed when listening to sound via a Bluetooth audio device. [288]
- You cannot display or delete content such as music received using the Bluetooth function. [289]
- The cover art of a song received using the Bluetooth function is not displayed. [290]
NFC
Noise Canceling
- The noise canceling function is not effective. [292]
- You want to use the noise canceling function with headphones other than noise canceling headphones compatible with your Walkman. [293]
microSD Card
- Your Walkman does not recognize a microSD card that is inserted. [294]
- The computer does not recognize a microSD card inserted in your Walkman. [295]
Other
Message
[1] How to UseGetting StartedCustomer Registration WebsiteCustomer registration website
We recommend that you register your Walkman so we can provide better customer support. Visit one of the following websites to register the Walkman.
For customers in the USA:
For customers in Latin America:
For customers in Europe:
For customers in Asia/Oceania/Middle East/Africa:
English/Korean/Traditional Chinese
http://www.sony-asia.com/dmpwalkman/register/
Simplified Chinese
https://www.sonystyle.com.cn/b2c_sony/b2c/productRegister.do
[2] How to UseGetting StartedBefore UseBefore first use
Thank you for purchasing this Walkman.
This “Help Guide” explains how to transfer content to your Walkman, and how to use the various functions. Browse this “Help Guide” for necessary information.
The printed manuals (supplied), such as “Instruction Manual,” also contain important information for you. For information about the customer support website, see “Customer support website.”
- For information on laws, regulations and trademark rights, refer to “Important Information” contained in the supplied software. To read it, install the supplied software on your computer.
- All other trademarks and registered trademarks are trademarks or registered trademarks of their respective holders. In this manual, TM and ® marks are not specified.
About model names mentioned in this “Help Guide”
Depending on the country/region in which you have purchased your Walkman, some models may not be available.
Computer system requirements when connecting your Walkman
See “System requirements” for details on computer system requirements.
Battery charging
The battery might be low when you use your Walkman for the first time. Charge the battery before using the Walkman.
About microSD cards
In this “Help Guide,” microSD cards, microSDHC cards and microSDXC cards are called “microSD cards.”
About images used in this “Help Guide”
The screens and illustrations shown are for reference only and may differ from the actual product or screen.Design and specifications are subject to change without notice.
[3] How to UseGetting StartedBefore UseWalkman instruction manuals
The operations of this Walkman are explained in the following instruction manuals.
 (Startup Guide) (paper)
Describes the operation flow from turning your Walkman on to listening to music.
Instruction Manual (paper)
Describes the notes on use, compliance and other information.
Help Guide
You are currently viewing the Help Guide. This contains information such as explanations of Walkman operations and software.
Important Information
Contains information on trademark rights, laws, and regulations. You can read it by installing the software (supplied) on your computer.
[4] How to UseGetting StartedBefore UseHow to use the operating explanations
This Help Guide shows icons on your Walkman as follows:  [Music],
  [Settings]. Items such as menus on the screen are shown as follows: [Album], [Play Mode].
Press the button ( ) to select items. Press the button (
 ) to confirm.
Home menu
Press and hold the button ( ) to display the Home menu.
Note
- Except for some special cases, operating explanations assume that you are starting from the Home menu. Operations may differ from the explanation in situations such as during playback of music.
- If a function or setting can be done in more than one way, the simpler method is explained.
[5] How to UseGetting StartedEnjoying Using Your Walkman3 steps to listening to music
Be sure to charge the battery before you use your Walkman for the first time. You can transfer music while charging the battery. You can listen to your music as soon as the transfer has completed.
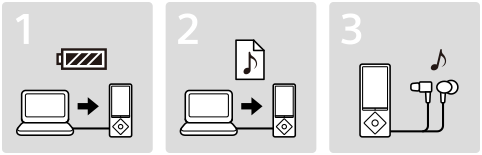
- Connect your Walkman to a computer.
You can charge the battery by connecting your Walkman via a USB connection to a computer that is turned on and running.
- Import music to your computer and transfer the music to your Walkman.
For Windows users
-
Recommended: Install the latest version of Media Go, which is available on the Internet.
You can transfer music that you have imported from CDs or downloaded from online music services to your Walkman.
- You can transfer music by drag-and-drop directly from Windows Explorer to your Walkman.
For Mac users
-
Recommended: Install the latest version of Content Transfer, which is available on the Internet.
You can transfer music and playlists that are managed with iTunes to your Walkman by an easy operation.
- You can transfer music by drag-and-drop directly from the Finder to your Walkman.
-
Recommended: Install the latest version of Media Go, which is available on the Internet.
- Enjoy your music!
Connect the headphones, unlock the HOLD function, and turn on your Walkman. Then simply select the music you want to listen to to start playback!
[6] How to UseGetting StartedEnjoying Using Your WalkmanVarious ways to enjoy using your Walkman
Your Walkman can do more than simply play back music. Get to know more about various ways you can enjoy using the Walkman.
Enjoying music without distraction with the noise canceling function
The noise canceling function can reduce unwanted ambient noise especially in a vehicle such as an airplane, train or bus, allowing you to enjoy music at a low volume.
Watching videos
You can transfer videos from your computer to your Walkman and enjoy watching them on the Walkman.
Viewing photos
You can enjoy viewing photos stored on your Walkman while you are listening to music. You can also set a photo as the wallpaper of the Walkman.
Listening to podcasts
You can enjoy listening and watching podcast episodes that you downloaded to your computer on your Walkman.
Listening to FM radio
You can enjoy listening to FM radio on your Walkman.
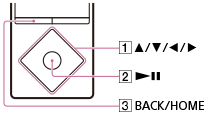
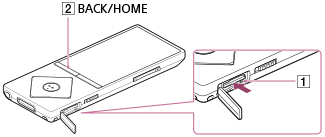
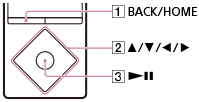
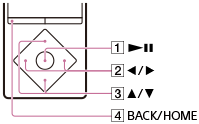
[7] How to UseGetting StartedParts and ControlsParts and controls
This section explains the functions of buttons, jacks, and other parts of your Walkman.
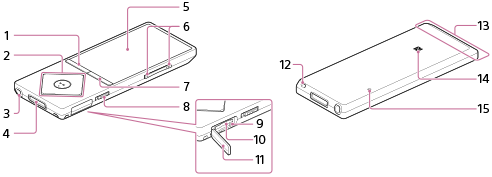
-
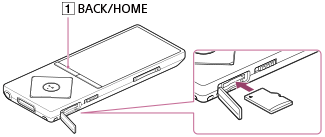
BACK/HOME button
Press to go up one list screen level or to return to the previous menu.
Press and hold to display the Home menu.
-
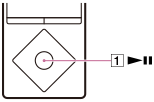
5-way button
Press to start playback or navigate through the on-screen menus of your Walkman.
There is a tactile dot on the
 button to help you operate the buttons without looking.
 -
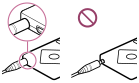
Headphone jack (*1)
Insert the headphone plug until it clicks into place.
Sound will be impaired if the headphones are not connected properly.
-
WM-PORT jack
Connect the USB cable (supplied) or other accessories that support WM-PORT (not supplied).
-
Display
-
VOL (Volume) +/– button
Press to adjust the volume.
There is a tactile dot on the + button to help you operate the buttons without looking.
-
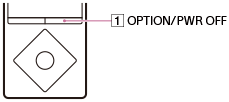
OPTION/PWR OFF (Option/Power off) button
Press to display the option menu.
Press and hold to turn the screen off and enter standby mode.
-
HOLD switch
Set the HOLD switch to protect your Walkman against accidental operation during transportation.
Slide the HOLD switch in the direction of the arrow (
 ) to disable all operation buttons. Slide the HOLD switch to the opposite position to release the HOLD function.
 -
Access lamp
-
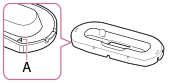
microSD card slot
Open the cover before inserting a microSD card. Insert a microSD card until it clicks into place to increase the available memory of your Walkman.
-
microSD card slot cover
-
Strap hole
Use to attach a strap (not supplied).
-
Built-in Bluetooth antenna
Do not cover the antenna part with your hands or other object when a Bluetooth connection is active. Doing so may interrupt the connection.
-
N-mark
Touch a Bluetooth audio device equipped with the NFC function to this mark to connect it to your Walkman.
-
RESTART button
Press the RESTART button with a small pin, etc. to restart your Walkman.
(*1) Sound is not emitted from the wired headphones while your Walkman is connected to a device via a Bluetooth connection. Disconnect the Bluetooth connection to use wired headphones.
Installing your Walkman in a peripheral device such as a cradle
You may need to use an adaptor to install your Walkman in a peripheral device such as a cradle. In this case, use the adaptor (Type A) supplied with the device.
[8] How to UseGetting StartedParts and ControlsChanging the earbuds
To enjoy better sound quality, change the earbuds (supplied) to another size to fit your ears comfortably and snugly.
- While holding the headphone, twist and pull the earbud off.
If the earbud slips and cannot be detached, wrap it in a soft dry cloth.
- Attach the earbuds to the headphone.
Push the earbud onto the headphone to where the end of the earbud’s colored part (
) aligns with . Attach the earbud firmly to the headphones to prevent it from detaching and remaining in your ear.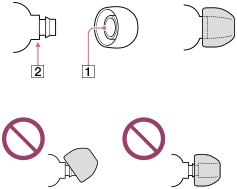
Hint
- If the earbuds become worn, purchase new earbuds.
- If the earbuds get dirty, remove the earbuds from the headphones and hand-wash them with neutral detergent. After washing, drain off the water and reattach them.
[9] How to UseGetting StartedParts and ControlsAttaching the clip
(Only for models supplied with clip)
Attach the clip to the headphones as illustrated below to affix it to your clothes, etc. Using the clip may reduce noise from the cord rubbing against your clothes.
[10] How to UseGetting StartedPower/ChargingTurning the power on
Turn on the power to start your Walkman.
-
Slide the switch () to unlock your Walkman.
-
Press any button.
Hint
- If there is no operation, the screen will be turned off. To turn on the screen, press any button.
- Set the date and time before you start to use your Walkman.
- If there is no operation for an extended period, your Walkman will be turned off automatically. When you turn on the Walkman again, it will take a while before the power comes on.
[11] How to UseGetting StartedPower/ChargingTurning the power off
Turn off the power when not using your Walkman.
-
Press and hold the button ().
[POWER OFF] appears.
Hint
- If there is no operation for an extended period, your Walkman will be turned off automatically.
[12] How to UseGetting StartedPower/ChargingUsing the HOLD switch
You can use the HOLD switch to prevent the buttons from being pressed and operated accidentally.

- Slide the switch () in the direction of the arrow.
The HOLD function is enabled and all operation buttons are disabled.
Hint
- Slide the switch () in the opposite position to release the HOLD function.
-
 flashes at the top of the screen if buttons are pressed while the HOLD function is enabled.
[13] How to UseGetting StartedPower/ChargingCharging the battery
Charge your Walkman by connecting it to a computer.

- Connect your Walkman to a running computer via USB.
The battery status icon shows
 when charging is complete.
- Disconnect your Walkman from the computer when charging is complete.
Hint
- Using the [Battery Care] mode shortens the usage time for that charge but reduces deterioration of the battery.
- For information about the time to fully charge the battery, see “Specifications.”
Note
- When you charge your Walkman when it has not been used for a long period of time or when you use it for the first time, your computer may not recognize it. The Walkman should start operating normally again after charging for about 10 minutes.
[14] How to UseGetting StartedPower/ChargingCharging in the battery care mode
You can reduce deterioration of the battery by using the [Battery Care] mode. The battery duration is approximately 10 % shorter in the [Battery Care] mode, as your Walkman stops charging at about 90 % of the full charge.
- From the Home menu, select [Settings].
- Select [Common Settings] - [Battery Care] - [On].
Note
- In the [Battery Care] mode, the first bar of the battery indicator will disappear somewhat more quickly than normal. This is because your Walkman stops charging at about 90 % of the full charge, and is not a malfunction.
[15] How to UseGetting StartedPower/ChargingExtending the battery life
You can reduce battery consumption by using your Walkman as follows.
For a comparison of battery life based on set effects, default settings and functions, see “Battery life.”
- Turn off the power manually.
- Set a shorter time for [Screen Off Timer].
- Set [Display Lyrics] to a setting other than [On (Screen Always On)].
- Adjust the screen brightness.
- Set all sound quality settings to off.
- Disconnect the Bluetooth audio device when not in use.
- Turn off the NFC function when not in use.
- Turn off the noise canceling function.
[16] How to UseGetting StartedPower/ChargingNotes on charging the battery
- The charging time differs depending on the battery usage conditions.
- If the battery life is reduced to about half of its normal life even if sufficiently charged, it has probably worn out. Please contact your nearest Sony dealer.
- If you charge your Walkman when it has not been used for a long period of time, your computer may not recognize it, or the Walkman may not respond. Charge the Walkman for about 10 minutes, after which it should start operating normally again.
-
When the ambient temperature exceeds the recommended range,
 is displayed on the screen and charging is forcibly stopped.
Charge the battery in an ambient temperature between 5 °C to 35 °C (41 ºF to 95 ºF).
is displayed on the screen and charging is forcibly stopped.
Charge the battery in an ambient temperature between 5 °C to 35 °C (41 ºF to 95 ºF).
- The number of times the battery can be recharged from complete discharge is approximately 500 times. This number may vary depending on the conditions under which you use your Walkman.
- To prevent battery deterioration, charge the battery at least once every six months to one year.
- Charging is not guaranteed with homebuilt or modified computers.
- Operation with a USB port extended with a USB hub is only guaranteed when a self-powered USB hub that carries an authorized logo is used.
- Do not leave your Walkman connected for an extended period of time to a laptop computer that is not connected to an AC power supply. Doing so may discharge the computer’s battery.
- Do not turn on, restart, wake up from sleep mode, or shut down the computer with your Walkman connected to the computer via USB. Doing so may cause the Walkman to malfunction. Disconnect the Walkman from the computer before conducting these operations.
- Your Walkman may become hot while charging. This is not a malfunction.
- The battery indicator scales are not equal. Refer the battery indicator as a guide.
- [Do not disconnect.] is displayed when transferring data between your Walkman and the computer. Do not remove the USB cable when [Do not disconnect.] is displayed. Doing so may result in a loss of the data being transferred and data on the Walkman.
[17] How to UseGetting StartedInitial SettingsSelecting the display language
You can select the language for menus and messages.
-
From the Home menu, select [Settings].
- Select [Language Settings] - desired language setting.
Hint
- Select the display language before transferring content.
[18] How to UseGetting StartedInitial SettingsSetting the date and time
You can set the current date and time.

- From the Home menu, select [Settings].
- Select [Common Settings] - [Clock Settings] - [Set Date-Time].
- Press the button () to select “Year,” “Month,” “Day,” “Hour” or “Minute.”
- Press the button () to select numbers, and press the button ().
Hint
- You can select [12-hour] or [24-hour] for the time display format.
Note
- If you leave your Walkman for a long time without using it and the battery is completely discharged, the date and time you have set will be reset and [--:--] will be displayed.
- The clock may gain or lose up to 60 seconds per month.
[19] How to UseGetting StartedInitial SettingsSetting the date display format
You can set the date format for displaying the current date as [YYYY/MM/DD] (year/month/day), [MM/DD/YYYY] (month/day/year), or [DD/MM/YYYY] (day/month/year).
- From the Home menu, select [Settings].
- Select [Common Settings] - [Clock Settings] - [Date Display Format] - desired format.
[20] How to UseGetting StartedInitial SettingsSetting the time display format
You can select [12-hour] or [24-hour] for the time display style.
- From the Home menu, select [Settings].
- Select [Common Settings] - [Clock Settings] - [Time Display Format] - desired format.
[21] How to UseGetting StartedInitial SettingsFormatting a microSD card
Before using a microSD card (not supplied) in your Walkman for the first time, be sure to format the microSD card using the Walkman by following the steps below. Formatting a microSD card will delete all data stored on the microSD card, so be careful not to delete important data.
-
From the Home menu, select
 [SD Card Settings].
-
Select [Format SD Card] - [Yes].
All data stored on the microSD card is deleted.
Note
- Be sure to format the microSD card using your Walkman when you use it on the Walkman for the first time.
[22] How to UseBasic OperationsmicroSD CardInserting a microSD card
You can store content such as music on microSD cards in addition to [System Storage].
- From the Home menu, select [SD Card Settings].
- Select [Insert/Remove SD Card] - [Yes].
An image of a microSD card is displayed on the screen and your Walkman enters the [Insert/Remove SD Card] status. Playback of content stops.
- Open the microSD card slot cover.
- While in the [Insert/Remove SD Card] status, insert a microSD card into the microSD card slot with the gold contact pins side facing down, until it clicks into place.
- Close the microSD card slot cover.
- Press the button () to exit the [Insert/Remove SD Card] status.
The library is updated and you can access the content stored on the microSD card.
Note
- If the microSD card is not recognized, remove it and then insert it into your Walkman again.
- Do not insert any liquids, metal, flammable substances or any object other than a microSD card into the microSD card slot.
[23] How to UseBasic OperationsmicroSD CardRemoving a microSD card
You can remove a microSD card from your Walkman.
- From the Home menu, select [SD Card Settings].
- Select [Insert/Remove SD Card] - [Yes].
An image of a microSD card is displayed on the screen and your Walkman enters the [Insert/Remove SD Card] status. Playback of content stops.
- Open the microSD card slot cover.
- While in the [Insert/Remove SD Card] status, check that the lamp () is off and push the microSD card into the microSD card slot. When the microSD card pops out, remove it from the slot.
- Close the microSD card slot cover.
- Press the button () to exit the [Insert/Remove SD Card] status.
Your Walkman starts updating the library.
Note
- Data relating to content stored on a microSD card, such as analysis results by [SensMe™ Channels] and bookmarks, is deleted once the microSD card is removed from your Walkman and is not recovered even when the microSD card is reinserted correctly. The data needs to be set every time you insert the microSD card.
[24] How to UseBasic OperationsmicroSD CardSelecting the memory to use
You can select the memory to store content and other data on from [System Storage] or [SD Card].
- From the Home menu, select [SD Card Settings].
- Select the menu items using either of the procedures below.
- To transfer content from a computer: Select [Location for USB Transfer] - [System Storage] or [SD Card].
- To receive content via a Bluetooth connection: Select [Location for Received File] - [System Storage] or [SD Card].
Hint
- [System Storage] is selected at the time of purchase.
- The memory to use can be switched while your Walkman is connected to a computer to transfer content such as music from the computer. Follow the instructions shown on the display of the Walkman to switch the memory.
Note
- Music content with copyright protection cannot be transferred to a microSD card.
- You cannot exchange data between the memory of your Walkman and a microSD card.
[25] How to UseBasic OperationsmicroSD CardFormatting a microSD card
Before using a microSD card (not supplied) in your Walkman for the first time, be sure to format the microSD card using the Walkman by following the steps below. Formatting a microSD card will delete all data stored on the microSD card, so be careful not to delete important data.
-
From the Home menu, select [SD Card Settings].
-
Select [Format SD Card] - [Yes].
All data stored on the microSD card is deleted.
Note
- Be sure to format the microSD card using your Walkman when you use it on the Walkman for the first time.
[26] How to UseBasic OperationsmicroSD CardNotes on microSD cards
- Use a microSD card (not supplied) that has been formatted using your Walkman. Operations of microSD cards formatted with computers or other devices are not guaranteed.
- If you format a microSD card containing data, the data will be deleted. Be careful not to delete important data.
- Do not leave a microSD card within the reach of small children. They might accidentally swallow it.
- Do not insert or remove a microSD card when your Walkman is not in the [Insert/Remove SD Card] status. Doing so may cause a malfunction in your Walkman.
- We do not guarantee the operation of all types of compatible microSD cards with your Walkman.
- Data may be corrupted in the following cases:
- When a microSD card is removed or your Walkman is turned off during a read or write operation.
- When a microSD card is used in locations subject to static electricity or electrical noise.
- We assume no responsibility for any loss or damage of stored data.
- We recommend that you save a backup copy of important data.
- Do not touch the terminal of a microSD card with your hand or a metal object.
- Do not strike, bend or drop a microSD card.
- Do not disassemble or modify a microSD card.
- Do not expose a microSD card to water.
- Do not use a microSD card under the following conditions:
- Locations beyond the required operating conditions, including locations such as the hot interior of a car parked in the sun and/or in the summer, outdoor areas exposed to direct sunlight, or near a heater.
- Humid locations or locations with corrosive substances present.
- When using a microSD card, make sure to check the correct insertion direction into the microSD card slot.
- Do not insert foreign objects into the microSD card slot.
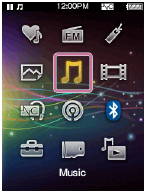
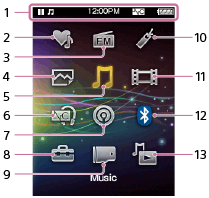
[27] How to UseBasic OperationsHome Menu/Option MenuHome menu
The following list shows the items in the Home menu.
-
Information area
-
 [SensMe™ Channels]
 Play songs using SensMe™ Channels.
-
 [FM Radio]
 Listen to FM radio broadcasts.
-
 [Photos]
View photos transferred to your Walkman.
-
[Music]
Listen to songs transferred to your Walkman.
-
 [Noise Canceling]
Reduce unwanted ambient noise using active noise control technology.
-
 [Podcasts]
 Play podcast episodes transferred to your Walkman.
-
[Settings]
Set up your Walkman and its functions.
-
[SD Card Settings]
Set up functions regarding the microSD card.
-
 [Bookmark]
Classify songs transferred to your Walkman according to personal taste.
-
 [Videos]
Watch videos transferred to your Walkman.
-
 [Bluetooth]
Connect with a Bluetooth device to listen to music or send/receive content.
-
 [Go to song playback screen]
Display the music playback screen.
[28] How to UseBasic OperationsHome Menu/Option MenuHow to use the Home menu
The Home menu is the starting point for all applications such as those for searching for songs and changing settings.
- Press and hold the button () until the Home menu appears.
- Press the button () to select the desired menu (for example [Music]) and then press the button () to confirm.

- Press the button () to select the desired function (for example [Album]) and then press the button () to confirm.
[Hi-Res] will be displayed after you update the system software of your Walkman to version 1.10 or later.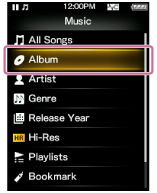
- Press the button () to select the desired content (for example a desired album) and then press the button () to confirm.

- Press the button () to select the desired content (for example a desired song) and then press the button () to confirm.
Hint
- Press the button () to return to the previous screen during an operation.
- Press and hold the button () to return to the Home menu during an operation.
[29] How to UseBasic OperationsHome Menu/Option MenuHow to use the option menu
Display the option menu by pressing the OPTION/PWR OFF button. The option menu items vary depending on the function and allow you to change the settings.

- Press the button () while your Walkman is playing, for example while in the music playback screen.
- Press the button () to select the desired menu (for example [Play Mode]) and then press the button () to confirm.
- Press the button () to select the desired menu (for example [Shuffle]) and then press the button () to confirm.
Hint
- To dismiss the option menu, press the button () while the option menu is displayed.
[30] How to UseBasic OperationsHome Menu/Option MenuList of icons displayed in the information area
The icons vary according to the playback status, setting and screen.
- Information area
Icons in the information area
Playback status
 (play),
  (pause),
  (fast forward),
  (fast rewind),
  (find the beginning of the next song),
  (find the beginning of the previous (or current) song), etc.
HOLD indication
Status of the noise canceling function (The icon lights up when noise canceling headphones are connected with the noise canceling function enabled.)
 ,
, 
Remaining battery power

Alarm timer

Sleep timer

Music functions available
Bluetooth status (When a Bluetooth connection is established, this icon turns blue.)
 ,
, 
[31] How to UseBasic OperationsConnecting Your Walkman to Your ComputerConnecting to a computer
Connect your Walkman to a computer via USB to charge the Walkman or transfer data.

- Connect your Walkman to a running computer via USB.
Hint
-
If your computer fails to establish a USB connection with your Walkman and neither [Connected USB (Storage in use: system storage)] or [Connected USB (Storage in use: SD card)] is not displayed, go to the Home menu and select [Settings] - [Common Settings] - [USB Connection Mode] - [Yes].
- If you are prompted to make a Windows operation, click “Cancel” or “×.”
[32] How to UseBasic OperationsConnecting Your Walkman to Your ComputerNotes on connecting your Walkman to a computer
-
Do not disconnect your Walkman from your computer when transferring data between the Walkman and the computer via USB. Doing so may result in loss of the data being transferred and data on the Walkman.
-
Do not turn on, restart, wake up from sleep mode, or shut down the computer with your Walkman connected to the computer via USB. Doing so may cause the Walkman to malfunction. Disconnect the Walkman from the computer before conducting those operations.
[33] How to UseBasic OperationsInitializing/UpdatingRestarting your Walkman
Try restarting your Walkman if operations become unstable. Before restarting the Walkman, disconnect the Walkman from your computer and check that no content such as music is being played. Otherwise, the data may be damaged.
-
Press the button () with a pen or a paper clip, etc. to restart your Walkman.
Note
- Restarting your Walkman will not delete any data or reset any settings.
[34] How to UseBasic OperationsInitializing/UpdatingResetting to the factory settings
Your Walkman can be reset to the default settings. Resetting the Walkman will not delete content such as music.
-
From the Home menu, select [Settings].
-
Select [Common Settings] - [Reset/Format] - [Reset All Settings] - [Yes].
Note
- If you reset your Walkman to the factory settings, the pairing information of the connected Bluetooth devices will be deleted.
[35] How to UseBasic OperationsInitializing/UpdatingFormatting memory
You can initialize your Walkman by formatting the memory.
-
From the Home menu, select [Settings].
- Select [Common Settings] - [Reset/Format] - [Format System Storage] or [Format SD Card] - [Yes].
-
Follow the on-screen instructions to format the memory.
Note
- Be sure not to initialize (format) the memory of your Walkman using a computer. If you have formatted it with a computer, format it again using the Walkman.
- Formatting the memory erases all content data (songs, etc., including the sample data installed at the factory, and the supplied software installer). Be sure to check the data stored in the memory and export any important data to your computer before formatting.
[36] How to UseBasic OperationsInitializing/UpdatingUpdating the system software of your Walkman
You can add new features to your Walkman by installing the latest system software. For details on the latest system software information and how to install it, visit the customer support website for your area.
- Download the update program to your computer from the website.
- Connect your Walkman to your computer and start the update program.
- Follow the on-screen instructions to update the system software of your Walkman.
Hint
-
To confirm the version information of your Walkman, select [Settings] - [Common Settings] - [Unit Information].
[37] How to UseBasic OperationsInitializing/UpdatingDisplaying your Walkman information
Display information such as model name and system software version.
-
From the Home menu, select [Settings].
-
Select [Common Settings] - [Unit Information].
[38] How to UseBasic OperationsUsing the ContentsChanging the earbuds
To enjoy better sound quality, change the earbuds (supplied) to another size to fit your ears comfortably and snugly.
- While holding the headphone, twist and pull the earbud off.
If the earbud slips and cannot be detached, wrap it in a soft dry cloth.
- Attach the earbuds to the headphone.
Push the earbud onto the headphone to where the end of the earbud’s colored part (
) aligns with . Attach the earbud firmly to the headphones to prevent it from detaching and remaining in your ear.
Hint
- If the earbuds become worn, purchase new earbuds.
- If the earbuds get dirty, remove the earbuds from the headphones and hand-wash them with neutral detergent. After washing, drain off the water and reattach them.
[39] How to UseBasic OperationsUsing the ContentsAttaching the clip
(Only for models supplied with clip)
Attach the clip to the headphones as illustrated below to affix it to your clothes, etc. Using the clip may reduce noise from the cord rubbing against your clothes.
[40] How to UseTransferring/Deleting ContentOperation Flow for Transferring Content to Your WalkmanPreparing content using a Windows computer
Installing the latest version of Media Go, available on the Internet, enables you to import CDs, download and manage content from online music services, and transfer them to the Walkman.
- Install the latest version of Media Go, available on the Internet, on your Windows computer.
- Import content to Media Go.
You can import content on media or your Windows computer to Media Go.
- Transfer the content to your Walkman.
Transfer the imported content from Media Go to your Walkman.
Hint
- You can also transfer content directly from Windows Explorer to your Walkman by drag-and-drop.
[41] How to UseTransferring/Deleting ContentOperation Flow for Transferring Content to Your WalkmanPreparing content using a Mac computer
Installing the latest version of Content Transfer, available on the Internet, enables you to transfer content to the Walkman.
- Install the latest version of Content Transfer, available on the Internet, on your Mac computer.
- Drag-and-drop the content on your Mac computer to Content Transfer.
The content is transferred to your Walkman.
Hint
- You can also transfer content directly from iTunes or the Finder to your Walkman by drag-and-drop.
[42] How to UseTransferring/Deleting ContentInstalling Media GoAbout Media Go
Media Go is software for your Windows computer that allows you to import various content such as music, photos or videos to your Windows computer and manage stored content on your Windows computer. You can transfer content that you have imported from CDs or downloaded from online music services to your Walkman. If you have already managed content such as music with iTunes, etc., you can use Media Go to transfer the content to the Walkman.
[43] How to UseTransferring/Deleting ContentInstalling Media GoInstalling Media Go
Install Media Go to your Windows computer.
- Access the Media Go download website.
- Install Media Go.
Confirm the supported operating systems, and then click
 . Click “Run” to install the software without downloading the installer.
 - Follow the on-screen instructions to install Media Go.
When you click “Finish” after installation, Media Go automatically starts.
Hint
- The installer is automatically downloaded to the Downloads folder with some web browsers.
- When your Windows computer is connected to the Internet, the latest version of Media Go is automatically searched and downloaded. If a message to install the latest version of Media Go appears, click the message and follow the on-screen instructions to install the software.
Note
- Depending on the environment, restarting your computer may be required. Follow the on-screen instructions.
[44] How to UseTransferring/Deleting ContentInstalling Content TransferAbout Content Transfer
Content Transfer is software for your Mac computer that allows you to transfer content such as music managed with iTunes or the Finder to your Walkman easily. You can transfer files, folders, and playlists to the appropriate folder of the Walkman simply by drag-and-drop.
[45] How to UseTransferring/Deleting ContentInstalling Content TransferInstalling Content Transfer
Install Content Transfer to your Mac computer.
- Access the installer for Content Transfer for Mac.
Confirm “System requirements.”
- Open the downloaded file.
The “ContentTransfer.dmg” file saved automatically to the Downloads folder opens.
- Start installation.
Run "ContentTransfer.pkg" and follow the on-screen instructions to install Content Transfer for Mac.
 is displayed in the Dock when the installation is completed. Click to start Content Transfer.
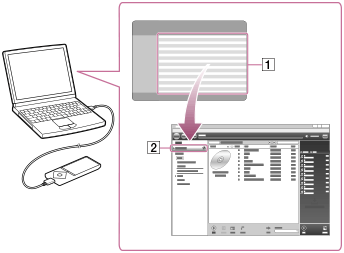
[46] How to UseTransferring/Deleting ContentImporting Content to the SoftwareImporting and transferring content from media using Media Go
Use Media Go to import and transfer content such as music on your Windows computer. This section explains how to import and transfer music from CDs. Your computer must be connected to the Internet to obtain CD information such as song names and artist names automatically.
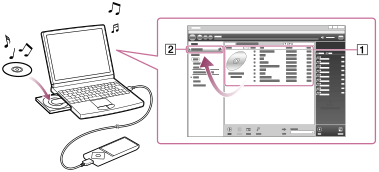
- Connect your Walkman to your Windows computer via USB.
- Start Media Go.
- Insert an audio CD into the CD drive of your Windows computer.
- Confirm the music content on the audio CD.
- Transfer the music content on the audio CD to your Walkman.
Drag-and-drop the cover art of the desired CD () to “WALKMAN (model name)” ().
Hint
- For details about how to use Media Go, refer to the help of Media Go.
- Songs transferred to your Walkman are imported to your computer at the same time.
- Recommended file formats for ripping CDs are FLAC for higher sound quality and AAC (.mp4) and MP3 (.mp3) for normal sound quality.
- Media Go obtains the CD information from a database on the Internet. Information on some CDs may not be available in the database. If information on your CD is missing, you can add it manually after importing the CD. For information about adding and editing CD information, refer to the help of Media Go.
Note
- Imported content is limited to private use only. Use of content for other purposes requires the permission of the copyright holders.
- Commercial DVDs and Blu-ray discs cannot be imported into Media Go.
[47] How to UseTransferring/Deleting ContentImporting Content to the SoftwareImporting content on your Windows computer into Media Go
Import content such as music imported to your Windows computer into Media Go.
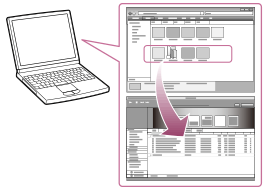
- Start Media Go.
- Select the type of content you want to import from “Library.”
- Drag-and-drop the content into the Content List area.
Hint
- You can also import data organized by programs such as iTunes by selecting “File” - “Add/Remove Media from Library” in Media Go. For details, refer to the help of Media Go.
Note
- Copy-protected videos cannot be imported into Media Go.
- Some video formats cannot be imported or played.
[48] How to UseTransferring/Deleting ContentImporting Content to the SoftwareImporting podcasts into Media Go
Media Go has a wide range of podcast functions on Windows, and you can use Media Go to manage your podcast subscriptions. The podcast directory is also convenient for finding the latest content or content you are interested in.
For details on importing podcasts, refer to the help of Media Go.
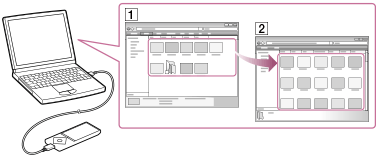
[49] How to UseTransferring/Deleting ContentTransferring Content to Your WalkmanTransferring content using Media Go
Transfer content such as music or playlists managed with Media Go on your computer to your Walkman. Content with copyright protection cannot be transferred.
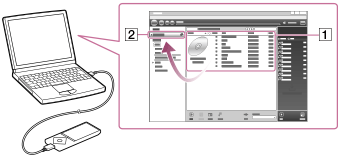
- Connect your Walkman to a running computer via USB, and then start Media Go.
- Select the desired content () on Music Library of Media Go, and drag-and-drop it to your “WALKMAN (model name)” ().
Media Go recognizes the type of data by the filename extension and sends it to the appropriate folder of your Walkman.
Note
- Media Go does not support content that uses Windows Media digital rights management technology (“WM-DRM”).
[50] How to UseTransferring/Deleting ContentTransferring Content to Your WalkmanTransferring iTunes content using Media Go
Media Go supports transfer of data from iTunes to your Walkman. Transfer content such as music managed with iTunes on your computer to the Walkman. Content with copyright protection cannot be transferred.
- Connect your Walkman to a running computer via USB, and then start Media Go.
- Start iTunes.
- Select the desired content from iTunes (), and drag-and-drop it to your “Walkman (model name)” ().
Media Go recognizes the type of data by the filename extension and sends it to the appropriate folder of your Walkman.
Hint
- You can also transfer playlists created with iTunes to your Walkman. Use iTunes to export playlists in m3u file format. Then use Media Go to import the m3u files and transfer the playlists to the Walkman.
[51] How to UseTransferring/Deleting ContentTransferring Content to Your WalkmanTransferring content using Content Transfer
Transfer content such as music or playlists on your Mac computer or managed with iTunes to your Walkman. Content with copyright protection cannot be transferred.

- Connect your Walkman to a running computer via USB, and then start Content Transfer.
- Display the desired content on the Finder or the desired content or playlists on iTunes.
- Drag-and-drop the content or playlists you want to transfer to Content Transfer.
Content is transferred to your Walkman.
[52] How to UseTransferring/Deleting ContentTransferring Content to Your WalkmanTransferring content using Explorer
Content such as music can be directly transferred by drag-and-drop using Windows Explorer.

- Connect your Walkman to a running computer via USB.
- Open “WALKMAN” using the procedure below that corresponds to your computer.
To store content on a microSD card, select the folder that has the same name as the microSD card instead of “WALKMAN.”
-
Windows 7 or earlier:
Select “Start” – “Computer,” and then open “WALKMAN.” -
Windows 8:
Select “Desktop” from the “Start screen” to open “File Explorer.” In the “Computer” list, open “WALKMAN.” - Windows 8.1:
Select “Desktop” to open “File Explorer.” In the “This PC” list, open “WALKMAN.” - Windows 10:
Select “File Explorer” in the “Start” menu, and then select “WALKMAN” from the left screen.
-
- Open the folder to which you want to transfer content.
To transfer music files or folders: “MUSIC” folder
To transfer photo files or folders: “PICTURE” or “DCIM” folder
To transfer video files or folders: “VIDEO” folder
To transfer podcast folders and episode files: “PODCASTS” folder
- Drag-and-drop the desired files or folders () to the applicable folder () in “WALKMAN.”
Note
- Do not change folder name placed in root memory such as “MUSIC.”
- Some songs may not be played back on your Walkman due to copyright protection.
- Depending on the language setting of your Walkman, the information of the transferred content may not be displayed correctly.
[53] How to UseTransferring/Deleting ContentTransferring Content to Your WalkmanTransferring content using the Finder
Content such as music can be directly transferred by drag-and-drop using the Finder.
- Connect your Walkman to a running computer via USB.
- Select “WALKMAN” in the sidebar of the Finder.
To store content on a microSD card, select the folder that has the same name as the microSD card instead of “WALKMAN.”
- Open the folder to which you want to transfer content.
To transfer music files or folders: “MUSIC” folder
To transfer photo files or folders: “PICTURE” or “DCIM” folder
To transfer video files or folders: “VIDEO” folder
To transfer podcast folders and episode files: “PODCASTS” folder
- Drag-and-drop the desired files or folders () to the applicable folder () in “WALKMAN.”
Note
- Do not change folder name placed in root memory such as “MUSIC.”
- Some songs may not be played back on your Walkman due to copyright protection.
- Do not disconnect your Walkman while the data is transferred. Otherwise, data being transferred or stored on the Walkman may be damaged. If the Walkman is disconnected while files are being transferred, unnecessary files may be left in the Walkman. In this case, transfer usable files back to the computer and format the Walkman.
- Depending on the language setting of your Walkman, the information of the transferred content may not be displayed correctly.
[54] How to UseTransferring/Deleting ContentTransferring Content to Your WalkmanNotes for transferring content such as music from your computer
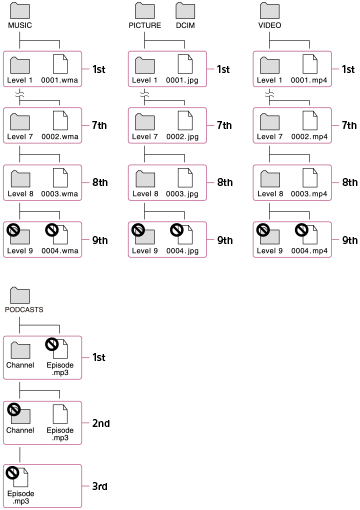
Drag-and-drop content such as music or folders into the correct folder as shown in the following illustrations. Your Walkman can play back content stored in the 1st to 8th level of each folder. The Walkman can play back podcast episodes in the 2nd level of the “PODCASTS” folder.
Note
- Do not rename the following default folders.
- MUSIC
- PICTURE and DCIM
- VIDEO
- PODCASTS
- Some songs may not be played back on your Walkman due to copyright protection.
[55] How to UseTransferring/Deleting ContentDeleting Content from Your WalkmanDeleting content from your Walkman using Media Go
You can use Media Go to delete content stored on your Walkman.
- Connect your Walkman to a running computer via USB.
- Start Media Go.
- Double-click “WALKMAN (model name)” and select the type of content you want to delete.
The content list is displayed.
- Select the content you want to delete.
- Click “Edit” - “Delete.”
A window to confirm the deletion of the item is displayed.
- Click “Yes.”
[56] How to UseTransferring/Deleting ContentDeleting Content from Your WalkmanDeleting content from your Walkman using Content Transfer
You can use Content Transfer to delete content stored on your Walkman.
- Connect your Walkman to a running computer via USB.
- Start Content Transfer.
- Click
 at the right bottom of the screen.
 - Click the icon of the folder (such as “Music”) that contains the content you want to delete.
The content list is displayed.
- Select the content you want to delete.
- Click “Delete.”
The selected content is deleted.
[57] How to UseTransferring/Deleting ContentDeleting Content from Your WalkmanDeleting content received from a Bluetooth connection
You can delete content received from a Bluetooth connection using your Walkman.
- From the Home menu, select [Music].
- Select [Received Songs] - [System Storage] or [SD Card] - desired song.
- On the music playback screen of the received song, display the option menu and select [Delete This Song] - [Yes].
[58] How to UseTransferring/Deleting ContentDeleting Content from Your WalkmanDeleting content from your Walkman using Explorer
Delete content stored on your Walkman using Windows Explorer.
- Connect your Walkman to a running computer via USB.
- Open “WALKMAN” using the procedure below that corresponds to your computer.
To delete content stored on a microSD card, select the folder that has the same name as the microSD card instead of “WALKMAN.”
-
Windows 7 or earlier:
Select “Start” - “Computer,” and open “WALKMAN.” -
Windows 8:
Select “Desktop” from the “Start screen” to open “File Explorer.” In the “Computer” list, open “WALKMAN.” -
Windows 8.1:
Select “Desktop” to open “File Explorer.” In the “This PC” list, open “WALKMAN.” -
Windows 10:
Select “File Explorer” in the “Start” menu, and then select “WALKMAN” from the left screen.
-
- Open the folder containing the file(s) you want to delete.
To delete a music file or a folder that contains music: “MUSIC” folder
To delete a photo file or a folder that contains photos: “PICTURE” or “DCIM” folder
To delete a video file or a folder that contains videos: “VIDEO” folder
To delete a podcast episode file or a podcast folder: “PODCASTS” folder
- Select the content you want to delete.
- Delete the content.
Note
- Do not change folder name placed in root memory such as “MUSIC.”
[59] How to UseTransferring/Deleting ContentDeleting Content from Your WalkmanDeleting content from your Walkman using the Finder
Delete content stored on your Walkman using the Mac Finder.
- Connect your Walkman to a running computer via USB.
- Open a folder under “WALKMAN” from the sidebar of the Finder.
To delete content stored on a microSD card, select the folder that has the same name as the microSD card instead of “WALKMAN.”
- Open the folder containing the file(s) you want to delete.
To delete a music file or a folder that contains music: “MUSIC” folder
To delete a photo file or a folder that contains photos: “PICTURE” or “DCIM” folder
To delete a video file or a folder that contains videos: “VIDEO” folder
To delete a podcast episode file or a podcast folder: “PODCASTS” folder
- Select the content you want to delete.
- Delete the content.
Note
- Do not change folder name placed in root memory such as “MUSIC.”
[60] How to UseTransferring/Deleting ContentOperating with Media GoPlaying live albums with no gaps in between songs
Songs that are recorded continuously on a live or concert album can be played with no gaps in between the songs on your Walkman. For gapless playback, import (rip) all songs on the album in the FLAC, AAC, or MP3 format at once into the latest version of Media Go, and then transfer them to the Walkman.
[61] How to UseTransferring/Deleting ContentOperating with Media GoDeleting content imported to Media Go
You can delete content imported to Media Go.
- Start Media Go.
- Select the type of content you want to delete from “Library.”
The content list is displayed.
- Select the content you want to delete.
- Click “Edit” - “Delete.”
A “Confirm Delete” window is displayed.
- Select a method to delete the content.
- Click “OK.”
[62] How to UseTransferring/Deleting ContentOperating with Media GoInputting the lyrics information using Media Go
Use the latest version of Media Go to input lyrics information to display lyrics when playing songs on your Walkman.
- Start Media Go.
- Select the song you want to add the lyrics information to and right-click on the song to select “Properties.”
- Input the lyrics information.
For details about how to input the lyrics, refer to the help of Media Go.
Hint
- For details about how to use Media Go, refer to the help of Media Go.
Note
- If lyrics information input using Media Go is not displayed on your Walkman, delete the song from the Walkman and transfer it again.
[63] How to UseMusicPlaying MusicPreparing music
You need to transfer music from your computer to your Walkman in order to listen to music on the Walkman. Use Media Go to transfer songs from a CD or your computer to the Walkman. You can also transfer them by drag-and-drop from Windows Explorer. For a Mac computer, you can use Content Transfer to transfer the songs from iTunes, etc. You can also transfer them by drag-and-drop from the Mac Finder.
[64] How to UseMusicPlaying MusicPlaying music
Play music transferred to your Walkman.

-
From the Home menu, select [Music].
-
Select the desired search method and items until a song list appears, and then select the desired song.
Playback starts and the music playback screen is displayed. To pause playback, press the button ().
Note
- If there is no operation for an extended period while paused, your Walkman will be turned off automatically. In this case, turn on the power before performing step 1 above.
- Depending on the way of transferring songs to your Walkman, songs might be played in different order from the song order on your computer. When you specify a song order other than that on your Walkman, edit the playlists with a function of Media Go or iTunes, and then transfer them to your Walkman.
[65] How to UseMusicPlaying MusicBrowsing the music list screen
The music list screen displays lists such as the song list and album list.


- Index
The index displays a list of song or album names, along with each letter of the alphabet. Navigate the index by pressing the button (
) to move to the next or previous letters.
Hint
- The display format of the album list can be changed so that only the cover art is displayed.
[66] How to UseMusicPlaying MusicVolume operation (Only for countries/areas complying with European and Korean Directives)
(Only for models supplied with headphones)
An alarm (beep) and a warning [Check the volume level] are meant to protect your ears when you turn the volume up to a level that is harmful for your ears for the first time. You can cancel the alarm and warning by pressing any button.
Note
- You can turn up the volume after canceling the alarm and warning.
- After the initial warning, the alarm and warning repeat every 20 cumulative hours that the volume is set to a level that is harmful for your ears. When this happens, the volume is turned down automatically.
- If the volume is set to a level that is harmful for your ears and you turn off your Walkman, the volume is turned down to a level that is safe for your ears automatically.
- The alarm (beep) does not sound when connected to a Bluetooth audio device.
[67] How to UseMusicPlaying MusicBrowsing the music playback screen
The following items are displayed on the music playback screen.
-
Information area
The playback status, remaining battery power, etc. are displayed.
- Current song number/Total number of songs to be played
- Elapsed current song time/Total current song time
- Time line bar
- Music setting icons
-
 [Repeat] from the [Play Mode] settings
  [Shuffle] from the [Play Mode] settings
- [Shuffle & Repeat] from the [Play Mode] settings
 [Repeat 1 Song] from the [Play Mode] settings
 [Selected Range] from the [Playback Range] settings
 Lyrics
-
 High-Resolution Audio icon
- Song title
- Artist name
- Album title
Note
- The elapsed time and the time line bar indications may be unstable and inaccurate when playing variable bit rate (VBR) songs.
[68] How to UseMusicPlaying MusicMusic playback operations
The following operations are available on the music playback screen.
To play/pause
Press the button ().
To fast forward or rewind
Press and hold the button ().
To go to the beginning of the next song or go to the beginning of the previous (or current) song
Press the button ().
To browse cover art to select an album
Press the button ().
To add a song to the bookmark list
Press and hold the button ().
Songs can be added to the bookmark list individually. Albums cannot be added.
To return to the list screen
Press the button ( ).
).
Hint
- If there is no operation for an extended period while paused, your Walkman will be turned off automatically.
[69] How to UseMusicPlaying MusicSearching for songs
You can quickly search a song by artist, genre, etc.
- On the music playback screen or the list screen, display the option menu and select
 (Search) - desired search method - desired song.
Hint
- “The” at the beginning of artist names is ignored when arranging the [Artist] list.
- The [All Songs], [Album], [Artist] and [Genre] lists are arranged in alphanumeric order. The [Release Year] list is arranged in reverse chronological order. In the [Folder] list, folders are displayed in name order first, then files are displayed in name order. Upper and lower case letters are not distinguished.
-
You can search for songs from [All Songs], [Album], [Artist], [Genre], [Release Year], [Playlists], [Bookmark], [Folder] or [Received Songs].
[Hi-Res] will be added to the search methods when you update the system software of your Walkman to version 1.10 or later. - [Playlists] are created by using software like Media Go. For information on how to create a playlist, refer to the Help of your software.
- [Folder] does not include the songs received using the Bluetooth function.
- The [Received Songs] list contains songs received using the Bluetooth function and the pre-installed sample data.
- To search for a song stored on [System Storage] or [SD Card], select the memory to search in [Folder] or [Received Songs].
[70] How to UseMusicPlaying MusicPlaying playlist songs
You can transfer and play playlists created by using software like Media Go. For information on how to create a playlist, refer to the Help of your software.
-
From the Home menu, select [Music].
- Select [Playlists] - desired playlist - desired song.
Note
- Cover art images registered to a playlist are not displayed on your Walkman.
[71] How to UseMusicPlaying MusicChoosing an album from the cover art images
If you register cover art images to albums using Media Go beforehand, you can choose an album by selecting a cover art image (Album scroll). For details on how to register cover art images to albums, refer to the Help of Media Go.

-
Press the button () in the music playback screen to browse cover art images.
-
Choose the cover art image registered to your desired album, then press the button ().
Hint
- To return to the music playback screen during this operation, press the button ().
Note
- Cover art appears only when a cover art image is registered to the album or song.
- Cover art in some formats may not be displayed on your Walkman.
[72] How to UseMusicDeleting SongsDeleting songs
To delete songs from your Walkman, use the software on your computer that you used to transfer the songs. If you used Windows Explorer to transfer the songs, use Windows Explorer to delete them. If you used the Finder on a Mac to transfer the songs, use the Finder on a Mac to delete the songs. You can delete songs that are received via a Bluetooth connection using your Walkman.
Hint
- Sample music is pre-installed on your Walkman. If you want to delete it, use the software.
Note
- Do not delete or rename the “MUSIC” folder. Otherwise, songs may not be recognized by your Walkman.
[73] How to UseMusicUsing BookmarksWhat is the bookmark function?
With the bookmark function, you can classify songs according to personal taste, and listen to your favorite songs as a collective group.
[74] How to UseMusicUsing BookmarksAdding a song to a bookmark list
You can add songs to bookmark lists.
- In the music playback screen or list screen, press and hold the button ().
Hint
- You can add songs to bookmark lists other than the default bookmark list by using the option menu on the music playback screen or list screen. Display the option menu and select [Add to Bookmark] - desired bookmark list.
- Up to 100 songs can be added to a bookmark list.
Note
- Bookmark list information cannot be imported to Media Go.
- If you add songs stored on a microSD card to bookmark lists, the bookmark lists are cleared when you remove the microSD card from your Walkman.
[75] How to UseMusicUsing BookmarksChanging the default bookmark list
You can change the bookmark list that is set as the default bookmark list.
- From the Home menu, select [Settings].
- Select [Music Settings] - [Default Bookmark List] - desired default bookmark list.
[76] How to UseMusicUsing BookmarksChanging the order of bookmarked songs
The order of songs in a bookmark list can be changed.

- From the Home menu, select [Music].
- Select [Bookmark] - desired bookmark list.
- On the bookmark list screen, display the option menu and select [Edit Song Order].
- Repeat the procedure below to sort songs.
- Press the button () to select a song, then press the button ().
A double-headed arrow appears to the left of the selected song.
- Press the button () to move the song to the desired location.
- Press the button () to fix the location of the song.
- Press the button (
- After sorting, press the button () to return to the bookmark list screen.
[77] How to UseMusicUsing BookmarksRemoving songs from a bookmark list
You can remove one or all of the songs from a bookmark list.
- From the Home menu, select [Music].
- Select [Bookmark] - desired bookmark list - desired song.
- On the music playback screen, display the option menu and select [Remove from Bookmark].
Hint
- To remove all songs from a bookmark list, display the option menu after selecting [Bookmark], and select [Clear Bookmark List].
[78] How to UseMusicDisplaying LyricsWhat is the Display Lyrics function?
The Display Lyrics function enables you to display the lyrics of a song, for example by transferring lyrics information for that song to your Walkman.
[79] How to UseMusicDisplaying LyricsAdding lyrics to songs
Your Walkman has a Display Lyrics function that enables you to display the lyrics of a song corresponding to the progression of the song. To display the lyrics, you need to prepare the lyrics information and transfer it to the Walkman. Prepare the lyrics information in the following ways:
- Use the latest version of Media Go to input the lyrics information.
- Create a text file (an LRC file) that contains the lyrics information.
[80] How to UseMusicDisplaying LyricsMaking lyrics information in a text file
You can also make lyrics information in a text file.
- Open the “Notepad” by following one of the procedures below depending on the operating system of your computer.
- Windows 7 or earlier:
Click “Start” - “All programs” - “Accessories” - “Notepad.” - Windows 8.1 or Windows 8:
Right-click on “Start screen” - “Accessories” - “Notepad.” - Windows 10:
Select “All apps” - “Windows Accessories” in the “Start” menu, and then open “Notepad.”
- Windows 7 or earlier:
- Type the lyrics text into “Notepad.”
- Play the audio file to check the time (minutes, seconds and hundredths of a second) for displaying each text line, then enter the time information.
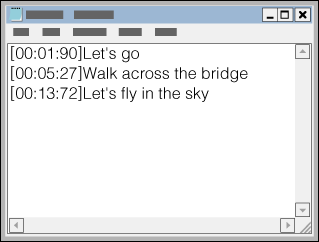
- You can enter the time information to the left of the text line in the following format.
minutes:seconds:hundredths of a second
- About 40 alphabetical characters (single-byte characters) are recommended for displaying on the screen of your Walkman.
- Time information must be entered in chronological order.
- You can separate seconds and hundredths of a second by a period instead of a colon.

- You can omit hundredths of a second.

- You can enter the time information to the left of the text line in the following format.
- After finishing lyrics text input, save it as a file.
- Select “File.”
- Select “Save As...” to open the “Save As” screen.
- Select “All Files” in the “Save as type:” list at the bottom of the screen.
- Select “UTF-8” in the “Encode:” list.
- Enter the file name into the “File name:” text box.
- Click “Save” to save the LRC file.
- The file name must be the same as the audio file, with the extension “.lrc.”
- The maximum size for an LRC file is 512 KB.
- If a text line cannot fit in the screen, it will be wrapped (up to 3 lines).
- Characters beyond 3 lines will not be displayed.
- CR, CRLF and LF line breaks are all recognized properly.
- Blank text lines are skipped.
- Connect your Walkman to your computer via USB.
- Open “WALKMAN” using the procedure below that corresponds to your computer.
To store the file on a microSD card, select the folder that has the same name as the microSD card instead of “WALKMAN.”
-
Windows 7 or earlier:
Select “Start” – “Computer,” and open “WALKMAN.” -
Windows 8:
Select “Desktop” from the “Start screen” to open “File Explorer.” In the “Computer” list, open “WALKMAN.” -
Windows 8.1:
Select “Desktop” to open “File Explorer.” In the “This PC” list, open “WALKMAN.” -
Windows 10:
Select “File Explorer” in the “Start” menu, and then select “WALKMAN” from the left screen.
-
- Create a new folder in the “MUSIC” folder under “WALKMAN,” then drag-and-drop both the audio file and the LRC file into the new folder to transfer them.
Hint
- With a Mac computer, you can create lyrics information using “TextEdit,” etc. Enter the lyrics or time information in the “Plain text” setting by following the same procedure as above. To save it, the file name must be the same as the audio file, with the extension “.lrc.” When you transfer the text file to your Walkman, create a new folder in the “MUSIC” folder under “WALKMAN,” then transfer the two files into the new folder.
Copyright notice
When creating LRC files using copyrighted materials authored by others, created LRC files are limited to private use only. Use of LRC files beyond this limitation requires the permission of the copyright holders.
[81] How to UseMusicDisplaying LyricsDisplaying lyrics
When you play songs to which lyrics have been previously added, the lyrics are displayed on your Walkman as the song progresses.
- From the Home menu, select [Settings].
- Select [Music Settings] - [Display Lyrics] - desired setting.
Hint
- If [On (Screen Always On)] is set, the music playback screen does not turn off regardless of the Screen Off Timer settings.
Note
- The timing at which the lyrics are displayed may not exactly match the progress of the song.
- You cannot display lyrics on the podcast playback screen.
- You cannot display lyrics information from still images.
[82] How to UseMusicSensMe™ ChannelsWhat is SensMe™ Channels?
SensMe™ Channels is a function that automatically groups songs by theme. You can play songs according to your mood, current activity, the time of day, etc. by selecting a channel.
To use SensMe™ Channels, songs must first be analyzed either on your computer before transferring them to your Walkman or on the Walkman.
Hint
- SensMe™ Channels is achieved by the following technologies.
- 12 TONE ANALYSIS on your Walkman by Low-Complexity Music Information Retrieval technology developed by Sony
- Music file transfer from software and devices that support the 12 TONE ANALYSIS technology developed by Sony
[83] How to UseMusicSensMe™ ChannelsPlaying songs using SensMe™ Channels
Play songs to fit your mood, current activity, the time of day, etc., by selecting a particular channel.

- From the Home menu, select [SensMe™ Channels].
- Press the button () to select the desired channel.
Hint
- Depending on the analysis, a song may be selected by several channels or not selected at all. However, all songs can be played using the [Shuffle All] channel.
- The result of the analysis may vary every time you perform [Updating Channels].
- To listen to [Morning], [Daytime], [Evening], [Night] or [Midnight] according to the timetable, [Set Date-Time] needs to be set. If [Set Date-Time] is not set, [Morning] will be selected.
- If you use the [SensMe™ Channels] function or change channels, the songs are played from the most melodic and rhythmical section.
If you analyze songs on your Walkman, the songs are played back from approximately 45 seconds into the songs, as the songs do not have information about the most melodic and rhythmical section. Also, if a song is shorter than 90 seconds, playback starts roughly from the middle of the song. - Songs are played in random order. Each time you select a channel, the order of playback will vary.
- If there are no songs for [Morning], [Daytime], [Evening], [Night] or [Midnight], all songs will be played in random order in those channels.
Note
- Depending on the file format, certain songs cannot be analyzed by 12 TONE ANALYSIS of Media Go. For these files, perform [Updating Channels] from the option menu.
- You cannot play podcast episodes using [SensMe™ Channels].
- Channels that do not contain any songs are not displayed in the list.
- When playing a time-based channel, the channel will not shift to the next time-based channel even if the set time has passed. To listen to the next time-based channel, change to another channel and go back.
[84] How to UseMusicSensMe™ ChannelsAnalyzing songs on your Walkman
If you have transferred songs that have not been analyzed yet and want to listen to them using SensMe™ Channels, analyze them on your Walkman.

- From the Home menu, select [SensMe™ Channels].
- Display the option menu and select [Updating Channels].
Your Walkman starts analyzing songs. When analyzing is finished, the [SensMe™ Channels] screen is displayed.
Hint
- To stop analyzing, press the button (). All songs analyzed up to the point where you stopped analyzing will be playable by [SensMe™ Channels].
Note
- If the alarm goes off during the analysis, the analysis will be stopped.
- Your Walkman cannot analyze songs during a Bluetooth connection.
- Your Walkman analyzes all songs that have not been analyzed yet at once. You cannot analyze songs individually.
- The results of the analysis may vary between your Walkman, Media Go, and other devices.
- When there are many songs to be analyzed, it may take time to complete analysis.
[85] How to UseMusicMusic SettingsShuffle playback
Play songs in random order. The playback range of songs can be changed.
-
On the music playback screen, display the option menu and select [Play Mode] - [Shuffle] or [Shuffle & Repeat].
Note
-
When [Play Mode] is selected and [Shuffle] or [Shuffle & Repeat] with [Playback Range] is set to [All Range], your Walkman will not shuffle all of the songs at once. Instead, the Walkman will select an artist, album, etc. and play all corresponding songs in random order before moving on to another artist or album. To shuffle all songs at once, start from [All Songs]. If you start from a bookmark list, only the songs on the selected bookmark list will be played.
[86] How to UseMusicMusic SettingsRepeat playback
Play songs repeatedly. The playback range of songs can be changed.
-
On the music playback screen, display the option menu and select [Play Mode] - desired setting.
Note
-
When [Play Mode] is selected and [Shuffle] or [Shuffle & Repeat] with [Playback Range] is set to [All Range], your Walkman will not shuffle all of the songs at once. Instead, the Walkman will select an artist, album, etc. and play all corresponding songs in random order before moving on to another artist or album. To shuffle all songs at once, start from [All Songs]. If you start from a bookmark list, only the songs on the selected bookmark list will be played.
[87] How to UseMusicMusic SettingsSetting the playback range
Set the playback range.
- On the music playback screen, display the option menu and select [Playback Range] - desired setting.
[All Range]
Plays back all songs in the built-in memory and microSD card by the selected search method ([All Songs], [Album], [Artist], etc.).
Select this to play all albums in the music menu in order.
[Selected Range]
Plays songs in the folder (artist, album, etc.) containing the currently playing song.
Note
- If you start playback from a bookmark list, only the songs in the bookmark list are played. Songs in other bookmark lists are not played even if [Playback Range] is set to [All Range].
[88] How to UseMusicMusic SettingsUpscaling compressed audio to quality almost that of High-Resolution Audio
The [DSEE HX] function upscales the audio file to quality almost that of High-Resolution Audio quality and reproduces the clear high-range sound that is often lost.
To enjoy High-Resolution Audio quality, use the headphones that are compatible with High-Resolution Audio. MDR-NW750N/MDR-NW750NE are compatible with High-Resolution Audio. You also need to select the High-Resolution Audio headphones that you use in [Select Headphones].
- From the Home menu, select [Settings].
- Select [Music Settings] - [DSEE HX] - [On].
Note
- The [DSEE HX] function cannot be enabled while listening to sound on the other Bluetooth audio device.
[89] How to UseMusicMusic SettingsEnjoying various sound quality
Enjoy music by either setting the optimum sound quality with a single operation or setting the sound quality to your own tastes.
To set the sound quality easily with a single operation
Turn on the [ClearAudio+] function.
To set the sound quality yourself
Change the settings of various functions.
Hint
- The following settings are not applied if [ClearAudio+] is turned on.
- [Equalizer]
- [VPT (Surround)]
- [Clear Stereo]
[90] How to UseMusicMusic SettingsSetting the sound quality easily with a single operation
Turn on the ClearAudio+™ function to enjoy audio with digital signal processing technology effects.
- From the Home menu, select [Settings].
- Select [Music Settings] - [ClearAudio+] - [On].
Note
- [Sound Settings] is not applied if [ClearAudio+] is turned on. [Sound Settings] is resumed when [ClearAudio+] is turned off.
- The [Clear Phase™ ] setting cannot be changed in [Select Headphones] when the [ClearAudio+] function is set to [On]. Set [ClearAudio+] to [Off] before changing the setting.
[91] How to UseMusicMusic SettingsCustomizing sound quality settings
You can use various functions to set the desired sound quality.
-
From the Home menu, select [Settings].
- Select [Music Settings] - [Sound Settings] - desired function - desired setting.
Equalizer function
You can set the sound quality according to the music genre. You can also preset your equalizer settings as a custom setting.
VPT (Surround) function
You can set sound effects and enrich the sound reproduction quality of the audio playback. VPT, which stands for Virtualphones Technology, is a proprietary sound processing technology developed by Sony.
[Clear Stereo] function
This function uses digital processing to clearly distinguish between sound from the left and right of the headphones, emphasizing the stereo effect during playback.
Hint
- You can also set some sound quality items from the option menu in the music playback screen.
Note
-
The following settings cannot be changed while the [ClearAudio+] function is set to on.
- [Equalizer]
- [VPT (Surround)]
- [Clear Stereo]
- The [Clear Stereo] function is optimized for use with the compatible headphones. The compatible headphones are MDR-NW750N/MDR-NW750NE. The effect of the [Clear Stereo] function may not work well with headphones other than the compatible ones. Set [Clear Stereo] to [Off] when using headphones that are not compatible.
- The [Clear Stereo] function does not work while listening to music using headphones connected via the Bluetooth function.
[92] How to UseMusicMusic SettingsPresetting your equalizer settings
You can preset the values of CLEAR BASS and the 5 band equalizer as custom settings. Increasing the CLEAR BASS setting value allows your Walkman to reproduce dynamic deep bass without distortion, even at a high volume.

- In the music playback screen, display the option menu and select [Sound Settings] - [Equalizer] - [Custom 1] or [Custom 2].
-
Press the button () to select CLEAR BASS or the frequency range setting, and press the button () to adjust the setting level.
-
Press the button () to confirm.
Note
- To change the equalizer setting, set the [ClearAudio+] function to off.
[93] How to UseMusicMusic SettingsModerating the differences in volume level between songs
You can moderate the volume between songs to minimize the differences in volume level (Dynamic Normalizer). You can use this setting to prevent the volume of certain songs from being too high or too low when shuffling songs from multiple albums with different recording levels.
- From the Home menu, select [Settings].
- Select [Music Settings] - [Dynamic Normalizer] - desired setting.
[94] How to UseMusicMusic SettingsOptimizing the sound characteristics
The [Clear Phase™ ] function optimizes the sound characteristics for the headphones you use. The compatible headphones for this product are MDR-NW750N/MDR-NW750NE.
- From the Home menu, select [Settings].
- Select [Select Headphones] - [MDR-NW750N/NE] - [On].
Note
- The [Clear Phase™ ] function does not work with headphone connected via the Bluetooth function.
- [Select Headphones] - [Clear Phase™ ] cannot be set when the [ClearAudio+] function is turned on. Turn the [ClearAudio+] function off before setting the [Clear Phase™ ] function.
- The [Clear Phase™ ] function does not have any effect on the sound of videos, video podcasts or FM radio.
[95] How to UseMusicMusic SettingsSelecting the album display format
Select the album list display format. The cover art registered in Media Go is displayed in the album list. For details on registering cover art, refer to the help of Media Go.
- From the Home menu, select [Settings].
- Select [Music Settings] - [Album Display Format] - desired display format.
[96] How to UsePhotos/Videos/PodcastsViewing PhotosPreparing photos
You need to transfer photo content onto your Walkman from your computer in order to view photos on the Walkman. After importing the photo content you want to display onto your computer, use Media Go to transfer the photos to the Walkman. For a Mac computer, you can use Content Transfer to transfer them. You can also transfer them by drag-and-drop from Windows Explorer or the Mac Finder.
[97] How to UsePhotos/Videos/PodcastsViewing PhotosViewing photos
You can view photos that you have transferred onto your Walkman. The Walkman uses landscape display when viewing photos.
- From the Home menu, select [Photos].
- Select the desired search method, then browse the list until the photo you want to select appears.
- Select the desired photo.
Hint
- Playback of songs continues while searching for photos in the photo screen, photo folder or photo list screen.
Note
- If a photo is too large or the data is corrupted,
 is displayed and the photo cannot be displayed.
[98] How to UsePhotos/Videos/PodcastsViewing PhotosBrowsing the photo screen
The following information is shown on the photo screen.
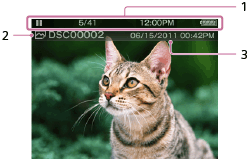
- Information area
The current photo number, total number of photos, current time, remaining battery power, etc. are displayed.
- Photo file name
- Shooting date and time
Hint
- These indications disappear after a while. They will appear again with button operations.
[99] How to UsePhotos/Videos/PodcastsViewing PhotosOperations on the photo screen
You can use the following operations in the photo screen. Your Walkman uses landscape display when viewing photos.
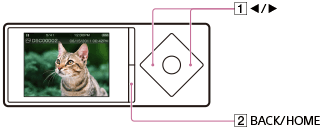
Display the previous or next photo
Press the button ().
Scroll through the previous or next photos
Press and hold the button ().
Return to the list screen
Press the button ().
[100] How to UsePhotos/Videos/PodcastsViewing PhotosDeleting photos
You can delete photos that have been transferred onto your Walkman.

- From the Home menu, select [Photos].
- Select the folder that contains the photo you want to delete.
- In the photo list screen, display the option menu and select [Select a Photo to Delete].
The delete photo screen is displayed.
- Repeat the following steps to delete photos.
- Press the button () to select the photo you want to delete and press the button () to confirm.
- Select [Yes].
- Press the button (
- Press the button () when you have finished deleting.
Hint
- You can also delete photos while viewing them. While the photo you want to delete is displayed, display the option menu and select [Delete Photo] - [Yes].
[101] How to UsePhotos/Videos/PodcastsWatching VideosPreparing videos
You need to transfer video content onto your Walkman from your computer in order to watch videos on the Walkman. After importing the video content you want to play onto your computer, use Media Go to transfer the videos to the Walkman. For a Mac computer, you can use Content Transfer to transfer them. You can also transfer them by drag-and-drop from Windows Explorer or the Mac Finder.
- You can add thumbnails on your computer for video content to be imported by drag-and-drop. Create them according to the following rules.
- Files must be JPEG format
- The file size must be 160 (horizontal) x 120 (vertical) dots
- The file name must be “(same name as the video file).jpg”
- Place in the same folder as the video file
- You can change the order in which videos are displayed in the list according to criteria such as the date the videos were imported or the titles of the videos.
[102] How to UsePhotos/Videos/PodcastsWatching VideosWatching videos
You can watch videos that you have transferred onto your Walkman. The maximum resolution of video content playable on the Walkman is 720×480 dots.
- From the Home menu, select [Videos].
- Select the desired search method, then browse the list until the video you want to select appears.
- Select the video.
Hint
- If you want to play only the sound of video, set the [On-Hold Display] option to [No] and then enable the HOLD mode. The screen turns off and you can listen only to the sound.
Note
- The sound quality settings are not applied while playing a video.
[103] How to UsePhotos/Videos/PodcastsWatching VideosBrowsing the video playback screen
The following items are displayed on the video playback screen.
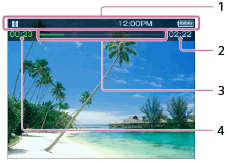
-
Information area
The playback status, current time, remaining battery power, etc. are displayed.
- Total time
- Progress bar
- Elapsed time
Hint
- These indications disappear after a while. They will appear again with button operations.
[104] How to UsePhotos/Videos/PodcastsWatching VideosOperations on the video playback screen
You can use the following operations in the video playback screen. Your Walkman uses landscape display when playing videos.
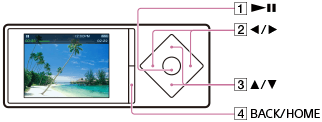
Play/pause
Press the button ().
Fast forward/fast rewind
Press the button () during playback and press the button () at the desired point. You can also press and hold the button () during playback or while paused and release it at the desired point.
Press the button () during fast forward or fast rewind to change between three fast forward and fast rewind speeds (10x, 30x and 100x).
Go back or forward slightly
Press the button () while paused.
Go to the previous or next scene or chapter
Press the button ().
If no chapters are set for the video, the scene jumps back or forward in five minute increments.
Return to the list screen
Press the button ().
Hint
- Your Walkman automatically enters playback standby if there is no operation for a fixed period of time while paused.
- The speed of fast forward/fast rewind while paused varies according to the length of the video.
[105] How to UsePhotos/Videos/PodcastsWatching VideosSearching for videos
You can search for a desired video quickly to play back.
- On the video playback screen or the list screen, display the option menu and select (Search) - desired search method - desired video.
Hint
- The [Received Videos] list has only videos received using the Bluetooth function.
[106] How to UsePhotos/Videos/PodcastsWatching VideosBrowsing scenes from thumbnails
You can display thumbnails as a guide for selecting a scene or chapter to play.
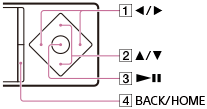
- On the video playback screen, display the option menu and select
 [Scene Scroll].
 - Press the button () to scroll through images.
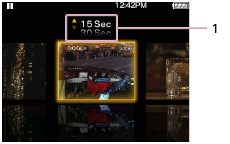
- Scene interval setting
You can set the interval of scenes displayed as thumbnails. Press the button () to select the desired interval.
- Scene interval setting
- Select the desired image, then press the button () to play.
Hint
- For videos with chapters, you can set your Walkman so that a thumbnail of each chapter is displayed.
- To go back to the original video playback screen during operations, press the button ().
[107] How to UsePhotos/Videos/PodcastsWatching VideosDeleting videos
You can delete videos that have been transferred onto your Walkman.
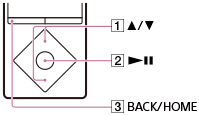
- From the Home menu, select [Videos].
- Select the folder that contains the video you want to delete.
- In the video list screen, display the option menu and select [Select a Video to Delete].
The delete video screen is displayed.
- Repeat the following steps to delete videos.
- Press the button () to select the video you want to delete and press the button () to confirm.
- Select [Yes].
- Press the button (
- Press the button () when you have finished deleting.
Hint
- You can also delete videos while viewing them. While the video you want to delete is displayed, display the option menu and select [Delete Video] - [Yes].
[108] How to UsePhotos/Videos/PodcastsPlaying PodcastsWhat is a podcast?
A podcast is a group of audio or video files that is published on the Internet. The files, called episodes, can be downloaded to a computer for playback automatically by using RSS. Many news sites, corporations, and individuals publish podcasts by using RSS. You can subscribe to a podcast by using your computer. When the latest episodes are added to the podcast, you can download them to your computer and transfer them to your Walkman using Media Go. For a Mac computer, you can use Content Transfer to transfer them. You can also transfer them by drag-and-drop from Windows Explorer or the Mac Finder.
[109] How to UsePhotos/Videos/PodcastsPlaying PodcastsPreparing podcasts
You need to transfer podcast episodes onto your Walkman from your computer in order to enjoy them on the Walkman. After importing the podcast episodes you want to play onto your computer, use Media Go to transfer them to the Walkman. For a Mac computer, you can use Content Transfer to transfer them. You can also transfer them by drag-and-drop from Windows Explorer or the Mac Finder.
[110] How to UsePhotos/Videos/PodcastsPlaying PodcastsPlaying podcasts
You can play an episode transferred to your Walkman.
- From the Home menu, select [Podcasts].
- Select the memory ([System Storage] or [SD Card]) that contains the episode you want to play.
- Browse the list until the episode you want to select appears.
- Select the desired episode.
Note
- You cannot play podcast episodes continuously.
- The sound quality settings are not applied while playing a video podcast.
[111] How to UsePhotos/Videos/PodcastsPlaying PodcastsBrowsing the podcast playback screen
There are 2 podcast playback screens: an audio podcast playback screen and a video podcast playback screen.
Audio podcast playback screen
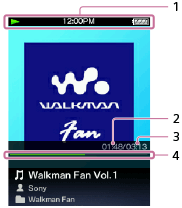
-
Information area
The playback status, current time, remaining battery power, etc. are displayed.
- Elapsed time
- Total time
- Progress bar
Video podcast playback screen
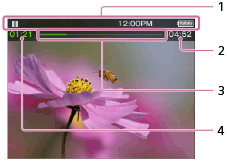
-
Information area
The playback status, current time, remaining battery power, etc. are displayed.
- Total time
- Progress bar
- Elapsed time
Hint
- These indications disappear after a while. They will appear again with button operations.
[112] How to UsePhotos/Videos/PodcastsPlaying PodcastsOperations for audio podcast playback
You can use the following operations in the audio podcast screen.
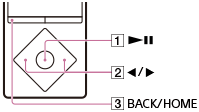
Play/pause
Press the button ().
Fast forward/fast rewind
Press and hold the button ().
Go to the start of the episode being played
Press the button ().
Pressing either the button () returns to the start of the episode being played.
Go to the next episode
Press the button () to display the episode list and select the episode you want to play.
Return to the list screen
Press the button ().
Hint
- Your Walkman automatically enters playback standby if there is no operation for a fixed period of time while paused.
[113] How to UsePhotos/Videos/PodcastsPlaying PodcastsOperations for video podcast playback
You can use the following operations in the video podcast screen. Your Walkman uses landscape display.

Play/pause
Press the button ().
Fast forward/fast rewind
Press the button () during playback and press the button () at the desired point. You can also press and hold the button () during playback or while paused and release it at the desired point.
Press the button () during fast forward or fast rewind to change between three fast forward and fast rewind speeds (10x, 30x and 100x).
If you fast-forward to the end of the episode, playback pauses. If you fast-rewind to the beginning of the episode during playback, playback restarts automatically. If you fast-rewind to the beginning of the episode while paused, playback remains paused. These buttons may not work as described above depending on the episode.
Go back/forward slightly
Press the button () while paused.
Go to the previous or next scene or chapter
Press the button ().
If no chapters are set for the video, the scene jumps in five minute increments.
Return to the list screen
Press the button ().
Hint
- Your Walkman automatically enters playback standby if there is no operation for a fixed period of time while paused.
- The speed of fast forward/fast rewind while paused varies according to the length of the episode.
[114] How to UsePhotos/Videos/PodcastsPlaying PodcastsDeleting podcast episodes
You can delete podcast episodes that have been transferred onto your Walkman.

- From the Home menu, select [Podcasts].
- Select the memory ([System Storage] or [SD Card]) and the folder that contains the episode you want to delete.
- On the episode list screen, display the option menu and select [Delete Episode].
The [Delete Episode] screen is displayed.
- Repeat the following steps to delete episodes.
- Press the button () to select the episode you want to delete and press the button () to confirm.
- Select [Yes].
- Press the button (
- Press the button () to return to the original list screen.
Hint
- You can also delete podcast episodes while playing them. While the episode you want to delete is playing, display the option menu and select [Delete This Episode] - [Yes].
-
To delete podcasts, display the option menu in the podcast list screen and select [Delete Podcast] - podcast you want to delete - [Yes].
To delete all podcasts, select
[Podcasts] from the Home menu, display the option menu in the podcast screen and select [Delete All Podcasts].
[115] How to UsePhotos/Videos/PodcastsPhoto SettingsSelecting how the photo list is displayed
You can select a photo list display format.
- On the photo list screen, display the option menu and select [Photo List Format] - desired photo list format.
Note
- Thumbnails may not be displayed depending on the file format.
[116] How to UsePhotos/Videos/PodcastsVideo SettingsDisplaying a video to match the screen size
You can change the size of a video being played to match the screen size.
- On the video playback screen, display the option menu and select [Zoom Settings] - desired setting.
[Auto]
The video image is resized to fit the display area, maintaining the original aspect ratio. When a 4:3 () video image is displayed, it is resized to fit the screen size. When a 16:9 () video image is displayed, black bands appear on the top and bottom of the screen.

[Full]
The video image is resized to fill the available display area, maintaining the aspect ratio. When a 4:3 () video image is displayed, it is resized as it is. When a 16:9 () video image is displayed, the right/left sides of the image (dotted line frame) are trimmed to fit.

[Off]
Videos are displayed in the resolution in which they were saved. If video resolution is too high, the left, right, top and bottom of the screen will be cut. If video resolution is too low, black bars will appear on the right, left, top and bottom of the screen.
[117] How to UsePhotos/Videos/PodcastsVideo SettingsPlaying only the sound of a video
You can turn off the video screen and enjoy only the sound of a video. Turning off the video screen saves battery power for longer battery life.
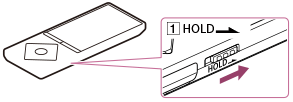
- In the video playback screen, display the option menu and select [On-Hold Display] - [No].
- Set the switch () to the HOLD position.
[118] How to UsePhotos/Videos/PodcastsVideo SettingsPlaying videos continually
You can play videos in the order of the video list.
- From the Home menu, select [Settings].
- Select [Video Settings] - [Continuous Playback] - [On].
[119] How to UsePhotos/Videos/PodcastsVideo SettingsChanging the order of videos
You can arrange the video list by date or by title.
- In the video list screen, display the option menu and select [Order of Video List] - desired video list order.
Note
- The [Order of Video List] function may not work depending on the screen.
[120] How to UseFM RadioListening to FM RadioListening to FM radio
Listen to FM radio on your Walkman. You cannot listen to FM radio without connecting headphones as the cord of the headphones works as the antenna. Extend the cord as long as possible.
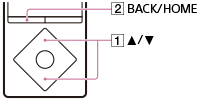
-
From the Home menu, select [FM Radio].
-
Press the button () to select the desired frequency.
To turn off FM radio, press the button ().
Note
- The sound quality settings are not applied while listening to FM radio.
- You cannot listen to FM radio while your Walkman connects via Bluetooth.
[121] How to UseFM RadioListening to FM RadioBrowsing the FM radio screen
The following items are displayed on the FM radio screen.

- Frequency
- Preset number
[122] How to UseFM RadioListening to FM RadioFM radio operations
The following operations are available on the FM radio screen. You cannot listen to FM radio without connecting headphones as the cord of the headphones works as the antenna. Extend the cord as long as possible.

To select the previous or next frequency
Press the button ().
To select the previous or next receivable station
Press and hold the button ().
Searching starts and stops at a receivable broadcast station.
To select the previous or next preset number
Press the button ().
Hint
- Preset numbers can only be used to select a broadcast station if one or more broadcast stations are saved as preset. Preset the receivable broadcast stations in advance.
- If the reception sensitivity is too strong and causes many unwanted broadcast stations to be received while searching, change the scan sensitivity setting.
[123] How to UseFM RadioListening to FM RadioPresetting broadcast stations automatically
You can use [Auto Preset] to automatically search for and preset broadcast stations that can be received in your area.
-
In the FM radio screen, display the option menu and select [Auto Preset] - [Yes].
Receivable broadcast stations will be preset in order of frequency (low to high).
Hint
- If the reception sensitivity is too strong and causes many unwanted broadcast stations to be received while searching, set the scan sensitivity to [Low].
- You can preset up to 30 stations.
Note
- Using [Auto Preset] clears all saved presets.
[124] How to UseFM RadioListening to FM RadioPresetting broadcast stations manually
You can manually preset receivable broadcast stations.
-
In the FM radio screen, select the frequency you want to save to preset.
The preset numbers are rearranged in order of frequency (low to high).
-
Display the option menu and select [Save to Preset].
Hint
- You can preset up to 30 stations.
[125] How to UseFM RadioListening to FM RadioDeleting preset broadcast stations
You can delete preset broadcast stations.
- On the FM radio screen, select the preset number of the frequency you want to delete from preset.
- Display the option menu and select [Delete from Preset].
[126] How to UseFM RadioFM Radio SettingsChanging the FM radio scan sensitivity
Sometimes the reception sensitivity may be too strong when receiving an FM radio broadcast station, causing many unwanted broadcast stations to be received. In such cases, set the scan sensitivity to low.
- On the FM radio screen, display the option menu and select [Scan Sensitivity] - desired setting.
[127] How to UseFM RadioFM Radio SettingsSetting monaural/auto for FM radio
If noise occurs during FM reception, set [Mono/Auto] to [Mono]. If you set it to [Auto], stereo or monaural is selected automatically, depending on reception conditions.
- In the FM radio screen, display the option menu and select [Mono/Auto] - desired setting.
[128] How to UsemicroSD CardmicroSD CardInserting a microSD card
You can store content such as music on microSD cards in addition to [System Storage].
- From the Home menu, select [SD Card Settings].
- Select [Insert/Remove SD Card] - [Yes].
An image of a microSD card is displayed on the screen and your Walkman enters the [Insert/Remove SD Card] status. Playback of content stops.
- Open the microSD card slot cover.
- While in the [Insert/Remove SD Card] status, insert a microSD card into the microSD card slot with the gold contact pins side facing down, until it clicks into place.
- Close the microSD card slot cover.
- Press the button () to exit the [Insert/Remove SD Card] status.
The library is updated and you can access the content stored on the microSD card.
Note
- If the microSD card is not recognized, remove it and then insert it into your Walkman again.
- Do not insert any liquids, metal, flammable substances or any object other than a microSD card into the microSD card slot.
[129] How to UsemicroSD CardmicroSD CardRemoving a microSD card
You can remove a microSD card from your Walkman.
- From the Home menu, select [SD Card Settings].
- Select [Insert/Remove SD Card] - [Yes].
An image of a microSD card is displayed on the screen and your Walkman enters the [Insert/Remove SD Card] status. Playback of content stops.
- Open the microSD card slot cover.
- While in the [Insert/Remove SD Card] status, check that the lamp () is off and push the microSD card into the microSD card slot. When the microSD card pops out, remove it from the slot.
- Close the microSD card slot cover.
- Press the button () to exit the [Insert/Remove SD Card] status.
Your Walkman starts updating the library.
Note
- Data relating to content stored on a microSD card, such as analysis results by [SensMe™ Channels] and bookmarks, is deleted once the microSD card is removed from your Walkman and is not recovered even when the microSD card is reinserted correctly. The data needs to be set every time you insert the microSD card.
[130] How to UsemicroSD CardmicroSD CardSelecting the memory to use
You can select the memory to store content and other data on from [System Storage] or [SD Card].
- From the Home menu, select [SD Card Settings].
- Select the menu items using either of the procedures below.
- To transfer content from a computer: Select [Location for USB Transfer] - [System Storage] or [SD Card].
- To receive content via a Bluetooth connection: Select [Location for Received File] - [System Storage] or [SD Card].
Hint
- [System Storage] is selected at the time of purchase.
- The memory to use can be switched while your Walkman is connected to a computer to transfer content such as music from the computer. Follow the instructions shown on the display of the Walkman to switch the memory.
Note
- Music content with copyright protection cannot be transferred to a microSD card.
- You cannot exchange data between the memory of your Walkman and a microSD card.
[131] How to UsemicroSD CardmicroSD CardFormatting a microSD card
Before using a microSD card (not supplied) in your Walkman for the first time, be sure to format the microSD card using the Walkman by following the steps below. Formatting a microSD card will delete all data stored on the microSD card, so be careful not to delete important data.
-
From the Home menu, select [SD Card Settings].
-
Select [Format SD Card] - [Yes].
All data stored on the microSD card is deleted.
Note
- Be sure to format the microSD card using your Walkman when you use it on the Walkman for the first time.
[132] How to UsemicroSD CardmicroSD CardNotes on microSD cards
- Use a microSD card (not supplied) that has been formatted using your Walkman. Operations of microSD cards formatted with computers or other devices are not guaranteed.
- If you format a microSD card containing data, the data will be deleted. Be careful not to delete important data.
- Do not leave a microSD card within the reach of small children. They might accidentally swallow it.
- Do not insert or remove a microSD card when your Walkman is not in the [Insert/Remove SD Card] status. Doing so may cause a malfunction in your Walkman.
- We do not guarantee the operation of all types of compatible microSD cards with your Walkman.
- Data may be corrupted in the following cases:
- When a microSD card is removed or your Walkman is turned off during a read or write operation.
- When a microSD card is used in locations subject to static electricity or electrical noise.
- We assume no responsibility for any loss or damage of stored data.
- We recommend that you save a backup copy of important data.
- Do not touch the terminal of a microSD card with your hand or a metal object.
- Do not strike, bend or drop a microSD card.
- Do not disassemble or modify a microSD card.
- Do not expose a microSD card to water.
- Do not use a microSD card under the following conditions:
- Locations beyond the required operating conditions, including locations such as the hot interior of a car parked in the sun and/or in the summer, outdoor areas exposed to direct sunlight, or near a heater.
- Humid locations or locations with corrosive substances present.
- When using a microSD card, make sure to check the correct insertion direction into the microSD card slot.
- Do not insert foreign objects into the microSD card slot.
[133] How to UseNoise CancelingUsing the Noise Canceling FunctionWhat is noise canceling?
The headphones equipped with the noise canceling function detect ambient noise using the built-in microphone and output antiphase sound to reduce the noise. This reduces unwanted ambient noise, especially in a vehicle such as an airplane, train or bus, allowing you to enjoy music even at a low volume.

Waveform of noise (original sound) ()
The microphone built into the headphones picks up ambient noise, then the noise canceling circuit analyzes the signal of the noise.
Waveform of antiphase sound ()
Antiphase sound that cancels out the analyzed noise is generated.
Waveform of composed and canceled noise ()
The original and antiphase sound combine to cancel out the original sound, reducing noise at the eardrums.
[134] How to UseNoise CancelingUsing the Noise Canceling FunctionNoise canceling compatible headphones
The noise canceling function is available only with noise canceling headphones.
The noise canceling headphones that are compatible with this product are MDR-NW750N/MDR-NW750NE.
[135] How to UseNoise CancelingUsing the Noise Canceling FunctionSelecting headphones
The effect of the noise canceling function or the [Clear Phase™ ] function is optimized by selecting the compatible headphones.
- From the Home menu, select [Settings].
- Select [Select Headphones] - headphones that you use.
Select [Clear Phase™ ] - [On] if you use the “Clear Phase” function.
Hint
- Select [Other Headphones] to use headphones that do not support the noise canceling function. You cannot change the [Clear Phase™ ] setting nor activate the noise canceling function while [Other Headphones] is selected.
[136] How to UseNoise CancelingUsing the Noise Canceling FunctionUsing noise canceling
The noise canceling function is available only with noise canceling headphones. The noise canceling headphones that are compatible with this product are MDR-NW750N/MDR-NW750NE. Select the noise canceling headphones that you use in [Select Headphones], and then perform the following operation.
- Connect the compatible headphones to your Walkman.
-
From the Home menu, select [Noise Canceling].
-
Select [Noise Canceling: On/Off] - [On].
is displayed in the information area.
Hint
- The noise canceling effect is adjustable.
[137] How to UseNoise CancelingUsing the Noise Canceling FunctionReducing noise to create a quiet environment
You can use the noise canceling function to reduce ambient sound even when not playing back content such as music. The noise canceling function is available only with noise canceling headphones. The noise canceling headphones that are compatible with this product are MDR-NW750N/MDR-NW750NE. You also need to select the noise canceling headphones that you use in [Select Headphones].
- Connect the noise canceling headphones to your Walkman.
- From the Home menu, select [Noise Canceling].
- Select [Quiet Mode].
[138] How to UseNoise CancelingUsing the Noise Canceling FunctionNotes for using the noise canceling function
- If the earbuds do not fit your ears, the effect of the noise canceling function may be compromised. Adjust the earbuds to a position where they fit well, and place them snugly in your ears.
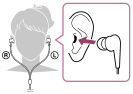
- Rubbing noises may occur while wearing headphones. This is not a malfunction.
- The noise canceling function mainly reduces noise in low frequency bands and has no effect on noise in higher frequency bands. Note that it does not cancel all sounds.
- Do not cover the microphone part () of the headphones with your hands or other objects. Doing so may compromise the noise canceling effect.

- You may hear a slight hissing noise when the noise canceling function is active. This is operational noise of the noise canceling function and not a malfunction.
- You may feel that the noise canceling function is not working or noise is louder in quiet places or with certain types of noises. In this case, deactivate the noise canceling function.
- Mobile phones or smartphones may cause noise. If this occurs, keep your Walkman away from these devices.
- Make sure to remove the headphones from your ears before you connect or disconnect the headphones from your Walkman. If the headphones are connected or disconnected from the Walkman during playback or while the noise canceling function is active, noise may be generated. This is not a malfunction.
- When changing the [Noise Canceling: On/Off] setting, a switching sound will be generated. This sound is generated by switching of the noise canceling circuit, and is not a malfunction.
[139] How to UseNoise CancelingNoise Canceling SettingsSelecting a noise canceling environment
You can set the noise canceling function most effective for the environment you are in by using noise canceling headphones and selecting the type of ambient noise.
The noise canceling function is available only with noise canceling headphones. The noise canceling headphones that are compatible with this product are MDR-NW750N/MDR-NW750NE.
-
From the Home menu, select [Noise Canceling].
- Select [Select NC Environment] - desired setting.
Hint
- When you select [Full-auto AINC], your Walkman analyzes the ambient sound immediately and sets the most effective noise canceling mode automatically.
[140] How to UseNoise CancelingNoise Canceling SettingsAdjusting noise canceling
The noise canceling function is available only with noise canceling headphones. The noise canceling headphones that are compatible with this product are MDR-NW750N/MDR-NW750NE.
Your Walkman has been set to obtain the maximum effect of the noise canceling function. However, you may be able to enhance the effect depending on your ear shape or usage environment by increasing (or decreasing) the sensitivity of the microphone that the compatible headphones are equipped with.
-
From the Home menu, select [Noise Canceling].
-
Select [Set Noise Cancel Level] - desired setting.
The setting can be adjusted in 31 steps. The center position of the slider is the setting where the maximum effect is obtained in a standard environment. Adjust as desired.
Note
- Maximizing microphone sensitivity does not necessarily enhance the noise canceling effect.
[141] How to UseBluetoothWhat Is the Bluetooth Function? What is the Bluetooth function?
The Bluetooth function enables wireless data transfer between devices that
support Bluetooth wireless technology. You can transfer data between these devices at a range of up to 10 meters in an open area.
You do not need to use a cable for connection, since the Bluetooth function uses wireless technology, nor is it necessary for the devices to face one another, as is the case with infrared technology. For example, you can use Bluetooth devices in a bag or pocket.
[142] How to UseBluetoothWhat Is the Bluetooth Function? What can your Walkman do with the Bluetooth function?
You can listen to sound on Bluetooth audio devices by sending data from your Walkman. You can also use the Walkman to send and receive content.
Listening to music
You can use a Bluetooth audio device to listen to music wirelessly.

Sending/receiving content
You can transfer content to/from another Bluetooth device.
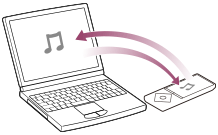
[143] How to UseBluetoothWhat Is the Bluetooth Function? What is pairing?
The registration between Bluetooth devices is called “pairing.” Once the devices are paired, you can easily connect your Walkman to the Bluetooth device from the next time onwards using a simple operation.
Connecting your Walkman to Bluetooth audio devices
Bluetooth audio devices need to be paired with each other beforehand. Once Bluetooth audio devices are paired, there is no need for pairing again, except in the following cases.
-
When the pairing information of your Walkman on the Bluetooth audio device is deleted.
-
When your Walkman is formatted and all pairing information is deleted.
-
When the pairing information is deleted by any operations other than above.
Transferring content to/from another Bluetooth device
Pairing in advance is not necessary because this is executed when your Walkman sends or receives content via a Bluetooth connection. The pairing information is stored on the Walkman but is deleted in the following cases.
-
When the pairing information of your Walkman on the Bluetooth device is deleted.
-
When your Walkman is reset to the factory settings.
-
When the pairing information is deleted by any operations other than above.
Note
- Your Walkman cannot be paired if the number of paired devices exceeds 20. If you want to pair another device, delete an unnecessary paired device beforehand.
[144] How to UseBluetoothConnecting with Bluetooth Audio DevicesSteps to use Bluetooth connection
To listen to sound from Bluetooth audio devices on your Walkman, the following steps are required.
- Pair your Walkman and a Bluetooth audio device.
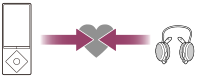
- Establish a Bluetooth connection between your Walkman and the Bluetooth audio device.
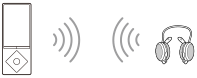
- Play sound on your Walkman.
Hint
- Your Walkman may not be connected depending on the profile of the Bluetooth audio device.
- Your Walkman can send information such as the song titles, the settings of the Walkman or the battery status to certain Bluetooth audio devices.
- You can wirelessly control the volume of certain Bluetooth audio devices using the VOL button of your Walkman.
- You can select whether or not to apply the following sound effects when you send content from your Walkman to a Bluetooth audio device.
- [ClearAudio+]
- [Equalizer]
- [VPT (Surround)]
- [Dynamic Normalizer]
[145] How to UseBluetoothConnecting with Bluetooth Audio DevicesPairing and connecting with a Bluetooth audio device
To connect with a Bluetooth audio device for the first time, your Walkman needs to be paired with it.
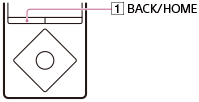
- Place your Walkman and the Bluetooth audio device within 1 meter of each other.
- Put the Bluetooth audio device you want to connect with in pairing mode.
Refer to the operating instructions supplied with the Bluetooth audio device for details.
- From the Home menu of your Walkman, select [Bluetooth].
- Select [Add Device (Pairing)].
The [Scan Peripheral Device] screen appears and
is displayed in the information area. - Select the Bluetooth audio device you want to connect with.
It may take time until the Bluetooth audio device is detected and displayed on your Walkman.
- Confirm that the pairing is completed and the Bluetooth connection is made automatically.
After the pairing is completed, the Bluetooth connection between your Walkman and the Bluetooth audio device is made. A message that the connection has been completed is displayed and
in the information area changes to . Start playback on the Walkman and you will hear the sound through the Bluetooth audio device.
To cancel pairing
Press the button () while pairing.
If the Bluetooth audio device is not detected
[No devices found; ensure a device is available to connect with, and search again via the Option menu.] is displayed if the Bluetooth audio device is not detected by your Walkman. Search for the Bluetooth audio device again by displaying the option menu and selecting [Search Again].
If the pairing is not completed
The screen for aborting the connection appears if the pairing fails to be completed, and the screen returns to where you are asked to select [Add Device (Pairing)]. Operate again from the [Scan Peripheral Device] screen.
Hint
- If more than one name for the Bluetooth audio device is displayed, check the BD address of the device you want to pair with. Refer to the operating instructions supplied with the Bluetooth audio device for details on the BD address.
- If the Bluetooth audio device you want to connect with has an NFC function, pairing and connection can be made with one touch.
- You can pair your Walkman with one Bluetooth audio device at a time. To pair more than one device, repeat the procedures above for each device.
Note
- When pairing starts, playback of content such as music stops automatically and the operations on your Walkman become unavailable.
- If the pairing is timed out, for example if you could not finish entering the pass key in time, perform the operation again by selecting [Bluetooth] from the Home menu.
[146] How to UseBluetoothConnecting with Bluetooth Audio DevicesConnecting with a paired Bluetooth audio device
Connect your Walkman to a Bluetooth audio device if they are paired but not connected with each other. You will need to do this when the connection is lost, for example, by turning off either the Walkman or the Bluetooth audio device.
- Turn on the Bluetooth audio device you want your Walkman to connect with and put the device in connection standby status.
Refer to the operating instructions supplied with the Bluetooth audio device for details.
- From the Home menu of your Walkman, select [Bluetooth].
- Select [Connect to Audio Device].
If the Bluetooth audio device is not paired with your Walkman, pair it first.
- Select the Bluetooth audio device to connect with.
The [Processing Connection] screen is displayed.
- Confirm that the Bluetooth audio device is connected to your Walkman.
When the connection is made successfully,
is displayed in the information area of your Walkman and next to the icon of the connected Bluetooth audio device.
About the Bluetooth status icons
: The Bluetooth function is on but no devices are connected.
: The Bluetooth function is on and your Walkman is connected to Bluetooth audio device(s).
No icon: The Bluetooth function is off.
Hint
- The behavior of your Walkman while connected with a Bluetooth audio device is as follows.
- If you connect a USB charger (not supplied), your Walkman is charged while holding the Bluetooth connection.
- If you make a USB connection, the USB connection is prioritized.
- If multiple names for a Bluetooth audio device are displayed, check the BD address of the Bluetooth audio device you want to connect with. Refer to the operating instructions supplied with the Bluetooth audio device for details on the BD address.
- If the Bluetooth audio device you want to connect with has an NFC function, pairing and connection can be made with one touch.
[147] How to UseBluetoothConnecting with Bluetooth Audio DevicesMaking a Bluetooth connection using the NFC function
Simply touch your Walkman to a Bluetooth audio device that has the NFC function to automatically turn on the power of the Bluetooth audio device, pair the Walkman and the Bluetooth audio device, and make a Bluetooth connection.

- If the Bluetooth audio device has an NFC switch, set the NFC switch to on.
- Touch your Walkman to the Bluetooth audio device.
Touch the mark of your Walkman () to the mark of the Bluetooth audio device (). Hold together until instructions appear on the screen of the Walkman.
- Follow the on-screen instructions to complete the connection.
Hint
- Touch the devices together again to disconnect.
- Take the following measures if the connection is poor.
- Slowly move your Walkman over the mark of the Bluetooth audio device ().
- If your Walkman is in a case, remove the case.
-
From the Home menu, select [Settings] - [Common Settings] - [NFC Settings] - [On].
- Slowly move your Walkman over the mark of the Bluetooth audio device (
Note
- One-touch connections (NFC) cannot be made while the HOLD function of your Walkman is enabled. Release the HOLD function before touching the devices together to make a one-touch connection.
- One-touch connections (NFC) cannot be made while your Walkman is in standby mode and the screen is off. Turn the screen on before touching the devices together to make a one-touch connection.
- One-touch connections (NFC) cannot be made while listening to FM radio. Stop FM radio before touching the devices together to make a one-touch connection.
[148] How to UseBluetoothConnecting with Bluetooth Audio DevicesDisconnecting a Bluetooth audio device
Disconnect the connection between your Walkman and a Bluetooth audio device.
- From the Home menu, select [Bluetooth].
- Select [Disconnect Audio Device].
Hint
- If the Bluetooth audio device you want to connect with has an NFC function, disconnection can be done with one touch.
Note
- The Bluetooth connection is disconnected automatically in the following cases:
- The remaining battery power of your Walkman is low.
- The battery of your Walkman has run out.
- Your Walkman is connected to a computer via USB.
- When you end the Bluetooth connection using the Bluetooth audio device, your Walkman enters the connection standby mode. If you do not make another Bluetooth connection within 5 minutes after this, the Bluetooth function of the Walkman turns off automatically.
- A Bluetooth connection is held for 24 hours even if no content is played during that time. However, the length of the time may be shorter depending on the Bluetooth audio device.
[149] How to UseBluetoothListening to Sound Using a Bluetooth Audio DeviceListening to sound using a Bluetooth audio device
Once paired and connected, you can listen to sound from your Walkman wirelessly through the Bluetooth audio device.
- Confirm that the Bluetooth connection between the Bluetooth audio device and your Walkman is active.
is displayed in the information area of your Walkman.
- Play music on your Walkman.
Hint
- You can change the setting so that the Bluetooth audio device is automatically connected when you turn on your Walkman.
- The following operations are available with some Bluetooth audio devices. The available operations vary depending on the Bluetooth audio device you use.
- Play/Pause
- Fast forward/rewind
- Go to the beginning of the next song
- Go to the beginning of the current song
- Skip to the previous/next folder
- Adjust the volume
Your Walkman may not operate depending on the connection status.
Note
- Sound is not emitted from the following devices while connecting via a Bluetooth connection.
- Headphones connected to the headphone jack
- Operation sounds set to on
- Speakers or USB digital output devices connected to the WM-PORT jack
- You cannot listen to FM radio while connecting via a Bluetooth connection. Use the headphones to listen to FM radio.
- Sound may skip depending on the usage environment or the settings. Take the following measures to reduce sound skipping.
- Place your Walkman and the Bluetooth audio device close together.
- Set [Wireless Playback Quality] to [Standard] or [Prioritize Connection].
[150] How to UseBluetoothSending/Receiving Content via a Bluetooth ConnectionSteps to transfer content via a Bluetooth connection
You can transfer content to/from another Bluetooth device via a Bluetooth connection. Pairing in advance is not necessary because this is executed when your Walkman sends or receives content via a Bluetooth connection.
The pairing information is stored on the Walkman.
Sending content
Your Walkman can send content to the other Bluetooth device.

Receiving content
Your Walkman can receive content from the other Bluetooth device.

Note
- Copyright laws may prohibit content transfer without the copyright holder's permission for purposes other than your personal/private enjoyment.
- Some Bluetooth devices may not be able to receive files sent from your Walkman. For details on how to use the Bluetooth function of your device, refer to the manual of that device.
[151] How to UseBluetoothSending/Receiving Content via a Bluetooth ConnectionSending content via a Bluetooth connection
You can send content stored on your Walkman to another device via a Bluetooth connection.

- Set the Bluetooth device to standby status to receive content.
Refer to the operating instructions supplied with the Bluetooth device for details.
- In the music playback screen, display the option menu and select [Send File].
The copyright warning message appears when you send a file. Follow the on-screen instructions.
- Display the option menu and select [Search for a Device].
The [Scan Peripheral Device] screen is displayed.
Skip this step if you have sent content to the same device before.
- Select the desired device.
Check the BD address (alphanumeric code) displayed under the model name to make sure that the BD address on the screen matches that of the Bluetooth device. To locate the BD address of the Bluetooth device, refer to the operating instructions supplied with the device.
A pairing process is performed when the device establishes a Bluetooth connection with your Walkman for the first time. When authentication codes (alphanumeric codes) appear on the Walkman and on the Bluetooth device, check that they are the same.
A message confirming the connection appears and file transfer begins.
- Check that the content transfer is completed.
Exit the content reception standby status on the Bluetooth device.
To cancel pairing
Press the button () while pairing.
If the Bluetooth device is not detected
[No devices found; ensure a device is available to connect with, and search again via the Option menu.] is displayed if the Bluetooth device is not detected by your Walkman. Search for the Bluetooth device again by displaying the option menu and selecting [Search Again].
If the pairing is not completed
The screen for aborting the connection appears if the pairing fails to be completed and the screen returns to where you are asked to select [Add Device (Pairing)]. Perform this operation again from the [Scan Peripheral Device] screen.
Note
- Files protected by DRM (Digital Rights Management) cannot be sent.
- Content transfer may fail if the Bluetooth device is too far from your Walkman, or there is interference from other devices. In these cases, reduce the distance between the Walkman and the Bluetooth device, and keep a good distance from other devices or turn them off if possible.
- Playback is stopped when your Walkman sends content.
- LRC files for songs and thumbnails for videos cannot be sent.
- Cover art for songs may not be sent.
[152] How to UseBluetoothSending/Receiving Content via a Bluetooth ConnectionReceiving content via a Bluetooth connection
Your Walkman can receive content from a Bluetooth device via a Bluetooth connection.

- On your Walkman, select the memory ([System Storage] or [SD Card]) as the destination for receiving content.
- From the Home menu, select [Bluetooth].
- Select [Receive File].
Your Walkman enters standby state to receive a file.
- Send content from the other Bluetooth device to your Walkman.
The BD address (alphanumeric code) of your Walkman is displayed under the model name on the Walkman. When the Bluetooth device displays the receiver’s BD address, make sure that the BD addresses displayed on the device and on the Walkman are the same. (Some Bluetooth devices may not display the receiver’s BD address.)
A pairing process is performed when the device establishes a Bluetooth connection with your Walkman for the first time. When authentication codes (alphanumeric codes) appear on the Walkman and on the Bluetooth device, check that they are the same.
- Press the button () after receiving content.
Your Walkman is released from standby status.
Hint
- The received content is stored in the “RECEIVED” folder of the device selected in step 3 above. Although your Walkman can receive files in unsupported formats, these files cannot be displayed or played. You need to use Windows Explorer or the Mac Finder to search for them in the “RECEIVED” folder.
- If files of the same name are received, a file number is added between the filename and extension.
- If your Walkman receives files in unsupported formats, these files cannot be displayed or played.
Note
- If the pairing or transfer times out and stops, send the content from the Bluetooth device again.
- Content transfer may fail if the Bluetooth device is too far from your Walkman, or there is interference from other devices. In these cases, reduce the distance between the Walkman and the Bluetooth device, and keep a good distance from other devices or turn them off if possible.
- Playback stops when your Walkman receives content.
- The maximum receivable file size is 4 GB.
[153] How to UseBluetoothSending/Receiving Content via a Bluetooth ConnectionPlaying content received via a Bluetooth connection
You can play content transferred via a Bluetooth connection on your Walkman.
- Select the desired content.
- For music content, from the Home menu, select [Music] - [Received Songs] - [System Storage] or [SD Card] - desired content.
-
For photo content, from the Home menu, select [Photos] - [Received Photos] - [System Storage] or [SD Card] - desired content.
-
For video content, from the Home menu, select [Videos] - [Received Videos] - [System Storage] or [SD Card] - desired content.
- For music content, from the Home menu, select
Hint
- To play received podcasts, select [System Storage] or [SD Card] under [Received Songs] for an audio podcast or select [System Storage] or [SD Card] under [Received Videos] for a video podcast.
- The latest content is shown on the top in the content list screens.
[154] How to UseBluetoothSending/Receiving Content via a Bluetooth ConnectionDeleting content received via a Bluetooth connection
You can delete content received by your Walkman via a Bluetooth connection.
- Select the content you want to delete.
- To delete music, from the Home menu, select [Music] - [Received Songs] - [System Storage] or [SD Card] - the content you want to delete.
-
To delete photos, from the Home menu, select [Photos] - [Received Photos] - [System Storage] or [SD Card] - the content you want to delete.
-
To delete videos, from the Home menu, select [Videos] - [Received Videos] - [System Storage] or [SD Card] - the content you want to delete.
- To delete music, from the Home menu, select
- In the playback screen, display the option menu and select [Delete This Song], [Delete Photo] or [Delete Video] - [Yes].
Hint
- To delete all content received via a Bluetooth connection, from the Home menu, select [Settings] - [Bluetooth Settings] - [Delete All Received Files] - [Yes].
- To delete all content in “RECEIVED” folder under [System Storage] or [SD Card], select [Delete All Received Files].
[155] How to UseBluetoothSending/Receiving Content via a Bluetooth ConnectionEntering a passkey to make a Bluetooth connection
When the screen to enter the passkey is displayed while pairing, check and enter the passkey of the other Bluetooth device. “Passkey” may also be called “Pass code,” “PIN code,” “PIN number,” or “Password.” The passkey of your Walkman is “0000.” For the passkey of the Bluetooth device, refer to the operating instructions of the Bluetooth device.
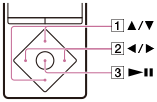
- Press the button () to select the number and press the button () to move the cursor.
- Press the button () to enter.
[156] How to UseBluetoothInformation of Bluetooth Audio DevicesDisplaying the pairing information of Bluetooth audio devices
Once paired, you can display the pairing information of the connected Bluetooth audio device such as the model name, BD address, and the profile when connected.
- From the Home menu, select [Bluetooth].
- Select [Manage Added Devices] - desired device.
The pairing information of the Bluetooth audio device is displayed. The information differs depending on the Bluetooth audio device.
[157] How to UseBluetoothInformation of Bluetooth Audio DevicesDeleting the pairing information of Bluetooth audio devices
Your Walkman cannot be paired if the number of paired devices exceeds the maximum number. If you want to pair another device, delete an unnecessary paired device beforehand.
- From the Home menu, select [Bluetooth].
- Select [Manage Added Devices].
- Display the option menu and select [Delete Device] - device you want to delete - [Yes].
Note
- To connect with a deleted Bluetooth audio device, you need to pair with it again.
[158] How to UseBluetoothBluetooth SettingsSetting automatic Bluetooth connection at startup
You can set your Walkman to connect to a Bluetooth audio device automatically at startup.
- From the Home menu, select [Settings].
- Select [Bluetooth Settings] - [Autoconnect at Startup] - desired setting.
Hint
- You can select a device from the paired Bluetooth audio devices displayed on the [Autoconnect at Startup] screen to connect to your Walkman automatically at startup.
Note
- Your Walkman may not be connected automatically while the alarm goes off.
[159] How to UseBluetoothBluetooth SettingsSetting wireless playback quality
You can set whether to prioritize the stability of the connection or the sound quality for a Bluetooth connection as you like.
- From the Home menu, select [Settings].
- Select [Bluetooth Settings] - [Wireless Playback Quality] - desired setting.
[Prioritize Sound Quality]
Sound is transmitted in high quality, but the connection may become unstable depending on the usage environment.
[Standard]
Both sound quality and connection are stable.
[Prioritize Connection]
The sound quality may not be as good as the other mode, but the connection status will most likely be stable. This setting is recommended if the connection is unstable.
[Select]
You can set the wireless playback quality setting of your choice. However, the setting may be changed depending on the status of the connected Bluetooth audio device.
Hint
- Change the setting to [Prioritize Connection] if the connection is unstable due to the usage environment.
- The wireless playback quality setting is automatically selected depending on the status of the connected Bluetooth audio device when [Prioritize Sound Quality], [Standard] or [Prioritize Connection] is selected. The selected mode is displayed when the connection is established.
Note
- The [Wireless Playback Quality] setting cannot be changed while your Walkman is connected to a Bluetooth audio device. To change the setting, disconnect the connection.
- Changing the [Wireless Playback Quality] setting may not have any effect depending on the settings of the connected Bluetooth audio device.
[160] How to UseBluetoothBluetooth SettingsSetting sound effects during a Bluetooth connection
You can select whether or not to apply the sound effects when you send content from your Walkman to a Bluetooth audio device.
- From the Home menu, select [Settings].
- Select [Bluetooth Settings] - [Sound Effect Preset] - desired device - desired setting.
When you select [On], the following sound effects are applied.
- [Equalizer]
- [VPT (Surround)]
- [Dynamic Normalizer]
- [ClearAudio+]
Note
- For details about the sound effect settings on the other Bluetooth audio device, refer to the operating instructions supplied with the device.
- The [Clear Stereo] function does not work while listening to music on the other Bluetooth audio device.
[161] How to UseBluetoothBluetooth SettingsDisplaying Bluetooth information on your Walkman
Display Bluetooth information such as Bluetooth version and profile.
-
From the Home menu, select [Settings].
- Select [Bluetooth Settings] - [Bluetooth Information].
[162] How to UseBluetoothNotes on the Bluetooth FunctionNotes on the Bluetooth function
- Bluetooth wireless technology allows connection at a distance of up to about 10 meters. However, the effective range may vary depending on obstructions (people, metals, walls, etc.) or signal status.
- The Bluetooth antenna (aerial) is built into your Walkman. You can improve the sensitivity of Bluetooth communications by turning the built-in Bluetooth antenna (aerial) in the direction of the connected Bluetooth device. The communication distance shortens if there are obstructions between the connected device and the Walkman.
-
The following conditions may cause noise, breakup of sound, or changes in playback speed.
- When using inside a metal bag.
- When using inside a backpack or shoulder bag.
- When using in an area with a wireless LAN, in an area where devices such as microwave ovens, mobile phones and mobile gaming devices with a communication function are in use nearby, or in other areas where electromagnetic waves are being emitted.
- When the antenna (aerial) built into your Walkman is covered by your hand or blocked by people in situations such as riding in a crowded train.
- Because Bluetooth and wireless LAN (IEEE802.11b/g) devices use the same frequency (2.4 GHz), signal interference may occur, resulting in communication speed decrease, noise, or inability to connect, if Bluetooth communications are used near a wireless LAN device. In such cases, take the following measures.
- Perform Bluetooth communications at least 10 meters away from the wireless LAN device when connecting your Walkman and a Bluetooth device.
- Place your Walkman and the Bluetooth device as close together as possible.
- Turn off the wireless LAN device when performing Bluetooth communications within about 10 meters of a wireless LAN device.
- Due to a characteristic of Bluetooth wireless technology, the sound played on the receiving Bluetooth device lags slightly behind the sound of the sending device.
- Radio waves emitted from a Bluetooth device may affect the operation of equipment such as electronic medical devices. Turn off your Walkman and other Bluetooth devices in the following locations as failure to do so may cause an accident.
- In hospitals, near priority seats on trains, in airplanes, in places such as gasoline stations where flammable gases are present, near automatic doors or fire alarms
- Your Walkman supports security functions that comply with the Bluetooth standard to provide a secure connection when Bluetooth technology is used, but security may not be sufficient depending on the settings. Be careful when connecting using Bluetooth technology.
- Sony bears no responsibility whatsoever for information leaks that occur as a result of using Bluetooth technology.
- Your Walkman is not guaranteed to connect with all Bluetooth devices.
- Bluetooth devices you connect to must conform to the Bluetooth standard specified by Bluetooth SIG and be certified.
- Even if the connected device conforms to the above-mentioned Bluetooth standard, some devices may not be connected or work correctly depending on the features or specifications of the device.
- Depending on the device to be connected, the Bluetooth connection may take some time to be established.
[163] How to UseNFCWhat Is the NFC Function?What is the NFC function?
This function is for close-range wireless communication between various devices. Simply touch the N-marks of your Walkman and your NFC-compatible Bluetooth audio device to automatically turn on the power of the Bluetooth audio device, pair the Walkman and the device, and make/end a Bluetooth connection.
[164] How to UseNFCConnecting with One Touch (NFC)Making a Bluetooth connection using the NFC function
Simply touch your Walkman to a Bluetooth audio device that has the NFC function to automatically turn on the power of the Bluetooth audio device, pair the Walkman and the Bluetooth audio device, and make a Bluetooth connection.
- If the Bluetooth audio device has an NFC switch, set the NFC switch to on.
- Touch your Walkman to the Bluetooth audio device.
Touch the mark of your Walkman () to the mark of the Bluetooth audio device (). Hold together until instructions appear on the screen of the Walkman.
- Follow the on-screen instructions to complete the connection.
Hint
- Touch the devices together again to disconnect.
- Take the following measures if the connection is poor.
- Slowly move your Walkman over the mark of the Bluetooth audio device ().
- If your Walkman is in a case, remove the case.
-
From the Home menu, select [Settings] - [Common Settings] - [NFC Settings] - [On].
- Slowly move your Walkman over the mark of the Bluetooth audio device (
Note
- One-touch connections (NFC) cannot be made while the HOLD function of your Walkman is enabled. Release the HOLD function before touching the devices together to make a one-touch connection.
- One-touch connections (NFC) cannot be made while your Walkman is in standby mode and the screen is off. Turn the screen on before touching the devices together to make a one-touch connection.
- One-touch connections (NFC) cannot be made while listening to FM radio. Stop FM radio before touching the devices together to make a one-touch connection.
[165] How to UseSettingsMusic SettingsShuffle playback
Play songs in random order. The playback range of songs can be changed.
-
On the music playback screen, display the option menu and select [Play Mode] - [Shuffle] or [Shuffle & Repeat].
Note
-
When [Play Mode] is selected and [Shuffle] or [Shuffle & Repeat] with [Playback Range] is set to [All Range], your Walkman will not shuffle all of the songs at once. Instead, the Walkman will select an artist, album, etc. and play all corresponding songs in random order before moving on to another artist or album. To shuffle all songs at once, start from [All Songs]. If you start from a bookmark list, only the songs on the selected bookmark list will be played.
[166] How to UseSettingsMusic SettingsRepeat playback
Play songs repeatedly. The playback range of songs can be changed.
-
On the music playback screen, display the option menu and select [Play Mode] - desired setting.
Note
-
When [Play Mode] is selected and [Shuffle] or [Shuffle & Repeat] with [Playback Range] is set to [All Range], your Walkman will not shuffle all of the songs at once. Instead, the Walkman will select an artist, album, etc. and play all corresponding songs in random order before moving on to another artist or album. To shuffle all songs at once, start from [All Songs]. If you start from a bookmark list, only the songs on the selected bookmark list will be played.
[167] How to UseSettingsMusic SettingsSetting the playback range
Set the playback range.
- On the music playback screen, display the option menu and select [Playback Range] - desired setting.
[All Range]
Plays back all songs in the built-in memory and microSD card by the selected search method ([All Songs], [Album], [Artist], etc.).
Select this to play all albums in the music menu in order.
[Selected Range]
Plays songs in the folder (artist, album, etc.) containing the currently playing song.
Note
- If you start playback from a bookmark list, only the songs in the bookmark list are played. Songs in other bookmark lists are not played even if [Playback Range] is set to [All Range].
[168] How to UseSettingsMusic SettingsUpscaling compressed audio to quality almost that of High-Resolution Audio
The [DSEE HX] function upscales the audio file to quality almost that of High-Resolution Audio quality and reproduces the clear high-range sound that is often lost.
To enjoy High-Resolution Audio quality, use the headphones that are compatible with High-Resolution Audio. MDR-NW750N/MDR-NW750NE are compatible with High-Resolution Audio. You also need to select the High-Resolution Audio headphones that you use in [Select Headphones].
- From the Home menu, select [Settings].
- Select [Music Settings] - [DSEE HX] - [On].
Note
- The [DSEE HX] function cannot be enabled while listening to sound on the other Bluetooth audio device.
[169] How to UseSettingsMusic SettingsSetting the sound quality easily with a single operation
Turn on the ClearAudio+™ function to enjoy audio with digital signal processing technology effects.
- From the Home menu, select [Settings].
- Select [Music Settings] - [ClearAudio+] - [On].
Note
- [Sound Settings] is not applied if [ClearAudio+] is turned on. [Sound Settings] is resumed when [ClearAudio+] is turned off.
- The [Clear Phase™ ] setting cannot be changed in [Select Headphones] when the [ClearAudio+] function is set to [On]. Set [ClearAudio+] to [Off] before changing the setting.
[170] How to UseSettingsMusic SettingsCustomizing sound quality settings
You can use various functions to set the desired sound quality.
-
From the Home menu, select [Settings].
- Select [Music Settings] - [Sound Settings] - desired function - desired setting.
Equalizer function
You can set the sound quality according to the music genre. You can also preset your equalizer settings as a custom setting.
VPT (Surround) function
You can set sound effects and enrich the sound reproduction quality of the audio playback. VPT, which stands for Virtualphones Technology, is a proprietary sound processing technology developed by Sony.
[Clear Stereo] function
This function uses digital processing to clearly distinguish between sound from the left and right of the headphones, emphasizing the stereo effect during playback.
Hint
- You can also set some sound quality items from the option menu in the music playback screen.
Note
-
The following settings cannot be changed while the [ClearAudio+] function is set to on.
- [Equalizer]
- [VPT (Surround)]
- [Clear Stereo]
- The [Clear Stereo] function is optimized for use with the compatible headphones. The compatible headphones are MDR-NW750N/MDR-NW750NE. The effect of the [Clear Stereo] function may not work well with headphones other than the compatible ones. Set [Clear Stereo] to [Off] when using headphones that are not compatible.
- The [Clear Stereo] function does not work while listening to music using headphones connected via the Bluetooth function.
[171] How to UseSettingsMusic SettingsPresetting your equalizer settings
You can preset the values of CLEAR BASS and the 5 band equalizer as custom settings. Increasing the CLEAR BASS setting value allows your Walkman to reproduce dynamic deep bass without distortion, even at a high volume.
- In the music playback screen, display the option menu and select [Sound Settings] - [Equalizer] - [Custom 1] or [Custom 2].
-
Press the button () to select CLEAR BASS or the frequency range setting, and press the button () to adjust the setting level.
-
Press the button () to confirm.
Note
- To change the equalizer setting, set the [ClearAudio+] function to off.
[172] How to UseSettingsMusic SettingsModerating the differences in volume level between songs
You can moderate the volume between songs to minimize the differences in volume level (Dynamic Normalizer). You can use this setting to prevent the volume of certain songs from being too high or too low when shuffling songs from multiple albums with different recording levels.
- From the Home menu, select [Settings].
- Select [Music Settings] - [Dynamic Normalizer] - desired setting.
[173] How to UseSettingsMusic SettingsChanging the default bookmark list
You can change the bookmark list that is set as the default bookmark list.
- From the Home menu, select [Settings].
- Select [Music Settings] - [Default Bookmark List] - desired default bookmark list.
[174] How to UseSettingsMusic SettingsSelecting the album display format
Select the album list display format. The cover art registered in Media Go is displayed in the album list. For details on registering cover art, refer to the help of Media Go.
- From the Home menu, select [Settings].
- Select [Music Settings] - [Album Display Format] - desired display format.
[175] How to UseSettingsMusic SettingsDisplaying lyrics
When you play songs to which lyrics have been previously added, the lyrics are displayed on your Walkman as the song progresses.
- From the Home menu, select [Settings].
- Select [Music Settings] - [Display Lyrics] - desired setting.
Hint
- If [On (Screen Always On)] is set, the music playback screen does not turn off regardless of the Screen Off Timer settings.
Note
- The timing at which the lyrics are displayed may not exactly match the progress of the song.
- You cannot display lyrics on the podcast playback screen.
- You cannot display lyrics information from still images.
[176] How to UseSettingsPhoto SettingsSelecting how the photo list is displayed
You can select a photo list display format.
- On the photo list screen, display the option menu and select [Photo List Format] - desired photo list format.
Note
- Thumbnails may not be displayed depending on the file format.
[177] How to UseSettingsVideo SettingsDisplaying a video to match the screen size
You can change the size of a video being played to match the screen size.
- On the video playback screen, display the option menu and select [Zoom Settings] - desired setting.
[Auto]
The video image is resized to fit the display area, maintaining the original aspect ratio. When a 4:3 () video image is displayed, it is resized to fit the screen size. When a 16:9 () video image is displayed, black bands appear on the top and bottom of the screen.
[Full]
The video image is resized to fill the available display area, maintaining the aspect ratio. When a 4:3 () video image is displayed, it is resized as it is. When a 16:9 () video image is displayed, the right/left sides of the image (dotted line frame) are trimmed to fit.
[Off]
Videos are displayed in the resolution in which they were saved. If video resolution is too high, the left, right, top and bottom of the screen will be cut. If video resolution is too low, black bars will appear on the right, left, top and bottom of the screen.
[178] How to UseSettingsVideo SettingsPlaying only the sound of a video
You can turn off the video screen and enjoy only the sound of a video. Turning off the video screen saves battery power for longer battery life.
- In the video playback screen, display the option menu and select [On-Hold Display] - [No].
- Set the switch () to the HOLD position.
[179] How to UseSettingsVideo SettingsPlaying videos continually
You can play videos in the order of the video list.
- From the Home menu, select [Settings].
- Select [Video Settings] - [Continuous Playback] - [On].
[180] How to UseSettingsVideo SettingsChanging the order of videos
You can arrange the video list by date or by title.
- In the video list screen, display the option menu and select [Order of Video List] - desired video list order.
Note
- The [Order of Video List] function may not work depending on the screen.
[181] How to UseSettingsFM Radio SettingsChanging the FM radio scan sensitivity
Sometimes the reception sensitivity may be too strong when receiving an FM radio broadcast station, causing many unwanted broadcast stations to be received. In such cases, set the scan sensitivity to low.
- On the FM radio screen, display the option menu and select [Scan Sensitivity] - desired setting.
[182] How to UseSettingsFM Radio SettingsSetting monaural/auto for FM radio
If noise occurs during FM reception, set [Mono/Auto] to [Mono]. If you set it to [Auto], stereo or monaural is selected automatically, depending on reception conditions.
- In the FM radio screen, display the option menu and select [Mono/Auto] - desired setting.
[183] How to UseSettingsNoise Canceling SettingsSelecting a noise canceling environment
You can set the noise canceling function most effective for the environment you are in by using noise canceling headphones and selecting the type of ambient noise.
The noise canceling function is available only with noise canceling headphones. The noise canceling headphones that are compatible with this product are MDR-NW750N/MDR-NW750NE.
-
From the Home menu, select [Noise Canceling].
- Select [Select NC Environment] - desired setting.
Hint
- When you select [Full-auto AINC], your Walkman analyzes the ambient sound immediately and sets the most effective noise canceling mode automatically.
[184] How to UseSettingsNoise Canceling SettingsAdjusting noise canceling
The noise canceling function is available only with noise canceling headphones. The noise canceling headphones that are compatible with this product are MDR-NW750N/MDR-NW750NE.
Your Walkman has been set to obtain the maximum effect of the noise canceling function. However, you may be able to enhance the effect depending on your ear shape or usage environment by increasing (or decreasing) the sensitivity of the microphone that the compatible headphones are equipped with.
-
From the Home menu, select [Noise Canceling].
-
Select [Set Noise Cancel Level] - desired setting.
The setting can be adjusted in 31 steps. The center position of the slider is the setting where the maximum effect is obtained in a standard environment. Adjust as desired.
Note
- Maximizing microphone sensitivity does not necessarily enhance the noise canceling effect.
[185] How to UseSettingsBluetooth SettingsSetting automatic Bluetooth connection at startup
You can set your Walkman to connect to a Bluetooth audio device automatically at startup.
- From the Home menu, select [Settings].
- Select [Bluetooth Settings] - [Autoconnect at Startup] - desired setting.
Hint
- You can select a device from the paired Bluetooth audio devices displayed on the [Autoconnect at Startup] screen to connect to your Walkman automatically at startup.
Note
- Your Walkman may not be connected automatically while the alarm goes off.
[186] How to UseSettingsBluetooth SettingsSetting wireless playback quality
You can set whether to prioritize the stability of the connection or the sound quality for a Bluetooth connection as you like.
- From the Home menu, select [Settings].
- Select [Bluetooth Settings] - [Wireless Playback Quality] - desired setting.
[Prioritize Sound Quality]
Sound is transmitted in high quality, but the connection may become unstable depending on the usage environment.
[Standard]
Both sound quality and connection are stable.
[Prioritize Connection]
The sound quality may not be as good as the other mode, but the connection status will most likely be stable. This setting is recommended if the connection is unstable.
[Select]
You can set the wireless playback quality setting of your choice. However, the setting may be changed depending on the status of the connected Bluetooth audio device.
Hint
- Change the setting to [Prioritize Connection] if the connection is unstable due to the usage environment.
- The wireless playback quality setting is automatically selected depending on the status of the connected Bluetooth audio device when [Prioritize Sound Quality], [Standard] or [Prioritize Connection] is selected. The selected mode is displayed when the connection is established.
Note
- The [Wireless Playback Quality] setting cannot be changed while your Walkman is connected to a Bluetooth audio device. To change the setting, disconnect the connection.
- Changing the [Wireless Playback Quality] setting may not have any effect depending on the settings of the connected Bluetooth audio device.
[187] How to UseSettingsBluetooth SettingsSetting sound effects during a Bluetooth connection
You can select whether or not to apply the sound effects when you send content from your Walkman to a Bluetooth audio device.
- From the Home menu, select [Settings].
- Select [Bluetooth Settings] - [Sound Effect Preset] - desired device - desired setting.
When you select [On], the following sound effects are applied.
- [Equalizer]
- [VPT (Surround)]
- [Dynamic Normalizer]
- [ClearAudio+]
Note
- For details about the sound effect settings on the other Bluetooth audio device, refer to the operating instructions supplied with the device.
- The [Clear Stereo] function does not work while listening to music on the other Bluetooth audio device.
[188] How to UseSettingsBluetooth SettingsDisplaying Bluetooth information on your Walkman
Display Bluetooth information such as Bluetooth version and profile.
-
From the Home menu, select [Settings].
- Select [Bluetooth Settings] - [Bluetooth Information].
[189] How to UseSettingsBluetooth SettingsDeleting content received via a Bluetooth connection
You can delete content received by your Walkman via a Bluetooth connection.
- Select the content you want to delete.
- To delete music, from the Home menu, select [Music] - [Received Songs] - [System Storage] or [SD Card] - the content you want to delete.
-
To delete photos, from the Home menu, select [Photos] - [Received Photos] - [System Storage] or [SD Card] - the content you want to delete.
-
To delete videos, from the Home menu, select [Videos] - [Received Videos] - [System Storage] or [SD Card] - the content you want to delete.
- To delete music, from the Home menu, select
- In the playback screen, display the option menu and select [Delete This Song], [Delete Photo] or [Delete Video] - [Yes].
Hint
- To delete all content received via a Bluetooth connection, from the Home menu, select [Settings] - [Bluetooth Settings] - [Delete All Received Files] - [Yes].
- To delete all content in “RECEIVED” folder under [System Storage] or [SD Card], select [Delete All Received Files].
[190] How to UseSettingsAlarm/Sleep Timer SettingsSetting the alarm to on/off
You can set the alarm timer to on/off.

- From the Home menu, select [Settings].
- Select [Alarm/Sleep Timer] - [Alarm Settings] - [Alarm On/Off] - desired setting.
Hint
- Press the button () to stop the alarm.
Note
- When the alarm timer is set to [On], is displayed in the information area.
- The alarm will automatically stop after 60 minutes.
- When using headphones, the alarm volume is limited by the AVLS function, regardless of the [AVLS (Volume Limit)] settings.
- Do not fall asleep while wearing headphones. If you sleep wearing headphones, the headphone cord may wind around your neck, which may cause suffocation.
- The alarm will not sound in the following situations.
- While connected to a computer
- While in USB connection mode
- While processing a Bluetooth connection (though the alarm icon flashes in the information area)
- Set the alarm timer to [Off] if you intend not to use your Walkman for a long time.
[191] How to UseSettingsAlarm/Sleep Timer SettingsSetting the alarm time
You can set the alarm time, repeat setting and alarm sound.
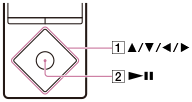
- From the Home menu, select [Settings].
- Select [Alarm/Sleep Timer] - [Alarm Settings] - desired item.
- Press the button () to select the item you want to set.
If you have selected [Alarm Time], press the button () to confirm.
[192] How to UseSettingsAlarm/Sleep Timer SettingsSetting a song as the alarm sound
You can select a song as the alarm sound.
- In the music playback screen, display the option menu and select [Set As Alarm Song].
[193] How to UseSettingsAlarm/Sleep Timer SettingsSetting the sleep timer
You can change the set time for the sleep timer.
- From the Home menu, select [Settings].
-
Select [Alarm/Sleep Timer] - [Sleep Timer Settings] - desired setting.
After setting the sleep timer, appears in the information area.
Note
- The sleep timer will not be activated in the following situations.
- While using [Auto Preset] for the FM radio
- While the alarm is going off
- If the power of your Walkman is turned off before the sleep timer is activated
- When your Walkman is connected to a computer via USB
- While processing a Bluetooth connection
- While deleting content on your Walkman
[194] How to UseSettingsSelecting HeadphonesSelecting headphones
The effect of the noise canceling function or the [Clear Phase™ ] function is optimized by selecting the compatible headphones.
- From the Home menu, select [Settings].
- Select [Select Headphones] - headphones that you use.
Select [Clear Phase™ ] - [On] if you use the “Clear Phase” function.
Hint
- Select [Other Headphones] to use headphones that do not support the noise canceling function. You cannot change the [Clear Phase™ ] setting nor activate the noise canceling function while [Other Headphones] is selected.
[195] How to UseSettingsSelecting HeadphonesOptimizing the sound characteristics
The [Clear Phase™ ] function optimizes the sound characteristics for the headphones you use. The compatible headphones for this product are MDR-NW750N/MDR-NW750NE.
- From the Home menu, select [Settings].
- Select [Select Headphones] - [MDR-NW750N/NE] - [On].
Note
- The [Clear Phase™ ] function does not work with headphone connected via the Bluetooth function.
- [Select Headphones] - [Clear Phase™ ] cannot be set when the [ClearAudio+] function is turned on. Turn the [ClearAudio+] function off before setting the [Clear Phase™ ] function.
- The [Clear Phase™ ] function does not have any effect on the sound of videos, video podcasts or FM radio.
[196] How to UseSettingsCommon SettingsDisplaying your Walkman information
Display information such as model name and system software version.
-
From the Home menu, select [Settings].
-
Select [Common Settings] - [Unit Information].
[197] How to UseSettingsCommon SettingsLimiting the volume
You can use AVLS (Automatic Volume Limiter System) to limit the maximum volume. This prevents the volume from getting too high and disturbing others, causing discomfort to your ears, or preventing you from hearing sounds around you, and it allows you to listen at a more comfortable volume.
-
From the Home menu, select [Settings].
-
Select [Common Settings] - [AVLS (Volume Limit)] - desired setting.
Note
- When using headphones, regardless of the [AVLS (Volume Limit)] settings, the alarm volume is limited by [AVLS (Volume Limit)].
- [AVLS (Volume Limit)] does not work during Bluetooth connections.
[198] How to UseSettingsCommon SettingsSetting the operation sound
You can turn the operation sounds of your Walkman on or off.
-
From the Home menu, select [Settings].
- Select [Common Settings] - [Beep Settings] - desired setting.
Note
- There is no beep during a Bluetooth connection.
[199] How to UseSettingsCommon SettingsSetting the screen off timer
You can set the time after which the screen is turned off when there are no operations.
-
From the Home menu, select [Settings].
- Select [Common Settings] - [Screen Off Timer] - desired setting.
Note
- The screen does not turn off in the following situations:
- While playing or deleting videos or video podcasts
- While playing songs in the playback screen with [Display Lyrics] set to [On (Screen Always On)] for music
- While accessing, creating or restoring databases
- While the alarm is going off
- While processing Bluetooth connections
- While scanning FM radio broadcast stations
- While presetting FM radio broadcast stations automatically
- The screen brightness is lowered while your Walkman is connected to a computer.
[200] How to UseSettingsCommon SettingsAdjusting the screen brightness
You can set the display brightness to one of five levels.
-
From the Home menu, select [Settings].
- Select [Common Settings] - [Brightness] - desired setting.
Hint
- Regardless of the brightness setting, the brightness of the screen may be low while connecting to a computer and charging.
[201] How to UseSettingsCommon SettingsSetting a photo as wallpaper
You can set your desired photo as the wallpaper by designating a photo stored on your Walkman.
- On the photo screen, display the option menu and select [Set as Wallpaper].
[202] How to UseSettingsCommon SettingsSetting the date and time
You can set the current date and time.
- From the Home menu, select [Settings].
- Select [Common Settings] - [Clock Settings] - [Set Date-Time].
- Press the button () to select “Year,” “Month,” “Day,” “Hour” or “Minute.”
- Press the button () to select numbers, and press the button ().
Hint
- You can select [12-hour] or [24-hour] for the time display format.
Note
- If you leave your Walkman for a long time without using it and the battery is completely discharged, the date and time you have set will be reset and [--:--] will be displayed.
- The clock may gain or lose up to 60 seconds per month.
[203] How to UseSettingsCommon SettingsSetting the date display format
You can set the date format for displaying the current date as [YYYY/MM/DD] (year/month/day), [MM/DD/YYYY] (month/day/year), or [DD/MM/YYYY] (day/month/year).
- From the Home menu, select [Settings].
- Select [Common Settings] - [Clock Settings] - [Date Display Format] - desired format.
[204] How to UseSettingsCommon SettingsSetting the time display format
You can select [12-hour] or [24-hour] for the time display style.
- From the Home menu, select [Settings].
- Select [Common Settings] - [Clock Settings] - [Time Display Format] - desired format.
[205] How to UseSettingsCommon SettingsCharging in the battery care mode
You can reduce deterioration of the battery by using the [Battery Care] mode. The battery duration is approximately 10 % shorter in the [Battery Care] mode, as your Walkman stops charging at about 90 % of the full charge.
- From the Home menu, select [Settings].
- Select [Common Settings] - [Battery Care] - [On].
Note
- In the [Battery Care] mode, the first bar of the battery indicator will disappear somewhat more quickly than normal. This is because your Walkman stops charging at about 90 % of the full charge, and is not a malfunction.
[206] How to UseSettingsCommon SettingsResetting to the factory settings
Your Walkman can be reset to the default settings. Resetting the Walkman will not delete content such as music.
-
From the Home menu, select [Settings].
-
Select [Common Settings] - [Reset/Format] - [Reset All Settings] - [Yes].
Note
- If you reset your Walkman to the factory settings, the pairing information of the connected Bluetooth devices will be deleted.
[207] How to UseSettingsCommon SettingsFormatting memory
You can initialize your Walkman by formatting the memory.
-
From the Home menu, select [Settings].
- Select [Common Settings] - [Reset/Format] - [Format System Storage] or [Format SD Card] - [Yes].
-
Follow the on-screen instructions to format the memory.
Note
- Be sure not to initialize (format) the memory of your Walkman using a computer. If you have formatted it with a computer, format it again using the Walkman.
- Formatting the memory erases all content data (songs, etc., including the sample data installed at the factory, and the supplied software installer). Be sure to check the data stored in the memory and export any important data to your computer before formatting.
[208] How to UseSettingsCommon SettingsRebuilding the library manually
Rebuild the library of your Walkman to add content stored in [System Storage] or [SD Card] to the library again.
- From the Home menu, select [Settings].
- Select [Common Settings] - [Reset/Format] - [Rebuild Library] - [Yes].
Hint
- If rebuilding of the library fails to be completed, format [System Storage].
Note
- Rebuilding the library erases the following data.
- Bookmarks
- Alarm settings
- The results of analysis by [SensMe™ Channels]
- The current song and the elapsed time
- The elapsed time of each video
- Wallpaper settings
Set them again after rebuilding is completed.
[209] How to UseSettingsCommon SettingsUsing USB connection mode
When connecting to a computer via USB, some computers may fail to establish a USB connection to your Walkman, causing it not to display [Connected USB (Storage in use: system storage)] or [Connected USB (Storage in use: SD card)].
In such a case, before connecting, display the USB connection standby screen to allow your Walkman to focus on establishing a USB connection with more reliability.
- From the Home menu, select [Settings].
- Select [Common Settings] - [USB Connection Mode] - [Yes].
Your Walkman enters USB connection standby mode, displaying the USB connection standby screen. After connecting to a computer via USB, [Connected USB (Storage in use: system storage)] or [Connected USB (Storage in use: SD card)] appears.
[210] How to UseSettingsLanguage SettingsSelecting the display language
You can select the language for menus and messages.
-
From the Home menu, select [Settings].
- Select [Language Settings] - desired language setting.
Hint
- Select the display language before transferring content.
[211] How to UseAnnouncementPrecautionsNotes on handling your Walkman
Warning
- Be sure not to short-circuit the terminals of your Walkman with metallic objects.
- Do not spill water on your Walkman or allow any foreign object to enter it. This may cause fire or electric shock. If this occurs, turn off the Walkman immediately, disconnect the Walkman from your computer, and consult your nearest Sony dealer or Sony Service Center.
- Do not place your Walkman in fire.
- Do not take apart or modify your Walkman. Doing so can result in electric shock. Consult your nearest Sony dealer or Sony Service Center for exchange of rechargeable batteries, internal checks, or repair.
-
Do not put any heavy object on top of your Walkman or apply a strong shock to it.
This may cause malfunction or damage.
The following descriptions are important for using your Walkman. Be sure to follow the instructions below.
- Charging time differs depending on battery usage conditions.
- If the battery life is reduced to about half of its normal life even if sufficiently charged, it has probably worn out. Please contact your nearest Sony dealer.
-
Do not touch the rechargeable battery with bare hands if it is leaking. Consult your nearest Sony dealer if the battery has leaked as battery liquid may remain in your Walkman. If the liquid gets into your eyes, do not rub your eyes as this may lead to blindness. Wash out your eyes with clean water and consult a doctor.
If the liquid gets onto your body or clothes, wash it off immediately. Failure to do so may cause burns or injury. Consult a doctor if you are burned or injured by the liquid from the battery.
- Heat may build up in your Walkman while charging if it is used for an extended period of time.
- Note that condensation may form temporarily in cases such as when your Walkman is moved quickly from a low-temperature environment to a high-temperature environment, or used in a room where a heater has just been turned on. Condensation is a phenomenon where moisture in the air adheres to surfaces such as metal panels and then changes to liquid. If condensation forms in the Walkman, leave it turned off until the condensation disappears. If you use the Walkman with condensation present, a malfunction may result.
- If you use your Walkman in a cold location, images may appear with black bands around them. This is not a malfunction of the Walkman.
- If your Walkman causes interference to radio or television reception, turn the Walkman off and move it away from the radio or television.
-
Mild tingling may be felt on your ears in particularly dry air conditions. This is a result of static electricity accumulated in the body, and it is not a malfunction of your Walkman.
This effect can be minimized by wearing clothes made from natural materials.
-
When using a strap (not supplied), be careful to avoid catching it on objects you pass by.
Also, be careful not to swing your Walkman by the strap to avoid bumping people.
- Refrain from using your Walkman as is requested by in-flight announcements during takeoff or landing in an aircraft.
- If you see lightning or hear thunder, take off the headphones immediately and refrain from using your Walkman.
- If you experience an allergic reaction while using headphones of a Walkman model supplied with headphones, stop using it immediately and contact a doctor.
- Never use your Walkman where it will be subjected to extreme light, temperatures, humidity or vibration. For example, never leave the Walkman in a car parked in the sun or in direct sunlight. It may become discolored, distorted or damaged.
- Do not leave your Walkman in a place subject to excessive dust.
- Do not leave your Walkman on an unstable surface or in an inclined position.
- When unplugging the headphones from your Walkman, make sure to hold the headphone plug. Pulling by the headphone cord itself may damage it.
- Do not apply strong force to the surface of the display. This may cause a distortion in colors or brightness, or it may cause a malfunction of the display.
- Be sure to follow the precautions below when using your Walkman. Failure to do so may warp the casing or cause the Walkman to malfunction.
- Do not sit down with your Walkman in your back pocket.

-
Do not put your Walkman in a bag with the headphones/earphones cord wrapped around it and subject the bag to strong impact.

- Do not sit down with your Walkman in your back pocket.
-
Do not expose your Walkman to water. The Walkman is not waterproof. Be sure to follow the precautions below.
- Be careful not to drop your Walkman into a sink or other container filled with water.
- Do not use your Walkman in humid locations or wet weather such as rain or snow.
-
Do not get your Walkman wet.
If you touch your Walkman with wet hands or put the Walkman in a damp article of clothing, the Walkman may get wet, which may cause a malfunction.

- Sample data is pre-installed on your Walkman.
- Sample data is not installed in some countries/regions.
- If you delete the sample data, you cannot restore it, and we will not supply any replacement data.
- Sony is not responsible for incomplete recording/downloading or damaged data due to problems with your Walkman or computer.
Notes on storing lithium-ion rechargeable batteries
A lithium-ion rechargeable battery is built into your Walkman. When you store it for a long period of time, be sure to follow the storage instructions below.
- Leaving a charged battery unused for a long period of time causes deterioration of the battery and results in a decrease of battery capacity. The deterioration is more severe when the battery is stored with a full charge, and is accelerated by prolonged exposure to heat such as when leaving your Walkman in a car while connected to the power port. Store the Walkman at temperatures below 35 °C (95 ºF). Charging or discharging the battery to approximately 50 % of capacity before storing is also recommended.
- The battery deteriorates when left in a depleted condition. Charge the battery to approximately 50 % of capacity at least once every six to twelve months to prevent deterioration.

[212] How to UseAnnouncementPrecautionsNotes on headphones
Road safety
Avoid listening with your headphones in situations where hearing must not be impaired.
Preventing hearing damage
Avoid using the headphones at a high volume. Hearing experts advise against continuous, loud, and extended play. If you experience a ringing in your ears, reduce the volume or discontinue use.
Do not turn the volume up high all at once, especially when using headphones. Turn up the volume gradually to avoid excessive levels hurting your ears.
Consideration for others
Keep the volume at a moderate level. This will allow you to hear outside sounds and to be considerate to the people around you.
About the in-ear headphones
The earbuds seal your ears. Therefore, be aware that there is a risk of damage to your ears or eardrums if strong pressure is applied to the earbuds or the earbuds are suddenly removed from your ears. After use, be sure to take the earbuds off your ears gently.
[213] How to UseAnnouncementPrecautionsNotes on the software
- Copyright laws prohibit reproducing the software or the manual accompanying it, in whole or in part, or renting the software without the permission of the copyright holder.
- In no event will Sony be liable for any financial damage or loss of profits, including claims made by third parties, arising out of the use of the supplied software.
- The supplied software cannot be used with equipment other than that to which it is designated.
- Please note that, due to continued efforts to improve quality, the software specifications may be changed without notice.
- Operation of your Walkman with software other than that supplied is not covered by the warranty.
- The explanations in this manual assume that you are familiar with the basic operations of your computer.
For details on the use of your computer and operating system, please refer to the respective manuals.
[214] How to UseAnnouncementPrecautionsMaintenance of your Walkman
- Clean your Walkman with a soft cloth, such as a cleaning cloth for eyeglasses.
- If the headphone plug is dirty, it may cause noise or sound skipping. To enjoy listening with good sound, wipe the headphone plug occasionally with a soft dry cloth.
- Should your Walkman become excessively dirty, clean it with a soft cloth slightly moistened with water or mild detergent solution, being careful not to allow water to get inside the Walkman and headphones.
- Do not use any type of abrasive pad, scouring powder, or solvent such as alcohol or benzene as doing so may damage the surface of your Walkman.
[215] How to UseAnnouncementCustomer Support WebsiteCustomer support website
If you have any questions or issues with your Walkman, or would like information on compatible items with the Walkman, visit one of the following websites.
For customers in the USA:
For customers in Latin America:
For customers in Europe:
For customers in Asia/Oceania/Middle East/Africa:
English
http://www.sony-asia.com/support
Korean
https://scs.sony.co.kr/scs/handler/ProductSupport
Simplified Chinese
http://service.sony.com.cn/KB/
Traditional Chinese
For customers who purchased the overseas models:
[216] How to UseSpecificationsSpecificationsSpecifications
Display
Size/resolution
2.2-inch (5.6 cm), QVGA (320 × 240 Pixels), 262,144 colors
Panel type
TFT color display with white LED-backlight
Interface
USB
Hi-Speed USB (USB 2.0 compliant)
Headphone
Stereo mini-jack
WM-PORT
WM-PORT (multiple connecting terminal): 22 pins
External memory
microSD
microSDHC
microSDXC
FM radio
FM Frequency range
87.5 MHz to 108.0 MHz
Antenna
Headphone cord antenna
Bluetooth
Bluetooth Specifications
- Communication system: Bluetooth specification version 3.0
- Frequency band: 2.4 GHz band (2.4000 GHz - 2.4835 GHz)
- Modulation method: FHSS
- Compatible Bluetooth profiles (*1)
- A2DP (Advanced Audio Distribution Profile)
- AVRCP (Audio Video Remote Control Profile)
- OPP (Object Push Profile)
- Supported Codec (*2): SBC (*3), aptX, LDAC
Output (headphones)
Frequency response
20 Hz to 40,000 Hz (when playing data file, single signal measurement)
Noise canceling system
Digital Noise canceling
Select NC Environment: Full-auto AINC, Bus/Train, Airplane, Office
Power Source
Built-in Rechargeable lithium-ion Battery
USB power (from a computer via a USB connector of the player)
Charging Time
USB-based charging
Approx. 4 hours
Operating temperature
5 °C to 35 °C (41 ºF to 95 ºF)
Dimensions
w/h/d, projecting parts not included
43.6 mm × 109 mm × 8.7 mm (1 3/4 inches x 4 3/8 inches x 11/32 inches)
w/h/d
44.4 mm × 109.1 mm × 9.1 mm (1 3/4 inches x 4 3/8 inches x 3/8 inches)
Mass
66 g (2.4 oz)
Capacity
Capacity
NW-A25: 16 GB
NW-A25HN: 16 GB
NW-A26HN: 32 GB
NW-A27HN: 64 GB
(*1) Bluetooth profiles are standardized according to the purpose of the Bluetooth device.
(*2) Codec indicates the audio signal compression and conversion format.
(*3) SBC stands for Subband Codec.
[217] How to UseSpecificationsSpecificationsBattery life
The values shown below are the approximate battery life when content is played continuously at the default settings.
Music
MP3 128 kbps
Noise Cancel ON: Approx. 43 Hrs
Noise Cancel OFF: Approx. 50 Hrs
AAC 256 kbps
Noise Cancel ON: Approx. 41 Hrs
Noise Cancel OFF: Approx. 48 Hrs
FLAC 96 kHz/24 bit
Noise Cancel ON: Approx. 35 Hrs
Noise Cancel OFF: Approx. 40 Hrs
FLAC 192 kHz/24 bit
Noise Cancel ON: Approx. 27 Hrs
Noise Cancel OFF: Approx. 30 Hrs
Video
MPEG-4 384 kbps
Noise Cancel ON: Approx. 13 Hrs
Noise Cancel OFF: Approx. 14 Hrs
FM Radio
Noise Cancel ON: Approx. 20 Hrs
Noise Cancel OFF: Approx. 22 Hrs
Bluetooth
MP3 128 kbps
SBC (Connection): Approx. 23 Hrs
FLAC 96 kHz/24 bit
LDAC (Standard): Approx. 16 Hrs
Note
- Even if the player is turned off for an extended period, a small amount of battery power is still consumed.
- Battery life may vary depending on volume setting, conditions of use and ambient temperature.
Hint
- When [Brightness] is set to [5], the battery life is about 45 % shorter than when it is set to [3].
- When more than one of the sound quality settings is enabled, the battery life is about 50 % shorter than when all sound quality settings are disabled.
- The battery life for continuous playback via a Bluetooth connection may become 40 % to 70 % shorter depending on the content format or the settings of the connected device.
[218] How to UseSpecificationsSpecificationsMaximum recordable number of songs and time (Approx.)
The approximate times are based on the case in which you transfer or record only 4 minute songs.
Number
NW-A25 (16 GB)
MP3 128 kbps: Approx. 3,600 songs
AAC 256 kbps: Approx. 1,800 songs
FLAC 44.1 kHz/16 bit: Approx. 330 songs
FLAC 192 kHz/24 bit: Approx. 50 songs
NW-A25HN (16 GB)
MP3 128 kbps: Approx. 3,600 songs
AAC 256 kbps: Approx. 1,800 songs
FLAC 44.1 kHz/16 bit: Approx. 330 songs
FLAC 192 kHz/24 bit: Approx. 50 songs
NW-A26HN (32 GB)
MP3 128 kbps: Approx. 7,600 songs
AAC 256 kbps: Approx. 3,800 songs
FLAC 44.1 kHz/16 bit: Approx. 690 songs
FLAC 192 kHz/24 bit: Approx. 100 songs
NW-A27HN (64 GB)
MP3 128 kbps: Approx. 15,000 songs
AAC 256 kbps: Approx. 7,700 songs
FLAC 44.1 kHz/16 bit: Approx. 1,400 songs
FLAC 192 kHz/24 bit: Approx. 200 songs
Time
NW-A25 (16 GB)
MP3 128 kbps: Approx. 213 hr. 20 min.
AAC 256 kbps: Approx. 106 hr. 40 min.
FLAC 44.1 kHz/16 bit: Approx. 19 hr. 20 min.
FLAC 192 kHz/24 bit: Approx. 2 hr. 40 min.
NW-A25HN (16 GB)
MP3 128 kbps: Approx. 213 hr. 20 min.
AAC 256 kbps: Approx. 106 hr. 40 min.
FLAC 44.1 kHz/16 bit: Approx. 19 hr. 20 min.
FLAC 192 kHz/24 bit: Approx. 2 hr. 40 min.
NW-A26HN (32 GB)
MP3 128 kbps: Approx. 480 hr. 00 min.
AAC 256 kbps: Approx. 240 hr. 00 min.
FLAC 44.1 kHz/16 bit: Approx. 43 hr. 20 min.
FLAC 192 kHz/24 bit: Approx. 6 hr. 40 min.
NW-A27HN (64 GB)
MP3 128 kbps: Approx. 1,000 hr. 00 min.
AAC 256 kbps: Approx. 506 hr. 40 min.
FLAC 44.1 kHz/16 bit: Approx. 86 hr. 40 min.
FLAC 192 kHz/24 bit: Approx. 13 hr. 20 min.
[219] How to UseSpecificationsSpecificationsMaximum recordable time of videos (Approx.)
The approximate times are estimated in the case where only videos are transferred. The time may differ, depending on the conditions under which the player is used.
NW-A25 (16 GB)
Video: 384 kbps/Music: 128 kbps
Approx. 49 hr. 00 min.
NW-A25HN (16 GB)
Video: 384 kbps/Music: 128 kbps
Approx. 49 hr. 00 min.
NW-A26HN (32 GB)
Video: 384 kbps/Music: 128 kbps
Approx. 108 hr. 40 min.
NW-A27HN (64 GB)
Video: 384 kbps/Music: 128 kbps
Approx. 228 hr. 00 min.
[220] How to UseSpecificationsSpecificationsSupported formats
Music (Music player)
Audio Formats
MP3
Media File format: MP3 (MPEG-1 Layer3) file format
File extension: .mp3
Bit rate: 32 kbps to 320 kbps (Supports variable bit rate (VBR))
Sampling frequency (*1): 32, 44.1, 48 kHz
WMA (*2)
Media File format: ASF file format
File extension: .wma
Bit rate: 32 kbps to 192 kbps (Supports variable bit rate (VBR))
Sampling frequency (*1): 44.1 kHz
FLAC
Media File format: FLAC file format
File extension: .flac
Bit depth: 16, 24 bit
Sampling frequency (*1): 8, 11.025, 12, 16, 22.05, 24, 32, 44.1, 48, 88.2, 96, 176.4, 192 kHz
Linear PCM
Media File format: Wave-Riff file format
File extension: .wav
Bit depth: 16, 24 bit
Sampling frequency (*1): 8, 11.025, 12, 16, 22.05, 24, 32, 44.1, 48, 88.2, 96, 176.4, 192 kHz
AAC (*3)
Media File format: MP4 file format
File extension: .mp4, .m4a, .3gp
Bit rate: 16 kbps to 320 kbps (Supports variable bit rate (VBR)) (*4)
Sampling frequency (*1): 8, 11.025, 12, 16, 22.05, 24, 32, 44.1, 48 kHz
HE-AAC
Media File format: MP4 file format
File extension: .mp4, .m4a, .3gp
Bit rate: 32 kbps to 144 kbps
Sampling frequency (*1): 8, 11.025, 12, 16, 22.05, 24, 32, 44.1, 48 kHz
Apple Lossless
Media File format: MP4 file format
File extension: .m4a, .mp4
Bit depth: 16, 24 bit
Sampling frequency (*1): 8, 11.025, 12, 16, 22.05, 24, 32, 44.1, 48, 88.2, 96, 176.4, 192 kHz
AIFF
Media File format: AIFF file format
File extension: .aif, .aiff, .afc, .aifc
Bit depth: 16, 24 bit
Sampling frequency (*1): 8, 11.025, 12, 16, 22.05, 24, 32, 44.1, 48, 88.2, 96, 176.4, 192 kHz
Video
Video Formats
AVC (H.264/AVC)
Media File format: MP4 file format, “Memory Stick” video format
File extension: .mp4, .m4v
Profile: Baseline Profile
Level: 1.2, 1.3, 2, 2.1, 2.2, 3
Bitrate: Max 10 Mbps
Frame rate: Max 30 fps
Resolution: Max 720 x 480 (*5)
MPEG-4
Media File format: MP4 file format, “Memory Stick” video format
File extension: .mp4, .m4v
Profile: Simple Profile
Bitrate: Max 6 Mbps
Frame rate: Max 30 fps
Resolution: Max 720 x 480 (*5)
Windows Media Video 9
Media File format: ASF file format
File extension: .wmv
Profile: VC1 simple profile, main profile
Bitrate: Max 6 Mbps
Frame rate: Max 30 fps
Resolution: Max 720 x 480 (*5)
Audio Formats
AAC-LC (for AVC, MPEG-4)
Channel number: Max 2 channels
Sampling frequency (*1): 24, 32, 44.1, 48 kHz
Bit rate: Max 288 kbps/channel
WMA (for Windows Media Video 9) (*6)
Bit rate: 32 kbps to 192 kbps (Supports variable bit rate (VBR))
Sampling frequency (*1): 44.1 kHz
Photo (*7) (Photo Viewer)
Photo Formats
JPEG
Media File format: Compatible with DCF 2.0/Exif 2.21 file format
File extension: .jpg
Profile: Baseline Profile
Number of pixels: Max. 4,096 x 4,096 pixels (16,000,000 pixels)
Note
- Files that are 4 GB or larger cannot be played back.
- This product recognizes audio sources exceeding CD quality (44.1 kHz/16 bit quantization) and DAT quality (48 kHz/16 bit quantization) as high-resolution audio.
The “HR” symbol is displayed for high-resolution audio sources.
(*1) Sampling frequency may not correspond to all encoders.
(*2) Copyright protected WMA files cannot be played back.
(*3) Copyright protected AAC-LC files cannot be played back.
(*4) Non-standard bit rates or non-guaranteed bit rates are included depending on the Sampling frequency.
(*5) These numbers indicate the maximum resolution of playable video, and do not indicate the player’s display resolution. The display resolution is 320 x 240.
(*6) Some WMV files can be played back only by transferring using Windows Media Player.
(*7) Some photo files cannot be played back, depending on their file formats.
[221] How to UseSpecificationsSpecificationsSystem requirements
- Computer
- Windows Vista® (Service Pack 2 or later)
- Windows® 7 (Service Pack 1 or later)
- Windows® 8
- Windows® 8.1
- Windows® 10
- Mac OS® X v10.6 or later
Pre-installed OS only supported.
[Compatibility mode] is not supported.
- PC application for Windows
- Media Go application for Windows (recommendation)
- Internet connection
- Hard Disk Drive/Solid State Drive: 400 MB or more of available space
- PC application for Mac
- Content Transfer for Mac application for Mac (recommendation)
- Internet connection
- Hard Disk Drive/Solid State Drive: 30 MB or more of available space
- Web browser: Internet Explorer 7 or later
- Internet: Internet connection (for Gracenote® MusicID® service, podcast features, Store access, or online help)
Not supported by the following environments:
- Personally constructed computers or operating systems
- An environment that is an upgrade of the original manufacturer-installed operating system
- Multi-boot environment
We do not guarantee operation for all computers even if they meet the above System Requirements.
[222] How to UseSpecificationsSpecificationsContents
List of accessories and manuals supplied with your Walkman.
- Walkman (1)
- USB cable (1)
- Startup Guide (1)
- Instruction Manual (1)
NW-A25HN/A26HN/A27HN
- Headphones (1)
MDR-NW750N or MDR-NW750NE (only for Europe and Korea)
- Earbuds (1 set)
- Clip (for Headphones) (1)
Note
- microSD card is not supplied with your Walkman.
[223] TroubleshootingTroubleshootingWhat Can I Do to Solve a Problem?What can I do to solve a problem?
If your Walkman does not function as expected, try the following steps to resolve the issue.
Before restarting your Walkman, disconnect the Walkman from your computer and check that no content such as music is being played back. Otherwise, the data may be damaged. You can then restart the Walkman safely.
- Check the topic on the issue in “Q&A.”
- Connect your Walkman to your computer to charge the battery.
You may be able to resolve some issues by charging the battery.
-
Press the button ( ) with a pen or paper clip, etc. to restart your Walkman.
- Check information on the issue in the help of the software having problems.
- Look up information on the issue on one of the customer support websites.
- If the approaches listed above fail to resolve the issue, consult your nearest Sony dealer.
Note
- Data will not be deleted, nor will any settings be changed by restarting.
[224] TroubleshootingTroubleshootingWhat Can I Do to Solve a Problem?Customer support website
If you have any questions or issues with your Walkman, or would like information on compatible items with the Walkman, visit one of the following websites.
For customers in the USA:
For customers in Latin America:
For customers in Europe:
For customers in Asia/Oceania/Middle East/Africa:
English
http://www.sony-asia.com/support
Korean
https://scs.sony.co.kr/scs/handler/ProductSupport
Simplified Chinese
http://service.sony.com.cn/KB/
Traditional Chinese
For customers who purchased the overseas models:
[225] TroubleshootingQ&AOperationYour Walkman does not operate or the power does not turn on.
- If you transfer a lot of content such as music to your Walkman at once, it will take time to build the database on the Walkman. Therefore, it will take more than 1 minute until the Walkman becomes operable again after you disconnect the Walkman from your computer.
- If the HOLD switch is set to the HOLD position, slide the switch to the opposite position.
- If your Walkman contains moisture condensation, wait a few hours to let the Walkman dry out.
- If the remaining battery power is low or insufficient, charge the battery.
- If your Walkman still does not operate after charging the battery, press the RESTART button with a pen or a paper clip, etc., to restart the Walkman.
[226] TroubleshootingQ&AOperationYour Walkman does not work properly.
-
Your Walkman may not work properly if the USB device (e.g. computer) to which it is connected is turned on or off without disconnecting the Walkman.
Restart your Walkman by pressing the RESTART button with a pen or a paper clip, etc.
[227] TroubleshootingQ&AOperationYour Walkman power turns off or on automatically.
- If a malfunction occurs, your Walkman turns off and then on again automatically.
[228] TroubleshootingQ&AOperationYou want your Walkman screen to stay on longer before it turns off automatically.
- You can set the screen off timer settings in [Screen Off Timer].
[229] TroubleshootingQ&AOperationThe date and time have been reset.
- If you leave your Walkman for a while with the battery used up, the date and time may be reset. This is not a malfunction. Charge the battery, and then set the date and time again.
[230] TroubleshootingQ&AOperationA drink (water, coffee, etc.) was spilled on your Walkman, or the Walkman was washed in the washing machine.
-
If you spill a drink on your Walkman or wash it in a washing machine, liquid may get inside the Walkman. Stop using the Walkman immediately and consult your nearest Sony dealer.
[231] TroubleshootingQ&AOperationThe earbuds supplied with the headphones are missing.
-
If you lose or break the earbuds supplied with your headphones, please contact your nearest Sony dealer.
[232] TroubleshootingQ&AOperationYou want to back up the content such as music stored on your Walkman.
- Connect to a computer and copy the files onto the computer.
- If you have already deleted content transferred to your Walkman from Media Go, transfer the content from the Walkman to Media Go again.
[233] TroubleshootingQ&AOperationYou want to find the product name (model name) of your Walkman.
- The model name is the alphabetical name starting with NW that is printed on the back of your Walkman. If the Walkman is inside a case, you need to remove it from the case to find the name.
[234] TroubleshootingQ&AOperation An alarm (beep) is heard and the message [Check the volume level] is displayed.
- An alarm (beep) and a warning [Check the volume level] are meant to protect your ears when you turn the volume up to a level that is harmful for your ears for the first time. You can cancel the alarm and warning by pressing any button.
- You can turn up the volume after canceling the alarm and warning.
- After the initial warning, the alarm and warning repeat every 20 cumulative hours that the volume is set to a level that is harmful for your ears. When this happens, the volume is turned down automatically.
[235] TroubleshootingQ&ASoundThere is no sound.
- Check that the volume level is not set to zero.
- Check whether the plug is inserted firmly in the headphone jack. Sound will be impaired if the headphones are not connected properly. Insert the plug until it clicks into place.
- If the plug is dirty, wipe it clean with a soft dry cloth.
- Sound is not emitted from the headphones connected to the headphone jack when a Bluetooth audio device is connected via a Bluetooth connection.
- If there is no sound from a Bluetooth audio device, pairing or connection may not have been completed. Check the Bluetooth connection.
- If the problem persists after performing the remedies above, use a pen or paper clip, etc., to press the RESTART button and restart your Walkman.
[236] TroubleshootingQ&ASoundContent such as music suddenly stops during playback.
- The remaining battery power is low or the battery has run out.
- The content may not be supported on your Walkman. Select and play other content.
- If a Bluetooth audio device is connected, check the connection status.
[237] TroubleshootingQ&ASoundNoise is generated.
- When the noise canceling function is on, you may hear more noise if you are listening in a quiet place or because of the type of noise in that location. If this occurs, turn the noise canceling function off.
- The sound pressure sensitivity of the noise canceling headphones that are compatible with your Walkman is set to the highest level to obtain the maximum noise canceling effects when the headphones are used in places where there is a lot of noise, such as outside or on trains and you may therefore hear more noise when using the headphones in a quiet location or because of the type of noise in that location. In this case we recommend turning the noise canceling function off, although there are cases in which noise can be heard irrespective of whether this function is turned on or off.
- If using your Walkman near a device that emits radio waves such as a mobile phone, move the Walkman away from the device.
- The content such as music on your Walkman may be corrupted. Connect the Walkman to a Windows computer and use Media Go or Windows Explorer to delete the content in which the noise occurred from the Walkman. If you use a Mac computer, use the Finder to delete the corrupted content. After you have deleted the corrupted content, transfer the content from the computer to the Walkman again. Do not perform any other tasks on the computer while transferring content to the Walkman. Doing so may cause the content to be corrupted.
- If the plug is dirty, wipe it clean with a soft, dry cloth.
- If your Walkman is connected to a Bluetooth audio device, check the connection status.
[238] TroubleshootingQ&ASoundVolume cannot be turned up, or the volume remains low when the playback volume is turned up.
- If the HOLD switch is in the HOLD position, slide it to the opposite position.
- If the AVLS (Volume Limit) setting is activated, deactivate it.
- When listening on a Bluetooth audio device, turn up the volume control of the Bluetooth audio device.
- If the volume level cannot be adjusted directly on the Bluetooth audio device, increase the volume on your Walkman.
[239] TroubleshootingQ&ASoundSound can only be heard from one side of the headphones.
- Sound will not be output properly if the plug is not inserted correctly into the jack. Insert the headphone plug until it clicks into place.
- Wires inside the headphone cable may be broken due to unnecessary force, etc. being applied to the cable. If this occurs while using the supplied headphones with a Walkman model supplied with headphones, contact your nearest Sony dealer for repairs.
[240] TroubleshootingQ&ASoundSound is interrupted or skips.
-
The sound may be interrupted or skip depending on the environment where your Walkman is used or the settings of the Walkman.
Following the procedures below may reduce the amount of skipping or interruptions.- Set all sound quality settings to off.
- If you are listening to music using the Bluetooth function, see “Notes on the Bluetooth function.”
- When listening to songs with the noise canceling function on inside transportation such as a bus or train, large vibrations other than the driving noise (such as when the vehicle drives over a large bump) may be transmitted to the headphone unit's built-in microphone due to your seating position, which may cause the sound to cut out. This phenomenon can be improved by reducing the [Set Noise Cancel Level] value. Set the [Set Noise Cancel Level] value to a smaller value for use.
[241] TroubleshootingQ&ASoundSound is interrupted between songs.
- To play songs without interruption (gapless playback), import (rip) content from media in AAC, MP3, or FLAC format to the latest version of Media Go, and then transfer them to your Walkman.
[242] TroubleshootingQ&ASoundThe sound effect settings do not seem to have any effect.
-
Sound effect settings are not applied in the following cases.
- During video playback
- During podcast playback
- While listening to FM radio
[243] TroubleshootingQ&APowerYou cannot charge your Walkman.
-
The battery cannot be charged while
is displayed because the protection function is engaged.
Charge the battery within the ambient temperature range of 5 °C to 35 °C (41 ºF to 95 ºF).
-
You need to turn the computer power on in order to charge your Walkman. Check whether the computer is in standby (sleep) or hibernation status.
-
Check that the USB connection to the computer is made properly.
-
There may be bad electrical contact in the connector. Disconnect your Walkman, and then reconnect it.
-
Use the supplied USB cable.
-
Your Walkman may not be able to connect properly to your computer when using a USB hub. Connect the Walkman directly to a USB connector on your computer.
-
Check whether the operating system and operating system version installed on the computer are compatible with your Walkman.
-
The battery may have deteriorated if you have not used your Walkman for more than a year. Contact your nearest Sony dealer.
- If the remedies above do not solve the problem, use a pen or paper clip, etc. to press the RESTART button and restart your Walkman, and then connect again using USB.
[244] TroubleshootingQ&APowerHow long is the life of the built-in rechargeable battery?
-
This will differ depending on the environment where your Walkman is used, but on average the built-in rechargeable battery can be charged approximately 500 times. The battery life becomes shorter and capacity is reduced as a result of the number of times it is recharged or used, and the environment in which it is used. When the usable battery life is half the usual time even when the battery is fully charged, the battery should be replaced.
-
Consult your nearest Sony dealer for more details on the life of the built-in battery.
[245] TroubleshootingQ&APowerThe rechargeable battery needs to be replaced.
-
To replace rechargeable batteries, your Walkman needs to be taken apart professionally. Do not take apart the Walkman by yourself.
-
Consult your nearest Sony dealer or Sony Service Center for replacement of rechargeable batteries.
[246] TroubleshootingQ&APowerThe battery life is short.
- If your Walkman is used in an environment where the temperature is below 5 °C (41 ºF), the battery life becomes shorter due to characteristics of the battery. This is not a malfunction.
- Charge the battery until it is full.
- The battery life can be extended by using wired headphones instead of Bluetooth audio devices.
- More battery power is consumed when the Bluetooth function is used.
- More battery power is consumed when the noise canceling function is used.
-
When [Battery Care] is set to [On], the maximum recharge capacity is limited to about 90 %, resulting in the first bar of the battery indication disappearing quickly.
- You can preserve the battery life and get more use from each charge by changing your Walkman settings and managing the power appropriately.
- Depending on the environment in which your Walkman is used, the battery may deteriorate if it is not used for over a year. Contact your nearest Sony dealer.
- If the usable battery life is half that when new even after sufficiently charging the battery, your battery may have deteriorated. Contact your nearest Sony dealer.
[247] TroubleshootingQ&APowerHow long is the standard battery duration?
-
For details on the battery duration, see “Battery life.”
[248] TroubleshootingQ&APowerHow long does it take to charge the battery?
-
For details on the charging time, see “Specifications.”
[249] TroubleshootingQ&APowerThe battery runs out fast when you turn on the battery care mode.
-
When charging the battery in battery care mode, the battery status icon is full when charging is complete. However, the time it takes for the first bar of the battery indication to disappear is quicker than when the battery is charged to 100 %.
[250] TroubleshootingQ&AConnection to a ComputerThe computer does not recognize your Walkman.
- If the remaining battery power is low, charge the battery.
- When you use your Walkman for the first time, or if you have not used the Walkman for a long time, it may take a few minutes to be recognized by the computer. Check that the computer recognizes the Walkman after you have connected it to the computer for about 10 minutes.
- Make sure that the USB connection to the computer is made properly and securely.
- Use the supplied USB cable.
- Your Walkman may not be recognized if connected via a USB hub. Connect the Walkman directly to the USB connector on your computer.
- Change the setting to [USB Connection Mode].
- If the approaches listed above fail to resolve the issue, press the RESTART button with a pen or a paper clip, etc., to restart your Walkman, and then try the USB connection again.
[251] TroubleshootingQ&AConnection to a ComputerThe computer does not recognize a microSD card inserted in your Walkman.
- [System Storage] is selected as the memory to use. Change the memory to use to [SD Card] by following the instructions shown on the display of your Walkman.
- Make sure that no data is being transferred by checking your Walkman screen. Disconnect the USB cable from your computer, and then connect it again.
- Back up all of the data on the microSD card (not supplied) to your computer, and then initialize (format) the microSD card with your Walkman.
[252] TroubleshootingQ&AConnection to a ComputerEven if you use “Safely Remove Hardware” on the computer, [Connected USB (Storage in use: system storage)] or [Connected USB (Storage in use: SD card)] remains displayed on your Walkman screen.
-
When using Windows Vista, Windows 7, Windows 8, Windows 8.1 or Windows 10, the Walkman screen remains as [Connected USB (Storage in use: system storage)] or [Connected USB (Storage in use: SD card)]. This is not a problem provided that the "Safely Remove Hardware" operation is complete. Disconnect your Walkman from the computer.
[253] TroubleshootingQ&AConnection to a ComputerYou cannot install software to your computer.
- If other software is running, it may interfere with the installation. Be sure to quit all other software before installing this software. Particularly, be sure to disconnect from the Internet and quit security software as it can put a heavy load on the computer.
- There may not be enough free space on the hard drive. Check the amount of free hard drive space required to install the software, and then delete any unnecessary files.
- With a Windows computer, you may not be able to install the software if your account does not have administrator privileges or if you have not logged in as a computer administrator. Log in using an account with administrator privileges or as the computer's administrator. Furthermore, if two-byte characters are used in the user name, create a new account using only one-byte characters in the user name.
- With a Windows computer, a message dialog may be hidden by the install screen, making the install process seem stopped. Press and hold the “Alt” key while pressing the “Tab” key several times. When the dialog is displayed, follow the instructions in the dialog box.
[254] TroubleshootingQ&AConnection to a ComputerThe progress bar on the install screen does not proceed while installing the software.
- Wait until the installation is completed, because it is progressing properly. Installation may take 30 minutes or more depending on the computer used.
[255] TroubleshootingQ&AConnection to a ComputerYour Walkman is not recognized by Media Go.
- Your Walkman may not be recognized by the computer. Disconnect the Walkman from the computer, and then reconnect it.
-
The software may have failed to install correctly. Use the installer to re-install the software. The imported data will remain untouched.
- If the remedies above do not solve the problem, use a pen or paper clip, etc. to press the RESTART button and restart your Walkman, and then connect again via USB.
[256] TroubleshootingQ&AConnection to a ComputerContent such as music cannot be transferred from the computer to your Walkman.
- Check that the USB connection to the computer is made properly.
- Use the supplied USB cable.
- You may not be able to transfer content when using a USB hub. Connect directly to the USB connector on your computer.
- The version of the installed Media Go may not be the latest. Install the latest version via the Internet.
- To transfer content to a microSD card inserted in your Walkman, set the destination for transferring content to the microSD card by following the instructions shown on the display of your Walkman.
- There is not enough free space in your Walkman, or the number of files has exceeded the maximum number of transferable files. Delete any unnecessary content to increase free space. For details on the number of files recordable, see the following.
- “Maximum recordable number of songs and time (Approx.)”
- “Maximum recordable time of videos (Approx.)”
- Songs with a limited playing period or playing count may not be transferred due to restrictions set by copyright holders. For details on the settings of each audio file, contact the distributor.
- Some of the content on your Walkman may be damaged. Copy the content that you need onto the computer and initialize (format) the Walkman.
- If the software is not compatible with your Walkman, install compatible software and use the compatible software to transfer content.
- You may be attempting to transfer corrupted content. Delete the content that cannot be transferred from the computer, and import this content to the computer again. Do not perform any other tasks on the computer when transferring content to your computer. Doing so may cause the content to be corrupted.
- You may be attempting to transfer a file that is not in playable format. See “Supported formats.”
- Transferring may be stopped due to noise such as static electricity accumulated in the computer. This happens to protect data. Disconnect your Walkman, and then reconnect it.
[257] TroubleshootingQ&ADisplaying/Playing/Deleting ContentYou cannot play content such as music transferred to your Walkman.
-
If the remaining battery power is low or insufficient, charge the battery. If your Walkman still does not operate after charging the battery, press the RESTART button with a pen or a paper clip, etc. to restart the Walkman.
-
The data hierarchy levels of the content such as music transferred by drag-and-drop may not be correct. Place them in the appropriate folder and hierarchy.
-
Transferred files are not in a playable format. See “Supported formats” for details on playable formats.
-
When you transfer audio MP4 files by drag-and-drop, place them in the “MUSIC” folder of your Walkman.
-
The transferred content may be damaged. When you transfer content, make sure that no other tasks are running on your computer until transferring is completed. Otherwise, the content may be damaged. Delete the unplayable content from your Walkman and transfer it again. If the Walkman is still unable to play the content, format the built-in flash memory of the Walkman using the function of the Walkman and then transfer the content again.
-
If you change the file names or location of the content such as music that was transferred from your computer to your Walkman, the content may not be recognized by the Walkman. Return it to the correct name and location.
-
If you have initialized (formatted) the built-in flash memory of your Walkman using Windows Explorer, initialize (format) it again using the Walkman. If you have initialized (formatted) the Walkman using the Mac Finder, initialize (format) it again using the Walkman.
[258] TroubleshootingQ&ADisplaying/Playing/Deleting ContentSongs are not played back in the expected order.
-
If songs are being played back using shuffle, cancel shuffle to return to normal playback.
- When tracks are transferred from the computer using drag-and-drop, the track order may be different from the album track order. Create a playlist using software on your computer and transfer the playlist to your Walkman. For details on playlists, refer to the help of the software you are using.
-
If you want to repeat a song in an album, select [Settings] - [Music Settings] - [Playback Range] -[Selected Range], and then play the song by selecting [Music] - [Album] from the Home menu.
[259] TroubleshootingQ&ADisplaying/Playing/Deleting ContentContent such as music suddenly stops during playback.
- The remaining battery power is low or the battery has run out.
- The content may not be supported on your Walkman. Select and play other content.
- If a Bluetooth audio device is connected, check the connection status.
[260] TroubleshootingQ&ADisplaying/Playing/Deleting ContentPlayback progresses to the next album when repeat playback is set.
- If [Playback Range] is set to [All Range], change the playback range settings to [Selected Range].
[261] TroubleshootingQ&ADisplaying/Playing/Deleting ContentSongs are only played within a limited range such as within one album.
- If [Playback Range] is set to [Selected Range], change the playback range settings to [All Range].
[262] TroubleshootingQ&ADisplaying/Playing/Deleting ContentYou cannot stop playback.
- When you press and hold the button, songs can be added to the bookmark list individually and playback of the songs continues. When you press the button, playback of the song stops.
[263] TroubleshootingQ&ADisplaying/Playing/Deleting ContentSongs are not displayed in the order they were transferred in.
-
Songs are not displayed in the order they were transferred in. To transfer songs in a specific order, create a playlist using software on your computer and transfer the playlist to your Walkman. For details on playlists, refer to the help of the software you are using.
[264] TroubleshootingQ&ADisplaying/Playing/Deleting ContentSound is interrupted between songs.
- To play songs without interruption (gapless playback), import (rip) content from media in AAC, MP3, or FLAC format to the latest version of Media Go, and then transfer them to your Walkman.
[265] TroubleshootingQ&ADisplaying/Playing/Deleting ContentThe content such as music is displayed repeatedly.
-
Content is displayed repeatedly when you transfer content using 2 or more software programs, for example when you transferred content using Media Go and then transferred the same content using software other than Media Go.
-
When you import a compilation album using Media Go, it may be imported as multiple albums. If this happens, edit the data using Media Go so that they are put together as an album, and then transfer it to your Walkman again. For details on how to edit, refer to the help of Media Go.
[266] TroubleshootingQ&ADisplaying/Playing/Deleting ContentThe same song is displayed repeatedly in an album.
- The album or songs have been transferred both to the system storage and to a microSD card (not supplied).
Delete the duplicated album or songs from either the system storage or the microSD card.
[267] TroubleshootingQ&ADisplaying/Playing/Deleting ContentThumbnails such as cover art are not displayed.
-
Register the cover art in Media Go or iTunes. Cover art may not be displayed for songs transferred from Windows Explorer or the Mac Finder.
- When you transfer video content to your Walkman using Windows Explorer or the Mac Finder, transfer a JPEG file with the same name as the video content in the “VIDEO” folder as well.
- If photos do not have thumbnails that comply with Exif file format, the thumbnails cannot be displayed.
- To attach cover art to a song that has already been transferred to your Walkman, delete the music content from the Walkman, add the cover art to the content on your computer, and then transfer the content to the Walkman again.
- Your Walkman is unable to display a thumbnail for video content that has been transferred to the Walkman via a Bluetooth connection. Connect the Walkman to a computer via USB and transfer the video content to the Walkman again using software.
- Depending on the software used to register the cover art to the song, the cover art may not be sent if the song is sent via a Bluetooth connection. Connect your Walkman to a computer via USB and transfer the song to the Walkman again using software.
[268] TroubleshootingQ&ADisplaying/Playing/Deleting ContentLyrics are not displayed.
-
There is no lyrics data for the songs. See “Adding lyrics to songs.”
-
Create an LRC file for the song to display lyrics.
-
The file name or file format is incorrect.
See “Making lyrics information in a text file” for information on the file naming rule and file format.
- Your Walkman is unable to display lyrics information for songs that have been transferred to the Walkman using a Bluetooth connection, even if the songs have lyrics information, due to system restrictions. Connect the Walkman to a computer via USB and transfer the song to the Walkman again using software.
[269] TroubleshootingQ&ADisplaying/Playing/Deleting Content[ □ ] is displayed in the screen.
-
Some types of characters and symbols may not be displayed correctly on your Walkman in the following cases:
- A language that is not supported by your Walkman is used in the text.
- User-defined characters or special symbols are used in the text.
- Replace the characters of the content that has been transferred to your Walkman using software with displayable characters in the software and transfer the content to the Walkman again.
[270] TroubleshootingQ&ADisplaying/Playing/Deleting Content[Unknown] is displayed for the album name or artist name.
-
Information such as the album or artist name is not contained in the data. You can add an album or artist name to content such as music transferred using software and transfer the content to your Walkman again.
- Information such as the song title, album or artist name cannot be added to WAV files due to the file specifications. To attach such information, convert the file to a format that supports data attachment such as FLAC, and then add the information to the file before transferring it to your Walkman again.
[271] TroubleshootingQ&ADisplaying/Playing/Deleting ContentYou cannot delete content such as music using the Walkman functions.
- You cannot delete content transferred using software such as Media Go or iTunes by using the function on your Walkman. Delete them using the software that you used to transfer them.
- You cannot delete content transferred using Windows Explorer by using the function on your Walkman. Delete the content using Windows Explorer.
- You cannot delete content transferred using the Finder by using the function on the Walkman. Delete the content using the Finder.
[272] TroubleshootingQ&ADisplaying/Playing/Deleting ContentYou cannot play a podcast episode.
-
Your Walkman may not support the file format of the episode. Check the file formats playable on the Walkman.
[273] TroubleshootingQ&ADisplaying/Playing/Deleting ContentYou cannot continually play podcast episodes.
-
You cannot continually play episodes from the podcast library.
[274] TroubleshootingQ&ADisplaying/Playing/Deleting ContentYou cannot register podcasts to a bookmark list.
- You cannot register podcasts to a bookmark list.
[275] TroubleshootingQ&ADisplaying/Playing/Deleting ContentYou cannot find your desired channel.
- If there are no songs to match the theme of a channel, the channel is not displayed on the SensMe™ Channels screen.
[276] TroubleshootingQ&ADisplaying/Playing/Deleting Content[Morning] is always displayed for the time-based channel.
-
If you have not set the clock of your Walkman, [Morning] always appears for the time-based channel. Set the clock of the Walkman.
[277] TroubleshootingQ&ADisplaying/Playing/Deleting ContentUnsuitable songs for selected time-based channels are played.
- If there are no songs to match the theme of the time-based channel, all of the songs in your Walkman are played in random order.
[278] TroubleshootingQ&ADisplaying/Playing/Deleting ContentAudio podcasts are not played by SensMe™ Channels.
- Audio podcasts are not analyzed by 12 TONE ANALYSIS and you therefore cannot play them using SensMe™ Channels.
[279] TroubleshootingQ&AFM RadioYou cannot hear FM radio broadcasts.
-
The headphone cord functions as an antenna. FM broadcasts cannot be received when the headphones are not connected.
-
The received station may not be fully tuned in. Fully tune in to a station for the best reception.
-
FM radio is not available during a Bluetooth connection.
[280] TroubleshootingQ&AFM RadioThere is a lot of noise in an FM radio broadcast and the sound quality is poor.
-
The FM signal may be weak inside a building or vehicle. Listen to the FM broadcast near a window if the signal is weak inside a building or vehicle.
-
The headphone cord functions as an antenna. Extend the headphone cord as far as possible.
-
When [Mono/Auto] is set to [Auto], the reception sensitivity is set automatically according to the reception status. Set [Mono/Auto] to [Mono].
-
When using a device that emits radio signals, such as a mobile phone, keep it away from your Walkman.
[281] TroubleshootingQ&ABluetoothPairing cannot be done.
-
Pair the devices within the Bluetooth communications range.
- If the supported profiles are different, your Walkman and Bluetooth device cannot be paired. See "Specifications."
- Your Walkman cannot be paired if the number of paired devices exceeds the maximum number. If you want to pair another device, delete unnecessary paired devices in advance.
[282] TroubleshootingQ&ABluetoothYou cannot connect via the Bluetooth function.
- Turn on the Bluetooth device and set it up for a Bluetooth connection.
- Your Walkman cannot connect with devices that are not paired. Check that the Walkman has been paired with the Bluetooth device.
- The pairing information might have been deleted. Make the pairing operation again.
- Make sure the Bluetooth audio device supports the A2DP profile.
- If your Walkman and the Bluetooth device are too far from each other, a Bluetooth connection may not be established or may be interrupted. Place the Walkman and Bluetooth device closer.
[283] TroubleshootingQ&ABluetoothThe screen to enter the passkey appears when pairing with a Bluetooth device.
-
A passkey may need to be entered when establishing a connection with certain Bluetooth devices. Enter the same passkey on your Walkman and the Bluetooth device. The passkey on the Walkman is “0000.” Refer to the manual for your Bluetooth device for instructions on how to enter the passkey on the Bluetooth device.
[284] TroubleshootingQ&ABluetoothYou cannot hear sound from the Bluetooth audio device.
-
Check the volume on the connected Bluetooth audio device.
-
It may not be possible to adjust the volume of certain Bluetooth audio devices. Turn up the volume of your Walkman.
-
Make sure your Walkman starts playback.
-
Turn on the connected Bluetooth audio device and make sure the Bluetooth function is activated.
-
Make sure the Bluetooth connection is not disconnected.
-
If your Walkman does not recognize playback operations on the Bluetooth audio device, the profile of the connected Bluetooth audio device may not support AVRCP. Perform the operations on the Walkman.
[285] TroubleshootingQ&ABluetoothYou cannot operate your Walkman from a Bluetooth audio device.
-
Depending on the Bluetooth audio device, you might not be able to operate your Walkman from the Bluetooth audio device. In this case, operate the Walkman itself.
[286] TroubleshootingQ&ABluetoothSound skips or noise is generated during a Bluetooth connection.
-
Devices using the 2.4 GHz frequency, such as a wireless LAN device, cordless telephone, or microwave oven, may disturb the Bluetooth connection. Use your Walkman and the connected Bluetooth audio device away from these electronic devices.
-
The Bluetooth connection is impeded by obstructions such as metal, walls or people. Remove any obstructions or change the location to enable proper communication.
- The Bluetooth connection may become unstable depending on the combination of the usage environment and the method of connecting with the Bluetooth audio device.
The Bluetooth connection may be stabilized by performing the following measures.- Set [Wireless Playback Quality] to [Standard] or [Prioritize Connection].
[287] TroubleshootingQ&ABluetoothSound effects do not seem to have any effect when listening to sound via a Bluetooth audio device.
-
Sound effects may not be enabled. Set [Sound Effect Preset] to [On].
- The [Clear Stereo] function or the [Clear Phase™ ] function does not work with Bluetooth audio devices even when [Sound Effect Preset] is set to [On].
- The [DSEE HX] function is disabled while listening to sound on the other Bluetooth audio device.
[288] TroubleshootingQ&ABluetoothVideo sound is delayed when listening to sound via a Bluetooth audio device.
- The sound of videos may lag slightly behind the picture with certain Bluetooth audio devices.
[289] TroubleshootingQ&ABluetoothYou cannot display or delete content such as music received using the Bluetooth function.
-
Make sure the transferred content is supported by your Walkman. Unsupported content will not be displayed on the screen. To delete unsupported content, use Windows Explorer or the Mac Finder, or delete all transferred content.
[290] TroubleshootingQ&ABluetoothThe cover art of a song received using the Bluetooth function is not displayed.
- Depending on the software used to register the cover art to the song, the cover art may not be sent if the song is sent via a Bluetooth connection. Connect your Walkman to a computer via USB and transfer the content to the Walkman again using software.
[291] TroubleshootingQ&ANFCYou cannot connect with one touch (NFC).
- When a dialog is displayed on the screen, follow the on-screen instructions to complete the connection. When you connect your Walkman and the Bluetooth audio device for the first time, you need not only to touch the marks together but also to pair the devices.
- If your Walkman does not recognize the Bluetooth audio device, slowly move the Walkman in all directions with the N-mark touching over the N-mark of the Bluetooth audio device.
- If a clip or case is attached to the device to connect with or to your Walkman, remove the clip or case.
- The NFC reception sensitivity of the device you use may be insufficient to make a one-touch connection (NFC). In this case, make the Bluetooth connection with pairing.
- One-touch connection (NFC) cannot be made while your Walkman is connected to a computer. Disconnect the Walkman from the computer and try again.
- Depending on the Bluetooth audio device, the NFC function or the power may need to be turned on. Refer to the operating instructions of the Bluetooth audio device for details.
- One-touch connections (NFC) cannot be made while the HOLD function of your Walkman is enabled. Release the HOLD function before touching the devices together to make a one-touch connection.
- One-touch connections (NFC) cannot be made while your Walkman is in standby mode and the screen is off. Turn the screen on before touching the devices together to make a one-touch connection.
[292] TroubleshootingQ&ANoise CancelingThe noise canceling function is not effective.
-
Make sure the noise canceling function is enabled.
-
The noise canceling function is available only with noise canceling headphones. The noise canceling headphones that are compatible with this product are MDR-NW750N/MDR-NW750NE.
- Make sure the headphones you use are selected in the [Select Headphones] setting.
-
Make sure the headphones fit your ears snugly by means such as changing the size of the earbuds or adjusting the earbud position. If you change the size of earbuds, attach them firmly on the headphones to prevent them from detaching and remaining in your ears.
-
The noise canceling function is not adjusted appropriately. Your Walkman is preset to maximize the effect of noise canceling. However, you may attain more effectiveness by raising or lowering the sensitivity of the microphone built in to the supplied headphones. See "Adjusting noise canceling."
-
The noise canceling effect may not be noticeable in a quiet place or with some types of ambient noise.
- The type of environment set in [Select NC Environment] may not be suitable for the surrounding environment. Set [Select NC Environment] according to the surrounding environment.
[293] TroubleshootingQ&ANoise CancelingYou want to use the noise canceling function with headphones other than noise canceling headphones compatible with your Walkman.
- The noise canceling function is available only with noise canceling headphones. The noise canceling headphones that are compatible with this product are MDR-NW750N/MDR-NW750NE. Select the noise canceling headphones in [Select Headphones] to use the noise canceling function.
- If you use headphones other than noise canceling headphones, the noise canceling function does not work even when the noise canceling function is enabled.
[294] TroubleshootingQ&AmicroSD Card Your Walkman does not recognize a microSD card that is inserted.
- The microSD card (not supplied) is not inserted correctly. Remove the microSD card and reinsert it.
- The contact pins of the microSD card are not clean. Clean the contact pins of the microSD card using a dry cloth or cotton bud and reinsert the microSD card.
- The microSD card has been formatted in an unsupported format. Copy all data on the microSD card onto your computer and format the microSD card again using your Walkman.
[295] TroubleshootingQ&AmicroSD Card The computer does not recognize a microSD card inserted in your Walkman.
- [System Storage] is selected as the memory to use. Change the memory to use to [SD Card] by following the instructions shown on the display of your Walkman.
- Make sure that no data is being transferred by checking your Walkman screen. Disconnect the USB cable from your computer, and then connect it again.
- Back up all of the data on the microSD card (not supplied) to your computer, and then initialize (format) the microSD card with your Walkman.
[296] TroubleshootingQ&AOtherYour Walkman gets warm.
-
Depending on the way you use your Walkman, the Walkman may become warm while the battery is being charged or the Walkman is performing intensive data processing. This is not a malfunction.
[297] TroubleshootingQ&AMessageMessage list
[Unable to set photo as wallpaper.] is displayed.
You are trying to set a photo that is too large as wallpaper.
Reduce the file size of the selected photo.
[System software update failed.] is displayed.
The update of the system software failed to be completed.
Follow the instructions displayed on your computer to retry updating the system software.
[Check the volume level] is displayed.
-
An alarm (beep) and a warning [Check the volume level] are used to protect your ears when you turn the volume up to a level that is harmful to your ears for the first time. You can cancel the alarm and warning by pressing any button.
- You can turn up the volume after canceling the alarm and warning.
- After the initial warning, the alarm and warning repeat for every 20 cumulative hours that the volume is set to a level that is harmful for your ears. When this happens, the volume is turned down automatically.