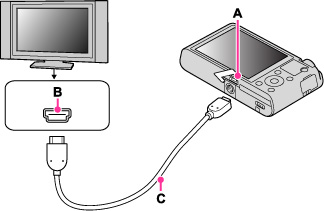
Viewing an image on a “BRAVIA” Sync-compatible TV
-
Connect the HDMI connector of the camera (A) and the HDMI jack of the TV (B) using the HDMI Cable (sold separately) (C).

-
Turn on the TV and set the input.
-
Press the
 (playback) button of the camera to turn on the camera.
-
MENU

 1
1  [CTRL FOR HDMI]
  [On]
[On]
-
Press the SYNC MENU button of the TV’s remote control to select the desired mode.
|
Menu
|
Function
|
|
Slide Show
|
Plays back images automatically.
|
|
1 Image Display
|
Plays back a single image at a time.
|
|
Image Index
|
Displays multiple images at the same time.
|
|
3D Viewing
|
Connects to a 3D compatible TV and allows you to view 3D images.
|
|
Still/Movie Select
|
Switches the display mode between still images and movies.
|
|
Delete
|
Deletes recorded images.
|
-
When the camera is connected to a TV set using an HDMI Cable, the functions that you can operate are limited.
-
You can perform the operation of the camera with the remote control of your TV by connecting your camera to a “BRAVIA” Sync-compatible TV. For details, see the operating instructions of the TV.
-
If the camera functions in an undesired manner when you are controlling it using the TV’s remote controller, such as when connected via HDMI to another manufacturer’s TV, press MENU

 1
1  [CTRL FOR HDMI]
  [Off].
-
Open the HDMI cover all the way when inserting the HDMI Cable into the camera.
-
Nothing is displayed on the screen of the camera.

 Before Use