- Top Page >
- Configuring Various Settings >
- Setting the screen size/position
Setting the screen size/position
Overview
You can set the screen size and position according to your preference.
Steps
Press the HOME button, then select
 [Settings].
Select
 [Picture & Display] → [Screen] → the desired option.
Available Options (for inputs other than a PC)
- [Setting Memory]
- Applies custom screen settings to the current input or to common memory shared by other inputs.
- [Wide Mode]
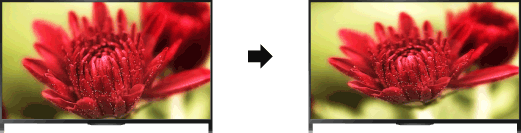
- [Wide Zoom]: Enlarges the picture, preserving the original picture as much as possible.
[Normal]: For 4:3 original source, displays a 4:3 picture in its original size, with side bars to fill the 16:9 screen. For 16:9 original source, displays a 4:3 picture that has been horizontally stretched to 16:9, in 4:3 format.
[Full]: Enlarges the picture horizontally to fill the screen when the input signal is 4:3. When the input signal is 16:9 (High-definition source), select this option to display the 16:9 picture in its original size.
[Zoom]: Displays a 16:9 picture that has been converted into 4:3 letter box format, in the correct aspect ratio.
[14:9]: Displays the 14:9 picture in the correct proportion. As a result, side bars are shown on the screen. ([14:9] is available depending on your region/country.)
[Captions]: Enlarges the picture horizontally, while fitting captions in the screen.
If component input (480p) is selected and [Scene Select] is set to [Game] or [Graphics], the available options change to [Fine-Normal]/[Fine-Full]/[Portable Game 1]/[Portable Game 2].
[Fine-Normal]: Displays a 4:3 picture in its original size. Side bars are shown to fill the 16:9 screen.
[Fine-Full]: Stretches a 4:3 picture horizontally, to fill the 16:9 screen.
[Portable Game 1]: Stretches a black-framed game picture from PlayStation®Portable.
[Portable Game 2]: Stretches a black-framed picture (e.g. browser) from PlayStation®Portable. - [Auto Wide]
- Automatically changes [Wide Mode] to match the input signal.
- [4:3 Default]
- Sets the default screen format for a 4:3 input signal.
- [Auto Display Area]
- Automatically adjusts the picture to the most appropriate display area.
- [Display Area]
- [Full Pixel]: Displays the original picture when parts of the picture are cut.
[+1]: Displays the picture using the TV’s maximum display area.
[Normal]: Displays the recommended size picture.
[-1]: Enlarges the picture.
([Full Pixel] is available only when the input signal is 1080i/1080p and [Wide Mode] is set to [Full].) - [Screen Position]
- Adjusts the vertical position and horizontal position of the picture.
The vertical position cannot be adjusted when [Wide Mode] is set to [Wide Zoom], [Normal] or [Full]. - [Vertical Size]
- Adjusts the vertical size of the picture.
This function is not available when [Wide Mode] is set to [Normal] or [Full].
Available Options (for PC input)
- [Reset]
- Resets all PC screen settings to factory settings.
- [Wide Mode]
- [Normal]: Displays the original picture.
[Full 1]: Enlarges the picture to fill the display area, maintaining the original picture.
[Full 2]: Enlarges the picture to fill the display area.
