Transferring music using Windows Media Player
-
Do not disconnect the USB cable while [Do not disconnect.] appears on the player, as the data being transferred may be damaged.
-
If Content Transfer starts automatically after connecting the player to your computer using the USB cable (supplied), close or ignore Content Transfer as Content Transfer need not be used. For details on setting automatic start of Content Transfer, refer to the Help of Content Transfer.
-
For details about usage or support on Windows Media Player, refer to Windows Media Player information from the following web site:
http://support.microsoft.com/
-
Start up Windows Media Player, and then connect the player to your computer using the USB cable (supplied).
The [Device Setup] window appears.
-
Click [Cancel].
-
If you click [Finish] instead of [Cancel], the entire library data of Windows Media Player is automatically copied to the player. If the library data size is larger than the available storage space on the player, the copy process will not start.
-
You can open the [Device Setup] window at any time. To open it, right-click [WALKMAN] on the left side of the Windows Media Player window, and then click [Set Up Sync].
-
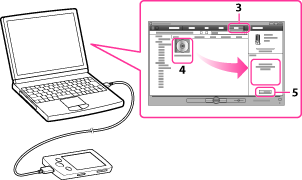
Click the [Sync] tab on the Windows Media Player window.
-
Drag-and-drop the desired songs to the Sync List on the right side of the window.
-
Click [Start Sync] to start synchronization.
-
Some files may not be played back on the player due to copyright protection.
-
The player cannot play the audio files that use the digital rights management technology for Windows Media (“WM-DRM”). If the audio files cannot be transferred, check on Windows Media Player information about DRM from the following web site:
http://support.microsoft.com/