Transferring videos/photos using Windows Explorer
-
Some WMV files can be played back only by transferring using Windows Media Player.
-
Connect the player to your computer using the USB cable (supplied).
-
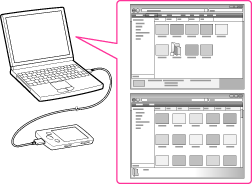
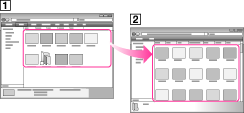
Click [start] – [My Computer] or [Computer] – [WALKMAN] – [Storage Media], and then select the [VIDEO], [PICTURE] or [PICTURES] folder.
-
Drag-and-drop files or folders into the [VIDEO], [PICTURE] or [PICTURES] folder or one of their subfolders.
-
Video files or folders: drag and drop into the [VIDEO] folder, or one of its subfolders.
-
Photo files or folders: drag and drop into the [PICTURE] or [PICTURES] folder, or one of their subfolders.
-
Video/photo files or folders in your computer
-
Video: [VIDEO] folder in your player
-
Do not disconnect the USB cable while [Do not disconnect.] appears on the player. Otherwise, data being transferred or stored on the player may be damaged. If the player is disconnected while files are being transferred, unnecessary files may be left in the player. In this case, transfer usable files back to the computer and format the player [Details].
-
Do not change folder names or delete the [MUSIC], [MP_ROOT], [MPE_ROOT], [VIDEO], [PICTURE] and [PICTURES] folders.
-
Do not change folder or file names directly under the [MP_ROOT] and [MPE_ROOT] folders. Otherwise, they will not be displayed on the player.
-
Some files may not be played back on the player due to copyright protection.
-
If Content Transfer starts automatically after connecting the player to your computer using the USB cable (supplied), close or ignore Content Transfer as Content Transfer need not be used. For details on setting automatic start of Content Transfer, refer to the Help of Content Transfer.