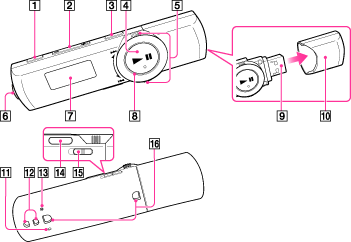
Parts and controls
-
REC/STOP button [Details]
Press to start or stop recording.
-
VOL + (*1)/– button
Press to adjust the volume.
(*1) There is a tactile dot to help with button operations.
-
ZAP/BASS button
Press to change between normal playback and ZAPPIN playback [Details].
When you press and hold the ZAP/BASS button, you can activate the Bass function to emphasize the low sound range [Details].
-
 (*1) button [Details]
Press to turn your Walkman on or press and hold to turn the Walkman off.
When you press the button in a menu screen, you can confirm an item [Details].
button in a menu screen, you can confirm an item [Details].(*1) There is a tactile dot to help with button operations.
-
Shuttle switch [Details]
Rotate to select an item.
When you rotate and hold the shuttle switch while playing a song, you can fast-rewind/forward the song [Details].
-
 (Headphone) jack
Insert the headphone plug until it clicks into place. If the headphones are connected improperly, the sound from the headphones will be impaired.
-
Display
-
Power illuminator
The illumination pattern varies according to the currently playing song.
-
USB connector
-
USB cap
Before you connect your Walkman to your computer, remove the USB cap.
-
MIC (Microphone) [Details]
-
Strap holes
A strap (not supplied) can be attached to the strap hole.
-
RESET button [Details]
Press the RESET button with a small pin, etc., to reset your Walkman.
-
BACK/HOME button [Details]
Press to go up one list screen level, or to return to the previous menu.
When you press and hold the BACK/HOME button, the Home menu appears.
-
HOLD switch
You can protect your Walkman against accidental operation during transportation by setting the HOLD switch. By sliding the HOLD switch in the direction of the arrow  , you can disable all operation buttons. If you slide the HOLD switch in the opposite position, the HOLD function is released.
, you can disable all operation buttons. If you slide the HOLD switch in the opposite position, the HOLD function is released.-
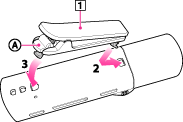
Clip holes
Attaching the clip (supplied)
-
Clip (supplied)
-
Check the orientation of the clip.
-
Fix one tab of the clip into the clip hole.
-
Attach the other tab into the other clip hole, pushing
 lightly.
Note
-
To remove the clip, push
lightly. Otherwise, the clip may be damaged.