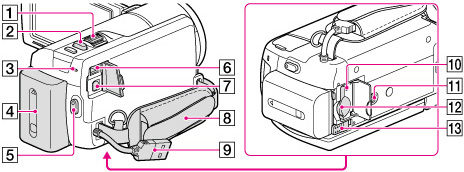
Parts and controls

-
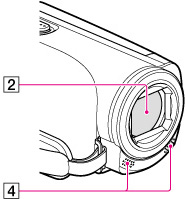
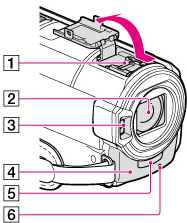
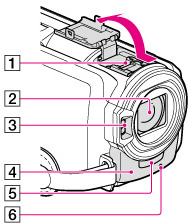
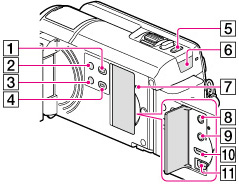
Active Interface Shoe (HDR-CX570E/ CX580E/ CX580VE/ PJ580E/ PJ580VE/ PJ600E/ PJ600VE)

-
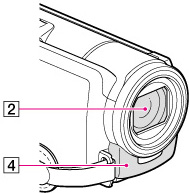
Lens (G lens)
-
Flash (HDR-CX570E/ CX580E/ CX580VE/ PJ580E/ PJ580VE/ PJ600E/ PJ600VE)/Video light (HDR-CX570E/CX580E/CX580VE/PJ580E/PJ580VE)
-
Built-in microphone
-
Remote sensor/Infrared port (HDR-PJ260E/PJ260VE/PJ580E/PJ580VE/PJ600E/PJ600VE)
-
Camera recording lamp (HDR-CX570E/ CX580E/ CX580VE/ PJ580E/ PJ580VE/ PJ600E/ PJ600VE)
-
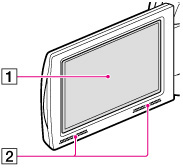
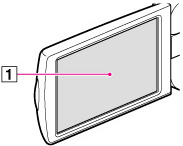
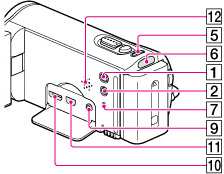
LCD screen/Touch panel
-
Speakers (HDR-CX570E/ CX580E/ CX580VE/ PJ260E/ PJ260VE/ PJ580E/ PJ580VE/ PJ600E/ PJ600VE/ XR260E/ XR260VE)
-
Projector lens (HDR-PJ260E/PJ260VE/PJ580E/PJ580VE/PJ600E/PJ600VE)
-
PROJECTOR FOCUS lever (HDR-PJ260E/PJ260VE/PJ580E/PJ580VE/PJ600E/PJ600VE)
-
GPS antenna (HDR-CX260VE/CX580VE/PJ260VE/PJ580VE/PJ600VE/XR260VE)

-
 (View Images) button
-
POWER button
-
LIGHT (Video Light) button (HDR-CX570E/CX580E/CX580VE/PJ580E/PJ580VE)
-
PROJECTOR button (HDR-PJ260E/PJ260VE/PJ580E/PJ580VE/PJ600E/PJ600VE)
-
MODE button
-
 (Movie)/
  (Photo) lamp
-
RESET button
-
 (headphones) jack (HDR-CX570E/ CX580E/ CX580VE/ PJ260E/ PJ260VE/ PJ580E/ PJ580VE/ PJ600E/ PJ600VE/ XR260E/ XR260VE)
-
 (microphone) jack (PLUG IN POWER)
-
HDMI OUT jack
-
 (USB) jack
-
Speaker (HDR-CX250E/CX260E/CX260VE/CX270E)
-
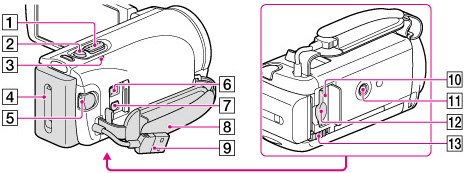
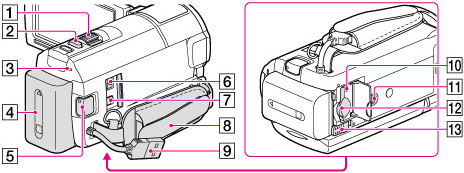
Power zoom lever
-
PHOTO button
-
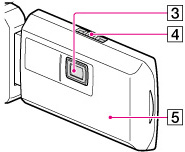
CHG (charge) lamp
-
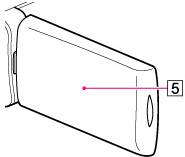
Battery pack
-
START/STOP button
-
DC IN jack
-
A/V Remote Connector
-
Grip belt
-
Built-in USB Cable
-
Memory card access lamp
-
Tripod receptacle
-
Memory card slot
-
BATT (battery) release lever
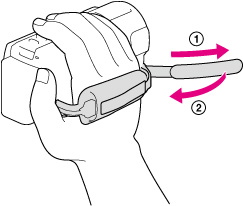
To fasten the grip belt
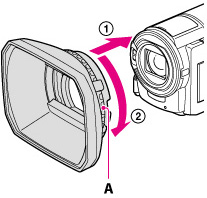
To attach the lens hood (HDR-CX570E/ CX580E/ CX580VE/ PJ580E/ PJ580VE/ PJ600E/ PJ600VE)
-
When attaching the lens hood, align the opening section of the lens hood with the flash-emitting section of the camcorder properly.
-
To remove the lens hood, turn the securing ring of the lens hood in the opposite direction from that of the arrow.
-
Remove the lens hood when you operate the camcorder with the supplied remote commander.
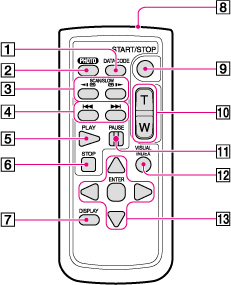
Wireless Remote Commander (HDR-PJ260E/PJ260VE/PJ580E/PJ580VE/PJ600E/PJ600VE)
-
DATA CODE button
-
PHOTO button
-
SCAN/SLOW buttons
-
 /
/ (Previous/Next) buttons
-
PLAY button
-
STOP button
-
DISPLAY button
-
Transmitter
-
START/STOP button
-
Power zoom buttons
-
PAUSE button
-
VISUAL INDEX button
-
 /
/ /
/ /
/ /ENTER buttons
///, then press ENTER to enter.