Controlling the image settings manually with the MANUAL dial
You can assign 1 menu item you use often to the MANUAL dial.
Since the 3D depth adjustment is assigned to the MANUAL dial in the default settings, the operation below is described as adjusting the 3D depth using the dial.
-
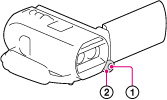
Press MANUAL (
 ) to activate the manual adjustment mode.
Pressing MANUAL switches the setting mode between automatic and manual.
-
Rotate the MANUAL dial (
 ) to adjust the depth.
Items you can assign to the MANUAL dial
3D recording:
[3D Depth Adjustment]
[Focus]
[Exposure]
[AE Shift]
[White Balance Shift]
2D recording:
[Focus]
[Exposure]
[IRIS]
[Shutter Speed]
[AE Shift]
[White Balance Shift]
To assign the menu item to the MANUAL dial
-
Press and hold MANUAL down for a few seconds.
The [Dial Setting] screen appears.
-
Rotate the MANUAL dial and select the item to be assigned.
If you want to change the settings to the default, select [Reset].
-
Press MANUAL.
The camera data that appears on the LCD screen will differ, depending on the recording settings of the camcorder. The settings will be displayed with the following icons.
 : Automatic
 : Exposure is set manually.
 : IRIS priority
 : Shutter speed priority
Notes
-
Manual settings will be retained even if you change the assigned item of the MANUAL dial. However, if you set [Exposure] after setting [AE Shift] manually, [Exposure] will override [AE Shift].
-
If you set either one of [Exposure], [IRIS], or [Shutter Speed], the settings of other 2 items are canceled.
Related topics
Assigning the function from the menu: [Dial Setting]