Parts and controls
-
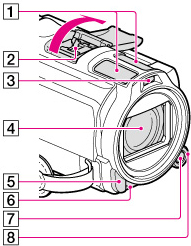
Built-in microphone
-
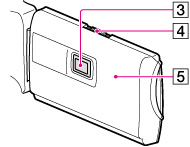
Active Interface Shoe

-
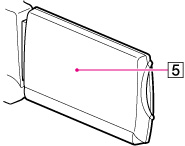
Flash/Video light
-
Lens (Carl Zeiss lens)
-
Remote sensor/Infrared port
-
Camera recording lamp
-
MANUAL button
-
MANUAL dial

-
LCD screen/Touch panel
-
Speakers
-
Projector lens
-
PROJECTOR FOCUS lever
-
GPS antenna (HDR-CX740VE/ CX760VE/ PJ710VE/ PJ740VE/ PJ760VE)
-
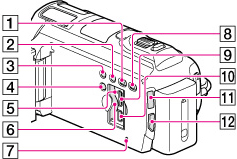
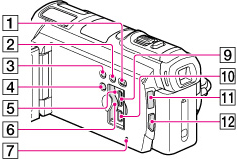
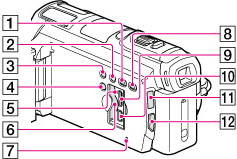
 (View Images) button
-
LIGHT (Video Light) button
-
NIGHTSHOT button
-
POWER button
-
Memory card access lamp
-
Memory card slot
-
RESET button
-
PROJECTOR button (HDR-PJ710VE/ PJ720E/ PJ740VE/ PJ760E/ PJ760VE)
-
HDMI OUT jack
-
 (USB) jack
-
 (Movie)/
  (Photo) lamp
-
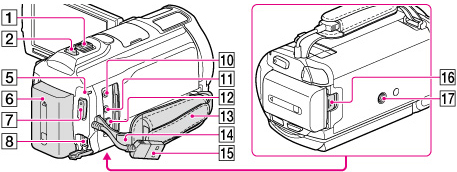
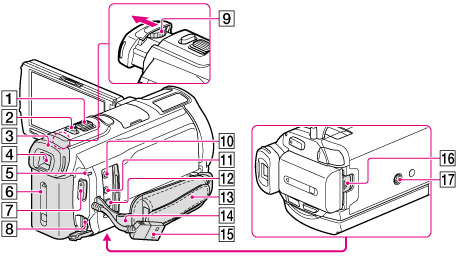
MODE button
-
Power zoom lever
-
PHOTO button
-
Eyecup
-
Viewfinder
-
CHG (charge) lamp
-
Battery pack
-
START/STOP button
-
DC IN jack
-
Viewfinder lens adjustment lever
-
 (microphone) jack (PLUG IN POWER)
-
 (headphones) jack
-
A/V Remote Connector
-
Grip belt
-
Loop for a shoulder belt
-
Built-in USB Cable
-
BATT (battery) release lever
-
Tripod receptacle
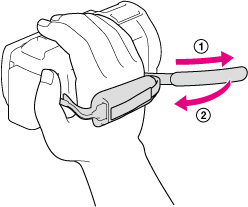
To fasten the grip belt
To attach the lens hood
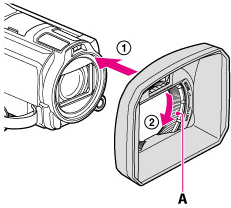
 ), then turn the securing ring of the lens hood in the direction of the arrow (
 ).
). -
When attaching the lens hood, align the opening section of the lens hood with the flash-emitting section of the camcorder properly.
-
To remove the lens hood, turn the securing ring of the lens hood in the opposite direction from that of the arrow.
-
Remove the lens hood when you record movies using the NightShot function. If you do not do so, the shadow of the lens hood will be reflected and recorded in your movies.
-
Remove the lens hood when you operate the camcorder with the supplied remote commander.
To attach the Step Down Ring
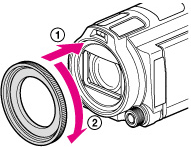 ), then turn it in the direction of the arrow until the Step Down Ring is locked in place ().
 -
You can change to the filter diameter to 37 mm (1 1/2 in.) by attaching the Step Down Ring, allowing you to use the recommended conversion lens.
-
You cannot attach the wide end conversion lens/filter, if the Step Down Ring is attached.
-
To remove Step Down Ring, turn it in the opposite direction from that of the arrow.
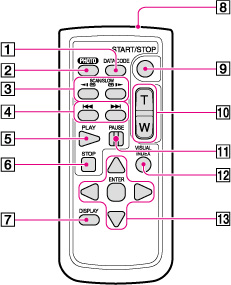
Wireless Remote Commander
-
DATA CODE button
-
PHOTO button
-
SCAN/SLOW buttons
-
 /
/ (Previous/Next) buttons
-
PLAY button
-
STOP button
-
DISPLAY button
-
Transmitter
-
START/STOP button
-
Power zoom buttons
-
PAUSE button
-
VISUAL INDEX button
-
 /
/ /
/ /
/ /ENTER buttons
///, then press ENTER to enter.