Send by TransferJet
 (TransferJet) mark on the bottom of the camera.
-
Insert a Memory Stick with TransferJet into the camera.
-
Press the
 (Playback) button to switch to playback mode.
-
MENU

 (Send by TransferJet)
  desired mode
 on the control wheel
-
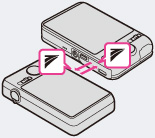
Transfer images by closely aligning the
 (TransferJet) marks on the camera and other device.
 (This Image) (This Image) |
Sends the currently displayed image in single-image mode.
|
 (Multiple Images) (Multiple Images) |
You can select and send multiple images.
 After step 3, select an image to be sent, then press After step 3, select an image to be sent, then press  . .To cancel the selection, press  again to cancel the again to cancel the  mark. mark. MENU MENU
 [OK] [OK] 

|
-
Only still images can be transferred.
-
Up to 10 images can be transferred at once. However, for 3D images, both the MPO file and the JPEG file are transferred. Depending on the receiving device, up to 20 images are received.
-
Set [TransferJet] to [On] in
 (Settings). [Details]
-
On an airplane, set [TransferJet] to [Off] in
 (Settings) [Details]. In addition, follow the rules of the place where you use.
-
The connection is cut if transfer cannot be made within about 30 seconds. If this happens, select [Yes] and realign the two
 (TransferJet) marks on the camera and another device.
-
The Memory Stick with TransferJet and camera models with TransferJet are not sold in some countries and regions due to local laws and regulations.
-
Set the [TransferJet] function to [Off] in countries and regions other than where you purchased your camera. Depending on the country or region, if you use the TransferJet function, you may be liable due to local restrictions on transmission of electromagnetic waves.
Receiving images using TransferJet
-
Press the
 (Playback) button to switch to playback mode.
-
Closely align the
 (TransferJet) marks on the camera and sending device to receive images.
 Tips for sending and receiving data successfully
 (TransferJet) mark on the camera and other device.
-
The transfer rate and range differ depending on the angle at which the
 (TransferJet) marks are aligned.
-
It may be necessary to alter the position/angle of the camera until communication can be obtained.
-
Sending and receiving data is easier if the
 (TransferJet) marks are aligned with both cameras parallel to each other as shown in the figure.
-
Only images that can be played back on the camera can be sent or received.
-
This camera can receive only JPEG and MPO files.
-
If an Image Database File error occurs during saving, a Recover Image Database File screen will appear.
-
Play images that cannot be registered in the Image Database File using [Folder view (Still)].
Using separately sold TransferJet-compatible devices
-
Note the following points when using TransferJet-compatible devices.
-
Before use, set the camera to playback mode.
-
If no image is displayed, press MENU

 (Settings)
 (Main Settings)
  [LUN Setting]
  [Single].
-
While connected, data cannot be written to or deleted from the camera.
-
Do not disconnect while importing images to “PlayMemories Home”.

 Before Use