Viewing 3D images on a 3D TV
-
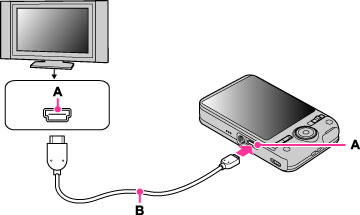
Turn off both the camera and the TV.
-
Connect the camera to the TV using an HDMI Cable (sold separately).
-
Turn on the TV and set the input.
-
Switch to playback mode.
-
MENU

 (3D Viewing)

-
Select images and set the desired mode.
|
Operation
|
Action
|

|
Continuously plays back only 3D images.
|

|
Previous image
|

|
Next image
|

|
Ends 3D playback.
|
-
You can change the zoom scale for 3D still images using the W/T (zoom) lever.
-
When you select
(3D Viewing) mode, only 3D images are displayed.
-
Do not connect the camera and equipment to be connected using output terminals. When the camera and TV are connected using output terminals, no video and sound are produced. Such a connection can also cause trouble of the camera and/or connected equipment.
-
This function may not work properly with some TVs. For example, you may not be able to view a video on your TV, output in 3D mode or hear sound from the TV.
-
Use an HDMI Cable with the HDMI logo.
-
When connecting the camera to a TV, use an HDMI Cable that can be connected to the HDMI micro jack on the camera end and to the TV jack.
-
Recording may automatically stop to protect the camera after a period of time when you shoot movies in the condition where the camera and TV are connected by an HDMI Cable (sold separately).