Attaching the supplied accessories
To attach the lens hood
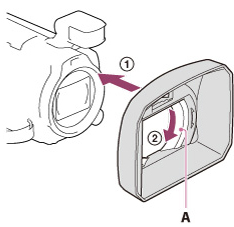
 ), then turn the securing ring of the lens hood in the direction of the arrow (
 ).
). -
When attaching the lens hood, align the opening section of the lens hood with the flash-emitting section of the camcorder properly.
-
To remove the lens hood, turn the securing ring of the lens hood in the opposite direction from that of the arrow.
-
Remove the lens hood when you record movies using the NightShot function. If you do not do so, the shadow of the lens hood will be reflected and recorded in your movies.
-
Remove the lens hood when you operate the camcorder with the supplied remote commander.
To attach the Step Down Ring
 ), then turn it in the direction of the arrow until the Step Down Ring is locked in place ().
 -
You can change the filter diameter to 37 mm (1 1/2 in.) by attaching the Step Down Ring, allowing you to use the recommended conversion lens.
-
You cannot attach the wide end conversion lens/filter, if the Step Down Ring is attached.
-
To remove Step Down Ring, turn it in the opposite direction from that of the arrow.
To attach the wind screen
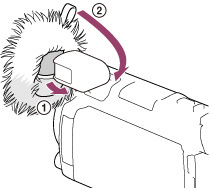 ), then pull the tag on the windscreen backwards until the wind screen covers the built-in microphone ().
-
When the lens hood is attached, it may be difficult to attach the wind screen.
-
Pull the tag upward to remove the wind screen.