White Balance
-
MENU

 3 [White Balance] desired mode
-
In [White Balance] modes other than [C.Temp./Filter], you can fine tune the color tone as you like. Press
 on the control wheel to display the adjustment screen, then adjust the tone using
  /
/ /
/ /.
/.
-
The color tone can be micro adjusted to the Green (G)/Magenta (M)/Blue (B)/Amber (A) directions.
 |
 (Auto WB) (Auto WB) |
Adjusts the white balance automatically so that the colors appear natural.
|
|
|
 (Daylight) (Daylight) |
Adjusts for outdoors conditions on a fine day, evening views, night scenes, neon signs, fireworks, etc.
|
|
|
 (Shade) (Shade) |
Adjusts for a shady location.
|
|
|
 (Cloudy) (Cloudy) |
Adjusts for a cloudy sky or a shady location.
|
|
|
 (Incandescent) (Incandescent) |
Adjusts for places under incandescent lamp, or under bright lighting, such as in a photo studio.
|
|
|
 (Fluor.: Warm White) (Fluor.: Warm White) (Fluor.: Cool White) (Fluor.: Cool White) (Fluor.: Day White) (Fluor.: Day White) (Fluor.: Daylight) (Fluor.: Daylight) |
[Fluor.: Warm White]: Adjusts for warm white fluorescent lighting.
[Fluor.: Cool White]: Adjusts for cool white fluorescent lighting.
[Fluor.: Day White]: Adjusts for day white fluorescent lighting.
[Fluor.: Daylight]: Adjusts for daylight fluorescent lighting.
|
|
|
 (Flash) (Flash) |
Adjusts for the flash conditions.
|
|
|
 (C.Temp./Filter) (C.Temp./Filter) |
Adjusts the color temperature depending on the light source. Achieves the effect of CC (Color Compensation) filters for photography. If you press
, you can set the color temperature using /. If you press again, the fine adjustment screen will be displayed. |
|
|
 (Custom) (Custom) |
Fixes the white balance to a setting depending on the light source. Use this mode when [Auto WB] and other settings do not provide accurate colors.
|
|
|
 (Custom Setup) (Custom Setup) |
Memorizes the basic white color which will be used in [Custom] mode.
|
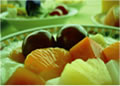
 Effects of lighting conditions
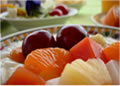


To capture a basic white color in [Custom Setup] mode
-
MENU
3 [White Balance]
[Custom Setup]
-
Hold the camera so that the white area fully covers the AF area located in the center, and then press the shutter button down.
-
Press
 on the control wheel.
-
The custom white balance setting registered using this operation is effective until a new setting is registered.
-
The message “Custom WB Error” indicates that the value is beyond the expected range. (For example, when the flash is used on a subject in close proximity or when a brightly colored subject is in the frame.) If you register this value, the
indicator turns yellow on the recording information display. You can shoot at this point, but it is recommended that you set the white balance again to obtain a more accurate white balance value.
-
Do not shake or strike the camera while capturing the basic white color.
-
If the flash is used when the shutter button is pressed, a custom white balance is registered with the flash light taken into account. Take pictures with the flash in later shootings.