Charging the battery pack using the AC Adaptor
-
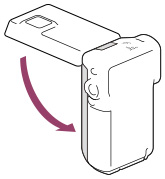
Close the LCD screen.
-
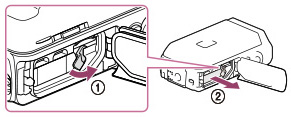
Open the battery/memory card/jack cover.

-
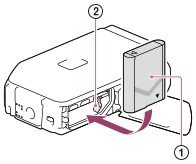
Slide the cover lock lever (
 ) to slide back the battery/memory card/jack cover (
 ). Then open the battery/memory card/jack cover (
 ).
).
-
Insert the battery.
-
Insert the battery (
) while pressing and holding the battery release lever ().
-
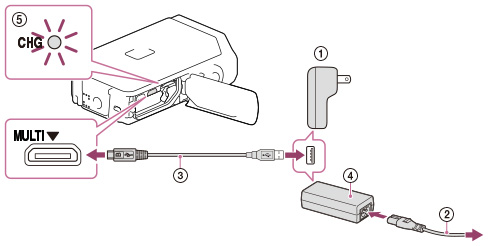
For customers in the USA and Canada:
Connect the AC Adaptor (AC-UD11,) and the USB cable () to your camcorder and the wall outlet (wall socket).
For customers in countries/regions other than the USA and Canada:
Connect the AC Adaptor (AC-UD10, ), the power cord (mains lead) () and the USB cable () to your camcorder and the wall outlet (wall socket).
-
The CHG (charge) lamp (
 ) turns on.
-
The CHG (charge) lamp turns off when the battery pack is fully charged. Disconnect the USB cable from the Multi/Micro USB Terminal of your camcorder.
-
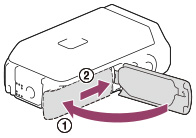
Close the battery/memory card/jack cover.
-
Flip the battery/memory card/jack cover back (
), then slide () and close the cover firmly until the yellow mark of the cover lock lever is hidden.
-
You cannot insert any battery pack other than an NP-BX1 (supplied) into your camcorder.
-
You cannot use a Sony CP-AH2R, CP-AL, or AC-UP100 portable power supply device (sold separately) to charge camcorder.
-
In the default setting, the LCD screen turns dark if you do not operate the camcorder for about 1 minute, and the power turns off if you do not opearate the camcorder for 2 minutes, to save battery power ([Power Save]).
Charging time
-
The charging time shown above is measured when charging the camcorder at a temperature of 25 °C (77 °F). It is recommended that you charge the battery in a temperature range of 10 °C to 30 °C (50 °F to 86 °F).
To remove the battery pack
-
Close the LCD screen, slide the cover lock lever to slide back the battery/memory card/jack cover, and then open the battery/memory card/jack cover.
-
Slide the battery release lever (
) and remove the battery pack ().
-
Make sure that the battery does not fall out.
On the power supply
-
Insert the battery into the camcorder before connecting it to a power supply either by connecting the camcorder to the AC Adaptor or the computer.
-
The recording mode can be selected only when the camcorder is connected to the AC Adaptor or a computer which is compatible with a 1,500 mA standard power supply.
-
When you connect the camcorder to a computer using the USB cable during playback, the USB connection screen appears. It will turn to the Playback screen if you select

 [Yes].
To check the remaining battery power
 |
 |
 |
 |
 |
|
High
|
|
Low
|
Empty
|
|
-
It will take approximately 1 minute to display the correct remaining battery power.
-
The remaining battery power may not be displayed correctly depending on ambient conditions and the environment in which you are using your camcorder.
-
Your camcorder cannot display the remaining battery life in minutes using the “InfoLITHIUM” battery.