Join a Wi-Fi® Network
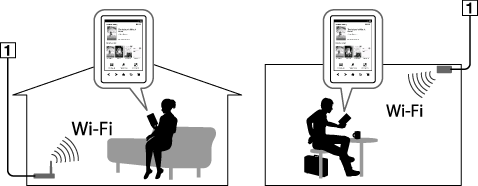
Preparing to set up a Wi-Fi connection
-
Press the
 (Home) button
  tap [Applications] [Settings] [Wireless Network Settings].
-
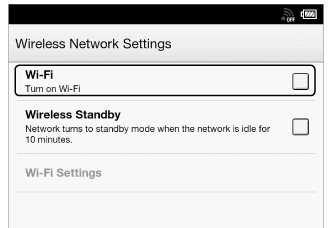
Check the check box to the right of [Wi-Fi] to turn on the Wi-Fi network.
[Wi-Fi]. See Details.-
Turn off [Wi-Fi] when it is not in use in order to extend the battery life of the Reader.
-
Turn on [Wireless Standby] when you want to extend the battery life. See Details.
Wi-Fi status icons
|
Icon
|
Status
|
 |
Wi-Fi is activated. The number of bars indicates the Wi-Fi signal strength.
|
 |
The Wi-Fi network feature of the Reader is in standby mode. See Details.
|
 |
There is no Wi-Fi access point. In this state, you cannot access Reader Store.
|
 |
The [Wi-Fi] setting is turned off.
|
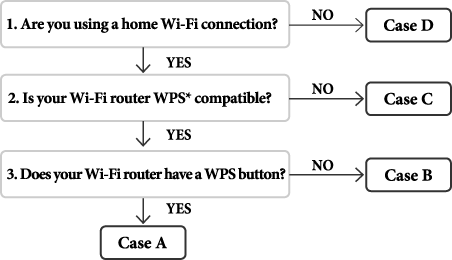
Choosing a connection type
-
Internet
|
Case A
|
|
Case B
|
|
Case C
|
|
Case D
|
|
Manual setup
|
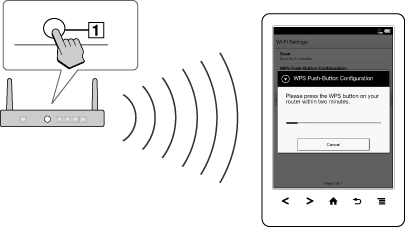
Case A: A WPS-compatible Wi-Fi router with WPS button
-
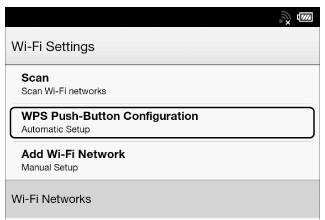
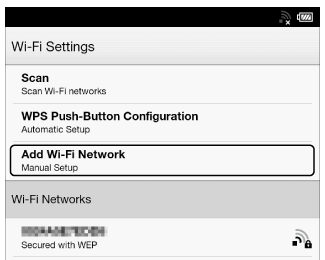
Tap [WPS Push-Button Configuration]
[Start].
-
On your Wi-Fi router, press the “WPS” or “Connect” button within 2 minutes.*
-
“WPS” or “Connect” button
-
After the Reader screen shows the setup completion, tap [OK].
Case B: A WPS-compatible Wi-Fi router with PIN input
-
Tap [Add Wi-Fi Network]
[WPS PIN Method] [Start].
-
After entering the PIN, tap [OK] on the Reader.
Case C: Connecting to a Wi-Fi router without WPS support
-
Tap [Scan].
|
Item
|
Description
|

|
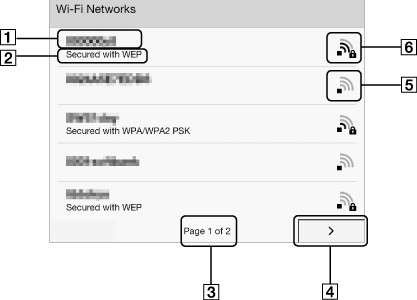
Network SSID
|

|
Security type
|

|
Page indicator
|

|
Page turn icon
|

|
Wi-Fi is activated and the Reader detects an unsecured network.
|

|
Wi-Fi is activated and the Reader detects a secured network. The Wi-Fi router to which you want to connect requires a password. A password may also be called a WEP key/WPA key/encryption key/network key, etc.
|
-
Tap your Wi-Fi router’s SSID (Service Set Identifier) in the [Wi-Fi Networks] list. For details on determining your Wi-Fi router’s SSID, refer to your Wi-Fi router’s instruction manual.
-
If prompted for a password, tap the input area and type in the password using the on-screen keyboard.
-
Tap [Connect].
Case D: Connecting to an available Wi-Fi network
-
Tap [Scan].

|
Item
|
Description
|
|
|
Network SSID
|
|
|
Security type
|
|
|
Page indicator
|
|
|
Page turn icon
|
|
|
Wi-Fi is activated and the Reader detects an unsecured network.
|
|
|
Wi-Fi is activated and the Reader detects a secured network. The Wi-Fi router to which you want to connect requires a password. A password may also be called a WEP key/WPA key/encryption key/network key, etc.
|
-
Tap your Wi-Fi router’s SSID (Service Set Identifier) in the [Wi-Fi Networks] list.
-
If prompted for a password, tap the input area and type in the password using the on-screen keyboard.
-
Tap [Connect].
-
The [Browser] application may start automatically to connect to a public access point. Otherwise, start the [Browser] application manually; press the
(Home) button, tap [Applications] [Browser].
-
The browser screen may show further information about completing the connection. Follow any instruction(s) where applicable.
Manually setting a Wi-Fi connection
-
Tap [Add Wi-Fi Network].

-
Tap [Manual Registration].
-
Tap the [SSID] input area and type in using the on-screen keyboard.
-
Tap the [Security Method] menu (the default value is [Open]), and then tap the supported security type.
-
Tap the [Password] input area and type in your password using the on-screen keyboard, and then tap [Done]
[Save].
-
Tap the saved network SSID in the [Wi-Fi Networks] list on the [Wi-Fi Settings] screen.
-
If prompted for a password, tap the input area and type in the password using the on-screen keyboard.
-
Tap [Connect].
General notes on Wi-Fi connectivity
-
Tap and hold a network SSID in the [Wi-Fi Networks] list to display the access point’s status and related information.
-
Before connecting to a wireless network, check all requirements, user name and/or password details with the internet/Wi-Fi service provider.
-
You can configure up to 20 Wi-Fi network connections.
-
The Reader does not support certain custom Wi-Fi network security systems. For details, contact the internet/Wi-Fi service provider.
-
If you edit the password of a Wi-Fi network to which you are currently connected, the Reader will attempt to reconnect to the Wi-Fi network using the new password.
-
To use a static IP address, press the
 (Menu) button tap [Advanced] in the [Wi-Fi Settings] tap [Use Static IP]. Do not change this setting unless instructed to by a network administrator, as the Wi-Fi network connection may not be established correctly.
-
If an access point’s SSID (Service Set Identifier) is private, enter Wi-Fi connection information manually.
-
The access point may filter access by MAC address. Check the MAC address by pressing the
(Home) button tap [Applications] [Settings] [About] [Device Information], then register the MAC address with the access point to establish a Wi-Fi connection.
-
When you are connected to a Wi-Fi network, you can also display speed, security and other Wi-Fi network details by pressing the
(Menu) button and tapping [Connection Information] in the [Wi-Fi Settings] screen.
-
An access point, once configured, can be connected to again simply by tapping it in the [Wi-Fi Networks] list and tapping [Connect].