

Identifying parts
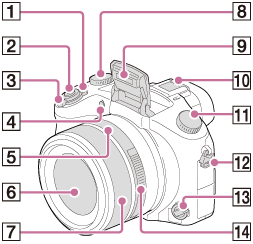
- ON/OFF (Power) switch
- Shutter button
- For shooting: W/T (zoom) lever
For viewing: (Index) lever/Playback zoom lever
 - Self-timer lamp/AF illuminator
- Aperture index
- Lens
- Manual ring
- Exposure compensation dial
- Flash
- Multi interface shoe*
- Mode dial
- Hook for shoulder strap
- Focus mode dial
- Aperture ring
*For details on compatible accessories for the multi interface shoe, visit the Sony web site, or consult your Sony dealer or local authorized Sony service facility. You can also use accessories that are compatible with the accessory shoe. Operations with other manufacturers’ accessories are not guaranteed.


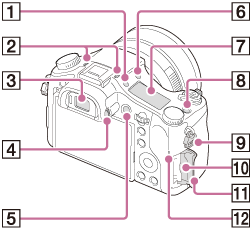
 (Display panel illumination) button
- Microphone
- Viewfinder
- Diopter-adjustment dial
- MOVIE (Movie) button
 (Flash pop-up) button
- Display panel
- C (Custom) button
- Hook for shoulder strap
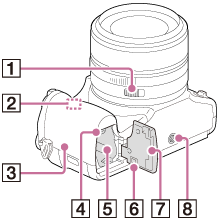
- Memory card slot
- Memory card cover
- Access lamp
- MENU button
- Speaker
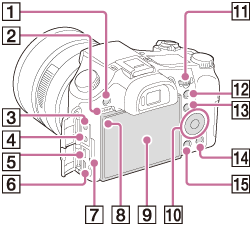
 (Microphone) jack
- When an external microphone is connected, this product switches from the internal microphone to the external microphone. If the external microphone is a plug-in-power type, the power of the microphone is supplied by this product.
 (Headphones) jack
- Multi Terminal
- Supports Micro USB compatible device.
- HDMI micro jack
- Charge lamp
- Light sensor
- LCD screen
- You can adjust the screen to an easily viewable angle and shoot from any position.
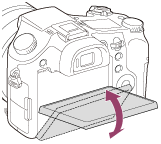
- You can adjust the screen to an easily viewable angle and shoot from any position.
- Control wheel
- Control dial
- For shooting: AEL (AE lock)
button
For viewing: (Playback zoom) button
 - For shooting: Fn (Function) button
For viewing: (Send to Smartphone) button
  (Delete/In-Camera Guide) button
 (Playback) button
- Aperture Click Switch
- Wi-Fi sensor
 (N mark)
- This mark indicates the touch point for connecting this product and an NFC-enabled smartphone.
- NFC (Near Field Communication) is an international standard of the short-range wireless communication technology.
- Battery eject lever
- Battery insertion slot
- Connection plate cover
Use this when using an AC-PW20 AC Adaptor (sold separately). Insert the connection plate into the battery compartment, and then pass the cord through the connection plate cover as shown below.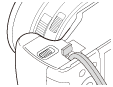
- Make sure that the cord is not pinched when you close the cover.
- Battery cover
- Tripod socket hole
- Use a tripod with a screw less than 5.5 mm (7/32 inches) long. Otherwise, you cannot firmly secure this product, and damage to the product may occur.