Shooting movies
-
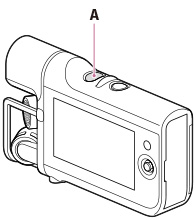
Press the POWER button to turn on the camcorder.
-
Press START/STOP to start shooting.

-
The LCD screen will be dimmed about 3 seconds after starting shooting (in the default setting).
-
To stop shooting, press START/STOP again.
-
The maximum continuous shooting time of movies is about 13 hours.
-
When a movie file exceeds 4 GB, the next movie file is created automatically.
-
The following states will be indicated if data is still being written onto the recording media after shooting has finished. During this time, do not apply shock or vibration to the camcorder, or remove the battery pack or AC Adaptor (sold separately).
-
Access lamp is lit or flashing
-
The media icon in the upper right of the LCD screen is on
-
The LCD screen of your camcorder can display shooting movies across the entire screen (full pixel display). However, this may cause slight trimming of the top, bottom, right, and left edges of movies when played back on a TV which is not compatible with full pixel display. It is recommended you shoot movies with [Grid Line] set to [On] and using the outer frame of [Grid Line] as a guide.
-
Since the camcorder is equipped with a high-sensitivity microphone, noise or operation sound may be recorded in the following situations.
-
When shooting by holding the camcorder
-
When operating the multi-selector