- Top Page >
- Troubleshooting >
- Picture
Picture
- No information from connected equipment.
- Ghosting or double images appear.
- Only noise appears on the screen.
- There is picture or sound noise when viewing a TV channel.
- Tiny black points and/or bright points appear on the screen.
- The pictures are distorted.
- No picture colour.
- No picture colour from equipment connected to the
 video input jacks (sockets).
- No information from connected equipment.
-
- Press
 to display the list of inputs, then select the desired input.
 - Check the connection between the equipment and the TV.
- Press
- Ghosting or double images appear.
-
- Check the antenna (aerial)/cable connection.
- Check the antenna (aerial) location and direction.
- Only noise appears on the screen.
-
- Check if the antenna (aerial) is broken or bent.
- Check if the antenna (aerial) has reached the end of its serviceable life (three to five years for normal use, one to two years at a seaside location).
- There is picture or sound noise when viewing a TV channel.
-
- Adjust “AFT” (Automatic Fine Tuning) to obtain better picture reception.
- Tiny black points and/or bright points appear on the screen.
-
- The screen is composed of pixels. Tiny black points and/or bright points (pixels) on the screen do not indicate a malfunction.
- The pictures are distorted.
-
- Select “Standard” or “Off” in “Motionflow”.
- Change the current setting of “CineMotion”/”Cinema Drive” to other settings. (option name varies depending on your region/country)
- No picture colour.
-
- Select “Reset” in “Picture”.
- No picture colour from equipment connected to the
 video input jacks (sockets).
-
- Check the connection of the
 video input jacks (sockets) and check if the jacks (sockets) are fully plugged in.
- Check the connection of the
- No picture from connected equipment.
-
- Turn the connected equipment on.
- Check the cable connection.
- Press
 to display the list of inputs, then select the desired input.
 - Correctly insert the memory card or other storage device, such as digital still camera.
- Make sure that the memory card (in equipment such as a digital still camera) has been properly formatted.
- Operation is not guaranteed for all USB devices. Also, operations differ depending on the features of the USB device or the video files being played.
- You cannot select connected equipment in the Home Menu.
-
- Check the cable connection.
- Set the servers to be displayed in the Home Menu.
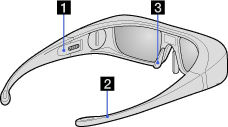
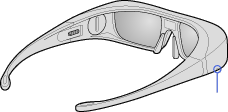
- 3D Glasses do not fit properly. (The following illustration shows TDG-BR100.)
-
- Refer to the following instructions and illustration.
- Set both the switches on either side for a comfortable fit. Close the temple arms slightly inwards to set the switch. (
 )
) - Bend (adjust) the temple frames for a comfortable fit. (
 )
) - Adjust the nose pad for your nose. (
 )
) 
- LED indicator on the 3D Glasses flashes. (The following illustration shows TDG-BR100.)
-
- Refer to the following explanations and illustration.
- Flashes every 3 seconds: Indicates the glasses are powered on.
- Flashes 3 times: Indicates the glasses have been powered off. The glasses turn off if you hold the power button down for 2 seconds, or if no signal from the 3D Sync Transmitter is detected for more than 5 minutes.
- Flashes 3 times every 3 seconds: Indicates the battery capacity is almost running out. Replace the battery.
-
 LED Indicator
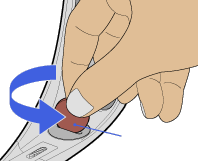
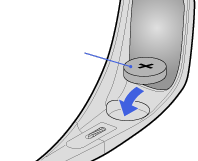
- You cannot turn the 3D Glasses on. (The following illustrations show TDG-BR100.)
-
- Replace the battery referring to the following instructions and illustrations.
-


 Battery (CR2032)Coin etc.
 - When opening or closing the battery cover, be sure to insert a coin, etc., into the slot securely to avoid slippage.
1: Open the battery cover using a coin, etc.
2: Push the edge of the battery and remove it at an angle.
3: Insert a battery (CR2032) with its positive (+) side facing up.
4: Close the battery cover using a coin, etc.
5: Make sure the cover is closed.

- 3D pictures are not displayed./3D effect is weak.
-
- Check the connection between the 3D Sync Transmitter and 3D SYNC OUT (if 3D Sync Transmitter is required to enjoy the feature). Refer to the following instructions and illustration.
- - Be sure to turn the TV off before connecting the 3D Sync Transmitter.
- - Make sure that “3D Menu” is displayed on the screen by pressing OPTIONS on the remote, after the connection has been completed.
-
 TV3D Sync Transmitter3D SYNC OUT
- Press the 3D button on the remote.
- Replace the battery in the 3D Glasses.
- Be sure that the 3D Glasses are powered on.
- Set the appropriate angle of 3D Sync Transmitter (optional) by using the angle adjustment dial or adjust its installation location.
- Be sure that there are no obstacles between the 3D Sync Transmitter and 3D Glasses.
- When the “3D Menu” setting screen appears but 3D pictures are not displayed, turn off the device that plays 3D content and turn it on again.
- 3D Sync Transmitter may not work when it is directly under the sunlight.
- Perceived 3D effect may vary from person to person.
- 3D effect may be less pronounced if ambient temperature is low.
- 3D effect may be less pronounced and the display colour will be shifted if you lie down or lean your head.
- Black bars appear on the both sides of the screen when watching 3D pictures.
-
- Black bars appear on the both sides of the screen in order to process 3D signals for the simulated 3D display mode or when adjusting the depth of 3D pictures in “3D Depth Adjustment”.
- 3D display automatically switches on when 3D signal is detected.
-
- Select “Off” from “Auto 3D” to manually turn the 3D display on or off. Press HOME, then select
 > Display > 3D Settings.
- Select “Off” from “Auto 3D” to manually turn the 3D display on or off. Press HOME, then select
- The message "3D signal is detected." automatically appears when 3D signal is detected.
-
- Select “Off” from ”3D Signal Notification”. Press HOME, then select
 > Display > 3D Settings.
- Select “Off” from ”3D Signal Notification”. Press HOME, then select
3D Sync Transmitter is integrated depending on the TV model.


