
- Top Page >
- Troubleshooting >
- Picture
Picture
- You cannot receive any channels.
- TV is locked to one channel.
- You cannot receive or select channels.
- TV turns off automatically.
- No picture from some video sources.
- Picture quality is not as good as viewed at the store.
- Broadcast HD formats have poor quality.
- Double images or ghosts appear.
- Only snow and noise appear on the screen.
- Dotted lines or stripes appear.
- You cannot receive any channels.
-
- Make sure the “Cable/Antenna” setting is correct for your TV signal source.
- TV is locked to one channel.
-
- Perform “Auto Program” to add receivable channels that are not present in the TV’s memory.
- You cannot receive or select channels.
-
- Perform “Auto Program” to add receivable channels that are not present in the TV’s memory.
- To receive or select cable channels, make sure that signal type in the channel settings is set to “Cable.”
- To receive or select UHF channels over an antenna, make sure signal type is set to “Antenna.”
- TV turns off automatically.
-
- Check if “Sleep Timer” is activated.
- Check if “PC Power Management” in “Eco” is activated.
- No picture from some video sources.
-
- Check the connection between the optional video equipment and the TV.
- Press
 on the remote control.
 - Press
 on the remote control. Select the desired input from the
  .
.
- Picture quality is not as good as viewed at the store.
-
- Picture quality depends on the signal content. See the specifications to display the best possible picture for that signal.
- Broadcast HD formats have poor quality.
-
- Content and signal quality are regulated by the signal provider. Many HD channels and content are actually upscaled versions of standard-definition broadcasts. The picture is affected by the quality of the signal received, which varies between channel and program.
- Double images or ghosts appear.
-
- Check cable or antenna connections.
- Check the antenna location and direction.
- Set the “Motionflow” to “Standard” or “Off.”
- Only snow and noise appear on the screen.
-
- Check if the antenna is broken or bent.
- Check if the antenna has reached the end of its serviceable life (3-5 years in normal use, 1-2 years at the seaside).
- Dotted lines or stripes appear.
-
- Keep the TV away from noise sources such as cars, motorcycles, or hair-dryers.
- If using the 300-ohm twin lead, move the excess lead away from the TV or try using the 75-ohm coaxial cable (not supplied) instead.
- No color/Dark picture/Color is not correct/Picture is too bright.
-
- Press
 then select “Picture Adjustments” to make adjustments.
 - Adjust the “Picture Mode” in “Picture Adjustments.”
- If you set the “Power Saving” mode to “Low” or “High,” black level will be enhanced.
- Press
- Noisy picture.
-
- Make sure that the antenna is connected using a 75-ohm coaxial cable.
- Keep the antenna cable away from other connecting cords.
- To avoid TV interference, make sure to use an undamaged antenna cable.
- Blurry picture or poor color.
-
- Transporting the TV from a cold to a warm location or a sudden change in room temperature may cause moisture condensation, resulting in a blurry picture or poor color. Turn off your TV and wait a few hours before powering on again.
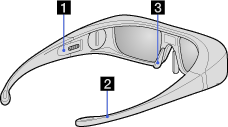
- 3D Glasses do not fit properly. (The following illustration shows TDG-BR100.)
-
- Refer to the following instructions and illustration.
- Set both the switches on either side for a comfortable fit. Close the temple arms slightly inwards to set the switch. (
 )
) - Bend (adjust) the temple frames for a comfortable fit. (
 )
) - Adjust the nose pad for your nose. (
 )
) -
- LED indicator on the 3D Glasses flashes. (The following illustration shows TDG-BR100.)
-
- Refer to the following explanations and illustration.
- Flashes every 3 seconds: Indicates the glasses are powered on.
- Flashes 3 times: Indicates the glasses have been powered off. The glasses turn off if you hold the power button down for 2 seconds, or if no signal from the 3D Sync Transmitter is detected for more than 5 minutes.
- Flashes 3 times every 3 seconds: Indicates the battery capacity is almost running out. Replace the battery.
-
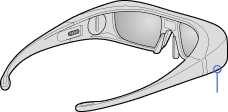 LED Indicator
- You cannot turn the 3D Glasses on. (The following illustrations show TDG-BR100.)
-
- Replace the battery referring to the following instructions and illustrations.
- 1: Open the battery cover using a coin, etc.
- 2: Push the edge of the battery and remove it at an angle.
- 3: Insert a battery (CR2032) with its positive (+) side facing up.
- 4: Close the battery cover using a coin, etc.
- 5: Make sure the cover is closed.
-
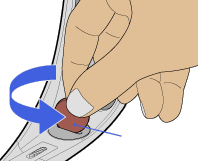

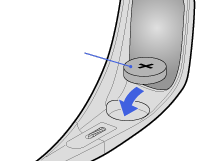 Battery (CR2032)Coin etc.
 - When opening or closing the battery cover, be sure to insert a coin, etc., into the slot securely to avoid slippage.

- 3D pictures are not displayed./3D effect is weak.
-
- Check the connection between the 3D Sync Transmitter and 3D SYNC OUT (if 3D Sync Transmitter is required to enjoy the feature). Refer to the following instructions and illustration.
- - Be sure to turn the TV off before connecting the 3D Sync Transmitter.
-
- Make sure that “3D Menu” is displayed on the screen by pressing on the remote control, after the connection has been completed.
-
 3D Sync TransmitterTV3D SYNC OUT
 - Press the 3D button on the remote control.
- Replace the battery in the 3D Glasses.
- Be sure that the 3D Glasses are powered on.
- Set the appropriate angle of 3D Sync Transmitter (optional) by using the angle adjustment dial or adjust its installation location.
- Be sure that there are no obstacles between the 3D Sync Transmitter and 3D Glasses.
- When the “3D Menu” setting screen appears but 3D pictures are not displayed, turn off the device that plays 3D content and turn it on again.
- 3D Sync Transmitter may not work when it is directly under the sunlight.
- Perceived 3D effect may vary from person to person.
- 3D effect may be less pronounced if ambient temperature is low.
- 3D effect may be less pronounced and the display color will be shifted if you lie down or lean your head.
3D Sync Transmitter is integrated depending on the TV model.
- Black bars appear on the both sides of the screen when watching 3D pictures.
-
- Black bars appear on the both sides of the screen in order to process 3D signals for the simulated 3D display mode or when adjusting the depth of 3D pictures in “3D Depth Adjustment.”
- 3D display automatically switches on when 3D signal is detected.
-
- Select “Off” from “Auto 3D” to manually turn the 3D display on or off. Press , then select
 > Picture & Display > 3D Settings.
- Select “Off” from “Auto 3D” to manually turn the 3D display on or off. Press
- The message “3D signal has been detected” automatically appears when 3D signal is detected.
-
- Select “Off” from “3D Signal Notification.” Press , then select > Picture & Display > 3D Settings.
- Select “Off” from “3D Signal Notification.” Press
