IC RecorderICD-SX733/SX734/SX1000
Recording from external equipment (using the synchronized recording function)
You can make music files without using the computer by recording sound/music from other equipment such as a radio cassette recorder, a tape recorder, etc. connected to the IC recorder.
When the synchronized recording function is set to “ON,” the IC recorder enters the recording pause mode when no sound is detected for more than 2 seconds.
The IC recorder starts recording again as a new file when sound is detected.
Hint
- If the input level is not strong enough, connect the headphone jack (minijack, stereo) of other equipment to the
 (microphone) jack of the IC recorder and adjust the volume level on the piece of equipment connected to the IC recorder while checking the recording level guide. You can also adjust the input level using the “Sensitivity setting” for “Audio IN” in the “Ext. Input Setting” menu.
- Connect a piece of external equipment (
 ) to the (microphone) jack of the IC recorder when the IC recorder is in the stop mode.
Connect the audio output connector (stereo mini-plug) of other equipment to the
(microphone) jack of the IC recorder using an audio connecting cable (not supplied).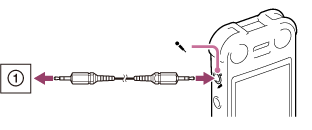
“Ext. Input Setting” appears in the display window.
If “Ext. Input Setting” is not displayed, set it in the menu.
- Press
 or
or  to select “Audio IN,” and then press
  .
.
“Use SYNC REC Function To Record?” appears on the display.
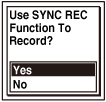
- Press or to select “Yes,” and then press .
The synchronized recording setting is on. The synchronized recording setting is set to “OFF” when you purchase the IC recorder.
- Press
 REC/PAUSE.
“
REC/PAUSE.
“ ” flashes and the IC recorder enters the recording pause mode.
 - Start playback on the piece of equipment connected to the IC recorder.
“
 ” appears on the display and synchronized recording starts.
” begins to flash. The synchronized recording pauses. The IC recorder starts recording again as a new file when sound is detected. Note
-
When no sound is detected for more than 2 seconds, the IC recorder enters the recording pause mode.
When the sound is detected again, the IC recorder starts recording again in a new file. However, in this case, if the number of files will exceed the maximum number that can be saved in the folder or on the drive, the IC recorder will not create a new file, but will continue to record as a part of the current file.
- During synchronized recording, you cannot pause recording, record with the pre-recording function, record with the VOR function, record with the cross-memory recording function, and add a track mark.
- Depending on the piece of equipment connected to the IC recorder, the synchronized recording function may not operate properly due to a difference in the audio input level.
- The illustrations used in this Help Guide are based on the ICD-SX1000 model. These illustrations may look different from the model you are using, however, the buttons and controls used for operations are the same.
Hint
- You can set “Sensitivity setting” for “Audio IN” in step 2.
- You can also set the synchronized recording function from the menu. Select MENU - the
 tab - “SYNC REC.”