You can divide a file in the stop mode, so that the file is divided into two parts and new file numbers are added to the divided file names. By dividing a file, you can easily find the point from which you want to play back when you make a long recording such as at a meeting. You can divide a file until the total number of files in the folder reaches the maximum number allowed.
- Stop the file at the position where you want to divide a file.
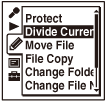
- Select MENU - the
 tab - “Divide Current
Position,” and then press
tab - “Divide Current
Position,” and then press  .
.
A period of approximately 4 seconds from the dividing point will be played back repeatedly.
- Press
 or
or  to adjust the position to be divided, if you wish.
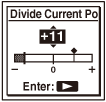
You can adjust the position to be divided by approximately 0.3 seconds in a period of approximately 6 seconds each, both before and after the current position.
- Press .
“Divide?” appears on the display.
- Press or to select “Execute,” and then press .
The “Dividing...” animation appears, and the divided files will be suffixed with a sequential number (“_1” for the original file, and “_2” for the new file).
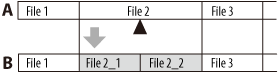
A. Before dividing a file:
is the position you want to divide.B. After dividing a file: A suffix made up of a sequential number is added to a file name of the divided files.
- Press
 STOP to exit the menu mode.
Note
- You cannot divide a protected file. To divide the file, release the protection first.
- You cannot divide music files or podcast files.
- You can divide the files in the recordable area (under the
 tab) only.
Hint
- To cancel dividing, select “Cancel” in step 5, and then press .