

Identifying parts
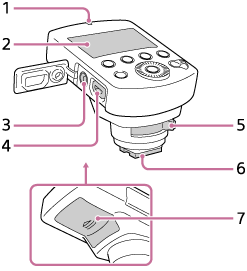
Control panel
- LINK lamp
- LCD panel
 (flash sync) terminal
-
Multi/Micro USB Terminal
Connects the product and the camera for remote release shooting.
- Lock lever
- Multi Interface foot
- Battery cover
-
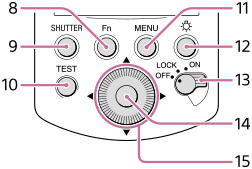
Fn (function) button
Switches the display to the settings adjustment screen (Quick Navi screen), letting settings be changed quickly.
-
SHUTTER button
Releases the shutter of the camera to which a Wireless Radio Receiver is connected during remote release shooting.
-
TEST button
Tests the flash before shooting.
- MENU button
-
 (LCD illuminator) button
Turn the lighting of the LCD panel and the areas around the buttons on or off.
-
Power switch
When the switch is set to “LOCK,” buttons including the control wheel become inactive to avoid unintended operations.
-
Center button
Confirms selections on the menu screen.
-
Control wheel
Moves the cursor and changes values on the Quick Navi screen or menu screen.
When shooting, flash compensation and flash level settings are assigned to the left button, and receiver settings are assigned to the right button.
How to use the control wheel
You can perform operations corresponding to the on-screen display using the control wheel.
- Shooting screen
- Flash compensation and flash level settings are assigned to the left button, and receiver settings are assigned to the right button.
- Quick Navi screen
- You can select an item by moving the cursor (which item is highlighted) using the top/bottom/right/left button on the control wheel, and change the value by turning the wheel.
- Menu screen
- You can select an item by moving the cursor using the top/bottom/right/left button on the control wheel, and change the setting by pressing the center button.