
How to use the “Help Guide”
The “Help Guide” is a “Web Instruction Manual” that has been designed to describe the functions and operating methods of this camera. Use the “Help Guide” to search for any information that you require in order to make full use of the camera.
(The “Help Guide” screens shown on this page are for reference only. They may differ from the actual on-screen display of your model.)
Hint
- The “Startup Guide” supplied with the camera describes basic operating methods and precautions for use. Please refer to the “Startup Guide” in combination with this “Help Guide.”
Icons used in the “Help Guide”
 : Menu items displayed in the still image shooting modes
 : Menu items displayed in the movie recording modes and slow-motion/quick-motion shooting modes
 : Menu items displayed in any of the still image shooting modes, movie recording modes, or slow-motion/quick-motion shooting modes
For details on the relationship between each shooting mode and the menu, refer to “MENU button.”
Finding your desired information
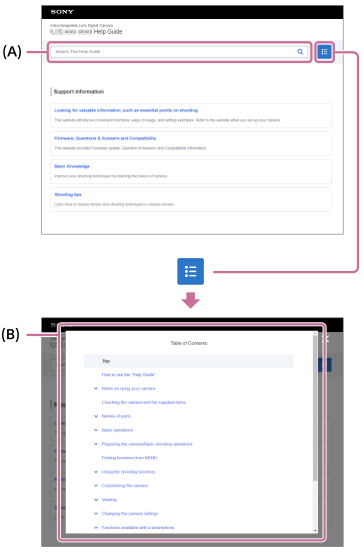
Method A: Searching by keyword
Enter a search keyword (“white balance,” “focus area,” etc.), and use the search results to display the description page that you want to view. If you enter two or more keywords by separating them with spaces (blanks), you can search for pages that contain all of those keywords.
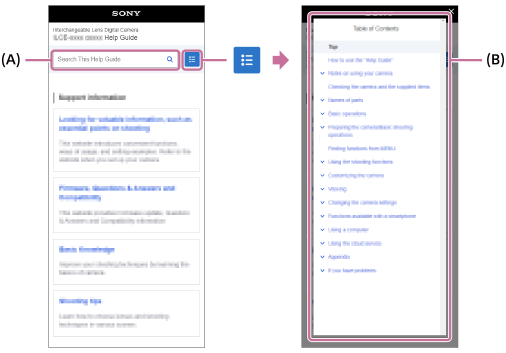
Method B: Viewing the table of contents
Click  (Table of contents) to display the table of contents. Select a heading from the table of contents to display the description page.
Screen displayed on a computer
Screen displayed on a smartphone
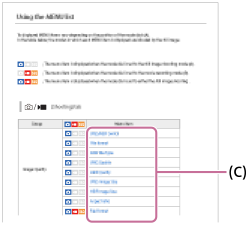
Method C: Finding functions from MENU
If you want to search for information while checking it against the MENU screen of the camera, use the “Finding functions from MENU” page. Select a MENU item from the list to go directly to the description page.
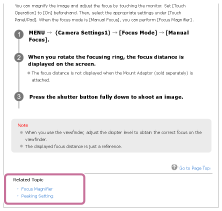
Viewing information about related features
“Related Topic” at the bottom of each page lists sections that contain information related to the description page currently being displayed. For a deeper understanding of the currently displayed page, refer to the listed sections as well.
Going to the previous/next page
Select the “Previous” or “Next” in the bottom of the page to move to the previous or next page without returning to the table of contents.
Printing all the pages of the “Help Guide”
To print all the pages, select the [ Download PDF] button in the bottom left corner of the top page. When the PDF file appears, use the printing menu of the browser to print it out.
This function is not available for certain languages.
Printing only the currently displayed page (only on a computer)
To print only the page currently being displayed, select the [ Print This Page] button at the bottom of the page. When the printing screen appears, specify your printer.
Changing the display language
Go to the language selection page from [ Language Selection Page] at the bottom of the page and select a language.
[2] Notes on using your cameraPrecautions
Refer also to “Notes on use” in the Startup Guide (supplied) for this product.
We use environmentally conscious packaging materials
Environmentally conscious packaging materials were used for the camera and supplied accessories. Due to the characteristics of the packaging materials, note the following points.
- Powder, etc. from the packaging materials may adhere to the camera or supplied accessories. In this case, remove it with a commercially available blower or cleaning paper before use.
- The packaging materials will deteriorate with continuous use. Be careful when carrying the product by the packaging.
On the data specifications described in this manual
- The data on performance and specifications in this manual are based on an ordinary ambient temperature of 25ºC (77°F), except where otherwise indicated.
- For the battery pack, the data are based on a battery pack that was fully charged until the charge lamp turned off.
On operating temperatures
- Shooting in extremely cold or hot environments that exceed the operating temperature range is not recommended.
- Under high ambient temperatures, the temperature of the camera rises quickly.
- When the temperature of the camera rises, the image quality may deteriorate. It is recommended that you wait until the temperature of the camera drops before continuing to shoot.
- Depending on the camera and battery temperature, the camera may become unable to record movies or the power may turn off automatically to protect the camera. A message will be displayed on the screen before the power turns off or you can no longer record movies. In this case, leave the power off and wait until the camera and battery temperature goes down. If you turn on the power without letting the camera and battery cool sufficiently, the power may turn off again, or you may still be unable to record movies.
Notes on recording/streaming for long periods of time or recording 4K movies
- During use, the camera and battery may become warm. This is not a malfunction.
- Especially during 4K shooting, the recording time may be shorter under low temperature conditions. Warm up the battery pack or replace it with a new battery.
Notes on playing movies on other devices
XAVC HS and XAVC S movies can only be played back on compatible devices.
Notes on recording/playback
- Before you start recording, make a trial recording to make sure that the camera is working correctly.
- The recorded image may be different from the image you monitored before recording.
- Playback of images recorded with your product on other equipment and playback of images recorded or edited with other equipment on your product are not guaranteed.
- Sony can provide no guarantees in the event of failure to record, or loss of or damage to recorded images or audio data, due to a malfunction of the camera or recording media, etc. We recommend backing up important data.
- Once you format the memory card, all the data recorded on the memory card will be deleted and cannot be restored. Before formatting, copy the data to a computer or other device.
- Attach the shoulder strap to the camera to prevent it from falling.
- When using this product with a tripod or grip, be sure to attach the camera securely.
Notes on using a tripod
Use a tripod with a screw less than 5.5 mm (7/32 inches) long. Otherwise, you cannot firmly secure the camera, and damage to the camera may occur.
Notes on handling memory cards
The temperature of memory cards may rise after saving. This is not a malfunction.
Backing up memory cards
Data may be corrupted in the following cases. Be sure to back up the data for protection.
- When the memory card is removed, the USB cable is disconnected, or the product is turned off in the middle of a read or write operation.
- When the memory card is used in locations subject to static electricity or electrical noise.
Database file error
- If you insert a memory card that does not contain an image database file into the product and turn on the power, the product automatically creates an image database file using some of the memory card’s capacity. The process may take a long time and you cannot operate the product until the process is completed.
- If a database file error occurs, export all the data to your computer, etc. to save it, and then format the memory card using this product.
Do not use/store the product in the following places
- In an extremely hot, cold or humid place
In places such as in a car parked in the sun, the camera body may become deformed and this may cause a malfunction. - Storing under direct sunlight or near a heater
The camera body may become discolored or deformed, and this may cause a malfunction. - In a location subject to rocking vibration
It may cause malfunctions and an inability to record data. In addition, the recording media may become unusable, and recorded data may be corrupted. - Near strong magnetic place
- In sandy or dusty places
Be careful not to let sand or dust get into the product. This may cause the product to malfunction, and in some cases this malfunction cannot be repaired. - In places with high humidity
This may cause the lens to mold. - In areas where strong radio waves or radiation are being emitted
Recording and playback may not function correctly.
On moisture condensation
- If the product is brought directly from a cold to a warm location, moisture may condense inside or outside the product. This moisture condensation may cause a malfunction of the product.
- To prevent moisture condensation when you bring the product directly from a cold to a warm location, first put it in a plastic bag and seal it to prevent air from entering. Wait for about an hour until the temperature of the product has reached the ambient temperature.
- If moisture condensation occurs, turn off the product and wait about an hour for the moisture to evaporate. Note that if you attempt to shoot with moisture remaining inside the lens, you will be unable to record clear images.
Precaution on carrying
- Do not hold, hit, or apply excessive force to the following parts, if your camera is equipped with them:
- The lens part
- The movable monitor part
- The movable flash part
- The movable viewfinder part
- Do not carry the camera with the tripod attached. This may cause the tripod socket hole to break.
- Do not sit down in a chair or other place with the camera in the back pocket of your trousers or skirt, as this may cause malfunction or damage the camera.
Notes on handling the product
- This camera is not dustproof, drip-proof, or waterproof.
- Before you connect the cable to the terminal, be sure to check the orientation of the terminal. Then, insert the cable straight. Do not insert or remove the cable forcefully. This may cause the terminal part to break.
- The camera uses magnetic parts including magnets. Do not bring objects affected by magnetism, including credit cards and floppy disks, close to the camera.
On storing
- For lens-integrated cameras
Always attach the lens cap when you are not using the camera. (Only for models supplied with a lens cap) - For interchangeable-lens cameras
Always attach the lens front cap or body cap when you are not using the camera. To prevent dust or debris from getting inside the camera, remove dust from the body cap before attaching it to the camera. - If the camera is dirty after use, clean it. Water, sand, dust, salt, etc. left in the camera may cause a malfunction.
Notes on using lenses
- When using the power zoom lens, be careful not to get your fingers or any other objects caught in the lens. (Only for models with a power zoom feature or interchangeable lens cameras)
- If you must place the camera under a light source such as sunlight, attach the lens cap to the camera. (Only for models supplied with a lens cap or interchangeable lens cameras)
- If sunlight or a strong light source enters the camera through the lens, it may focus inside the camera and cause smoke or fire. Attach the lens cap to the lens when storing the camera. When you shoot with backlighting, keep the sun sufficiently far away from the angle of view. Note that smoke or fire may occur even if the light source is slightly away from the angle of view.
- Do not directly expose the lens to beams such as laser beams. These may damage the image sensor and cause the camera to malfunction.
- If the subject is too close, the image may show any dust or fingerprints on the lens. Wipe the lens with a soft cloth, etc.
Notes on the flash (Only for models with a flash)
- Keep your fingers away from the flash. The light-emitting part may get hot.
- Remove any dirt from the surface of the flash. Dirt on the surface of the flash may emit smoke or burn due to heat generated by the emission of light. If there is dirt/dust, clean it off with a soft cloth.
- Restore the flash to its original position after using it. Make sure that the flash portion is not sticking up. (Only for models with a movable flash)
Notes on the Multi Interface Shoe (Only for models with a Multi Interface Shoe)
- When attaching or detaching accessories such as an external flash to the Multi Interface Shoe, first turn the power to OFF. When attaching the accessory, confirm that it is firmly fastened to the camera.
- Do not use the Multi Interface Shoe with a commercially available flash that applies voltages of 250 V or more or has the opposite polarity of the camera. It may cause a malfunction.
Notes on the viewfinder and flash (Only for models with a viewfinder or a flash)
- Take care that your finger is not in the way when pushing the viewfinder or flash down. (Only for models with a movable viewfinder or a movable flash)
- If water, dust or sand adheres to the viewfinder or flash unit, it may cause a malfunction. (Only for models with a movable viewfinder or a movable flash)
Notes on the viewfinder (Only for models with a viewfinder)
- When shooting with the viewfinder, you may experience symptoms such as eyestrain, fatigue, travel sickness, or nausea. We recommend that you take a break at regular intervals when you are shooting with the viewfinder.
In case you may feel uncomfortable, refrain from using the viewfinder until your condition recovers, and consult your doctor if necessary. - Although the viewfinder is built with high-precision technology for 99.99% or more effective pixels, black dots may appear, and white, red, blue, and green dots may not disappear. This is not a malfunction. These dots are not recorded.
- Do not forcibly push down the viewfinder when the eyepiece is pulled out. It may cause a malfunction. (Only for models with a movable viewfinder and an eyepiece that can be pulled out)
- If you pan the camera while looking into the viewfinder or move your eyes around, the image in the viewfinder may be distorted or the color of the image may change. This is a characteristic of the lens or display device and is not a malfunction. When you shoot an image, we recommend that you look at the center area of the viewfinder.
- The image may be slightly distorted near the corners of the viewfinder. This is not a malfunction. When you want to see the full composition with all its details, you can also use the monitor.
- If you use the camera in a cold location, the image may have a trailing appearance. This is not a malfunction.
- When the temperature of the camera changes, the color tone of the viewfinder display may change due to the characteristics of the display device.
- Do not directly expose the viewfinder to beams such as laser beams. These may damage the inside of the viewfinder and cause the camera to malfunction.
Notes on the monitor
- Although the monitor is built with high-precision technology for 99.99% or more effective pixels, black dots may appear, and white, red, blue, and green dots may not disappear. This is not a malfunction. These dots are not recorded.
- Do not press against the monitor. The monitor may be discolored and that may cause a malfunction.
- If the monitor has drops of water or other liquids on it, wipe it with a soft cloth. If the monitor stays wet, the surface of the monitor may change or deteriorate. This may cause a malfunction.
- If you use the camera in a cold location, the image may have a trailing appearance. This is not a malfunction.
- When you connect cables to the terminals on the camera, the rotating range of the monitor may become limited.
Notes on the image sensor
If you point the camera at an extremely strong light source while shooting images with a low ISO sensitivity, highlighted areas in the images may be recorded as black areas.
Notes on the wind screen (Only for models supplied with a wind screen)
- If the wind screen is stored for a long time in a place exposed to direct sunlight or near a heating device, it may become discolored. The texture and degree of raising of the hairs may change depending on the environment during use and storage as well as aging.
- Brushing or forcefully pulling the hairs on the wind screen may cause them to come off.
- If the wind screen gets wet or dirty, do not remove it from the wind screen adaptor. Wipe it off with a soft, dry cloth and dry it in the shade.
On image data compatibility
This product conforms with DCF (Design rule for Camera File system) universal standard established by JEITA (Japan Electronics and Information Technology Industries Association).
Services and software provided by other companies
Network services, content, and the [operating system and] software of this Product may be subject to individual terms and conditions and changed, interrupted or discontinued at any time and may require fees, registration and credit card information.
Notes on connecting to the internet
- When connecting to a wireless LAN network, this camera cannot connect to an access point that only uses WEP or WPA, which are security methods with potential vulnerabilities.
- This camera is not a network device (e.g., a router or switching hub). We strongly recommend connecting this camera to a network that can be properly configured and managed to protect against network-based attacks such as DoS (Denial of Service) attacks.
- When connecting this camera to a network, connect it via a properly configured and managed router or connect it to a LAN port with the same functionality as such a router. If you do not connect it in this way (for example, if you connect it to a free Wi-Fi network), security issues may occur. Properly configuring the router will provide sufficient protection against DoS attacks or loss of functionality of devices in the network. If you notice any abnormality, immediately disconnect the camera from the network.
Notes on security
- If you set [Security] to [None] in the camera’s wireless LAN settings and connect the camera to an access point, wireless communications between the camera and the access point will not be encrypted, and third parties within the signal range may be able to intercept the content of the communications. Use WPA3 or WPA2, which are more secure security methods.
- SONY WILL NOT BE HELD LIABLE FOR DAMAGES OF ANY KIND RESULTING FROM FAILURE TO IMPLEMENT PROPER SECURITY MEASURES ON TRANSMISSION DEVICES, UNAVOIDABLE DATA LEAKS CAUSED BY TRANSMISSION SPECIFICATIONS, OR OTHER SECURITY PROBLEMS.
- Depending on the usage environment, unauthorized third parties on the network may be able to access the product. When connecting the camera to a network, be sure to confirm that the network is protected securely.
Optional accessories
- It is recommended that you use genuine Sony accessories.
- Some Sony accessories are only available in certain countries and regions.
Available models and kits
Some models and kits are only available in certain countries and regions.
[3] Notes on using your cameraLending, transferring or discarding the camera and/or memory card to others (Notes on protecting private information)
Important information may be recorded on the camera and/or memory card depending on the functions and camera settings.
Before lending, transferring, or discarding the camera and/or memory card to others, be sure to read the following and make sure that you have completed the procedures.
Notes on lending, transferring, or discarding the camera to others
Before lending, transferring, or discarding the camera to others, be sure to perform the following operation to protect private information.
- Select MENU →
 (Setup) → [Reset/Save Settings] → [Setting Reset] → [Initialize].
When you initialize the device, the following information is deleted:
- Faces registered in [Face Memory]
- Root certificates for RTMP, and the correct date and time
- Access point information
- Access authentication information
- Cloud connection information
- Network streaming connection information
Notes on using the cloud service (Creators' Cloud)
Before lending or transferring the camera, make sure that the camera linkage information and upload settings are appropriate to prevent damage such as the content on the camera being uploaded to an unintended third party’s Creators' Cloud. If the settings are not appropriate, be sure to perform the following operations.
- If you will transfer or lend the camera: initialize the camera or cancel the linkage with Creators' Cloud on the camera. Also, cancel the camera linkage in Creators' Cloud.
- If the camera is transferred to you or you borrow the camera: initialize the camera or cancel the linkage with Creators' Cloud on the camera.
Note that Creators' Cloud may only be available in certain countries and regions.
Notes on lending, transferring, or discarding a memory card to others
Executing [Format] or [Delete] on the camera or a computer may not completely delete the data on the memory card. Before lending or transferring a memory card to others, we recommend that you delete any data on it completely using data deletion software. When discarding a memory card, we recommend that you physically destroy it.
Notes on network functions
When you use network functions, unintended third parties on the network may access the camera, depending on the usage environment. For example, unauthorized access to the camera may occur in network environments to which another network device is connected or can connect without permission. Sony bears no responsibility for any loss or damage caused by connecting to such network environments.
Notes on the [Face Memory] function
Faces registered through the [Face Memory] function are considered biometric information. Before lending or transferring this camera, initialize the camera to prevent face information registered through the [Face Memory] function from being passed on to an unintended third party.
Notes on location information
If you upload and share still images or movies taken with this camera on the Internet while the location information is linked with the dedicated smartphone application, you may accidentally reveal the location information to a third party. To prevent third parties from obtaining your location information, deactivate the [Location Information Linkage] function of the dedicated application.
Warning on copyrights
Television programs, films, videotapes, and other materials may be copyrighted. Unauthorized recording of such materials may be contrary to the provisions of the copyright laws.
[4] Notes on using your cameraNotes on the battery pack and charging the battery
Notes on using the battery pack
- Be sure to use only genuine Sony brand battery packs.
- The correct remaining battery indicator may not be displayed under some operating or environmental conditions.
- Do not expose the battery pack to water. The battery pack is not water-resistant.
- Do not leave the battery pack in extremely hot places, such as in a car or under direct sunlight.
Notes on charging the battery pack
- Charge the battery pack (supplied) before using the product for the first time.
- The charged battery pack will discharge little by little even if you do not use it. Charge the battery pack each time before you use the product so that you do not miss any opportunities to shoot images.
- Do not charge battery packs except battery packs specified for this product. Doing so can result in leaks, overheating, explosions, electric shocks, burns, or injuries.
- When you use a completely new battery pack or a battery pack that has not been used for a long time, the charge lamp (CHARGE) may flash quickly when the battery is charged. If this happens, remove the battery pack and then re-insert it to recharge.
- We recommend charging the battery pack in an ambient temperature of between 10 °C and 30 °C (50 °F and 86 °F). The battery pack may not be correctly charged in temperatures outside this range.
- Operation cannot be guaranteed with all external power supplies.
- When charging is finished, disconnect the AC Adaptor from the wall outlet (wall socket) or disconnect the USB cable from the camera. Not doing so may result in a shorter battery life.
- Do not continuously or repeatedly charge the battery pack without using it if it is already fully charged or close to fully charged. Doing so may cause a deterioration in battery performance.
- If the product's charge lamp flashes while charging, remove the battery pack being charged, and then insert the same battery pack firmly back into the product. If the charge lamp flashes again, this may indicate a faulty battery or that a battery pack other than the specified type has been inserted. Check that the battery pack is the specified type.
If the battery pack is the specified type, remove the battery pack, replace it with a new or different one and check that the newly inserted battery is charging correctly. If the newly inserted battery is charging correctly, the previously inserted battery may be faulty. - If the charge lamp flashes while charging the battery pack inside the camera, this indicates that charging has stopped temporarily and is on standby. Charging stops and enters standby status automatically when the temperature is outside of the recommended operating temperature. When the temperature returns to the appropriate range, charging resumes and the charge lamp lights up again.
Remaining battery indicator
- The remaining battery indicator appears on the screen. It takes about one minute for the correct remaining battery indicator to appear.
- The correct remaining battery indicator may not be displayed under some operating or environmental conditions.
- If the remaining battery indicator does not appear on the screen, press the DISP (Display Setting) button to display it.
Effective use of the battery pack
- Battery performance decreases in low temperature environments. So in cold places, the operational time of the battery pack is shorter. To ensure longer battery pack use, we recommend putting the battery pack in your pocket close to your body to warm it up, and insert it in the product immediately before you start shooting. If there are any metal objects such as keys in your pocket, be careful of causing a short-circuit.
- The battery pack will run down quickly if you use the flash or continuous shooting function frequently, turn the power on/off frequently, or set the monitor very bright.
- We recommend preparing spare battery packs and taking trial shots before taking the actual shots.
- If the battery terminal is dirty, you may not be able to turn on the product or the battery pack may not be properly charged. In that case, clean the battery by lightly wiping off any dust using a soft cloth or a cotton swab.
How to store the battery pack
To maintain the battery pack’s function, charge the battery pack and then fully discharge it in the camera at least once a year before storing it. Store the battery in a cool, dry place after removing it from the camera.
On battery life
- The battery life is limited. If you use the same battery repeatedly, or use the same battery for a long period, the battery capacity decreases gradually. If the available time of the battery is shortened significantly, it is probably time to replace the battery pack with a new one.
- The battery life varies according to how the battery pack is stored and the operating conditions and environment in which each battery pack is used.
[5] Notes on using your cameraNotes on memory card
- If
 (overheating warning icon) is displayed on the monitor, do not remove the memory card from the camera right away. Instead, wait for a while after turning off the camera, and then remove the memory card. If you touch the memory card while it is hot, you may drop it and the memory card may be damaged. Be careful when removing the memory card.
 - If you repeatedly shoot and delete images for a long time, fragmentation of data in a file in the memory card may occur, and movie recording may be interrupted in the middle of shooting. If this happens, save your images to a computer or other storage location, then execute [Format] using this camera.
- Do not remove the battery pack or the memory card, disconnect the USB cable, or turn the camera off while the access lamp is lit up. This may cause the data on the memory card to become damaged.
- Be sure to back up the data for protection.
- Not all memory cards are guaranteed to operate correctly.
-
Images recorded on an SDXC memory card cannot be imported to or played on computers or AV devices not compatible with exFAT when connected using a USB cable. Make sure that the device is compatible with exFAT before connecting it to the camera. If you connect your camera to an incompatible device, you may be prompted to format the card. Never format the card in response to this prompt, as doing so will erase all data on the card.
(exFAT is the file system used on SDXC memory cards.) - Do not expose the memory card to water.
- Do not strike, bend or drop the memory card.
- Do not use or store the memory card under the following conditions:
- High temperature locations such as in a car parked under the sun
- Locations exposed to direct sunlight
- Humid locations or locations with corrosive substances present
- If the memory card is used near areas with strong magnetization, or used in locations subject to static electricity or electrical noise, the data on the memory card may become damaged.
- Do not touch the terminal section of the memory card with your hand or a metal object.
- Do not leave the memory card within the reach of small children. They might accidentally swallow it.
- Do not disassemble or modify the memory card.
- The memory card may be hot just after it has been used for a long time. Be careful when you handle it.
- Memory card formatted with a computer is not guaranteed to operate with the product. Be sure to format the memory card using this product.
- Data read/write speeds differ depending on the combination of the memory card and the equipment used.
- Do not press down hard when writing in the memo space on the memory card.
- Do not attach a label on the memory card itself nor on a memory card adaptor. You may not be able to remove the memory card.
- If the write-protect switch or delete-protect switch of an SD memory card is set to the LOCK position, you cannot record or delete images. In this case, set the switch to the record position.
-
To use a microSD memory card with this product:
- Be sure to insert the memory card into a dedicated adaptor. If you insert a memory card into the product without a memory card adaptor, you might not be able to remove it from the product.
- When inserting a memory card into a memory card adaptor, be sure that the memory card is inserted in the correct direction and then insert it as far as it will go. If the card is not inserted properly, it may result in a malfunction.
[6] Notes on using your camera Cleaning the image sensor
If dust or debris gets inside the camera and adheres to the surface of the image sensor (the part that converts the light to an electric signal), it may appear as dark spots on the image, depending on the shooting environment. If this happens, clean the image sensor quickly by following the steps below.
- Turn off the camera.
- Detach the lens.
- Use a commercially available blower to clean the image sensor surface and the surrounding area.
- Hold the camera slightly face downward so that the dust falls out.
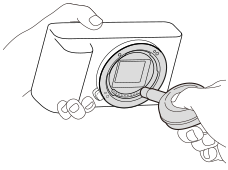
- Hold the camera slightly face downward so that the dust falls out.
- Attach the lens.
Hint
- For how to check the amount of dust on the image sensor, and for further details on cleaning methods, please refer to the following URL.
https://support.d-imaging.sony.co.jp/www/support/ilc/sensor/index.php
Note
- Do not use a spray type blower as it may scatter water droplets inside the camera body.
- Do not put the tip of a blower into the cavity beyond the lens mount area, so that the tip of the blower does not touch the image sensor.
- When cleaning the image sensor with a blower, do not blow too hard. If you blow the sensor too hard, the inside of the product may be damaged.
- If the dust remains even after you cleaned the product as described, consult the service facility.
[7] Notes on using your cameraOn cleaning
Cleaning the lens
- Do not use a cleaning solution containing organic solvents, such as thinner, or benzine.
- When cleaning the lens surface, remove dust with a commercially available blower. In case of dust that sticks to the surface, wipe it off with a soft cloth or tissue paper slightly moistened with lens cleaning solution. Wipe in a spiral pattern from the center to the outside. Do not spray lens cleaning solution directly onto the lens surface.
Cleaning the camera body
Do not touch the parts of the product inside the lens mount, such as a lens signal contact. To clean inside the lens mount, use a commercially available blower* to blow any dust off.
* Do not use a spray-type blower as doing so may cause a malfunction.
Cleaning the product surface
Clean the product surface with a soft cloth slightly moistened with water, then wipe the surface with a dry cloth. To prevent damage to the finish or casing:
- Do not expose the product to chemical products such as thinner, benzine, alcohol, disposable cloths, insect repellent, sunscreen or insecticide.
- Do not touch the product with any of the above on your hand.
- Do not leave the product in contact with rubber or vinyl for a long time.
Cleaning the monitor
- If you wipe the monitor firmly using tissue paper, etc., the monitor may be scratched.
- If the monitor becomes dirty with fingerprints or dust, gently remove the dust from the surface, and then clean the monitor using soft cloth, etc.
Checking the camera and the supplied items
The number in parentheses indicates the number of pieces.
- Camera (1)
- NP-FZ100 Rechargeable Battery Pack (1)

-
Wind screen (1) (Attached to the wind screen adaptor)

- Wind screen adaptor (1)
-
Shoulder Strap (1)
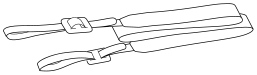
-
Body Cap (1)
(Attached to the camera)
Only for the ZV-E10M2

- Startup Guide (1)
- Reference Guide (1)
Note
- Accessories may differ depending on the country or region. Please check the Startup Guide for details on accessories.
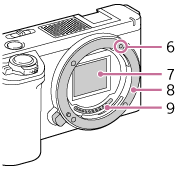
[9] Names of partsFront side
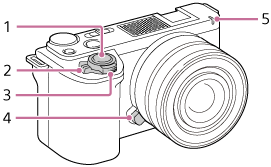
- Shutter button
- ON/OFF (Power) switch
- For shooting: W/T (zoom) lever
For viewing: (Index) lever/Playback zoom lever
 - Lens release button
- Self-timer lamp/Recording lamp
- Mounting index
- Image sensor*
- Mount
- Lens contacts*
*Do not directly touch these parts.
[10] Names of partsRear side
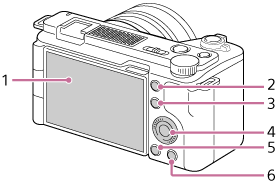
- Monitor/Touch panel
You can adjust the monitor to an easily viewable angle and shoot from any position.
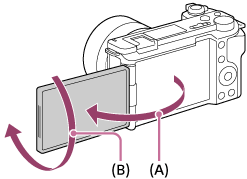
(A): Approx. 176°
(B): Approx. 270°
- You may not be able to adjust the monitor angle depending on the type of a tripod you use. In such a case, release the tripod screw once to adjust the monitor angle.
- Do not apply excessive force when opening, closing, or rotating the monitor. Doing so may cause a malfunction.
- MENU button
- For shooting: Fn (Function) button
For viewing:
 (Send to Smartphone) button
You can display the screen for transferring images to a smartphone by pressing this button.
- Control wheel
 (Playback) button
- For shooting:
 (Product Showcase Set) button
For viewing:
 (Delete) button
[11] Names of partsTop side
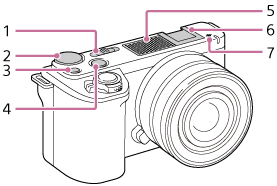
- Still/Movie/S&Q switch
- Control dial
- C1 button (Custom button 1)/
 (Background Defocus) button
 - MOVIE (Movie) button
- Internal microphone
Do not cover this part during movie recording. Doing so may cause noise or lower the volume.
- Multi Interface Shoe*
Some accessories may not go in all the way and protrude backward from the Multi interface shoe. However, when the accessory reaches the front end of the shoe, the connection is completed.
 Image sensor position mark
- The image sensor is the sensor that converts light into an electric signal. The position of the image sensor is indicated by (Image sensor position mark). When you measure the exact distance between the camera and the subject, refer to the position of the horizontal line.
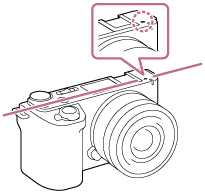
- If the subject is closer than the minimum shooting distance of the lens, the focus cannot be confirmed. Make sure you put enough distance between the subject and the camera.
- The image sensor is the sensor that converts light into an electric signal. The position of the image sensor is indicated by
* For details on compatible accessories for the Multi Interface Shoe, visit the Sony website, or consult your Sony dealer or local authorized Sony service facility.
Accessories for the Accessory Shoe can also be used. Operations with other manufacturers’ accessories are not guaranteed.


Using the wind screen (supplied)
Use the wind screen to reduce wind noise picked up by the internal microphone when recording a movie.
Attach the wind screen to the Multi Interface Shoe.
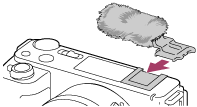
Note
- When attaching the wind screen, make sure that the wind screen does not get caught in the Multi Interface Shoe.
- When attaching a lens, make sure that the wind screen does not get caught in the lens mount.
[12] Names of partsSides
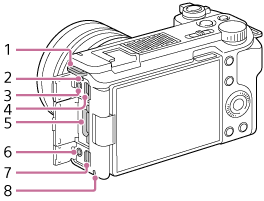
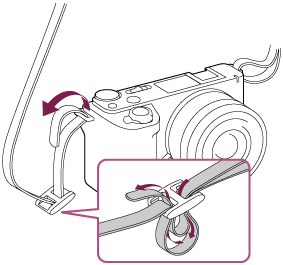
- Hooks for shoulder strap
Attach both ends of the strap onto the camera.
- Charge lamp
 (Microphone) jack
When an external microphone is connected, the built-in microphone turns off automatically. When the external microphone is a plugin-power type, the power of the microphone is supplied by the camera.
- USB Type-C® terminal
- Memory card slot
 (Headphones) jack
- HDMI micro jack
- Access lamp
[13] Names of partsBottom
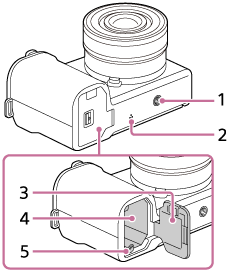
- Tripod socket hole
Supports 1/4-20 UNC screws
Use a tripod with a screw less than 5.5 mm (7/32 inches) long. Otherwise, you cannot firmly secure the camera, and damage to the camera may occur.
- Speaker
- Battery cover
- Battery insertion slot
- Lock lever
[14] Names of partsBasic icons displayed on the monitor
This section describes the screen display when the shooting mode is  (Program Auto).
- The following is an example of the display when [DISP (Screen Disp) Set] is set to [Display All Info.] and the touch function icons are hidden.
- The displayed content and positions are for reference only, and may differ from the actual display. Some icons may not be displayed depending on the camera settings.
- For information on how to show/hide the touch function icons and examples of the touch function icon display, refer to “Touch function icons.”
During movie recording
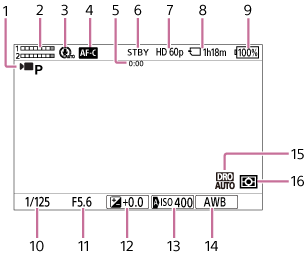
Display when holding the camera vertically
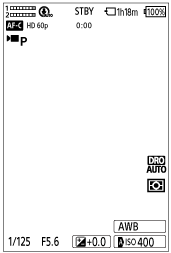
- [
 Shoot Mode] is set to [Program Auto].
 - Audio level
- [Microphone Directivity] is set to [Auto].
- [
 Focus Mode] is set to [Continuous AF].
 - Actual shooting time of the movie
- The camera is in the shooting standby mode.
- [File Format] is set to [XAVC S HD] and [Rec Frame Rate] is set to [60p].
- Recordable movie time on the memory card
- Remaining battery level
- Shutter speed
- Aperture value
- Exposure compensation
- [ISO] is set to [ISO AUTO]. (The ISO value automatically set by the camera is displayed.)
- [White Balance] is set to [Auto].
- [D-Range Optimizer: Auto] is selected.
- [Metering Mode] is set to [Multi].
During still image shooting
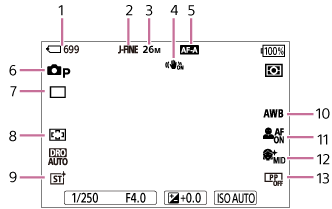
Display when holding the camera vertically
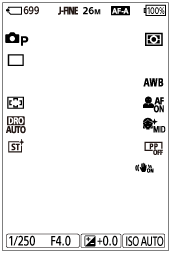
- Number of still images that can be recorded on the memory card
- [JPEG/HEIF Switch] is set to [JPEG]. [JPEG Quality] is set to [Fine].
- [JPEG Image Size] is set to [L: 26M].
- [
 SteadyShot] is set to [On].
 - [Focus Mode] is set to [Automatic AF].
- [Shoot Mode] is set to [Program Auto].
- [Drive Mode] is set to [Single Shooting].
- [Focus Area] is set to [Wide].
- [Creative Look] is set to [ST].
- [White Balance] is set to [Auto].
- [Subject Recog in AF] is set to [On] and [Recognition Target] is set to [Human].
- [Soft Skin Effect] is set to [On: Mid].
- [Picture Profile] is set to [Off].
[15] Names of partsTouch function icons
Some functions have icons for touch operations (touch function icons). You can execute or change the settings of the functions by touching the icons.
Settings for using the touch function icons
Configure the settings as follows from MENU → (Setup) → [Touch Operation] in advance:
- [Touch Operation]: [On]
-
[Shooting Screen]:
- Set [Shooting Screen] to [On].
- [Swipe Right] or [Swipe Left] → desired setting.
To show/hide the touch function icons
Swipe right or left on the shooting standby screen. The touch function icons will appear on the left and right sides of the screen according to the settings for [Swipe Right] and [Swipe Left] under [Shooting Screen].
To hide the touch function icons, swipe the screen in the opposite direction from when you made the icons appear.
Examples of the touch function icon display and functions of each icon
The examples show the display when you set the icons to appear on both the left and right sides.
During movie recording
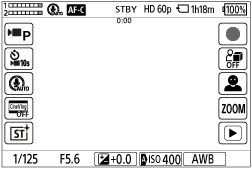
Icons on the left side: Shoot Mode, Self-timer, Mic Directivity Select, Cinematic Vlog Set., Creative Look*
Icons on the right side: Starts recording movies, Product SC Set, Recog. Target Select, Step Zoom, switches to the playback screen**
*When the shooting mode is set to [Intelligent Auto], the icon changes to the  (image adjustment) setting icon.
**The shot mark button is displayed during movie recording so that shot marks can be set for the movie being recorded.
During still image shooting
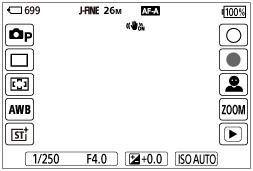
Icons on the left side: Shoot Mode, Drive Mode, Focus Area, White Balance, Creative Look*
Icons on the right side: Shoots a still image, starts recording movies, Recog. Target Select, Step Zoom, switches to the playback screen**
*When the shooting mode is set to [Intelligent Auto] or [Scene Selection], the icon changes to the (image adjustment) setting icon.
**The shot mark button is displayed even during movie recording in the still image shooting mode so that shot marks can be set for the movie being recorded.
Hint
-
When MENU → (Setup) → [Touch Operation] → [Playback Screen] is set to [On], the touch function icons on the playback screen are always displayed.
-
If you set MENU → (Setup) →[Touch Operation] → [Shooting Screen] → [Icon When Monitor Flipped] to [Flip], you can set whether to switch the left and right icons on the shooting screen when the monitor is flipped.
[16] Names of partsE PZ 16–50mm F3.5–5.6 OSSⅡ (Power zoom)
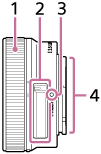
- Zooming/Focusing ring
- Zooming lever
- Mounting index
- Lens contacts*
*Do not touch this part directly.
Specifications
Focal length: 16 mm – 50 mm
Equivalent 35 mm-format focal length*1: 24 mm – 75 mm
Lens groups – elements: 8 – 9
Angle of view*1: 83° – 32°
Minimum focus*2: 0.25 m – 0.3 m (0.82 ft. – 1 ft.)
Maximum magnification: 0.215×
Minimum aperture: f/22 – f/36
Filter diameter: 40.5 mm
Dimensions (max. diameter × height): Approx. 66 mm × 31.3 mm (Approx. 2 5/8 inches × 1 1/4 inches)
Mass: Approx. 107 g (Approx. 3.8 oz.)
SteadyShot: Available
*1The values for equivalent 35 mm-format focal length and angle of view are based on digital cameras equipped with an APS-C sized image sensor.
*2Minimum focus is the shortest distance from the image sensor to the subject.
Supplied items
Lens (1), Front Lens Cap (1)
Note
- This lens is only supplied with lens-kit models. The release status of lens-kit models may vary among countries and regions.
[17] Names of partsE 55-210 mm F4.5-6.3 OSS
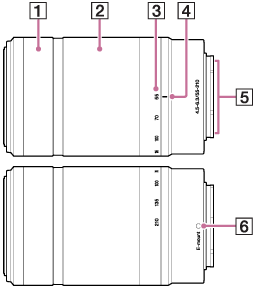
- Focusing ring
- Zooming ring
- Focal-length scale
- Focal-length index
- Lens contacts*
- Mounting index
*Do not touch this part directly.
Specifications
Focal length: 55 mm – 210 mm
Equivalent 35 mm-format focal length*1: 82.5 mm – 315 mm
Lens groups – elements: 9 – 13
Angle of view*1: 28.2° – 7.8°
Minimum focus*2: 1.0 m (3.28 ft.)
Maximum magnification: 0.225×
Minimum aperture: f/22 – f/32
Filter diameter: 49 mm
Dimensions (max. diameter × height): Approx. 63.8 mm × 108 mm (Approx. 2 5/8 inches × 4 3/8 inches)
Mass: Approx. 345 g (Approx. 12.2 oz.)
SteadyShot: Available
*1 The values for equivalent 35 mm-format focal length and angle of view are based on digital cameras equipped with an APS-C sized image sensor.
*2 Minimum focus is the shortest distance from the image sensor to the subject.
Supplied items
Lens (1), Front Lens Cap (1), Rear Lens Cap (1), Lens Hood (1)
Note
- This lens is only supplied with lens-kit model. The release status of lens-kit models may vary among countries and regions.
[18] Basic operationsTouch panel
By touching the monitor, you can intuitively perform operations such as focusing on the shooting screen and operating the playback screen.
Touch operations (on the shooting screen)
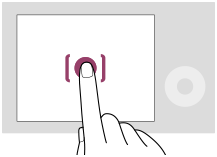
Touch the monitor to specify where to focus (Touch Focus).
Touch a subject on the monitor to use the touch tracking function (Touch Tracking).
You can also focus on a subject and shoot images simply by touching the subject on the screen (Touch Shutter).
When you touch the subject on the screen, the camera adjusts the brightness automatically according to the subject (Touch AE). [Touch AE] can also be used in combination with [Touch Focus], [Touch Tracking], or [Touch Shutter].
For information on how to switch the function activated by touch operation, refer to “Shooting Screen.”
Touch operations (on the playback screen)
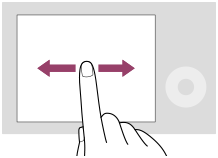
During single-image playback, swipe the screen to the left or right to move to the previous or next image.
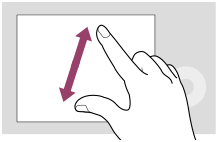
During single-image playback, you can enlarge or reduce the displayed image by moving apart or bringing together two fingers on the screen (pinch-out/pinch-in).
- You can also double-tap the monitor to enlarge a still image or exit the enlarged image.
- During movie playback, you can start or pause playback using touch operations.
Hint
- You can also operate the camera by touching the guides displayed on the bottom of the screen (Except when in the [Intelligent Auto] mode).
- You can open the function menu by swiping upward quickly on the shooting screen or playback screen. You can show and hide the icons for functions displayed on the left and right sides of the screen by swiping left and right quickly on the shooting screen.
- You can set whether to enable touch operations and configure detailed settings under [Shooting Screen], [Playback Screen], and [Menu Screen].
[19] Basic operationsTouch function icons
Some functions have icons for touch operations (touch function icons). You can execute or change the settings of the functions by touching the icons.
Settings for using the touch function icons
Configure the settings as follows from MENU → (Setup) → [Touch Operation] in advance:
- [Touch Operation]: [On]
-
[Shooting Screen]:
- Set [Shooting Screen] to [On].
- [Swipe Right] or [Swipe Left] → desired setting.
To show/hide the touch function icons
Swipe right or left on the shooting standby screen. The touch function icons will appear on the left and right sides of the screen according to the settings for [Swipe Right] and [Swipe Left] under [Shooting Screen].
To hide the touch function icons, swipe the screen in the opposite direction from when you made the icons appear.
Examples of the touch function icon display and functions of each icon
The examples show the display when you set the icons to appear on both the left and right sides.
During movie recording
Icons on the left side: Shoot Mode, Self-timer, Mic Directivity Select, Cinematic Vlog Set., Creative Look*
Icons on the right side: Starts recording movies, Product SC Set, Recog. Target Select, Step Zoom, switches to the playback screen**
*When the shooting mode is set to [Intelligent Auto], the icon changes to the (image adjustment) setting icon.
**The shot mark button is displayed during movie recording so that shot marks can be set for the movie being recorded.
During still image shooting
Icons on the left side: Shoot Mode, Drive Mode, Focus Area, White Balance, Creative Look*
Icons on the right side: Shoots a still image, starts recording movies, Recog. Target Select, Step Zoom, switches to the playback screen**
*When the shooting mode is set to [Intelligent Auto] or [Scene Selection], the icon changes to the (image adjustment) setting icon.
**The shot mark button is displayed even during movie recording in the still image shooting mode so that shot marks can be set for the movie being recorded.
Hint
-
When MENU → (Setup) → [Touch Operation] → [Playback Screen] is set to [On], the touch function icons on the playback screen are always displayed.
-
If you set MENU → (Setup) →[Touch Operation] → [Shooting Screen] → [Icon When Monitor Flipped] to [Flip], you can set whether to switch the left and right icons on the shooting screen when the monitor is flipped.
[20] Basic operationsControl wheel
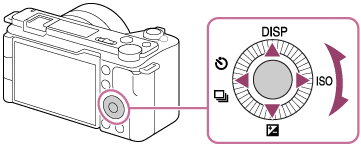
-
The DISP (Display Setting),
 (Exposure Comp.),
  /
/ (Self-timer/Drive Mode), and ISO (ISO) functions are assigned to the top/bottom/left/right side of the control wheel. In addition, you can assign selected functions to the left/right/bottom side and the center of the control wheel, and to the rotation of the control wheel.
- During playback, you can display the next/previous image by pressing the right/left side of the control wheel or by turning the control wheel.
- During vertical display, the movement directions of the top/bottom/left/right side of the control wheel are also rotated to match the orientation of the monitor so that intuitive operation is possible. The functions assigned to the top/bottom/left/right side of the control wheel using [Custom Key/Dial Set.] or [Custom Key/Dial Set.] will not rotate during vertical display.
[21] Basic operationsStill/Movie/S&Q switch
You can use the Still/Movie/S&Q switch to select a shooting mode.
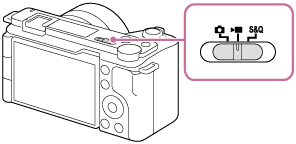
You can select the still image shooting mode, movie recording mode, or slow-motion/quick-motion recording mode as the shooting mode using the Still/Movie/S&Q switch.
Hint
- The menu items displayed in the [Shooting], [Exposure/Color], and [Focus] tabs of the menu screen vary depending on the shooting mode (still image/movie/S&Q). Before you adjust these settings, select the desired shooting mode with the Still/Movie/S&Q switch.
- When shooting a time-lapse movie, set the Still/Movie/S&Q dial to S&Q, and select [
 Time-lapse].
[22] Basic operationsMENU button
The menu screen is displayed by pressing the MENU button. You can change settings related to all of the camera operations including shooting and playback, or you can execute a function from the menu screen.
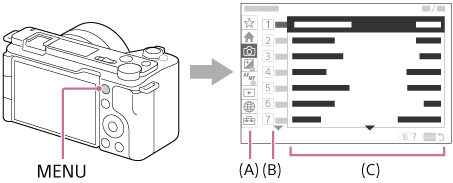
(A) Menu tab
Menu tabs are categorized by usage scenario, such as shooting, playback, network settings, etc.
(B) Menu group
In each tab, menu items are grouped by function.
The number assigned to the group is the serial number in the tab. Refer to the number to determine the location of the group in use.
(C) Menu item
Select the function you want to set or execute.
Hint
- The name of the selected tab or group is displayed at the top of the screen.
- When [Touch Operation] is set to [On] and [Menu Screen] is set to [On], touch operations on the menu screen are possible.
Basic operations on the menu screen
- Press the MENU button to display the menu screen.
- Move within the menu tree and find the desired menu item by pressing the top/bottom/left/right side of the control wheel.
- The displayed menu items differ between the still image shooting modes and movie recording modes.
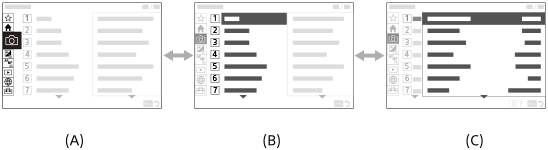
(A) Menu tabs
(B) Menu groups
(C) Menu items
- The displayed menu items differ between the still image shooting modes and movie recording modes.
- Press the center of the control wheel to select the menu item.
The setting screen or execution screen for the selected item will appear on the monitor.
- Select a parameter or execute the function.
- If you want to cancel changing the parameter, press the MENU button and go back to the previous screen.
- Press the MENU button to exit the menu screen.
You will return to the shooting screen or playback screen.
Hint
-
In the
 (Main) tab, you can view a list of the current shooting settings. Select a setting value in the tab to open the corresponding menu item and change the setting value.
-
You can display the menu screen by assigning the [MENU] function to a custom key using [Custom Key/Dial Set.] or [Custom Key/Dial Set.], and then pressing that key.
Relationship between the Still/Movie/S&Q switch and menu screen
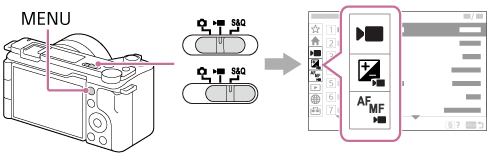
The menu groups and menu items displayed in the [Main], [Shooting], [Exposure/Color], and [Focus] tabs vary depending on the Still/Movie/S&Q switch position.
- The displayed menu groups and menu items are the same in the movie recording modes and the slow-motion/quick-motion shooting modes.
Still image shooting modes
- Menu items for shooting still images are displayed.*
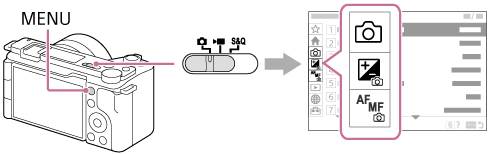
* Since you can record movies with the MOVIE (Movie) button even in the still image shooting mode, some basic movie menu items are also displayed.
Movie recording modes/Slow-motion and quick-motion shooting modes
- Menu items for recording movies are displayed.
Latest software notification badge
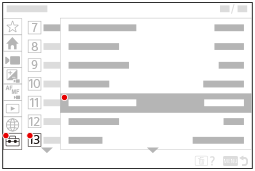
If newer camera software is available, a red notification badge will appear over the (Setup) tab, [Setup Option], and [Version] in the menu screen to notify you that an update is available (when the camera’s system software (firmware) is Ver.1.01 or later).
Icons used in the “Help Guide”
: Menu items displayed in the still image shooting modes
: Menu items displayed in the movie recording modes and slow-motion/quick-motion shooting modes
: Menu items displayed in any of the still image shooting modes, movie recording modes, or slow-motion/quick-motion shooting modes
[23] Basic operationsMain menu (shooting setting list)
Select the (Main) tab on the menu screen to display a list of shooting settings. You can confirm the settings before shooting or for each scene, and also change the settings directly from this screen.
Main menu for shooting movies
Main 1
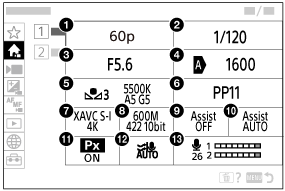
-
Rec Frame Rate/
 Frame Rate Settings (when shooting slow-motion/quick-motion movies)/Rec Frame Rate (when shooting time-lapse)
 -
Shutter Speed
-
Aperture
-
ISO
-
White Balance
-
Picture Profile
-
File Format
-
Record Setting/
Record Setting (when shooting slow-motion/quick-motion movies)/Record Setting (when shooting time-lapse) -
Gamma Display Assist
-
Gamma Disp. Assist Typ.
-
 Proxy Recording
 -
Wind Noise Reduct.
-
Audio Rec Level
Main 2
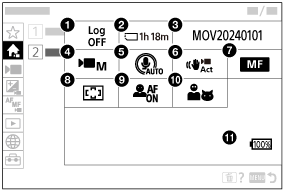
-
Log Shooting Setting
-
Format
-
File Settings
-
Shoot Mode
-
Microphone Directivity
-
SteadyShot
-
Focus Mode
-
Focus Area
-
Subject Recog in AF
-
Recognition Target
-
Remaining battery level
Main menu for shooting still images
Main 1
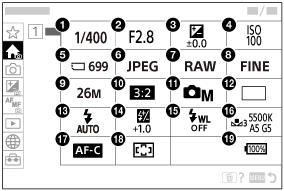
-
Shutter Speed*
-
Aperture*
-
Exposure Comp.
-
ISO
-
Format
-
File Format
-
RAW File Type
-
JPEG Quality/HEIF Quality
-
JPEG Image Size/HEIF Image Size
-
Aspect Ratio
-
Shoot Mode
-
Drive Mode
-
Flash Mode
-
Flash Comp.
-
Wireless Flash
-
White Balance
-
Focus Mode
-
Focus Area
- Remaining battery level
* When the shooting mode is [Program Auto], the shutter speed and aperture value are displayed in the same area. You can perform Program Shift by selecting the area.
Hint
- If you assign the [Display Main Menu] function to the desired key using the custom key settings, you can also open the Main menu by pressing the assigned key.
- You can open the setting screens by touching the icons on the main menu when [Touch Operation] is set to [On] and [Menu Screen] is set to [On].
[24] Basic operationsFn (function) button
If you press the Fn (function) button while shooting or playing back images, a menu (function menu) containing frequently used functions will appear on the screen, allowing you to quickly call up the functions.
Example of function menu
The displayed items differ depending on the camera status.
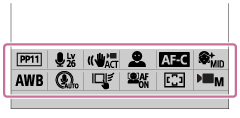
Hint
-
Use [Fn Menu Settings]/[
 Fn Menu Settings] to register your favorite functions to the function menus for shooting still images, for shooting movies, and for playing back images, respectively. You can register 12 functions to each function menu.
- When [Touch Operation] is set to [On] and [Shooting Screen]/[Playback Screen] is set to [On], touch operations on the function menu screen are possible.
-
When [Touch Operation] is set to [On] and [Shooting Screen]/[Playback Screen] is set to [On], you can also open [Fn Menu Settings]/[Fn Menu Settings] by holding down the icon in the function menu.
- When [Swipe Up] under [Shooting Screen] is set to [Open the Fn Menu], the function menu can be displayed using touch operations by swiping the shooting screen upward quickly. When [Playback Screen] is set to [On], the function menu can be displayed using touch operations by swiping the playback screen upward quickly.
- Swipe downward from the area outside of the function menu or touch the area outside of the function menu to close the function menu.
- Press the Fn (Function) button.
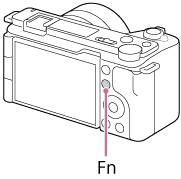
- Press the top/bottom/left/right side of the control wheel to select a function to set.
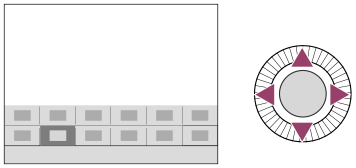
- Select the desired setting by turning the control wheel, and press the center of the control wheel.
- Some functions can be fine-tuned using the control dial.
- Press the center of the control wheel.
To adjust settings from the dedicated setting screens
Select the icon for the desired function and then press the center of the control wheel. The dedicated setting screen for the function will appear. Follow the operating guide (A) to adjust settings.
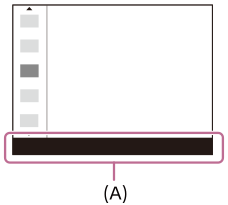
[25] Basic operations C (custom) buttons
If you assign frequently used functions to the custom button (C1) in advance, you can quickly call up those functions simply by pressing the button during shooting or playback.
Recommended functions are assigned to the custom buttons by default.
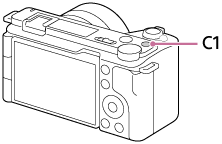
To check/change the functions of the custom buttons
You can confirm the function currently assigned to each custom button via the following procedure.
MENU → (Setup) → [Operation Customize] → [Custom Key/Dial Set.], [Custom Key/Dial Set.] or [Custom Key Setting].
If you want to change the function of the custom button, press the center of the control wheel while the custom button is selected. The functions that can be assigned to that button will appear. Select your desired function.
[26] Basic operationsDISP (Display Setting) button
By pressing the DISP (Display Setting) button, you can change the content displayed on the screen during shooting and playback. The display switches each time the DISP button is pressed.
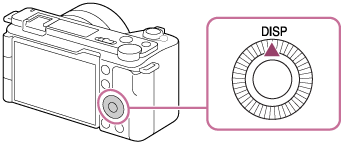
During shooting
Display All Info. → No Disp. Info. → Histogram → Level → Display All Info.
When shooting movies:

When shooting still images:

During playback
Display Info. → Histogram → No Disp. Info. → Display Info.
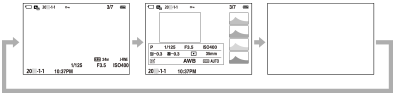
- If the image has an overexposed or underexposed area, the corresponding section will blink on the histogram display (overexposed/underexposed warning).
- The settings for playback are also applied in [Auto Review].
Hint
- If [Vertical Display] is set to [On], the information display will rotate vertically to fit the orientation of the camera when you hold the camera vertically in the shooting mode.
Note
- The displayed contents and their position shown in the illustration are just a guideline, and may differ from the actual display.
[27] Basic operationsDelete button
You can delete an image currently being displayed by pressing the (Delete) button.

- When a confirmation message appears after you press the (Delete) button, use the control wheel to select [Delete] and press the center.
- You can also delete two or more images at once.
Select MENU → (Playback) → [Delete] → [Delete]. Then, select the images you want to delete.
Hint
-
If you set MENU → (Playback) → [Delete] → [
 Delete pressing twice] to [On], you can delete images by pressing the (Delete) button twice in a row.
- Other than the single-image playback screen, you can also use the (Delete) button for the following operations.
- Custom Key
- Opening the context menu ([Add to My Menu]/[In-Camera Guide])
[28] Basic operationsControl dial
You can use the control dial to quickly change the setting values in the following cases:
- When you want to adjust the aperture value or shutter speed.
- When you want to change the camera settings during shooting.
During playback, you can turn the dials to browse images.
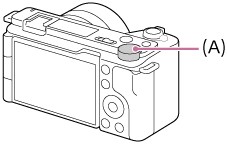
(A): Control dial
Hint
- You can use [Custom Key/Dial Set.]/[Custom Key/Dial Set.] to assign the desired function to the control dial.
- You can also use the [My Dial Settings] function to assign your desired function to the control dial, and recall the function when required.
[29] Basic operationsKeyboard screen
When manual character entry is required, a keyboard is displayed on the screen. For examples of functions that use the keyboard, see “Related Topic” at the bottom of this page.
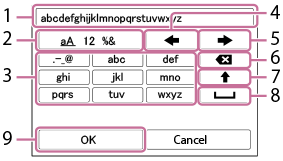
- Input box
The characters you entered are displayed. - Switch character types
Each time you press this key, the character type will switch between alphabet letters, numerals and symbols. - Keyboard
Each time you press this key, the characters corresponding to that key will be displayed one-by-one in order. To switch letters from lower to upper case, press (Up arrow).
 -
 (Left arrow)
Moves the cursor in the input box to the left. -
 (Right arrow)
Moves the cursor in the input box to the right. This key is also used to finalize the input of a character being edited and move to the next character. -
 (Delete)
Deletes the character preceding the cursor. - (Up arrow)
Switches a letter to upper or lower case. -
 (Space)
Enters a space. - OK
Press this key after entering characters to finalize the entered characters.
The procedure for entering alphabetic characters is explained below.
- Use the control wheel to move the cursor to the desired key.
- Each time you press the center of the control wheel, the characters will change.
- To switch the letter to upper or lower case, press (Up arrow).
- When the character that you want to enter appears, press (Right arrow) to confirm the character.
- Make sure to confirm one character at a time. Unless a character is confirmed, you cannot enter the next character.
- Even if you do not press (Right arrow), the entered character will be automatically confirmed after several seconds.
- After you finish entering all characters, press [OK] to finalize the entered characters.
- To cancel input, select [Cancel].
[30] Basic operationsIn-Camera Guide
The [In-Camera Guide] displays descriptions of MENU items, Fn (Function) items, and settings.
- Select the MENU or Fn item for which you want to see a description, and then press the (Delete) button (A).

The descriptions of the item are displayed.
- Select [In-Camera Guide] and press the center of the control wheel when the context menu appears.
[31] Basic operationsFunctions for accessibility
The camera is equipped with functions for accessibility to serve as visual aids.
Screen reader function
The camera reads aloud information such as menu screens and messages.
To always enable the screen reader function, enable the screen reader function on the initial setup screen displayed after you turn the camera on for the first time.
Once you use the screen reader function on the initial setup screen, the screen reader function will be kept enabled after the initial setup, and you can switch it on and off by pressing and holding the MENU button.
The MENU button is located on the rear side of the camera, immediately to the right of the monitor, and is the round button at the top.
Enlarge screen function
You can enlarge the menu screen display for better readability of the text. (Some menu screens do not support the enlarging function.)
Select MENU → (Setup) → [ Accessibility] → [Enlarge Screen] to enable the function. The menu screen display will be enlarged when you press the custom key on the menu screen.
For details, refer to “Enlarge Screen.”
Hint
- If you did not use the screen reader function on the initial setup screen, you can enable the function from the menu. Select MENU → (Setup) → [Accessibility] → [Screen Reader] → [Screen Reader] → [On].
- If you did not use the screen reader function on the initial setup screen, [
 Long Press to Switch] under [Screen Reader] will be set to [Off]. Set [Long Press to Switch] to [On] when you want to switch the screen reader function on and off by pressing and holding the MENU button.
Note
- Depending on the language you selected on the initial setup screen or in [
 Language], the screen reader function may not be supported.
[32] Preparing the camera/Basic shooting operationsCharging the battery packInserting/removing the battery pack
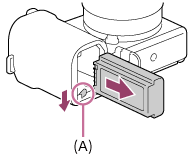
- Slide the switch on the battery cover to open the cover.
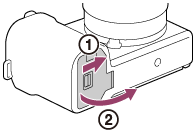
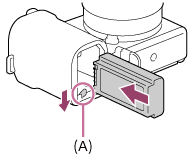
- Insert the battery pack while pressing the lock lever (A) with the tip of the battery until the battery locks into place.
- Close the cover and slide the switch to the LOCK side.
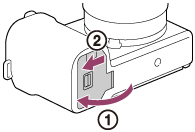
To remove the battery pack
Make sure that the access lamp is not lit, and turn off the camera. Then, slide the lock lever (A) and remove the battery pack. Be careful not to drop the battery pack.
[33] Preparing the camera/Basic shooting operationsCharging the battery packCharging the battery with a USB-PD-compatible device
- Turn off the camera.
- Connect the USB Type-C terminal of the camera to the USB Type-C terminal of a device compatible with USB PD (USB Power Delivery) using a commercially available USB Type-C cable (USB-C® – USB-C).
- Use a USB-PD-compatible device with an output of 18 W (9 V/2 A) or more and a USB Type-C cable (USB-C – USB-C) that supports 3 A or more.
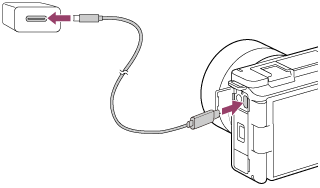
Charge lamp on the camera (orange)
Lit: Charging
Off: Charging finished
Flashing: Charging error or charging paused temporarily because the camera is not within the proper temperature range
-
Charging time (Full charge): The charging time is approximately 175 min. (when using a USB-PD-compatible device with an output of 27 W (9 V/3 A)).
The charging time varies depending on the USB-PD-compatible device and USB cable. - The above charging time applies when charging a fully depleted battery pack at a temperature of 25 °C (77 °F). Charging may take longer depending on conditions of use and circumstances.
- The charge lamp turns off when charging is completed.
- If the charge lamp lights up and then immediately turns off, the battery pack is fully charged.
Hint
- You can also charge using a device that is not compatible with USB PD. Use a USB Type-C cable (USB-A - USB-C) (commercially available). When you use an AC adaptor, use one with a rated output of 1.5 A or higher.
Charging may take longer than when using a USB-PD-compatible device.
Note
- Use a nearby wall outlet (wall socket) when using an AC Adaptor. If any malfunction occurs, disconnect the plug from the wall outlet (wall socket) immediately to disconnect from the power source. If you use the product with a charge lamp, note that the product is not disconnected from the power source even when the lamp turns off.
- If you turn on the camera, power will be supplied from the wall outlet (wall socket) and you will be able to operate the camera. However, the battery pack will not be charged.
- If the product is connected to a laptop computer that is not connected to a power source, the laptop battery level decreases. Do not leave the product connected to a laptop computer for an extended period of time.
- Do not turn on/off or restart the computer, or wake the computer from sleep mode when a USB connection has been established between the computer and the camera. Doing so may cause a malfunction. Before turning on/off or restarting the computer, or waking the computer from sleep mode, disconnect the camera from the computer.
- Charging cannot be guaranteed with a custom-built computer, modified computer, or a computer connected through a USB hub.
- The camera may not operate correctly when other USB devices are used at the same time.
- Before charging, be sure to also read “Notes on the battery pack and charging the battery.”
[34] Preparing the camera/Basic shooting operationsCharging the battery pack Using the battery charger abroad
You can use the battery charger (sold separately) in any country or region where the power supply is within 100 V to 240 V AC and 50 Hz/60 Hz.
Depending on the country/region, a converting plug adaptor may be needed to connect to a wall outlet (wall socket). Consult a travel agency, etc., and prepare one in advance.
Note
- Do not use an electronic voltage transformer as doing so may cause a malfunction.
[35] Preparing the camera/Basic shooting operationsSupplying power from a wall outlet (wall socket)
Use an AC adaptor, etc. to shoot and play back images while power is supplied from a wall outlet (wall socket). This conserves the camera's battery power.
We recommend using a USB-PD (USB Power Delivery) device that is compatible with an output of 9V/3A.
- Insert a sufficiently charged battery pack into the camera.
- The camera will not activate if there is no remaining battery. Insert a sufficiently charged battery pack into the camera.
- Connect a USB cable (commercially available) to the USB Type-C terminal on the camera.
- Connect to a wall outlet (wall socket) using an AC adaptor, etc.
- Turn on the camera.
- An icon (
 ) indicating USB power supply will appear next to the battery display on the monitor, and power supply will start.
- An icon (
Note
- As long as the power is on, the battery pack will not be charged even if the camera is connected to the AC Adaptor, etc.
- Under certain conditions, power may be supplied from the battery pack supplementarily even if you are using the AC adaptor, etc.
- Do not remove the battery pack while power is supplied from a wall outlet (wall socket). If you remove the battery pack, the camera will be turned off.
- Only connect the USB cable to the camera or disconnect the USB cable from the camera while the camera is turned off.
- Depending on the camera and battery temperature, the continuous recording time may be shortened while power is supplied from a wall outlet (wall socket). The area around the terminal may become hot. Be careful when handling it.
- When using a mobile charger as a power source, confirm that it is fully charged before use. Also, be careful of the remaining power on the mobile charger during use.
- Operation cannot be guaranteed with all external power supplies.
[36] Preparing the camera/Basic shooting operationsMemory cards that can be used
This camera supports only SD memory cards (UHS-II compatible). When using microSD memory cards with this camera, be sure to use the appropriate adaptor.
For still-image shooting
The following memory cards can be used.
- SD/SDHC/SDXC memory cards
For movie recording
(When [Proxy Recording] is set to [Off])
Movie recording formats and compatible memory cards are as follows.
| File Format |
Maximum recordable bit rate when recording | Supported memory card |
|---|---|---|
| XAVC HS 4K | 200Mbps |
|
| XAVC S 4K | 200Mbps |
|
| XAVC S HD | 100Mbps |
|
| XAVC S-I 4K | 600Mbps |
|
| XAVC S-I HD | 222Mbps |
|
For movie recording (When [Proxy Recording] is set to [On])
- Proxy recording is not possible when the recording frame rate is [120p]/[100p]. Depending on the setting for [File Format], the maximum recording bit rate may be lower than when [Proxy Recording] is set to [Off]. Supported memory cards for [File Format] are as follows.
- This camera cannot perform proxy recording when shooting in the XAVC S-I format.
| File Format |
Maximum recordable bit rate when recording | Supported memory card |
|---|---|---|
| XAVC HS 4K | 200Mbps + 16Mbps* |
|
| XAVC S 4K | 200Mbps + 16Mbps* |
|
| XAVC S HD | 50Mbps + 16Mbps* |
|
*The maximum recording bit rate for proxy movies on this camera is 16 Mbps.
For S&Q Motion shooting (When [Proxy Recording] is set to [Off])
File formats and compatible memory cards are as follows.
| File Format |
Maximum recordable bit rate when recording | Supported memory card |
|---|---|---|
| XAVC HS 4K | 250Mbps |
|
| XAVC S 4K | 280Mbps |
|
| XAVC S HD | 250Mbps |
|
| XAVC S-I 4K | 600Mbps |
|
| XAVC S-I HD | 445Mbps |
|
For S&Q Motion shooting (When [Proxy Recording] is set to [On])
- Proxy recording is not possible when the recording frame rate is [120p]/[100p]. Depending on the setting for [File Format], the maximum recording bit rate may be lower than when [Proxy Recording] is set to [Off]. Supported memory cards for [File Format] are as follows.
- This camera cannot perform proxy recording when shooting in the XAVC S-I format.
| File Format |
Maximum recordable bit rate when recording | Supported memory card |
|---|---|---|
| XAVC HS 4K | 250Mbps + 16Mbps* |
|
| XAVC S 4K | 280Mbps + 16Mbps* |
|
| XAVC S HD | 125Mbps + 16Mbps* |
|
*The maximum recording bit rate for proxy movies on this camera is 16 Mbps.
For time-lapse shooting (When [Proxy Recording] is set to [Off])
- Supported memory cards for [File Format] are as follows.
| File Format |
Supported memory card |
|---|---|
| XAVC HS 4K |
|
| XAVC S 4K | |
| XAVC S HD | |
| XAVC S-I 4K |
|
| XAVC S-I HD |
For time-lapse shooting (When [Proxy Recording] is set to [On])
- Supported memory cards for [File Format] are as follows.
- This camera cannot perform proxy recording when shooting in the XAVC S-I format.
| File Format |
Supported memory card |
|---|---|
| XAVC HS 4K |
|
| XAVC S 4K | |
| XAVC S HD |
|
Note
- In slow-motion recording, the recording bit rate is higher than usual. You may need a memory card that can be written at a higher speed.
- When an SDHC memory card is used to record movies over extended periods of time, the recorded movies are divided into files 4 GB in size.
- Charge the battery pack sufficiently before attempting to recover the database files on the memory card.
-
If the marks below appear on the memory card icon when shooting, use another memory card:
 : Indicates that the number of times the memory card can be rewritten is close to the upper limit.
 : Indicates that the number of rewrites on the memory card has reached the upper limit.
[37] Preparing the camera/Basic shooting operationsInserting/removing a memory card
Explains how to insert a memory card (sold separately) to the camera. You can use the SD memory cards with this camera.
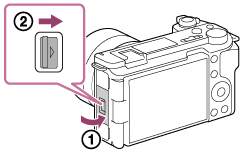
- Slide the switch on the memory card cover to open the cover.
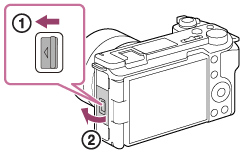
- Insert the memory card.
- With the notched corner facing in the direction illustrated, insert the memory card until it clicks into place. Insert the memory card correctly. Not doing so may cause a malfunction.
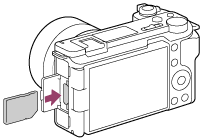
- Close the cover, and then slide the switch towards the LOCK side.
Hint
- When you use a memory card with the camera for the first time, it is recommended that you format the card on the camera for more stable performance of the memory card.
To remove the memory card
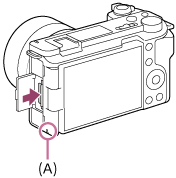
Open the memory card cover and make sure that the access lamp (A) is not lit, then push in the memory card lightly once to remove it.
[38] Preparing the camera/Basic shooting operationsAttaching/removing a lens
Turn off the camera before attaching or removing the lens.
- Remove the body cap (A) from the camera and the rear lens cap (B) from the rear of the lens.
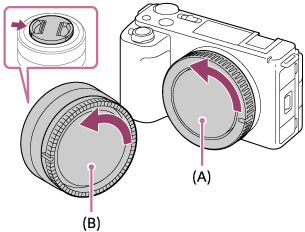
- It is recommended that you attach the front lens cap when you have done shooting.
- Mount the lens by aligning the two white index marks (mounting indexes) on the lens and camera.
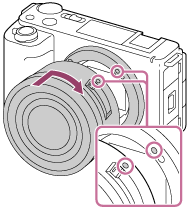
- Hold the camera with the lens mount facing down to prevent dust and debris from entering the camera.
- While pushing the lens lightly toward the camera, turn the lens slowly in the direction of the arrow until it clicks into the locked position.
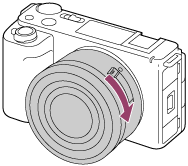
- Be sure to hold the lens straight when attaching it.
To remove the lens
Keep pressing the lens release button (A) and turn the lens in the direction of the arrow until it stops.
After removing the lens, attach the body cap to the camera and the lens caps to the front and rear of the lens to prevent dust and debris from entering the camera and lens.
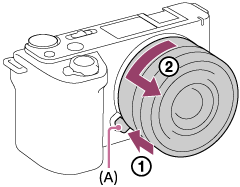
Lens hood
We recommend that you use the lens hood to prevent light outside the shooting frame from affecting the image. Attach the lens hood so that the indexes on the lens and lens hood are aligned.
(There may be no lens hood index on some lenses.)
Note
- When attaching/removing the lens, work quickly in a dust-free location.
- Do not press the lens release button when attaching a lens.
- Do not use force when attaching a lens.
- A Mount Adaptor (sold separately) is required to use an A-mount lens (sold separately). When using the Mount Adaptor, refer to the operating manual supplied with the Mount Adaptor.
- When you use a lens with a tripod socket, attach a tripod to the tripod socket of the lens to help balance the weight of the lens.
- When carrying the camera with a lens attached, hold both the camera and the lens firmly.
- Do not hold the part of the lens that is extended for zoom or focus adjustment.
- Attach the lens hood properly. Otherwise, the lens hood may not have any effect or may be partially reflected in the image.
- Remove the lens hood when using the flash as the lens hood blocks the flash light and may appear as a shadow on the image.
[39] Preparing the camera/Basic shooting operationsPerforming initial setup for the camera
By establishing a Bluetooth connection (pairing) between the camera and a smartphone and using the smartphone application Creators' App, you can perform initial camera settings such as date and time settings from the smartphone. Install Creators' App from your smartphone’s application store. If the application is already installed, be sure to update it to the latest version.
You can also install Creators' App by scanning the QR Code displayed on the screen of the camera using your smartphone.
For details on Creators' App, refer to the following website.
https://www.sony.net/ca/
- Set the ON/OFF (Power) switch to “ON” to turn on the camera.
- Select the desired language and then press the center of the control wheel.
- The setting screen for the screen reader function and a privacy notice will appear. Follow the on-screen instructions.
- Read the notice regarding biometrics carefully by opening the link provided on the privacy notice screen.
- Follow the instructions on the camera screen to connect the camera with your smartphone.
- Launch Creators' App on your smartphone to connect the camera with your smartphone.
- If you do not connect a smartphone, the area/date/time setting screen will appear.
- To connect your smartphone to the camera after the initial setup, select MENU →
 (Network) → [
 Cnct./Remote Sht.] → [Smartphone Connection].
- Perform initial camera setup on the Creators' App screen.
- Follow the instructions on the screen to set the following items.
- Date and time / Display format
- Auto Power OFF Temp.
- Device name
You can change these settings later from the camera menu.
- Follow the instructions on the screen to set the following items.
On maintaining the date and time
This camera has an internal rechargeable backup battery for maintaining the date and time and other settings regardless of whether the power is turned on or off, or whether the battery pack is charged or discharged.
To charge the internal backup battery, insert a charged battery pack into the camera, and leave the product for 24 hours or more with the power turned off.
If the clock resets every time the battery pack is charged, the internal rechargeable backup battery may be worn out. Consult your service facility.
Hint
- To turn on the screen reader function, press and hold the MENU button on the initial setup screen. Depending on the language you have selected, the screen reader function may not be supported.
- By connecting the camera and a smartphone via the Bluetooth function, you can operate the camera using the smartphone and transfer images from the camera to the smartphone.
Note
- If the date and time setting is canceled halfway, the setting screen for the date and time appears every time you turn on the camera.
- The built-in clock of the camera may exhibit time errors. Adjust the time at regular intervals.
- When establishing a Bluetooth connection, only pair with trusted devices. Avoid unsolicited pairing requests or connections to unknown devices.
- Turn off the Bluetooth function when not in use.
- Check your paired devices regularly and delete any unnecessary ones.
[40] Preparing the camera/Basic shooting operationsBasic shooting operationsConfirmation before shooting
This section introduces useful settings and functions that you should know when using the camera. We recommend that you confirm these settings and functions before using the camera.
From each item name listed below, you can jump to the page explaining the respective functions.
Preparing a memory card for use with this camera
Preventing accidental failure to insert a memory card
Setting whether camera operating sounds are generated
Convenient functions for shooting self-portrait videos and vlogs
Making it easy to check whether the camera is on standby or recording when set to a movie mode
Resetting shooting settings or resetting all camera settings
[41] Preparing the camera/Basic shooting operationsBasic shooting operationsShooting movies (Intelligent Auto)
This section describes how to record movies in the [Intelligent Auto] mode. In the [Intelligent Auto] mode, the camera automatically focuses and automatically determines the exposure based on the recording conditions.
- Set the Still/Movie/S&Q switch to (Movie) to select the movie recording mode.
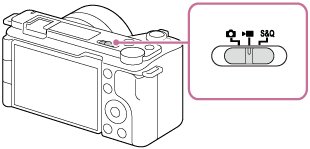
- MENU →
 (Shooting) → [Shooting Mode] → [Shoot Mode] → [Intelligent Auto].
The shooting mode will be set to
 (Intelligent Auto).
 - Press the MOVIE (Movie) button to start recording.
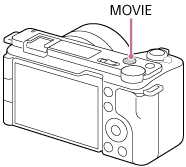
- Press the MOVIE button again to stop recording.
To shoot with the touch function icons
You can also start shooting by touching an icon on the screen instead of pressing the MOVIE (movie) button. Swipe the monitor left or right to display the touch function icons, and then touch the  (start recording) icon. You can view the captured image by touching the
  (switch to playback screen) icon.
For details on how to display the touch function icons, see “Touch function icons.”
To adjust the image brightness, color tone, etc. ( My Image Style)
Swipe the monitor left or right to display the touch function icons on the shooting screen, and touch (image adjustment). You can set (Background Defocus),  (Brightness),
  (Color), and [Creative Look] to your preferences. Touch each icon at the bottom of the screen to set each item.
For details, refer to “Adjusting images in the auto mode (My Image Style).”
To select the recording format (File Format)
The resolution and degree of compatibility vary depending on the recording format (XAVC HS 4K/XAVC S 4K/XAVC S HD/XAVC S-I 4K/XAVC S-I HD). Select the format in accordance with the purpose of the movie to be shot.
To select the frame rate or image quality (Movie Settings)
The frame rate determines the smoothness of motion in movies.
([Movie Settings] → [Rec Frame Rate])
The image quality changes with the bit rate. ([Movie Settings] → [Record Setting])
If the bit rate is high, the amount of information will increase and you can shoot high-quality movies. However, this will result in a larger volume of data.
Select the frame rate and bit rate according to your preference and purpose.
To adjust the exposure (Shoot Mode)
You can select the exposure mode in [Shoot Mode]. Select the exposure mode through the combination of a shutter speed and aperture value.
Also, if you enable [Touch AE] under [Touch Func. in Shooting], you can adjust the exposure to the touched area.
To select the focusing method (Focus Mode/Focus Area)
Select  (Continuous AF) or
  (Manual Focus) for [Focus Mode].
You can specify the focus area by setting [Focus Area].
(Manual Focus) for [Focus Mode].
You can specify the focus area by setting [Focus Area].
Even during shooting with manual focus, you can temporarily switch to auto focus in the following ways.
- Press the custom key to which [AF On] is assigned, or press the shutter button halfway.
- Press the custom key to which [Subject Recognition AF] is assigned.
- Touch the subject on the monitor. (when [Touch Func. in Shooting] under [Shooting Screen] is set to [Touch Focus] or [Touch Tracking])
To record movie audio in 4 channels
Attach a genuine Sony accessory that supports 4-channel and 24-bit audio recording to the Multi Interface Shoe of the camera.
Hint
- You can also assign the start/stop movie recording function to a preferred key.
- You can focus quickly while shooting movies by pressing the shutter button halfway down. (The sound of auto focus operation may be recorded in some cases.)
- You can change the settings for ISO sensitivity, exposure compensation, and focus area while shooting movies.
- The sounds of the camera and lens in operation may be recorded during movie shooting. To prevent sounds from being recorded, set [Audio Recording] to [Off].
- To prevent the operating sound of the zoom ring from being recorded when a power zoom lens is used, we recommend recording movies using the zoom lever of the lens. When moving the zoom lever of the lens, be careful not to flip the lever.
- To prevent the operating sound of the zoom from being recorded when the camera’s W/T (zoom) lever is used, set the zoom speed slower in [Zoom Lever Speed] to reduce the operating sound.
- When [Auto Power OFF Temp.] is set to [High], the camera can continue movie recording even when the temperature of the camera becomes high.
Note
- An icon indicating that data is being written is displayed after shooting. Do not remove the memory card while the icon is displayed.
- You cannot start recording a movie while writing data. Wait until data writing is completed and “STBY” is displayed before recording a movie.
- If the (Overheating warning) icon appears, the temperature of the camera has risen. Turn the power off and cool the camera and wait until the camera is ready to shoot again.
- The temperature of the camera tends to rise when shooting movies continuously, and you may feel that the camera is warm. This is not a malfunction. Also, [Internal temp. high. Allow it to cool.] may appear. In such cases, turn the power off and cool the camera and wait until the camera is ready to shoot again.
- For the continuous shooting time of a movie recording, refer to “Recordable movie times.” When movie recording is finished, you can record another movie by pressing the MOVIE button again. Recording may stop to protect the product, depending on the temperature of the product or the battery.
- Still images cannot be captured during movie recording. If you want to create a still image from a scene during movie recording, use [
 AutoCreateStillImage].
[42] Preparing the camera/Basic shooting operationsBasic shooting operationsShooting still images (Intelligent Auto)
- Set the Still/Movie/S&Q switch to (Still) to select the still image shooting mode.
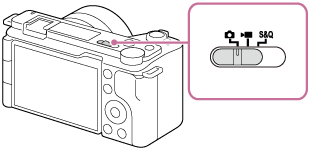
- MENU →
 (Shooting) → [Shooting Mode] → [Shoot Mode] → [Intelligent Auto].
The shooting mode will be set to
(Shooting) → [Shooting Mode] → [Shoot Mode] → [Intelligent Auto].
The shooting mode will be set to (Intelligent Auto).
- Adjust the monitor angle, and hold the camera.
- When a zoom lens is mounted, enlarge images by using the zoom lever or the zoom ring.
- Press the shutter button halfway down to focus.When the image is in focus, a beep sounds and the indicator (
 , etc.) lights up.
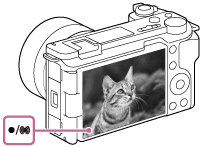
- Press the shutter button fully down.
To shoot with the touch function icons
You can also shoot by touching an icon on the screen instead of pressing the shutter button. Swipe the monitor left or right to display the touch function icons, and then touch the  (shutter) icon. You can view the captured image by touching the (switch to playback screen) icon.
For details on how to display the touch function icons, see “Touch function icons.”
To adjust the image brightness, color tone, etc. ( My Image Style)
Swipe the monitor left or right to display the touch function icons on the shooting screen, and touch (image adjustment). You can set (Background Defocus), (Brightness), (Color), and [Creative Look] to your preferences. Touch each icon at the bottom of the screen to set each item.
For details, refer to “Adjusting images in the auto mode (My Image Style).”
To select the focus mode yourself (Focus Mode / Focus Area)
Specifying [Focus Mode], such as selecting  (Single-shot AF) for landscapes or still subjects and selecting (Continuous AF) for moving subjects, makes it easier to focus on the desired subject. You can also specify the focus position and range using [Focus Area].
Shooting while focusing on human eyes
The [Subject Recog in AF] function under [Subject Recognition] is enabled in the default settings, so you can use the Eye AF function immediately.
To shoot images with the focus locked on the desired subject (Focus-lock)
When you focus on the subject, the focus is locked while the shutter button is pressed halfway down. Switch to the desired composition and press the shutter button all the way down to take the picture.
-
You can lock the focus on non-moving subjects. Set [Focus Mode] to (Single-shot AF).
- Setting [Focus Area] to [Center Fix] makes it easier to focus on subjects located in the center of the screen.
Hint
- When the product cannot focus automatically, the focus indicator flashes and the beep does not sound. Either recompose the shot or change the focus mode or focus area settings.
In [Continuous AF] mode,
 (focus indicator) lights up and the beep indicating that the focus has been achieved does not sound.
Note
- An icon indicating that data is being written is displayed after shooting. Do not remove the memory card while the icon is displayed. Doing so will prevent images from being recorded normally.
Finding functions from MENU
The displayed MENU items vary depending on the position of the Still/Movie/S&Q switch. In the table below, the modes in which each MENU item is displayed are indicated by the still image/movie/S&Q icons.
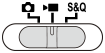
: The menu item is displayed when the Still/Movie/S&Q switch is set to (still image shooting mode).
: The menu item is displayed when the Still/Movie/S&Q switch is set to (movie recording mode) or S&Q (slow-motion/quick-motion shooting mode).
: The menu item is displayed regardless of the mode to which the Still/Movie/S&Q switch is set.
(Main) tab
Shooting settings are displayed in a list. For details, refer to “Main menu (shooting setting list).”
 (Shooting) tab
 (Exposure/Color) tab
| Groups | |
Menu items |
|---|---|---|
| Exposure | |
Auto Slow Shutter |
|
ISO |
|
|
ISO Range Limit |
|
|
ISO AUTO Min. SS | |
| Exposure Comp. | |
Exposure Comp. |
|
Exposure step |
|
|
Exposure Std. Adjust |
|
| Metering | |
Metering Mode |
|
Face Priority in Multi Metering |
|
|
Spot Metering Point |
|
|
AEL w/ Shutter | |
| Flash | |
Flash Mode |
|
Flash Comp. | |
|
Exp.comp.set | |
|
Wireless Flash | |
|
Red Eye Reduction | |
|
External Flash Set. | |
| White Balance | |
White Balance |
|
Priority Set in AWB |
|
|
Shutter AWB Lock | |
|
Shockless WB | |
|
WB Capt. Frame Size |
|
| Color/Tone | |
D-Range Optimizer |
|
Creative Look |
|
|
Picture Profile |
|
|
Select LUT | |
|
Manage User LUTs | |
|
Soft Skin Effect |
|
| Zebra Display | |
Zebra Display |
|
Zebra Level |
 (Focus) tab
(Playback) tab
| Groups | |
Menu items |
|---|---|---|
| Playback Target | |
Playback Filter Condition |
|
Image Order | |
| Magnification | |
 Enlarge Image Enlarge Image |
|
Enlarge Initial Mag. |
|
|
Enlarge Initial Position |
|
| Selection/Memo | |
Protect |
|
Rating | |
|
Rating Set(Custom Key) | |
| Delete | |
Delete |
|
Delete pressing twice |
|
|
Delete confirm. | |
| Edit | |
Crop |
|
Rotate | |
|
Photo Capture | |
|
Create Still Image |
|
|
 after still img crt after still img crt |
|
|
 JPEG/HEIF Switch JPEG/HEIF Switch |
|
| Viewing | |
Cont. Play for Interval |
|
Play Speed for Interval |
|
|
Slide Show | |
| Playback Option | |
Image Index |
|
Display as Group | |
|
Display Rotation | |
|
Focus Frame Display |
|
|
 Aspect Marker Disp. Aspect Marker Disp. |
|
|
Disp Specified Time Img. | |
|
Select Image Jump Dial | |
|
Image Jump Method |
(Network) tab
| Groups | |
Menu items |
|---|---|---|
| Cnct./Remote Sht. |
|
Smartphone Connection |
|
Remote Shoot Function | |
|
 Select on Cam & Send Select on Cam & Send |
|
|
Reset Transfer Status |
|
|
Cnct. while Power OFF |
|
|
Remote Shoot Setting | |
| Streaming | |
Network Streaming |
|
USB Streaming |
|
| Creators' Cloud | |
Cloud Connection |
|
Cloud Information | |
| Wi-Fi | |
Wi-Fi Connect |
|
WPS Push | |
|
Access Point Set. | |
|
Wi-Fi Frequency Band * | |
|
Display Wi-Fi Info. | |
|
SSID/PW Reset | |
| Bluetooth | |
Bluetooth Function |
|
Pairing | |
|
Manage Paired Device | |
|
Bluetooth Rmt Ctrl | |
|
Disp Device Address | |
| Wired LAN | |
 IP Address Setting IP Address Setting |
|
Display Wired LAN Info. | |
| USB-LAN/Tethering | |
USB-LAN Connection |
|
USB-LAN Disconnection | |
|
Tethering Connection | |
|
Tethering Disconnection | |
| Network Option | |
Airplane Mode |
|
Edit Device Name | |
|
Import Root Certificate | |
|
Access Authen. Settings | |
|
Access Authen. Info | |
|
Reset Network Set. |
*For some models only
(Setup) tab
*For some models only
 (My Menu) tab
| Groups | |
Menu items |
|---|---|---|
| My Menu Setting | |
Add Item |
|
Sort Item | |
|
Delete Item | |
|
Delete Page | |
|
Delete All | |
|
Display From My Menu |
Note
- The order in which the menu tabs are listed here differs from the actual display.
[44] Using the shooting functionsContents of this chapter
The following table of contents lists the features described in this chapter (“Using the shooting functions”). From each item name, you can jump to the page describing the respective functions.
Selecting a shooting mode
Convenient functions for shooting self-portrait videos and vlogs
Focusing
Subject Recognition
- Focusing on human eyes
- Subject Recog in AF (still image/movie)
- Recognition Target (still image/movie)
- Recog Trgt Select Set (still image/movie)
- Right/Left Eye Select (still image/movie)
- Sbj Recog Frm Disp. (still image)
- Sbj Recog Frm Disp. (movie)
- Face Memory
- Regist. Face Priority (still image/movie)
- Selecting a person to track (Select Face to Track)
Using focusing functions
- Focus Standard
- Adjusting the focus area settings to the camera’s orientation (horizontal/vertical) (Switch V/H AF Area)
- Registering the current focus area (AF Area Registration)
- Deleting a registered AF Area (Del. Regist. AF Area)
- Focus Area Limit (still image/movie)
- Circ. of Focus Point (still image/movie)
- AF Frame Move Amt (still image/movie)
- Focus Area Color (still image/movie)
- AF Area Auto Clear
- AF-C Area Display
- Phase Detect. Area
- AF Lvl for Crossing
- AF Trk for Spd Chng
- AF Transition Speed
- AF Subj. Shift Sensitivity
- AF Assist
- AF/MF Selector
- AF w/ Shutter
- AF On
- Focus Hold
- Pre-AF
- Priority Set in AF-S
- Priority Set in AF-C
- Aperture Drive in AF
- Preset Focus/Zoom
- AF in Focus Mag.
- Auto Magnifier in MF
- Focus Magnifier
- Focus Magnif. Time (still image/movie)
- Initial Focus Mag. (movie)
- Initial Focus Mag. (still image)
- Focus Map
- Peaking Display
Adjusting the exposure/metering modes
- Exposure Comp. (still image/movie)
- Histogram display
- Exposure step (still image/movie)
- Exposure Std. Adjust (still image/movie)
- D-Range Optimizer (still image/movie)
- Metering Mode (still image/movie)
- Face Priority in Multi Metering (still image/movie)
- Spot Metering Point (still image/movie)
- AE lock
- AEL w/ Shutter
- Auto Slow Shutter
- Zebra Display
Selecting the ISO sensitivity
White balance
Log shooting settings
Adding effects to images
Shooting with drive modes (continuous shooting/self-timer)
Setting the image quality and recording format
Using touch functions
Shutter settings
Using the zoom
Using the flash
Reducing blur
Noise reduction
Setting the monitor display during shooting
- Shoot Mode Sel. Screen
- Auto Review (still image)
- Grid Line Display (still image/movie)
- Grid Line Type (still image/movie)
- Live View Display Set.
- Aperture Preview
- Shot. Result Preview
- Bright Monitoring
- Emphasized REC Display
- Marker Display (still image)
- Marker Display (movie)
- Gamma Display Assist
- Gamma Disp. Assist Typ.
Creating still images while recording a movie
Recording movie audio
TC/UB settings
Livestreaming video and audio
[45] Using the shooting functionsSelecting a shooting mode Shoot Mode (still image)/Shoot Mode (movie)/Shoot Mode (S&Q/time-lapse)
You can set the shooting mode according to the subject you want to shoot or the function you want to adjust.
- Set the Still/Movie/S&Q switch to the desired shooting mode.
- If S&Q (slow-motion/quick-motion) is selected and [Shoot Mode Sel. Screen] is set to [Display], the [Shoot Mode] screen in Step 2 will be displayed at this point.
- If S&Q (slow-motion/quick-motion) is selected and [Shoot Mode Sel. Screen] is set to [Display], the [
- MENU → (Shooting) → [Shooting Mode] → [Shoot Mode]/[Shoot Mode]/[Shoot Mode] → desired setting.
Menu item details
- Intelligent Auto:
- The camera shoots with automatic scene recognition.
- Program Auto:
- Allows you to shoot with the exposure adjusted automatically (both the shutter speed and the aperture value).
- Aperture Priority:
- You can shoot by adjusting the aperture and changing the range in focus, or by defocusing the background.
- Shutter Priority:
- By adjusting the shutter speed, you can shoot still images with different effects for moving objects, or record movies with natural movement.
- Manual Exposure:
- You can shoot with the desired exposure setting by adjusting both the shutter speed and aperture.
 Cam.Set:
- Allows you to shoot an image after recalling often-used modes or camera settings registered in advance.
- Scene Selection (only when shooting still images):
- Allows you to shoot with preset settings according to the scene.
[46] Using the shooting functionsSelecting a shooting modeShoot Mode: Intelligent Auto
The camera shoots images with automatically adjusted settings.
- Set the Still/Movie/S&Q switch to the desired shooting mode.
- If S&Q (slow-motion/quick-motion) is selected and [Shoot Mode Sel. Screen] is set to [Display], the [Shoot Mode] screen in Step 2 will be displayed at this point.
- If S&Q (slow-motion/quick-motion) is selected and [Shoot Mode Sel. Screen] is set to [Display], the [
- MENU → (Shooting) → [Shooting Mode] → [Shoot Mode]/[Shoot Mode]/[Shoot Mode] → [Intelligent Auto].
- Point the camera at the subject.
When the camera recognized the scene, the icon for the recognized scene appears on the screen.
- Adjust the focus and shoot the image.
About Scene Recognition
The Scene Recognition function allows the camera to automatically recognize shooting conditions.
When the camera recognizes certain scenes, the following icons and guides are displayed at the top of the screen:


 (Portrait)


 (Infant)


 (Night Portrait)


 (Night Scene)


 (Backlight Portrait)


 (Backlight)


 (Landscape)


 (Macro)


 (Spotlight)


 (Low Light)


 (Night Scene using a tripod)
 (Tripod)*
*Only an icon is displayed.
To adjust the image brightness, color tone, etc. ( My Image Style)
Swipe the monitor left or right to display the touch function icons on the shooting screen, and touch (image adjustment). You can set (Background Defocus), (Brightness), (Color), and [Creative Look] to your preferences. Touch each icon at the bottom of the screen to set each item.
For details, refer to “Adjusting images in the auto mode (My Image Style).”
Note
- The product will not recognize the scene when you shoot still images with zoom functions other than optical zoom.
- The product may not properly recognize the scene under certain shooting conditions.
- In the [Intelligent Auto] mode, when the camera recognizes multiple people, it changes the aperture so that the recognized faces can be captured clearly. However, depending on the shooting conditions, not all recognized faces may be captured clearly. This function does not work in the following cases.
- When shooting still images
- When the [Background Defocus] button is pressed
- When [Subject Recog in AF] is set to [Off]
-
When [Recognition Target] is other than [Human]
[47] Using the shooting functionsSelecting a shooting modeShoot Mode: Scene Selection
Allows you to shoot with preset settings according to the scene.
- Set the Still/Movie/S&Q switch to (Still) to select the still image shooting mode.
- MENU → (Shooting) → [Shooting Mode] → [Shoot Mode] → [Scene Selection].
- Select the desired mode in scene selection.
Menu item details
 Portrait:
- Blurs background and sharpens the subject. Accentuates the skin tones softly.
 Sports Action:
- Shoots a moving subject at a fast shutter speed so that the subject looks as if it is standing still. The product shoots images continuously while the shutter button is pressed.
- Macro:
- Shoots close-ups of the subjects, such as flowers, insects, food, or small items.
- Landscape:
- Shoots the entire range of a scenery in sharp focus with vivid colors.
 Sunset:
- Shoots the red of the sunset beautifully.

- Night Scene:
- Shoots night scenes without losing the dark atmosphere.
- Night Portrait:
- Shoots night scene portraits using the flash (sold separately).
To adjust the image brightness, color tone, etc. ( My Image Style)
Swipe the monitor left or right to display the touch function icons on the shooting screen, and touch (image adjustment). You can set (Background Defocus), (Brightness), (Color), and [Creative Look] to your preferences. Touch each icon at the bottom of the screen to set each item.
For details, refer to “Adjusting images in the auto mode (My Image Style).”
[48] Using the shooting functionsSelecting a shooting modeAdjusting images in the auto mode (My Image Style)
You can adjust the amount of background defocus, the brightness and the color tone of the image, and select the finish of the image in the [Intelligent Auto] or [Scene Selection] mode using the touch function icons on the screen.
Set the camera as follows beforehand.
- [Touch Operation]: [On]
-
[Shooting Screen]:
- Set [Shooting Screen] to [On].
- Set [Footer Icon Touch] to [On].
- Touch (image adjustment) icon on the shooting screen in the [Intelligent Auto] or [Scene Selection] mode. Image adjustment is enabled.
- To adjust images to your preferences, you need to display the touch function icons on the screen in advance. If the icons are not displayed, swipe the screen to the left or right to display them.
For details, refer to “Touch function icons.”
- Set (Background Defocus), (Brightness), (Color), and [Creative Look] in the footer (bottom of the screen) to the desired values.
- Touch [AUTO] or press the (delete) button to return to the camera’s automatic settings.
- Touch [AUTO] or press the
- Shoot an image.
- The adjusted values can be reset by touching the (image adjustment) icon. The original shooting settings for [Intelligent Auto] or [Scene Selection] will be applied.
- The adjusted values can be reset by touching the
Details of the image adjustment screen
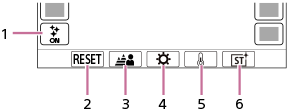
- (image adjustment) icon
- RESET: Resets all changes.
- Background Defocus: Sets a value from [Defocused] to [Clear] using the slider.
- Brightness: Sets a value from [Dark] to [Bright] using the slider.
- Color: Sets a value from [Cool] to [Warm] using the slider.
- Creative Look: Selects [Auto], ST, PT, NT, VV, VV2, FL, IN, SH, BW, or SE.
Note
- Image adjustments are not reflected when you change the shooting mode or when you start recording movies in the still image mode. In addition, settings that were adjusted prior to that point will be reset.
-
In the [Intelligent Auto] mode, the scene recognition function is locked when you start image adjustment and the shooting mode icon changes to
 /
/ /
/ (During image adjustment). The recognized scene will not be updated even if the shooting environment changes during image adjustment.
-
When [Cinematic Vlog Set.] is set to [On], (Color) and [Creative Look] cannot be adjusted.
- If you touch the screen while the touch AE function is enabled, the (Brightness) setting will be temporarily disabled, and the exposure will be set according to the brightness of the touched area.
[49] Using the shooting functionsSelecting a shooting modeShoot Mode: Program Auto
Allows you to shoot with the exposure adjusted automatically (both the shutter speed and the aperture value).
You can set shooting functions such as [ISO].
- Set the Still/Movie/S&Q switch to the desired shooting mode.
- If S&Q (slow-motion/quick-motion) is selected and [Shoot Mode Sel. Screen] is set to [Display], the [Shoot Mode] screen in Step 2 will be displayed at this point.
- If S&Q (slow-motion/quick-motion) is selected and [Shoot Mode Sel. Screen] is set to [Display], the [
- MENU → (Shooting) → [Shooting Mode] → [Shoot Mode]/[Shoot Mode]/[Shoot Mode] → [Program Auto].
- Set the shooting functions to your desired settings.
- Adjust the focus and shoot the subject.
Program Shift (only during still image shooting)
When you are not using a flash, you can change the shutter speed and aperture (F-value) combination without changing the appropriate exposure set by the camera.
Turn the control dial to select the aperture value and shutter speed combination.
-
“
 ” on the screen changes to “
 ” when you turn the control dial.
- To cancel program shift, set the shooting mode to other than [Program Auto], or turn off the camera.
- If [Footer Icon Touch] under [Shooting Screen] is set to [On], you can also perform program shift by touching the shutter speed and aperture display area at the bottom of the screen.
Note
- According to the brightness of the environment, the program shift may not be used.
- Set the shooting mode to another one than “P” or turn off the power to cancel the setting you made.
- When the brightness changes, the aperture (F-value) and shutter speed also change while maintaining the shift amount.
[50] Using the shooting functionsSelecting a shooting modeShoot Mode: Aperture Priority
You can shoot by adjusting the aperture and changing the range in focus, or by defocusing the background.
- Set the Still/Movie/S&Q switch to the desired shooting mode.
- If S&Q (slow-motion/quick-motion) is selected and [Shoot Mode Sel. Screen] is set to [Display], the [Shoot Mode] screen in Step 2 will be displayed at this point.
- If S&Q (slow-motion/quick-motion) is selected and [Shoot Mode Sel. Screen] is set to [Display], the [
- MENU → (Shooting) → [Shooting Mode] → [Shoot Mode]/[Shoot Mode]/[Shoot Mode] → [Aperture Priority].
- Select the desired value by turning the control dial.
- Smaller F-value: The subject is in focus, but objects in front of and beyond the subject are blurred.
Larger F-value: The subject and its foreground and background are all in focus. - If the aperture value you have set is not suitable for appropriate exposure, the shutter speed on the shooting screen will blink. If this happens, change the aperture value.
- Smaller F-value: The subject is in focus, but objects in front of and beyond the subject are blurred.
- Adjust the focus and shoot the subject.The shutter speed is automatically adjusted to obtain proper exposure.
Note
- The brightness of the image on the screen may differ from the actual image being shot.
[51] Using the shooting functionsSelecting a shooting modeShoot Mode: Shutter Priority
By adjusting the shutter speed, you can shoot still images with different effects for moving objects, or record movies with natural movement.
- Set the Still/Movie/S&Q switch to the desired shooting mode.
- If S&Q (slow-motion/quick-motion) is selected and [Shoot Mode Sel. Screen] is set to [Display], the [Shoot Mode] screen in Step 2 will be displayed at this point.
- If S&Q (slow-motion/quick-motion) is selected and [Shoot Mode Sel. Screen] is set to [Display], the [
- MENU → (Shooting) → [Shooting Mode] → [Shoot Mode]/[Shoot Mode]/[Shoot Mode] → [Shutter Priority].
- Select the desired value by turning the control dial.
- If proper exposure cannot be obtained after setup, the aperture value on the shooting screen blinks. If this happens, change the shutter speed.
- Adjust the focus and shoot the subject.The aperture is automatically adjusted to obtain proper exposure.
Hint
- Use a tripod to prevent camera-shake when you have selected a slow shutter speed.
- When you shoot indoor sports scenes, set the ISO sensitivity to a higher value.
Note
- The SteadyShot warning indicator does not appear in [Shutter Priority] mode.
- The brightness of the image on the screen may differ from the actual image being shot.
[52] Using the shooting functionsSelecting a shooting modeShoot Mode: Manual Exposure
You can shoot with the desired exposure setting by adjusting both the shutter speed and aperture.
- Set the Still/Movie/S&Q switch to the desired shooting mode.
- If S&Q (slow-motion/quick-motion) is selected and [Shoot Mode Sel. Screen] is set to [Display], the [Shoot Mode] screen in Step 2 will be displayed at this point.
- If S&Q (slow-motion/quick-motion) is selected and [Shoot Mode Sel. Screen] is set to [Display], the [
- MENU →(Shooting) → [Shooting Mode] → [Shoot Mode]/[Shoot Mode]/[Shoot Mode] → [Manual Exposure].
- Select the desired shutter speed by turning the control wheel.
Select the desired aperture value by turning the control dial.-
You can set which dial changes the aperture value and shutter speed with [Custom Key/Dial Set.] or [Custom Key/Dial Set.].
- You can also set [ISO] to [ISO AUTO] in manual exposure mode. The ISO value automatically changes to achieve the appropriate exposure using the aperture value and shutter speed you have set.
- When [ISO] is set to [ISO AUTO], the ISO value indicator will blink if the value you have set is not suitable for appropriate exposure. If this happens, change the shutter speed or aperture value.
- When [ISO] is set to other than [ISO AUTO], use MM (Metered Manual)* to check the exposure value.
Toward +: Images become brighter.
Toward -: Images become darker.
0: Appropriate exposure analyzed by the camera.
*Indicates under/over for appropriate exposure.
-
You can set which dial changes the aperture value and shutter speed with [
- Adjust the focus and shoot the subject.
Hint
- You can change the shutter speed and aperture (F-value) combination without changing the set exposure value (Manual shift). Assign [AEL hold] or [AEL toggle] to a desired key using the custom key settings, and then turn the control dial while pressing that key.
Note
-
The Metered Manual indicator does not appear when [ISO] is set to [ISO AUTO].
- When the amount of ambient light exceeds the metering range of the Metered Manual, the Metered Manual indicator flashes.
- The SteadyShot warning indicator does not appear in manual exposure mode.
- The brightness of the image on the screen may differ from the actual image being shot.
[53] Using the shooting functionsConvenient functions for shooting self-portrait videos and vlogsProduct Showcase Set
The camera settings are optimally configured for situations such as movie shooting for product reviews. The camera tends to focus on objects that are closer to it.
- Press(Product Showcase Set) button to switch the [Product Showcase Set] function on or off. You can also switch the [Product Showcase Set] function on or off by selecting MENU →(Shooting) → [Shooting Option].
Menu item details
- On:
- Shoots with optimal settings for product reviews. [Subject Recog in AF] under [Subject Recognition] is locked to [Off], and [Focus Area] is set to [Zone].
- Off:
- Shoots in the ordinary shooting mode.
Note
- Settings for [Product Showcase Set] cannot be changed during movie recording.
[54] Using the shooting functionsConvenient functions for shooting self-portrait videos and vlogsBackground Defocus
You can change the level of defocus in the background simply by pressing the button while shooting still images or movies.
- Press the
 (Background Defocus) button repeatedly.Once you press the button, the [Background Defocus] mode is activated, and the background becomes defocused. Afterwards, the level of defocus in the background switches between “Defocus” and “Clear” each time you press the button.
- The camera returns to the normal shooting mode and the aperture returns to the former value when you press the MENU button.
Hint
- The aperture value becomes locked and the icon (Defocus) or
 (Clear) is indicated instead of the aperture value in the [Background Defocus] mode.
-
You can set the amount of background defocus when (Defocus) is indicated using [
 Defocus Level Set].
Note
- [Background Defocus] mode is canceled, the camera returns to normal shooting mode, and the aperture returns to the former value when you perform the following operations:
- Turning the power off and back on again
- Operating the Still/Movie/S&Q switch
- Pressing the MENU button
- Changing the aperture value while the shooting mode is set to [Aperture Priority] or [Manual Exposure]
- Exposure Comp.
- Performing Program Shift or Manual Shift
- Even if you press the button, you cannot change the level of defocus while using [Focus Magnifier] in the [Background Defocus] mode.
- Depending on the shooting mode and shooting conditions, the camera may be unable to obtain the optimal exposure due to the locking of the aperture value in the [Background Defocus] mode.
[55] Using the shooting functionsConvenient functions for shooting self-portrait videos and vlogsDefocus Level Set
You can set the level of background defocus when using [Background Defocus].
- MENU → (Shooting) → [Shooting Option] → [Defocus Level Set].
- Adjust the level of defocus by moving the slider using the control wheel, and then select [OK].
Note
- The level of [Defocus Level Set] is reset when the lens is exchanged.
[56] Using the shooting functionsConvenient functions for shooting self-portrait videos and vlogsCinematic Vlog Set.
You can easily shoot cinematic images. When [Cinematic Vlog Set.] is set to [On], black bars are added at the top and bottom of the image, and the frame rate is locked to 24 fps.
- MENU → (Shooting) → [Shooting Option] → [Cinematic Vlog Set.] → desired setting.
- When [On] is selected, you can configure detailed settings for the effect by pressing the right side of the control wheel.
Menu item details
- On:
- Shoots images using the cinematic vlog effect. You can configure detailed settings for [Look]/[Mood]/[AF Transition Speed].
- Off:
- Does not use the cinematic vlog effect.
Settings for cinematic vlog
[Look], [Mood], and [AF Transition Speed] can be set according to the image to be shot.
When making settings for the cinematic vlog function from MENU
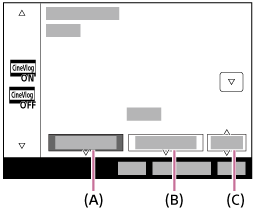
(A): Look
(B): Mood
(C): AF Transition Speed
When making settings for the cinematic vlog function from the shooting screen (touch function icons)
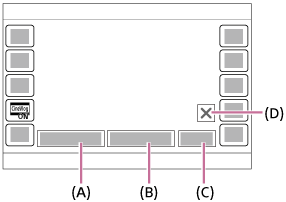
(A): Look
(B): Mood
(C): AF Transition Speed
(D): Close icon
- Touch the Close icon to hide the [Look], [Mood], and [AF Transition Speed] submenus. After hiding them, you can redisplay the submenus by holding down the
 (Cinematic Vlog) icon.
Look:
Select the finish of images from presets with varied contrast, saturation, etc. or from user LUTs in which you have registered settings.
- S-Cinetone:
- Creates an image with a cinematic look.
- CLEAN:
- Creates images with a refreshing look.
- CHIC:
- Creates images with a profound look.
- FRESH:
- Creates images with a colorful look.
- MONO:
- Creates images with a black and white look.
- User1–User16:
- Creates images with the look of the set User LUT.
- Once you have registered the desired LUT by selecting MENU → (Exposure/Color) → [Color/Tone] → [Manage User LUTs], that LUT is selectable under [Look].
Mood:
Select the color tone of the image from presets according to the color you want to emphasize. [Mood] cannot be selected when [Look] is set to [MONO].
- AUTO:
- Creates images with colors optimal for the environment.
- GOLD:
- Creates images with warm colors.
- OCEAN:
- Creates images with cool colors.
- FOREST:
- Creates images with nostalgic colors.
AF Transition Speed:
Sets the focusing speed when the target of the auto focus is switched or moving.
- HI:
- Sets a fast switching speed of focusing to focus on the subject rapidly.
- MID:
- Sets a normal switching speed of focusing.
- LO:
- Sets a slow switching speed of focusing to focus on the subject smoothly.
Hint
- By shooting images with the same [Look] and [Mood] throughout the work, you can create a sense of unity in your work.
Note
- The black bars at the top and bottom of the screen are recorded as part of the image. The image area excluding the black bars at the top and bottom of the screen has the aspect ratio of the cinema scope size, but the aspect ratio of the recorded image is 16:9.
-
When [File Format] is set to [XAVC S-I 4K] and the S&Q (slow-motion/quick-motion) shooting mode is selected, the [Cinematic Vlog Set.] setting is not reflected in the movie.
- When [Cinematic Vlog Set.] is set to [On], [AF Transition Speed] under [AF/MF] becomes temporarily invalid.
- When [Cinematic Vlog Set.] is set to [On], [White Balance] becomes locked to [Auto], and the color tone changes according to the setting for [Mood].
- If you press the MOVIE (movie) button in the still image shooting mode to record a movie, the [Cinematic Vlog Set.] setting will not be reflected in the movie.
[57] Using the shooting functionsConvenient functions for shooting self-portrait videos and vlogsSelf-timer (movie)
You can start shooting with the self-timer when recording a movie.
- Press/(Drive Mode) of the control wheel.
The [Self-timer] setting screen will be displayed.
- You can also set the drive mode by selecting MENU → (Shooting) → [Shooting Option] → [Self-timer].
- You can also set the drive mode by selecting MENU →
- Select [On] using the control wheel and set the desired countdown time.
-
Rec Start delay: Sets the count time until the start of movie recording. (3 s/5 s/10 s)
-
Repetition: Sets whether to repeat the movie self-timer. (Repeat/Only Once)
If you select [Repeat], the movie self-timer will be activated repeatedly even after movie recording is completed. If you select [Only Once], the movie self-timer will be canceled after movie recording is completed, and the camera will return to the normal movie recording standby mode.
-
- Adjust the focus and press the MOVIE (movie) button.When the countdown appears on the recording standby screen, the self-timer lamp flashes, a beep sounds, and recording starts after the designated number of seconds has elapsed.
- Press the MOVIE button again to end recording.
Menu item details
- On:
- Uses the movie self-timer function.
- Off:
- Does not use the movie self-timer function.
Hint
- To stop the self-timer countdown, press the MOVIE button again or press the button to which the [Self-timer] function is assigned.
Note
- If you press the MOVIE button in the still image shooting mode to start movie recording, [Self-timer] will not work.
[58] Using the shooting functionsFocusingSelecting the focus method (Focus Mode)
Selects the focus method to suit the movement of the subject.
- MENU → (Focus) → [AF/MF] → [Focus Mode] → desired setting.
Menu item details
-
Single-shot AF:
- The product locks the focus once focusing is complete. Use this when the subject is motionless.
-
-
 Automatic AF:
- [Single-shot AF] and [Continuous AF] are switched according to the movement of the subject. When the shutter button is pressed halfway down, the product locks the focus when it determines that the subject is motionless, or continues to focus when the subject is in motion. During continuous shooting, the product automatically shoots with [Continuous AF] from the second shot.
-
-
Continuous AF:
- The product continues to focus while the shutter button is pressed and held halfway down. Use this when the subject is in motion. In [Continuous AF] mode, there is no beep when the camera focuses.
-
-
 DMF:
DMF:
- You can make fine adjustments manually after performing auto focusing, letting you focus on a subject more quickly than when using [Manual Focus] from the beginning. This is convenient in situations such as macro shooting.
-
-
Manual Focus:
- Adjusts the focus manually. If you cannot focus on the intended subject using auto focus, use [Manual Focus].
Focus indicator
(lit):
The subject is in focus and the focus is locked.
(flashing):
The subject is not in focus.
(lit):
The subject is in focus. The focus will be adjusted continuously according to the movements of the subject.
 (lit):
Focusing is in progress.
Subjects on which it is difficult to focus using auto focus
- Dark and distant subjects
- Subjects with poor contrast
- Subjects seen through glass
- Fast-moving subjects
- Reflective light or shiny surfaces
- Flashing light
- Back-lit subjects
- Continuously repetitive patterns, such as the facades of buildings
- Subjects in the focusing area with different focal distances
Hint
- In [Continuous AF] mode, you can lock the focus by pressing and holding the button that has been assigned the [Focus Hold] function.
- When you set the focus to infinity in [Manual Focus] mode or [DMF] mode, make sure that the focus is on a sufficiently distant subject by checking the monitor.
Note
- [Automatic AF] is available only when you are using a lens that supports phase detection AF.
- When [Continuous AF] or [Automatic AF] is set, the angle of view may change little by little while focusing.
-
Only [Continuous AF] and [Manual Focus] are available when shooting movies or when the Still/Movie/S&Q switch is set to (Movie) or S&Q (S&Q Motion).
[59] Using the shooting functionsFocusingSelecting the focus area (Focus Area)
Set the type of focusing frame when shooting with the auto focus. Select the mode according to the subject.
- MENU → (Focus) → [Focus Area] → [Focus Area] → desired setting.
Menu item details
 Wide:
Wide:- Focuses on a subject covering the whole range of the screen automatically. When you press the shutter button halfway down in the still image shooting mode, a green frame is displayed around the area that is in focus.
-
 Zone:
Zone:- Select a zone on the monitor on which to focus, and the product will automatically select a focus area.
-
 Center Fix:
- Focuses automatically on a subject in the center of the image. Use together with the focus-lock function to create the composition you want.
-
 Spot: XL/Spot: L/Spot: M/Spot: S
:
Spot: XL/Spot: L/Spot: M/Spot: S
:- Allows you to move the focusing frame to a desired point on the screen and focus on an extremely small subject in a narrow area.
-
 Expand Spot:
- If the product cannot focus on a single selected point, it uses focus points around the [Spot] as a secondary priority area for focusing.
-
 Custom 1/Custom 2/Custom 3:
- Allows you to set the shape and size of the focusing area.
-


 Tracking:
-
This setting is available only when the [Focus Mode] is set to [Continuous AF].
When the shutter button is pressed and held halfway down, the product tracks the subject within the selected autofocus area. Point the cursor at [Tracking] on the [Focus Area] setting screen, and then select the desired area to start tracking using the left/right sides of the control wheel.
You can also move the tracking start area to the desired point by designating the area as [Tracking: Zone], [Tracking: Spot XL]/[Tracking: Spot L]/[Tracking: Spot M]/[Tracking: Spot S], [Tracking: Expand Spot], or [Tracking: Custom 1] through [Tracking: Custom 3].
Note
-
[Focus Area] is locked to [Wide] in the following situations:
- [Scene Selection]
- The focus area may not light up during continuous shooting or when the shutter button is pressed all the way down at once.
-
When the Still/Movie/S&Q switch is set to (Movie) or S&Q (S&Q Motion) or during movie shooting, [Tracking] cannot be selected for [Focus Area].
Examples of the focusing frame display
The focusing frame differs as follows.
When focusing on a larger area
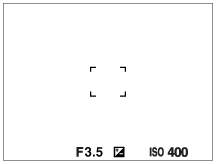
When focusing on a smaller area
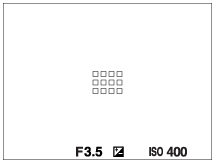
- When [Focus Area] is set to [Wide] or [Zone], the focusing frame may switch between “When focusing on a larger area” and “When focusing on a smaller area” depending on the subject or situation.
-
When [Focus Area] is set to [Custom], the focusing frame may switch to “When focusing on a smaller area” if either the vertical or horizontal side of the focus area is longer than the side of the focusing frame for [Spot: XL].
- When you attach an A-mount lens with a Mount Adaptor (LA-EA3 or LA-EA5) (sold separately), the focusing frame for “When focusing on a smaller area” may be displayed.
When focus is achieved automatically based on the whole range of the monitor
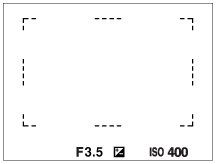
-
When you use a zoom function other than the optical zoom in the still image shooting mode, the [Focus Area] setting is disabled and the focusing frame is shown by the dotted line. The AF operates with priority on and around the center area.
To change the shape and size of the focus area ([Custom])
If you press the (Delete) button on the screen when an option from [Custom 1] to [Custom 3] is selected for [Focus Area], a screen for setting the shape and size of the focus frame will be displayed. Use the control dial/control wheel to set the shape and size of the focus frame.
Control dial: Changes the width of the focus frame.
Rotating the control wheel: Changes the height of the focus frame.
- The shape and size of the focus frame can also be set using touch operations. Drag the four corners or sides of the focus frame. You can also enlarge/reduce the size of the focus frame by pinching in/out on the monitor.
- You can change the position of the focus frame with the top/bottom/left/right side of the control wheel.
- Press the (Delete) button to return the focus frame shape and size to the default settings.
To move the focus area
-
When [Focus Area] is set to [Zone], [Spot] or [Expand Spot], if pressing the button to which [Focus Standard] is assigned, you can shoot while moving the focusing frame using the top/bottom/left/right sides of the control wheel. To return the focusing frame to the center of the monitor, press the (Delete) button while moving the frame. To change the shooting settings using the control wheel, press the button to which [Focus Standard] is assigned.
Hint
-
When [Focus Area] is set to one of the following, you can move the focusing frame over a greater distance at a time by setting [AF Frame Move Amt] to [Large].
- [Spot]
- [Expand Spot]
- [Custom 1] - [Custom 3]
- You can move the focusing frame quickly by touching and dragging it on the monitor. Set [Touch Operation] to [On], and set [Touch Func. in Shooting] under [Shooting Screen] to [Touch Focus] beforehand.
Note
-
You cannot execute functions assigned to the control wheel or the (Product Showcase Set) button while moving the focusing frame.
To track the subject temporarily when shooting still images and movies (Tracking On)
You can temporarily change the setting for [Focus Area] to [Tracking] while pressing and holding down the custom key to which you have assigned [Tracking On] with [Custom Key/Dial Set.] or [Custom Key/Dial Set.] in advance.
The [Focus Area] setting before you activated [Tracking On] will switch to the equivalent [Tracking] setting.
For example:
| [Focus Area] before you activate [Tracking On] |
[Focus Area] while [Tracking On] is active |
|---|---|
| [Wide] | [Tracking: Wide] |
| [Spot: S] | [Tracking: Spot S] |
| [Expand Spot] | [Tracking: Expand Spot] |
Hint
- When [Tracking On + AF On] or [Tracking On
 +
+  ] is assigned to a custom key using [Custom Key/Dial Set.], while the custom key is pressed during still image shooting, autofocus works simultaneously with tracking to keep the subject in focus.
[Tracking On + AF On]: Tracks the subject in the focus area according to the setting for [
Focus Area] before you pressed the custom key.[Tracking On
+ ]: Tracks the subject in the center of the screen despite the setting for [Focus Area] before you pressed the custom key.
Phase detection AF
When there are phase detection AF points within the auto focus area, the product uses the combined autofocus of the phase detection AF and contrast AF.
Note
-
Phase detection AF is available only when a compatible lens is attached. If you use a lens that does not support phase detection AF, you cannot use the following functions.
- [Automatic AF]
- [AF Lvl for Crossing]
- [AF Trk for Spd Chng]
- [AF Subj. Shift Sensitivity]
- [AF Transition Speed]
Also, even if you use a previously purchased applicable lens, the phase detection AF might not function unless you update the lens.
[60] Using the shooting functionsFocusingTracking subject (Tracking function)
This camera has the function of tracking which tracks the subject, and keeps marking it with the focusing frame.
You can set the start position to track by selecting from focusing areas, or by specifying by touch operation. The required function varies depending on the setting method.
- You can refer to the related functions under “Related Topic” at the bottom of this page.
Setting the start position to track by focusing area ([Tracking] under [Focus Area])
The selected focusing frame is set as the start position to track, and the tracking starts by pressing the shutter button halfway down.
- This function is available in still image shooting mode.
-
This function is available when [Focus Mode] is set to [Continuous AF].
Setting the start position to track by touch operation ([Touch Tracking] under [Touch Func. in Shooting])
You can set the subject to track by touching it on the monitor.
- This function is available in still image shooting mode and movie shooting mode.
-
You can use this function for shooting still images when [Focus Mode] is set to [Single-shot AF], [Automatic AF], [Continuous AF], or [DMF].
-
You can use this function for shooting movies when [Focus Mode] is set to [Continuous AF] or [Manual Focus].
Changing the setting for [Focus Area] to [Tracking] temporarily ([Tracking On] by Custom Key)
Even [Focus Area] is set to other than [Tracking], you can temporarily change the setting for [Focus Area] to [Tracking] while pressing and holding the key to which you have assigned [Tracking On] function.
-
Assign the [Tracking On] function to a desired key using [Custom Key/Dial Set.] or [Custom Key/Dial Set.] in advance.
- This function is available in still image shooting mode and movie shooting mode.
-
You can use this function for shooting still images when [Focus Mode] is set to [Continuous AF].
-
You can use this function for shooting movies when [Focus Mode] is set to [Continuous AF] or [Manual Focus].
Hint
- When [Tracking On + AF On] or [Tracking On + ] is assigned to a custom key using [Custom Key/Dial Set.], while the custom key is pressed during still image shooting, autofocus works simultaneously with tracking to keep the subject in focus.
[Tracking On + AF On]: Tracks the subject in the focus area according to the setting for [
Focus Area] before you pressed the custom key.[Tracking On
+ ]: Tracks the subject in the center of the screen despite the setting for [Focus Area] before you pressed the custom key.
Temporarily pausing the tracking function
By pressing the key to which you assigned [Tracking Off on Hold] or [Tracking Off on Toggle] using [Custom Key/Dial Set.], you can temporarily pause the tracking function.
Use this function when you are in a shooting situation where it is difficult to keep tracking, or when the tracking frame switches to another subject.
If you press the key to which you assigned [Track Recog Off on Hold] or [Track Recog Off Toggle] using [Custom Key/Dial Set.], [Subject Recog in AF] will temporarily switch to [Off], suspending tracking of the recognized subject.
Use this function when the tracking frame switches to an unintended subject.
[61] Using the shooting functionsFocusing Manual Focus
When it is difficult to focus properly in the autofocus mode, you can adjust the focus manually.
- MENU → (Focus) → [AF/MF] → [Focus Mode] → [Manual Focus].
- Rotate the focusing ring to achieve sharp focus.
-
When you shoot a still image, you can display the focus distance on the screen by rotating the focusing ring.
The focus distance is not displayed when the Mount Adaptor (sold separately) is attached.
-
When you shoot a still image, you can display the focus distance on the screen by rotating the focusing ring.
Note
- The displayed focus distance is just a reference.
[62] Using the shooting functionsFocusingDirect manual focus (DMF)
You can make fine adjustments manually after performing auto focusing, letting you focus on a subject more quickly than when using the manual focus from the beginning. This is convenient in situations such as macro shooting.
- MENU → (Focus) → [AF/MF] → [Focus Mode] → [DMF].
- Press the shutter button halfway down to focus automatically.
- Keep the shutter button pressed halfway down, and then rotate the focusing ring to achieve a sharper focus.
-
When you rotate the focusing ring, the focus distance is displayed on the screen.
The focus distance is not displayed when the Mount Adaptor (sold separately) is attached.
-
When you rotate the focusing ring, the focus distance is displayed on the screen.
- Press the shutter button fully down to shoot an image.
[63] Using the shooting functionsSubject RecognitionFocusing on human eyes
The camera can automatically recognize faces and eyes and focus on the eyes.
The following explanation is for cases where the recognition target is human. The faces of up to 8 subjects can be recognized.
There are two methods of focusing on eyes, with some differences between their specifications. Select the appropriate method according to your purpose.
| Item | [Subject Recog in AF] function |
[Subject Recognition AF] via a custom key |
|---|---|---|
| Characteristics | The camera will recognize faces/eyes with greater priority. | The camera will recognize faces/eyes exclusively. |
| Advance preparation |
|
Assign [Subject Recognition AF] to the desired key using [Custom Key/Dial Set.] or [Custom Key/Dial Set.]. |
| How to focus | Press the shutter button halfway down.*1 | Press the key to which you have assigned the [Subject Recognition AF] function.*2 |
| Function details |
|
|
| Focus mode |
Follows the setting designated with [Focus Mode]
|
Follows the setting designated with [Focus Mode]
|
| Focus area | Follows the setting designated with [Focus Area] |
The focus area temporarily becomes the entire screen, regardless of the setting for [Focus Area]. |
*1 This operation is for focusing when shooting still images. When shooting movies, the camera will focus on recognized faces or eyes, even if you do not press the shutter button.
*2 Regardless of whether [Subject Recog in AF] is set to [On] or [Off], if you have assigned [Subject Recognition AF] to a custom key, you can use [Subject Recognition AF] while you are pressing that custom key.
[Subject Recognition AF] by custom key
This function can be used by assigning [Subject Recognition AF] to a custom key. The camera can focus on eyes as long as you are pressing the key. This is useful when you want to temporarily perform auto-focusing anywhere on the entire screen regardless of the setting for [Focus Area].
If the camera does not recognize any faces or eyes, auto-focusing will not be performed.
- MENU → (Setup) → [Operation Customize] → [Custom Key/Dial Set.] or [Custom Key/Dial Set.] → desired key, then assign the [Subject Recognition AF] function to the key.
- MENU → (Focus) → [Subject Recognition] → [Recognition Target] → [Human].
- Point the camera at the face of a human, and press the key to which you have assigned the [Subject Recognition AF] function.
To shoot a still image, press the shutter button while pressing the key.
To focus on the eyes of an animal or a bird
Before shooting, set [Recognition Target] to [Animal] or [Bird] according to the subject.
Hint
- Setting [Sbj Recog Frm Disp.] or [Sbj Recog Frm Disp.] to [On] makes it easier to check the detection status of faces or eyes.
Note
- It may be difficult to focus on eyes in the following situations:
- When the person is wearing sunglasses.
- When the front hair covers the person’s eyes.
- In low-light or back-lit conditions.
- When the eyes are closed.
- When the subject is in the shade.
- When the subject is out of focus.
- When the subject is moving too much
There are also other situations in which it may not be possible to focus on the eyes.
- When the camera cannot focus on human eyes, it will recognize and focus on a face instead. The camera cannot focus on eyes when no human faces are recognized.
- The camera may not recognize faces at all or may accidentally recognize other objects as faces under some conditions.
[64] Using the shooting functionsSubject RecognitionSubject Recog in AF (still image/movie)
Sets whether to recognize and focus on subjects in the focus area when autofocusing.
- MENU→ (Focus) → [Subject Recognition] → [Subject Recog in AF] → desired setting.
Menu item details
- On:
- Focuses on a subject with priority if it has been recognized inside or around the designated focus area.
- Off:
- Does not recognize subjects when autofocusing.
Hint
- By combining the [Subject Recog in AF] function with [Focus Area] → [Tracking], you can maintain the focus on a moving subject.
- When [Subject Recog in AF] is assigned to the desired key using [Custom Key/Dial Set.] or [Custom Key/Dial Set.], you can switch the [Subject Recog in AF] function on or off by pressing the key.
- By assigning [Recognition Off on Hold] or [Recog. Off on Toggle] to the desired key with [Custom Key/Dial Set.], you can switch [Subject Recog in AF] to [Off] temporarily using the key.
Note
- If the camera does not recognize the subject specified with [Recognition Target] in or around the designated focus area, it will focus on another subject.
[65] Using the shooting functionsSubject RecognitionRecognition Target (still image/movie)
Selects the target to be recognized with the [Subject Recog in AF] function.
- MENU → (Focus) → [Subject Recognition] → [Recognition Target] → desired setting.
Menu item details
- Human:
- Recognizes humans as subjects.
- Animal:
- Recognizes animals as subjects.
- Bird:
- Recognizes birds as subjects.
Hint
- To recognize animal or bird eyes, compose the shot so that the entire head is within the angle of view. Once you focus on the animal’s or bird’s head, the eyes will be recognized more easily.
Note
- When [Recognition Target] is set to other than [Human], the following functions cannot be used.
- Face Priority in Multi Metering
- Regist. Face Priority
- Even when [Recognition Target] is set to [Animal] or [Bird], the eyes of some types of animals and birds cannot be recognized.
[66] Using the shooting functionsSubject RecognitionRecog Trgt Select Set (still image/movie)
Sets the types of recognition targets that are available when using the custom key to which [Recog. Target Select] is assigned.
- MENU → (Focus) → [Subject Recognition] → [Recog Trgt Select Set] → Add check marks to the recognition targets that you want to select, and then select [OK].The types of targets marked with
 (check mark) will be available as settings.
Hint
- Assign [Recog. Target Select] to the desired key using [Custom Key/Dial Set.] or [Custom Key/Dial Set.].
- You can select the types of targets to which you did not add a check mark in [Recog Trgt Select Set] by selecting MENU → (Focus) → [Subject Recognition] → [Recognition Target].
[67] Using the shooting functionsSubject Recognition Right/Left Eye Select (still image/movie)
Sets whether to focus on the left or right eye when [Recognition Target] is set to [Human] or [Animal].
- MENU → (Focus) → [Subject Recognition] → [Right/Left Eye Select] → desired setting.
Menu item details
- Auto:
- The camera automatically selects either the left eye or right eye.
- Right Eye:
- The right eye of the subject (the eye on the left side from the photographer’s perspective) is selected.
- Left Eye:
- The left eye of the subject (the eye on the right side from the photographer’s perspective) is selected.
[Switch Right/Left Eye] by custom key
You can also switch between the right eye and left eye to focus with the custom key.
When [Right/Left Eye Select] is set to [Right Eye] or [Left Eye], you can switch the eye to be focused by pressing the custom key to which you have assigned the [Switch Right/Left Eye] function.
When [Right/Left Eye Select] is set to [Auto], you can temporarily switch the eye to be focused by pressing the custom key to which you have assigned the [Switch Right/Left Eye] function.
The temporary left/right selection is canceled when you perform the following operations, etc. The camera returns to automatic eye selection.
- Pressing the center of the control wheel
- Stopping pressing the shutter button halfway down (only during still image shooting)
- Stopping pressing the custom key to which [AF On] or [Subject Recognition AF] is assigned (only during still image shooting)
- Pressing the MENU button
Hint
- When [Sbj Recog Frm Disp.] or [Sbj Recog Frm Disp.] is set to [On], the eye recognition frame appears around the eye you selected using [Right/Left Eye Select] or [Switch Right/Left Eye] with the custom key.
[68] Using the shooting functionsSubject RecognitionSbj Recog Frm Disp. (still image)
Sets whether to display a subject recognition frame when a subject is recognized.
- MENU → (Focus) → [Subject Recognition] → [Sbj Recog Frm Disp.] → desired setting.
Menu item details
- On:
- Displays a recognition frame when a subject is recognized.
- Off:
- Does not display a recognition frame when a subject is recognized.
Face recognition frame
When the camera recognizes a face, the gray face-recognition frame appears. The frame color will be reddish purple if the recognized face has been registered using the [Face Memory] function.
The face recognition frame turns white when the face is recognized inside or around the focus area, and the camera determines that autofocus is enabled.
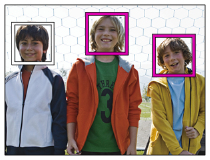
Eye recognition frame
A white eye recognition frame appears when an eye is recognized and the camera determines that auto-focusing is possible.
The eye recognition frame is displayed as follows when [Recognition Target] is set to [Animal] or [Bird].
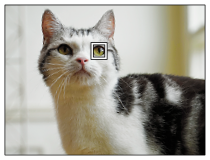
Note
- If the subject is moving too much or too fast, the subject recognition frame may not be displayed correctly over the subject.
- If the subject is not recognized, the subject recognition frame will not be displayed.
- Even if [Sbj Recog Frm Disp.] is set to [Off], a green focusing frame will appear over the subject that is in focus when you press the shutter button halfway down, etc.
[69] Using the shooting functionsSubject RecognitionSbj Recog Frm Disp. (movie)
Sets whether to display a subject recognition frame when a subject is recognized.
- MENU → (Focus) → [Subject Recognition] → [Sbj Recog Frm Disp.] → desired setting.
Menu item details
- On:
- Displays a recognition frame when a subject is recognized.
- Off:
- Does not display a recognition frame when a subject is recognized.
Face recognition frame
When the camera recognizes a face, the gray face-recognition frame appears. The frame color will be reddish purple if the recognized face has been registered using the [Face Memory] function.
The face recognition frame turns white when the face is recognized inside or around the focus area, and the camera determines that autofocus is enabled.
Eye recognition frame
A white eye recognition frame appears when an eye is recognized and the camera determines that auto-focusing is possible.
The eye recognition frame is displayed as follows when [Recognition Target] is set to [Animal] or [Bird].
Note
- If the subject is moving too much or too fast, the subject recognition frame may not be displayed correctly over the subject.
- If the subject is not recognized, the subject recognition frame will not be displayed.
- Even if [Sbj Recog Frm Disp.] is set to [Off], a green focusing frame will appear over the subject that is in focus when you press the shutter button halfway down, etc.
[70] Using the shooting functionsSubject RecognitionFace Memory
Sets personal face data. If you register faces in advance, the product can focus on the registered face as a priority.
Up to eight faces can be registered.
- MENU → (Focus) → [Subject Recognition] → [Face Memory] → desired setting item.
Menu item details
- New Registration:
- Shoots and registers faces.
- Order Exchanging:
- When multiple faces are registered, the order of priority for the registered face data can be changed.
- Delete:
- Deletes registered faces one by one.
- Delete All:
- Deletes all registered faces at once.
Note
- When performing [New Registration], shoot the face from the front in a brightly lit place. The face may not be registered correctly if it is obscured by a hat, a mask, sunglasses, etc.
- Even if you execute [Delete], the data for registered face will remain in the product. To delete the data for registered faces from the product, select [Delete All].
-
Faces registered through the [Face Memory] function are considered biometric information. Users are responsible for collecting and using such data and for complying with the laws and regulations of the relevant country or region. For more information, visit the following website.
https://www.sony.net/dics/privacy
[71] Using the shooting functionsSubject RecognitionRegist. Face Priority (still image/movie)
Sets whether to focus with higher priority on faces registered using [Face Memory].
- MENU → (Focus) → [Subject Recognition] → [Regist. Face Priority] → desired setting.
Menu item details
- On:
- Focuses with higher priority on faces registered using [Face Memory].
- Off:
- Focuses without giving higher priority to registered faces.
Hint
- To use the [Regist. Face Priority] function, set as follows.
-
[Subject Recog in AF] under [Subject Recognition]: [On]
-
[Recognition Target] under [Subject Recognition]: [Human]
-
[
[72] Using the shooting functionsSubject RecognitionSelecting a person to track (Select Face to Track)
When the camera recognizes multiple people, you can choose which person to track.
- MENU → (Setup) → [Operation Customize] → [Custom Key/Dial Set.] or [Custom Key/Dial Set.] → Assign the [Select Face to Track] function to the desired key.
The [Select Face to Track] screen will appear, and an orange bar will be displayed below the face to be tracked.
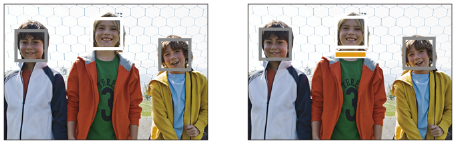
- Select a face to track using the control wheel and press the center.The orange bar will move to the selected face. Once the selection is confirmed, exit the [Select Face to Track] screen and start tracking the selected face.
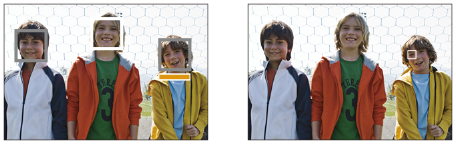
Note
- [Select Face to Track] is unavailable in the following situations:
-
When [Focus Mode] is set to [Manual Focus] in still image shooting mode
- When using the Smart Zoom, Clear Image Zoom and Digital Zoom in still image shooting mode
-
When [
[73] Using the shooting functionsUsing focusing functionsFocus Standard
If you press the key to which [Focus Standard] is assigned, you can recall useful functions such as moving the focusing frame quickly, etc. depending on the focus area settings.
- MENU → (Setup) → [Operation Customize] → [Custom Key/Dial Set.] or [Custom Key/Dial Set.] → desired key, then assign the [Focus Standard] function to the key.
- Press the key to which [Focus Standard] is assigned.
-
What you can do by pressing the key varies depending on the setting for [Focus Area].
-
What you can do by pressing the key varies depending on the setting for [
Examples of [Focus Standard] key functions
-
When [Focus Area] is set to any of the following parameters, pressing the key enables you to move the focusing frame using the top/bottom/left/right side of the control wheel.
- [Zone]
- [Spot: XL]/[Spot: L]/[Spot: M]/[Spot: S]
- [Expand Spot]
- [Custom 1] - [Custom 3]
- [Tracking: Zone]
- [Tracking: Spot XL]/[Tracking: Spot L]/[Tracking: Spot M]/[Tracking: Spot S]
- [Tracking: Expand Spot]
- [Tracking: Custom 1] - [Tracking: Custom 3]
-
When [Focus Area] is set to [Wide], [Center Fix], [Tracking: Wide], or [Tracking: Center Fix], pressing the key in the autofocus mode makes the camera focus on the center of the screen.
If you press the key while recording a movie with manual focus, you can temporarily switch to autofocus and focus on the center of the screen.
Note
- You cannot set the [Focus Standard] function to [Left Button], [Right Button] or [Down Button] of the control wheel.
[74] Using the shooting functionsUsing focusing functionsAdjusting the focus area settings to the camera’s orientation (horizontal/vertical) (Switch V/H AF Area)
You can set whether to switch the [Focus Area] and the position of the focusing frame according to the orientation of the camera (horizontal/vertical). This function is useful when shooting scenes for which you have to change the camera position frequently, such as portraits or sports scenes.
- MENU → (Focus) → [Focus Area] → [Switch V/H AF Area] → desired setting.
Menu item details
- Off:
- Does not switch the [Focus Area] and the position of the focusing frame according to the orientation of the camera (horizontal/vertical).
- AF Point Only:
- Switches the position of the focusing frame according to the orientation of the camera (horizontal/vertical). The [Focus Area] is fixed.
- AF Point + AF Area:
- Switches both the [Focus Area] and the position of the focusing frame according to the orientation of the camera (horizontal/vertical).
An example when [AF Point + AF Area] is selected
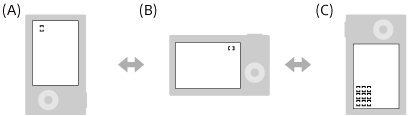
(A) Vertical: [Spot] (Upper left corner)
(B) Horizontal: [Spot] (Upper right corner)
(C) Vertical: [Zone] (Lower left corner)
- Three camera orientations are detected: horizontal, vertical with the side of the shutter button facing up, and vertical with the side of the shutter button facing down.
Note
- If the setting for [Switch V/H AF Area] is changed, the focus settings for each camera orientation will not be retained.
- The [Focus Area] and the position of the focusing frame will not change even when [Switch V/H AF Area] is set to [AF Point + AF Area] or [AF Point Only] in the following situations:
- During movie shooting
- While using the digital zoom function
- While the auto-focusing is activated
- During continuous shooting
- During the countdown for the self-timer
- When [Focus Magnifier] is activated
- When you shoot images right after the power is turned on and the camera is vertical, the first shot is taken with the horizontal focus setting or with the last focus setting.
- The orientation of the camera cannot be detected when the lens is facing up or down.
[75] Using the shooting functionsUsing focusing functionsRegistering the current focus area (AF Area Registration)
You can move the focusing frame to a preassigned position temporarily using a custom key. This function is useful when shooting scenes in which the subject’s movements are predictable; for example, sports scenes. With this function, you can switch the focus area quickly according to the situation.
How to register focus area
- MENU → (Focus) → [Focus Area] → [AF Area Registration] → [On].
- Set the focus area to the desired position and then hold down the Fn (Function) button.
How to call up the registered focus area
- MENU → (Setup) → [Operation Customize] → [Custom Key/Dial Set.] → desired key, then select [Regist. AF Area hold].
- Set the camera to the shooting mode, hold down the key to which [Regist. AF Area hold] has been assigned and then press the shutter button to shoot images.
Hint
- When a focusing frame is registered using [AF Area Registration], the registered focusing frame flashes on the monitor.
- If you assign [Regist AF Area tggle] to a custom key, you can use the registered focusing frame without holding down the key.
- If [Reg. AF Area+AF On] is assigned to a custom key, auto focusing using the registered focusing frame is performed when the key is pressed.
Note
- A focus area cannot be registered in the following situations:
- While [Touch Focus] is being performed
- While using the digital zoom function
- While [Touch Tracking] is being performed
- While focusing
- While performing focus lock
- You cannot assign [Regist. AF Area hold] to [Left Button], [Right Button], or [Down Button].
- You cannot call up the registered focus area in the following situations:
-
The Still/Movie/S&Q switch is set to either (Movie) or S&Q (S&Q Motion)
-
The Still/Movie/S&Q switch is set to either
- When [AF Area Registration] is set to [On], the [Dial / Wheel Lock] setting is locked to [Unlock].
[76] Using the shooting functionsUsing focusing functionsDeleting a registered AF Area (Del. Regist. AF Area)
Deletes the focusing frame position that was registered using [AF Area Registration].
- MENU → (Focus) → [Focus Area] → [Del. Regist. AF Area].
[77] Using the shooting functionsUsing focusing functionsFocus Area Limit (still image/movie)
By limiting the types of available focus area settings in advance, you can more quickly select settings for [Focus Area].
- MENU → (Focus) → [Focus Area] → [Focus Area Limit] → Add check marks to the focus areas that you want to use, and then select [OK]. The types of focus areas marked with (check mark) will be available as settings.
Hint
-
When you assign [Switch Focus Area] to a desired key using [
Custom Key/Dial Set.] or [Custom Key/Dial Set.], the focus area changes every time you press the assigned key. By limiting the types of selectable focus areas with [Focus Area Limit] in advance, you can more quickly select the focus area setting you want.
Note
- Types of focus areas that do not have a check mark cannot be selected using MENU or the Fn (function) menu. To select one, add a check mark using [Focus Area Limit].
- If you remove the check mark for a focus area registered with [Switch V/H AF Area] or [AF Area Registration], the registered settings will change.
[78] Using the shooting functionsUsing focusing functions Circ. of Focus Point (still image/movie)
Sets whether to allow the focusing frame to jump from one end to the other when you move the focusing frame. This function is useful when you want to move the focusing frame from one end to the other quickly.
The function can be used when the following settings are selected for [Focus Area].
- [Zone]
- [Spot: XL]/[Spot: L]/[Spot: M]/[Spot: S]
- [Expand Spot]
- [Custom 1] - [Custom 3]
- [Tracking: Zone]
- [Tracking: Spot XL]/[Tracking: Spot L]/[Tracking: Spot M]/[Tracking: Spot S]
- [Tracking: Expand Spot]
- [Tracking: Custom 1] - [Tracking: Custom 3]
- MENU → (Focus) → [Focus Area] → [Circ. of Focus Point] → desired setting.
When [Circulate] is selected:

Menu item details
- Does Not Circulate:
- The cursor does not move when you try to move the focusing frame past the end.
- Circulate:
- The cursor jumps to the opposite end when you try to move the focusing frame past the end.
[79] Using the shooting functionsUsing focusing functionsAF Frame Move Amt (still image/movie)
Sets the distance by which the focusing frame is moved when [Focus Area] is set to [Spot], etc. You can quickly move the focusing frame by increasing the distance, such as in situations where the subject is moving a lot.
- MENU → (Focus) → [Focus Area] → [AF Frame Move Amt] → desired setting.
Menu item details
- Standard:
- The focusing frame moves by the standard distance.
- Large:
- The focusing frame moves over a greater distance at a time than with [Standard].
Hint
- When [Swt. AF Frame Move hold] is assigned to the desired key using [Custom Key/Dial Set.] or [Custom Key/Dial Set.], the [AF Frame Move Amt] setting temporarily switches while the key is pressed.
- If any of the following functions is assigned to the dials or control wheel using [Custom Key/Dial Set.] or [Custom Key/Dial Set.], you can move the focusing frame by the distance determined for each function, regardless of the setting for [AF Frame Move Amt].
- [Move AF Frame
 : L]
: L] - [Move AF Frame
 : L]
: L] - [Move AF Frame : Std]
- [Move AF Frame : Std]
- [Move AF Frame
- If any of the following functions is assigned to the dials or control wheel using [My Dial Settings], you can move the focusing frame by the distance determined for each function, regardless of the setting for [AF Frame Move Amt].
- [Move AF Frame : L]
- [Move AF Frame : L]
- [Move AF Frame : Std]
- [Move AF Frame : Std]
- [Move AF Frame
[80] Using the shooting functionsUsing focusing functionsFocus Area Color (still image/movie)
You can specify the color of the frame indicating the focusing area. If the frame is difficult to see because of the subject, make it more visible by changing its color.
- MENU → (Focus) → [Focus Area] → [Focus Area Color] → desired color.
Menu item details
- White:
- Displays the frame indicating the focusing area in white.
- Red:
- Displays the frame indicating the focusing area in red.
[81] Using the shooting functionsUsing focusing functionsAF Area Auto Clear
Sets whether the focus area is displayed all the time or disappears automatically shortly after focus is achieved.
- MENU → (Focus) → [Focus Area] → [AF Area Auto Clear] → desired setting.
Menu item details
- On:
- The focus area disappears automatically shortly after focus is achieved.
- Off:
- The focus area is displayed all the time.
[82] Using the shooting functionsUsing focusing functionsAF-C Area Display
You can set whether or not to display the area that is in focus when [Focus Mode] is set to [Continuous AF] and [Focus Area] is set to [Wide] or [Zone].
- MENU → (Focus) → [Focus Area] → [AF-C Area Display] → desired setting.
Menu item details
- On:
- Displays the focus area that is in focus.
- Off:
- Does not display the focus area that is in focus.
Note
- When [Focus Area] is set to one of the following, the focusing frames in the area that is in focus turn green:
- [Center Fix]
- [Spot]
- [Expand Spot]
- [Custom] (when the size of the focus frame does not exceed the size of the [Spot: XL] focus frame)
[83] Using the shooting functionsUsing focusing functions Phase Detect. Area
Sets whether or not to display the Phase Detection AF area.
- MENU → (Focus) → [Focus Area] → [Phase Detect. Area] → desired setting.
Menu item details
- On:
- Displays the Phase Detection AF area.
- Off:
- Does not display the Phase Detection AF area.
Note
- Phase Detection AF is available only with compatible lenses. If an incompatible lens is attached, you will be unable to use Phase Detection AF. Phase Detection AF may not operate even with some compatible lens, such as lenses purchased in the past that have not been updated. For details on compatible lenses, visit the Sony web site in your area, or consult your Sony dealer or local authorized Sony service facility.
- When recording movies, the Phase Detection AF area will not be displayed.
[84] Using the shooting functionsUsing focusing functions AF Lvl for Crossing
You can select the AF tracking sensitivity (ease of re-targeting) when another subject crosses between the camera and the subject or when the subject goes out of the focus area in the still image shooting mode.
- MENU → (Focus) → [AF/MF] → [AF Lvl for Crossing] → desired setting.
Menu item details
- 5(Responsive)/4/3(Standard)/2/1(Locked on):
-
Select [5(Responsive)] when you want to quickly focus on the crossing subject if another subject crosses between the camera and the subject, or when you want to quickly focus on another subject in the focus area if the subject goes out of the focus area.
Select [1(Locked on)] when you want to keep focusing on the subject if another subject crosses between the camera and the subject, or when you want to keep focusing on the distance where the subject previously was if the subject goes out of the focus area.
[85] Using the shooting functionsUsing focusing functions AF Trk for Spd Chng
You can select the sensitivity of AF tracking relative to changes in the moving speed of the subject in the still image shooting mode.
- MENU → (Focus) → [AF/MF] → [AF Trk for Spd Chng] → desired setting.
Menu item details
- Stable/Standard/Responsive:
- Select [Stable] if you want to keep stable focus on a motionless subject or a subject that moves at a nearly constant speed.
- Select [Responsive] if you want to keep the focus on a subject whose moving speed changes significantly, such as one that suddenly starts or stops moving.
- Normally, we recommend that you set it to [Standard]. If the autofocus is not stable with [Standard], try [Stable] or [Responsive].
Hint
- If the autofocus is not stable when shooting in dark environments, setting [AF Trk for Spd Chng] to [Stable] will make it easier to focus on a stationary subject or a subject that moves at an almost constant speed.
[86] Using the shooting functionsUsing focusing functionsAF Transition Speed
Sets the focusing speed when the target of the auto focus is switched during movie shooting.
- MENU → (Focus) → [AF/MF] → [AF Transition Speed] → desired setting.
Menu item details
- 7 (Fast)/6/5/4/3/2/1 (Slow):
- Select a faster value to focus on the subject more quickly.
- Select a slower value to focus on the subject more smoothly.
Hint
- You can use the touch focus function to intentionally transition the AF.
[87] Using the shooting functionsUsing focusing functionsAF Subj. Shift Sensitivity
Sets the sensitivity with which the focus switches to another subject when the original subject leaves the focus area or an unfocused subject in the foreground approaches the center of the focus area during movie shooting.
- MENU → (Focus) → [AF/MF] → [AF Subj. Shift Sensitivity] → desired setting.
Menu item details
- 5(Responsive)/4/3/2/1(Locked on):
- Select a higher value when you want to shoot a quick-moving subject, or when you want to shoot multiple subjects while switching the focus continually.
Select a lower value when you want the focus to remain steady, or when you want to keep the focus on a particular target without being affected by other subjects.
[88] Using the shooting functionsUsing focusing functionsAF Assist
While shooting a movie with auto focus, you can change the subject in focus by operating the focus ring of the lens.
- MENU → (Focus) → [AF/MF] → [AF Assist] → [On].
- While shooting a movie with auto focus, turn the focus ring of the lens to focus on the intended subject.
When you stop operating the focus ring, the subject that is in focus with the focus ring becomes the autofocus target.
Menu item details
- On:
- Uses the AF assist function.
- Off:
- Does not use the AF assist function.
Hint
- It will be easier to see which region is in focus if you use the [Peaking Display] or [Focus Map] function along with [AF Assist], making it easier for you to focus on the intended subject.
Note
- Only subjects within the focus area are targeted by auto focus.
- The following lenses are not compatible with [AF Assist].
- SELP1650 (sold separately)
- SELP16502 (supplied with the ZV-E10M2X or the ZV-E10M2K)
- SEL18200LE (sold separately)
[89] Using the shooting functionsUsing focusing functionsAF/MF Selector
You can easily switch the focusing mode from auto to manual and vice versa while shooting without changing your holding position.
- MENU → (Setup) → [Operation Customize] → [Custom Key/Dial Set.] or [Custom Key/Dial Set.] → desired button → [AF/MF Selector Hold] or [AF/MF Selector Toggle].
Menu item details
- AF/MF Selector Hold:
- Switches the focusing mode while the button is held down.
- AF/MF Selector Toggle:
- Switches the focusing mode until the button is pressed again.
Note
- You cannot set the [AF/MF Selector Hold] function to [Left Button], [Right Button] or [Down Button] of the control wheel.
- If the lens is equipped with an AF/MF selector switch, the state of the switch on the lens will take priority.
[90] Using the shooting functionsUsing focusing functionsAF w/ Shutter
Selects whether to focus automatically when you press the shutter button halfway down. Select [Off] to adjust the focus and the exposure separately.
- MENU → (Focus) → [AF/MF] → [AF w/ Shutter] → desired setting.
Menu item details
- On:
- The auto focus operates when you press the shutter button halfway down.
- Off:
- The auto focus does not operate even if you press the shutter button halfway down.
[91] Using the shooting functionsUsing focusing functionsAF On
You can focus without pressing the shutter button halfway down. The settings for [Focus Mode] will be applied.
- MENU → (Setup) → [Operation Customize] → [Custom Key/Dial Set.] or [Custom Key/Dial Set.] → desired key, then assign the [AF On] function to the key.
- Press the key to which you have assigned the [AF On] function.
- When shooting a movie, you can perform auto-focusing by holding down the custom key to which [AF On] is assigned even in the manual focusing mode.
Hint
- Set [AF w/ Shutter] to [Off] when you do not want to perform auto focusing using the shutter button.
- Set [AF w/ Shutter] and [Pre-AF] to [Off] to focus at a specific shooting distance predicting the position of the subject.
[92] Using the shooting functionsUsing focusing functionsFocus Hold
Locks the focus while the key to which the Focus Hold function has been assigned is pressed.
- MENU → (Setup) → [Operation Customize] → [Custom Key/Dial Set.] or [Custom Key/Dial Set.] → assign the [Focus Hold] function to the desired key.
- Focus and press the key to which the [Focus Hold] function has been assigned.
[93] Using the shooting functionsUsing focusing functionsPre-AF
The product automatically adjusts focus before you press the shutter button halfway down.
- MENU → (Focus) → [AF/MF] → [Pre-AF] → desired setting.
Menu item details
- On:
- Adjusts focus before you press the shutter button halfway down.
- Off:
- Does not adjust focus before you press the shutter button halfway down.
Note
- [Pre-AF] is available only when an E-mount lens is mounted.
- During focusing operations, the screen may shake.
[94] Using the shooting functionsUsing focusing functionsPriority Set in AF-S
Sets whether to release the shutter even if the subject is not in focus when [Focus Mode] is set to [Single-shot AF], [DMF] or [Automatic AF] and the subject is remaining still.
- MENU → (Focus) → [AF/MF] → [Priority Set in AF-S] → desired setting.
Menu item details
- AF:
- Prioritizes focusing. The shutter will not be released until the subject is in focus.
- Release:
- Prioritizes the shutter's release. The shutter will be released even if the subject is out of focus.
- Balanced Emphasis:
- Shoots with a balanced emphasis on both focusing and shutter release.
[95] Using the shooting functionsUsing focusing functionsPriority Set in AF-C
Sets whether to release the shutter even if the subject is not in focus when the continuous AF is activated and the subject is in motion.
- MENU → (Focus) → [AF/MF] → [Priority Set in AF-C] → desired setting.
Menu item details
- AF:
- Prioritizes focusing.
- Release:
- Prioritizes the shutter's release. The shutter will be released even if the subject is out of focus.
- Balanced Emphasis:
- Shoots with a balanced emphasis on both focusing and shutter release.
[96] Using the shooting functionsUsing focusing functionsAperture Drive in AF
Changes the aperture drive system to prioritize the auto-focusing tracking performance or to prioritize silence.
- MENU → (Focus) → [AF/MF] → [Aperture Drive in AF] → desired setting.
Menu item details
- Focus Priority:
- Changes the aperture drive system to prioritize auto-focusing performance.
- Standard:
- Uses the standard aperture drive system.
- Silent Priority:
- Changes the aperture drive system to prioritize silence so that the sound from the aperture drive is quieter than in [Standard].
Note
- When [Focus Priority] is selected, sound from the aperture drive may be audible, or the aperture effect may not be visible on the monitor. Also, the continuous shooting speed may become slower or the screen may flicker. To avoid these phenomena, change the setting to [Standard].
- When [Silent Priority] is selected, the focusing speed may become slower, and it may be more difficult to focus on a subject.
- Focus during continuous shooting is locked to the setting of the first shot when the parameter for [Aperture Drive in AF] is set to [Standard] or [Silent Priority], and the F-value is greater than F22.
- The effect may differ depending on the lens you use and the shooting conditions.
[97] Using the shooting functionsUsing focusing functionsPreset Focus/Zoom
You can move the focus position (the distance to the subject in focus) and zoom position (angle of view) to preregistered positions using custom keys. You can register 5 focus position/zoom position combinations.
To register the focus position/zoom position
- MENU → (Setup) → [Operation Customize] → [Custom Key/Dial Set.] or [Custom Key/Dial Set.] → Assign [Preset Focus/Zoom 1] - [Preset Focus/Zoom 5] to the desired key.
- To use the [Preset Focus/Zoom] function, you need to assign the [Preset Focus/Zoom] function to a custom key.
- On the shooting screen, press and hold the key to which you have assigned [Preset Focus/Zoom].
The focus position and zoom position at the time that the key was pressed and held will be registered to the assigned number.
- If you register information again to a number to which content has already been registered, the content will be overwritten.
To recall the focus position/zoom position
Press the key to which you have assigned [Preset Focus/Zoom] on the shooting screen to recall the registered focus position and zoom position.
To check the registered settings
You can check the registered focus position and zoom position by selecting MENU → (Focus) → [AF/MF] → [Preset Focus/Zoom] → desired number.
- If you add a check mark to [Recalls only zoom position.] on the [Preset Focus/Zoom] screen, only the zoom position and not the focus position will be recalled when you recall the number.
Hint
- You can also assign [Preset Focus] to [Function Ring(Lens)]. In this case, move and hold the function ring of the lens on the shooting screen to register the focus position and zoom position, and briefly flick it to recall them.
- Only the settings for the focus position and zoom position to be registered to the function ring on the lens are registered to [Preset Focus/Zoom 6] under [Preset Focus/Zoom].
Note
- You can register zoom positions only within the range of the optical zoom.
- The focus position and zoom position cannot be recalled while the shutter button is pressed half way down.
- To use the [Preset Focus/Zoom] function in the movie mode, set [AF Assist] to [On].
- If a prime lens is attached, only the focus position will be registered.
- If a zoom lens without power zoom is attached, the focus position/zoom positions cannot be registered and recalled.
- The focus position and zoom position cannot be recalled if the attached lens is different from the lens that was attached when you registered them.
- Even if the model name is the same, if you attach a different individual lens, register the focus position/zoom position again.
[98] Using the shooting functionsUsing focusing functionsAF in Focus Mag.
You can focus on the subject more accurately using auto-focus by magnifying the area where you want to focus. While the magnified image is displayed, you can focus on a smaller area than [Spot] under [Focus Area].
- MENU → (Focus) → [Focus Assistant] → [AF in Focus Mag.] → [On].
- MENU → (Focus) → [Focus Assistant] → [Focus Magnifier].
- Magnify the image by pressing the center of the control wheel, and then adjust the position using top/bottom/right/left of the control wheel.
- The magnification scale changes each time you press the center.
- Press the shutter button halfway down to focus.
- The focus will be achieved at point of
 (plus mark) in the center of the screen.
- The focus will be achieved at point of
- Press the shutter button all the way down to shoot.
- The camera exits the magnified display after shooting.
Hint
- Use of a tripod is recommended to accurately identify the location you want to magnify.
- You can check the auto-focusing result by magnifying the displayed image. If you want to readjust the focus position, adjust the focus area on the magnified screen and then press the shutter button halfway down.
Note
- If you enlarge an area at the edge of the screen, the camera may not be able to focus.
- The exposure and white balance cannot be adjusted while the displayed image is being magnified.
- [AF in Focus Mag.] is unavailable in the following situations:
- During movie shooting
-
When [Focus Mode] is set to [Continuous AF].
-
When [Focus Mode] is set to [Automatic AF] and the shooting mode is set to other than P/A/S/M.
-
When [Focus Mode] is set to [Automatic AF] and [Drive Mode] is set to [Cont. Shooting].
- When using a Mount Adaptor (sold separately).
- While the displayed image is being magnified, the following functions are unavailable:
- [Subject Recognition AF]
- [Pre-AF]
-
[Subject Recog in AF]
[99] Using the shooting functionsUsing focusing functions Auto Magnifier in MF
Enlarges the image on the screen automatically to make manual focusing easier. This works in Manual Focus or Direct Manual Focus shooting.
- MENU → (Focus) → [Focus Assistant] → [Auto Magnifier in MF] → [On].
- Turn the focus ring to adjust the focus.
- The image is enlarged. You can magnify images further by pressing the center of the control wheel.
Hint
- You can set how long the image is to be shown magnified by selecting MENU → (Focus) → [Focus Assistant] → [Focus Magnif. Time].
Note
- You cannot use [Auto Magnifier in MF] when shooting movies. Use the [Focus Magnifier] function instead.
- [Auto Magnifier in MF] is not available when a Mount Adaptor is attached. Use the [Focus Magnifier] function instead.
[100] Using the shooting functionsUsing focusing functionsFocus Magnifier
You can check the focus by enlarging the image before shooting.
Unlike with [Auto Magnifier in MF], you can magnify the image without operating the focus ring.
- MENU → (Focus) → [Focus Assistant] → [Focus Magnifier].
- Press the center of the control wheel to enlarge the image and select the area you want to enlarge using top/bottom/left/right side of the control wheel.
- Each time you press the center, the magnification scale will change.
-
You can set the initial magnification by selecting MENU → (Focus) → [Focus Assistant] → [Initial Focus Mag.] or [Initial Focus Mag.].
- Confirm the focus.
- Press the (Delete) button to bring the magnified position into the center of an image.
- When the focus mode is [Manual Focus], you can adjust the focus while an image is magnified. If [AF in Focus Mag.] is set to [Off], the [Focus Magnifier] function is canceled when the shutter button is pressed halfway down.
-
When the shutter button is pressed halfway down while an image is magnified during the auto-focusing, different functions are performed depending on the [AF in Focus Mag.] setting.
- When [AF in Focus Mag.] is set to [On]: Auto-focusing is performed again.
- When [AF in Focus Mag.] is set to [Off]: The [Focus Magnifier] function is canceled.
- You can set how long the image is to be shown magnified by selecting MENU → (Focus) → [Focus Assistant] → [Focus Magnif. Time].
- Press the
To use the focus magnifier function by touch operation
When [Touch Func. in Shooting] is set to [Touch Focus], you can magnify the image and adjust the focus by touching the monitor. Set in advance as follows.
- [Touch Operation]: [On]
- [Shooting Screen]:
- Set [Shooting Screen] to [On].
- Set [Touch Func. in Shooting] to [Touch Focus].
Hint
- While using the focus magnifier function, you can move the magnified area by dragging it on the touch panel.
- To exit the focus magnifier function, double-tap the monitor again. When [AF in Focus Mag.] is set to [Off], the focus magnifier function is ended by pressing the shutter button halfway down.
-
You can set whether to exit or continue the magnified display after shooting by pressing the Fn (Function) button while the magnified image is displayed. This function is available when shooting with the following settings:
- Focus mode: [Single-shot AF], [DMF] or [Manual Focus]
- Drive mode: [Single Shooting] or [Cont. Shooting]
- [AF in Focus Mag.]: [On]
- [Auto Review]: [Off]
[101] Using the shooting functionsUsing focusing functionsFocus Magnif. Time (still image/movie)
Set the duration for which an image is to be magnified using the [Auto Magnifier in MF] or [Focus Magnifier] function.
- MENU → (Focus) → [Focus Assistant] → [Focus Magnif. Time] → desired setting.
Menu item details
- 2 Sec:
- Magnifies the images for 2 seconds.
- 5 Sec:
- Magnifies the images for 5 seconds.
- No Limit:
- Magnifies the images until you press the shutter button.
[102] Using the shooting functionsUsing focusing functionsInitial Focus Mag. (movie)
Sets the initial magnification scale for [Focus Magnifier] in the movie shooting mode.
- MENU → (Focus) → [Focus Assistant] →[Initial Focus Mag.] → desired setting.
Menu item details
- x1.0:
- Displays the image with the same magnification as the shooting screen.
- x4.0:
- Displays a 4.0-times enlarged image.
[103] Using the shooting functionsUsing focusing functionsInitial Focus Mag. (still image)
Sets the initial magnification scale when using [Focus Magnifier]. Select a setting that will help you frame your shot.
- MENU → (Focus) → [Focus Assistant] → [Initial Focus Mag.] → desired setting.
Menu item details
- x1.0:
- Displays the image with the same magnification as the shooting screen.
- x6.1:
- Displays a 6.1-times enlarged image.
[104] Using the shooting functionsUsing focusing functionsFocus Map
When shooting a movie, areas that are in focus and areas that are out of focus are displayed so that you can visually distinguish them. Areas behind the in-focus region are indicated by dots in a cool color (A) and those in front of the in-focus region are indicated by dots in a warm color (B). Dots are not displayed in the in-focus range. Dots are not recorded in the actual movie.

- MENU → (Focus) → [Focus Assistant] → [Focus Map] → desired setting.
Menu item details
- On:
- Displays the focus map.
- Off:
- Does not display the focus map.
Hint
- The focus map can also be output to an external monitor. To output the focus map to an external monitor, set [HDMI Info. Display] to [On].
Note
- [Focus Map] is unavailable in the following situations:
- When [Focus Magnifier] is activated
- While using the digital zoom function
- While streaming
- When using a lens that does not support phase detection AF
- When a Mount Adaptor is attached
- When the lens is not attached to the camera
[105] Using the shooting functionsUsing focusing functionsPeaking Display
Sets the peaking function, which enhances the outline of in-focus areas during shooting with Manual Focus or Direct Manual Focus. When shooting a movie, you can also use the peaking function with auto focus.
- MENU → (Focus) → [Peaking Display] → Select a menu item and set the desired parameter.
Menu item details
- Peaking Display:
- Sets whether to display peaking. ([On] / [Off])
- Peaking Level:
- Sets the level of enhancement of in-focus areas. ([High] / [Mid] / [Low])
- Peaking Color:
- Sets the color used to enhance in-focus areas. ([Red] / [Yellow] / [Blue] / [White])
Note
- Since the product recognizes sharp areas as in focus, the effect of peaking differs, depending on the subject and lens.
- The outline of in-focus ranges is not enhanced on devices connected via HDMI.
[106] Using the shooting functionsAdjusting the exposure/metering modes Exposure Comp. (still image/movie)
Normally, exposure is set automatically (auto exposure). Based on the exposure value set by auto exposure, you can make the entire image brighter or darker if you adjust [Exposure Comp.] to the plus side or minus side, respectively (exposure compensation).
- (Exposure Comp.) on the control wheel → press the left/right side of the control wheel or turn the control wheel, and select the desired setting.
+ (over) side:
Images become brighter.- (under) side:
Images become darker.-
You can also select MENU → (Exposure/Color) → [Exposure Comp.] → [Exposure Comp.].
- When [Touch Operation] is set to [On] and [Footer Icon Touch] is set to [On], you can change the exposure compensation values using touch operations.
- You can adjust the exposure compensation value within the range of -5.0 EV to +5.0 EV.
- You can confirm the exposure compensation value that you set on the shooting screen.
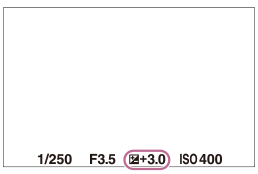
-
You can also select MENU →
Hint
- Only a value between -3.0 EV and +3.0 EV with the equivalent image brightness appears on the screen when shooting. If you set an exposure compensation value outside this range, the image brightness on the screen will not be affected, but the value will be reflected in the recorded image.
- You can adjust the exposure compensation value within the range of -2.0 EV to +2.0 EV for movies.
Note
-
You cannot perform the exposure compensation in the following shooting modes:
- [Intelligent Auto]
- [Scene Selection]
-
When using [Manual Exposure], you can perform the exposure compensation only when [ISO] is set to [ISO AUTO].
- If you shoot a subject in extremely bright or dark conditions, or when you use the flash, you may not be able to get a satisfactory effect.
[107] Using the shooting functionsAdjusting the exposure/metering modesHistogram display
A histogram shows the luminance distribution, displaying how many pixels there are by luminance.
To display the histogram on the shooting screen or playback screen, press the DISP (Display Setting) button repeatedly.
How to read the histogram
The histogram indicates darker values toward the left and brighter values toward the right.
The histogram changes depending on the exposure compensation.
A peak at the right or left end of the histogram indicates that the image has an overexposed or underexposed area, respectively. You cannot correct such defects using a computer after shooting. Perform exposure compensation before shooting as necessary.
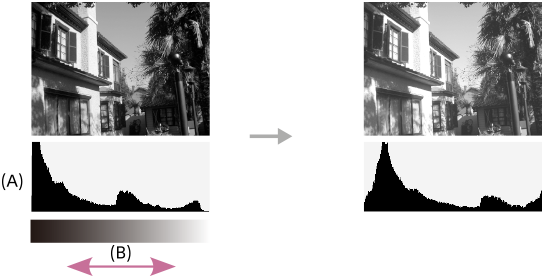
(A): Pixel count
(B): Brightness
Note
- The information in the histogram display does not indicate the final photograph. It is information about image displayed on the screen. The final result depends on the aperture value, etc.
- The histogram display is extremely different between shooting and playback in the following cases:
- When the flash is used
- When shooting a low luminance subject such as a night scene
[108] Using the shooting functionsAdjusting the exposure/metering modesExposure step (still image/movie)
You can adjust the setting increment for the shutter speed, aperture, and exposure compensation values.
- MENU → (Exposure/Color) → [Exposure Comp.] → [Exposure step] → desired setting.
Menu item details
0.5EV/0.3EV[109] Using the shooting functionsAdjusting the exposure/metering modesExposure Std. Adjust (still image/movie)
Adjusts this camera's standard for the correct exposure value for each metering mode.
- MENU → (Exposure/Color) → [Exposure Comp.] → [Exposure Std. Adjust] → desired metering mode.
- Select the desired value as the metering standard.
- You can set a value from -1 EV to +1 EV in 1/6 EV increments.
Metering Mode
The set standard value will be applied when you select the corresponding metering mode in MENU → (Exposure/Color) → [Metering] → [Metering Mode].
 Multi/
 Center/
 Spot/
Spot/ Entire Screen Average/
 Highlight
Note
- The exposure compensation will not be affected when [Exposure Std. Adjust] is changed.
- The exposure value will be locked according to the value set for [Spot] during using spot AEL.
- The standard value for M.M (Metered Manual) will be changed according to the value set in [Exposure Std. Adjust].
- The value set in [Exposure Std. Adjust] is recorded in Exif data separately from the exposure compensation value. The amount of exposure standard value will not be added to the exposure compensation value.
- If you set [Exposure Std. Adjust] during bracketing shooting, the number of shots for the bracketing will be reset.
[110] Using the shooting functionsAdjusting the exposure/metering modesD-Range Optimizer (still image/movie)
By dividing the image into small areas, the product analyzes the contrast of light and shadow between the subject and the background, and creates an image with the optimal brightness and gradation.
- MENU → (Exposure/Color) → [Color/Tone] → [D-Range Optimizer] → desired setting.
Menu item details
- Off:
- Does not adjust brightness and gradation.
- D-Range Optimizer:
- If you select [D-Range Optimizer: Auto], the camera will automatically adjust the brightness and gradation. To optimize the gradation of a recorded image by individual areas, select an optimization level from [D-Range Optimizer: Lv1] (weak) to [D-Range Optimizer: Lv5] (strong).
Note
- In the following situations, [D-Range Optimizer] is fixed to [Off]:
-
When [Picture Profile] is set to other than [Off]
- When [Log Shooting] is set to [On (Flexible ISO)].
-
When [
-
[D-Range Optimizer] is fixed to [Off] when the following modes are selected in [Scene Selection].
- [Sunset]
- [Night Scene]
- [Night Portrait]
- When shooting with [D-Range Optimizer], the image may be noisy. Select the proper level by checking the recorded image, especially when you enhance the effect.
[111] Using the shooting functionsAdjusting the exposure/metering modesMetering Mode (still image/movie)
Selects the metering mode that sets which part of the screen to measure for determining the exposure.
- MENU → (Exposure/Color) → [Metering] → [Metering Mode] → desired setting.
Menu item details
 Multi:
- Measures light on each area after dividing the total area into multiple areas and determines the proper exposure of the entire screen (Multi-pattern metering).
 Center:
- Measures the average brightness of the entire screen, while emphasizing the central area of the screen (Center-weighted metering).
 Spot:
Spot:-
Measures only inside the metering circle. This mode is suitable for measuring light on a specified part of the entire screen. The size of the metering circle can be selected from [Spot: Standard] and [Spot: Large].
The position of the metering circle depends on the setting for [Spot Metering Point].
 Entire Screen Avg.:
- Measures the average brightness of the entire screen. The exposure will be stable even if the composition or the position of the subject changes.
 Highlight:
- Measures the brightness while emphasizing the highlighted area on the screen. This mode is suitable for shooting the subject while avoiding overexposure.
Hint
- The spot metering point can be coordinated with the focus area by using [Focus Point Link].
- When [Multi] is selected and [Face Priority in Multi Metering] is set to [On], the camera measures brightness based on detected faces.
- When [Metering Mode] is set to [Highlight] and the [D-Range Optimizer] function is activated, the brightness and the contrast will be corrected automatically by dividing the image into small areas and analyzing the contrast of light and shadow. Make settings based on the shooting circumstances.
Note
- [Metering Mode] is locked to [Multi] in the following shooting situations:
- [Intelligent Auto]
- [Scene Selection]
- When using a zoom function other than the optical zoom
- In [Highlight] mode, the subject may be dark if a brighter part exists on the screen.
[112] Using the shooting functionsAdjusting the exposure/metering modesFace Priority in Multi Metering (still image/movie)
Sets whether the camera measures brightness based on detected faces when [Metering Mode] is set to [Multi].
- MENU → (Exposure/Color) → [Metering] → [Face Priority in Multi Metering] → desired setting.
Menu item details
- On:
- The camera measures brightness based on detected faces.
- Off:
- The camera measures brightness using the [Multi] setting, without detecting faces.
Note
-
When the shooting mode is set to [Intelligent Auto], [Face Priority in Multi Metering] is locked to [On].
-
When [Subject Recog in AF] under [Subject Recognition] is set to [On] and [Recognition Target] is set to an item other than [Human], [Face Priority in Multi Metering] does not work.
[113] Using the shooting functionsAdjusting the exposure/metering modesSpot Metering Point (still image/movie)
Sets whether to coordinate the spot metering position with the focus area when [Focus Area] is set to the following parameters:
- [Spot: XL]/[Spot: L]/[Spot: M]/[Spot: S]
- [Expand Spot]
- [Custom 1] – [Custom 3]
- [Tracking: Spot XL]/[Tracking: Spot L]/[Tracking: Spot M]/[Tracking: Spot S]
- [Tracking: Expand Spot]
- [Tracking: Custom 1] – [Tracking: Custom 3]
- MENU → (Exposure/Color) → [Metering] → [Spot Metering Point] → desired setting.
Menu item details
- Center:
- The spot metering position does not coordinate with the focus area, but always meters brightness at the center.
- Focus Point Link:
- The spot metering position coordinates with the focus area.
Note
- Even if the spot metering position is coordinated with the [Tracking] start position, it will not be coordinated with the tracking of the subject.
- When [Focus Area] is set to the following parameters, the spot metering position is locked to the center.
- [Wide]
- [Zone]
- [Center Fix]
- [Tracking: Wide]/[Tracking: Zone]/[Tracking: Center Fix]
[114] Using the shooting functionsAdjusting the exposure/metering modes AE lock
When the contrast between the subject and background is high, such as when shooting a backlit subject or a subject near a window, meter the light at a spot where the subject appears to have the appropriate brightness and lock the exposure before shooting. To reduce the brightness of the subject, meter the light at a spot brighter than the subject and lock the exposure of the entire screen. To make the subject brighter, meter the light at a spot darker than the subject and lock the exposure of the entire screen.
- MENU → (Setup) → [Operation Customize] → [Custom Key/Dial Set.] or [Custom Key/Dial Set.] → desired key, then assign [AEL toggle] to the key.
- Adjust the focus on the spot at which the exposure is adjusted.
- Press the button to which [AEL toggle] is assigned.The exposure is locked, and
 (AE lock) is displayed.
 - Focus on the subject again and press the shutter button.
- To cancel the exposure lock, press the button to which the [AEL toggle] function is assigned.
Hint
-
If you select the [AEL hold] function in [Custom Key/Dial Set.] or [Custom Key/Dial Set.], you can lock the exposure as long as you are holding down the button. You cannot set the [AEL hold] function to [Left Button], [Right Button] or [Down Button].
Note
-
[
 AEL hold] and [ AEL toggle] are not available when using zoom functions other than optical zoom.
[115] Using the shooting functionsAdjusting the exposure/metering modesAEL w/ Shutter
Sets whether to fix the exposure when you press the shutter button halfway down.
Select [Off] to adjust the focus and the exposure separately.
- MENU → (Exposure/Color) → [Metering] → [AEL w/ Shutter] → desired setting.
Menu item details
- Auto:
- Fixes the exposure after adjusting the focus automatically when you press the shutter button halfway down when [Focus Mode] is set to [Single-shot AF].
When [Focus Mode] is set to [Automatic AF], and the product determines that the subject is moving, or you shoot burst images, the fixed exposure is canceled.
- On:
- Fixes the exposure when you press the shutter button halfway down.
- Off:
- Does not fix the exposure when you press the shutter button halfway down. Use this mode when you want to adjust focus and exposure separately.
The product keeps adjusting the exposure while shooting in [Cont. Shooting] mode.
Note
-
When [AEL toggle] is assigned to any key using [Custom Key/Dial Set.] or [Custom Key/Dial Set.], operation using the key will be given priority over the [AEL toggle] settings.
[116] Using the shooting functionsAdjusting the exposure/metering modesAuto Slow Shutter
Sets whether or not to adjust the shutter speed automatically when recording movies if the subject is dark. This function cannot be used during slow-motion/quick-motion recording.
- MENU → (Exposure/Color) → [Exposure] → [Auto Slow Shutter] → desired setting.
Menu item details
- On:
- Uses Auto Slow Shutter. The shutter speed automatically slows when recording in dark locations. You can reduce noise in the movie by using a slow shutter speed when recording in dark locations.
- Off:
- Does not use Auto Slow Shutter. The recorded movie will be darker than when [On] is selected, but you can record movies with smoother motion and less object blur.
Note
-
[Auto Slow Shutter] does not function in the following situations:
-
 (Shutter Priority)
-
 (Manual Exposure)
- When [ISO] is set to other than [ISO AUTO]
-
[117] Using the shooting functionsAdjusting the exposure/metering modesZebra Display
Sets a zebra pattern, which appears over part of an image if the brightness level of that part meets the IRE level that you have set. Use this zebra pattern as a guide to adjust the brightness.
- MENU → (Exposure/Color) → [Zebra Display] → Select a menu item and set the desired parameter.
Menu item details
- Zebra Display:
- Sets whether to display the zebra pattern. ([Off] / [On])
- Zebra Level:
- Adjusts the brightness level of the zebra pattern. ([70] / [75] / [80] / [85] / [90]/ [95] / [100] / [100+])
Hint
- You can register values to check the correct exposure or overexposure as well as the brightness level for [Zebra Level]. The settings for correct exposure confirmation and overexposure confirmation are registered to [Custom 1] and [Custom 2] respectively in the default settings.
- To check the correct exposure, set a standard value and the range for the brightness level. The zebra pattern will appear on areas that fall within the range you set.
- To check the overexposure, set a minimum value for the brightness level. The zebra pattern will appear over areas with a brightness level equal to or higher than the value you set.
Note
- The zebra pattern is not displayed on devices connected via HDMI.
[118] Using the shooting functionsSelecting the ISO sensitivity ISO (still image/movie)
Sensitivity to light is expressed by the ISO number (recommended exposure index). The larger the number, the higher the sensitivity.
- ISO on the control wheel → select desired setting.
- You can also select MENU → (Exposure/Color) → [Exposure] → [ISO].
- You can change the value by 1/3 EV steps by turning the control wheel. You can change the value by 1 EV steps by turning the control dial.
- You can also select MENU →
Menu item details
- ISO AUTO:
- Sets the ISO sensitivity automatically.
- ISO 50 – ISO 102400:
- Sets the ISO sensitivity manually. Selecting a larger number increases the ISO sensitivity.
Hint
- You can change the range of ISO sensitivity that is set automatically in [ISO AUTO] mode. Select [ISO AUTO] and press the right side of the control wheel, and set the desired values for [ISO AUTO Maximum] and [ISO AUTO Minimum].
- The higher the ISO value, the more noise will appear in images.
- The available ISO settings will differ depending on whether you are shooting still images, shooting movies, or shooting slow-motion/quick-motion movies.
-
When shooting movies, ISO values between 100 and 32000* are available. If the ISO value is set to a value larger than 32000*, the setting is automatically switched to 32000*. When you finish recording the movie, the ISO value returns to the original setting.
*When [
SteadyShot] is set to [Active], the maximum value is ISO 6400. -
When shooting movies, ISO values between 100 and 32000* are available. If the ISO value is set to a value smaller than 100, the setting is automatically switched to 100. When you finish recording the movie, the ISO value returns to the original setting.
*When [
SteadyShot] is set to [Active], the maximum value is ISO 6400. -
The available range for ISO sensitivity varies depending on the setting for [Gamma] under [Picture Profile].
Note
- [ISO] is set to [ISO AUTO] in the following shooting modes:
- [Intelligent Auto]
- [Scene Selection]
- When the ISO sensitivity is set to a value lower than ISO 100, the range for recordable subject brightness (dynamic range) may decrease.
- When you select [ISO AUTO] with the shooting mode set to [P], [A], [S] or [M], the ISO sensitivity will be automatically adjusted within the set range.
- If you point the camera at an extremely strong light source while shooting images with a low ISO sensitivity, highlighted areas in the images may be recorded as black areas.
[119] Using the shooting functionsSelecting the ISO sensitivityISO Range Limit (still image/movie)
You can limit the range of ISO sensitivity when the ISO sensitivity is set manually.
- MENU → (Exposure/Color) → [Exposure] → [ISO Range Limit] → [Minimum] or [Maximum], and select the desired values.
To set the range for [ISO AUTO]
If you want to adjust the range of ISO sensitivity that is automatically set in the [ISO AUTO] mode, select MENU → (Exposure/Color) → [Exposure] → [ISO] → [ISO AUTO], and then press the right side of the control wheel to select [ISO AUTO Maximum]/[ISO AUTO Minimum].
Note
- ISO sensitivity values beyond the specified range become unavailable. To select ISO sensitivity values beyond the specified range, reset [ISO Range Limit].
[120] Using the shooting functionsSelecting the ISO sensitivityISO AUTO Min. SS
If you select [ISO AUTO] when the shooting mode is P (Program Auto) or A (Aperture Priority), you can set the shutter speed at which the ISO sensitivity starts changing.
This function is effective for shooting moving subjects. You can minimize subject blurring while also preventing camera shake.
- MENU → (Exposure/Color) → [Exposure] → [ISO AUTO Min. SS] → desired setting.
Menu item details
- SLOWER (Slower)/SLOW (Slow):
- The ISO sensitivity will start to change at shutter speeds slower than [Standard], so you can shoot images with less noise.
- STD (Standard):
- The camera automatically sets the shutter speed based on the focal length of the lens.
- FAST (Fast)/FASTER (Faster):
- The ISO sensitivity will start to change at shutter speeds faster than [Standard], so you can prevent camera shake and subject blurring.
- 1/8000 ― 30":
- The ISO sensitivity starts to change at the shutter speed you have set.
Hint
- The difference in shutter speed at which ISO sensitivity starts to change between [Slower], [Slow], [Standard], [Fast], and [Faster] is 1 EV.
Note
- If the exposure is insufficient even when the ISO sensitivity is set to [ISO AUTO Maximum] in [ISO AUTO], in order to shoot with an appropriate exposure, the shutter speed will be slower than the speed set in [ISO AUTO Min. SS].
-
In the following situations, the shutter speed may not function as set:
- When using the flash to shoot bright scenes. (The maximum shutter speed is limited to the flash-syncing speed of 1/30 second.)
- When using the flash to shoot dark scenes with the [Flash Mode] set to [Fill-flash]. (The minimum shutter speed is limited to the speed automatically determined by the camera.)
[121] Using the shooting functionsWhite balanceWhite Balance (still image/movie)
Corrects the tone effect of the ambient light condition to record a neutral white subject in white. Use this function when the color tones of the image did not come out as you expected, or when you want to change the color tones on purpose for photographic expression.
- MENU → (Exposure/Color) → [White Balance] → [White Balance] → desired setting.
Menu item details
-
 Auto /
  Auto: Ambience /
  Auto: White
/
Auto: White
/ Daylight
/
Daylight
/ Shade
/
Shade
/ Cloudy/
 Incandescent
/
Incandescent
/ Fluor.: Warm White
/
Fluor.: Warm White
/ Fluor.: Cool White/
 Fluor.: Day White/
 Fluor.: Daylight
/
Fluor.: Daylight
/ Flash (only when shooting still images)
/
Flash (only when shooting still images)
/ Underwater Auto
:
Underwater Auto
: - When you select a light source that illuminates the subject, the product adjusts the color tones to suit to the selected light source (preset white balance). When you select [Auto], the product automatically detects the light source and adjusts the color tones.
 C.Temp./Filter:
- Adjusts the color tones depending on the light source. Achieves the effect of CC (Color Compensation) filters for photography.
 Custom 1/Custom 2/Custom 3:
- Memorizes the basic white color under the light conditions for the shooting environment.
Hint
- You can display the fine adjustment screen and perform fine adjustments of the color tones as required by pressing the right side of the control wheel. When [C.Temp./Filter] is selected, you can change the color temperature by turning the control dial instead of pressing the right side of the control wheel.
- If the color tones do not come out as you expected in the selected settings, perform [WB bracket] shooting.
-
(Auto: Ambience), (Auto: White) is displayed only when [Priority Set in AWB] is set to [Ambience] or [White].
- If you want to moderate abrupt white balance switching, such as when the recording environment switches during movie recording, you can change the white balance switching speed with the [Shockless WB] function.
Note
- [White Balance] is fixed to [Auto] in the following shooting modes:
- [Intelligent Auto]
- [Scene Selection]
- When [Cinematic Vlog Set.] is set to [On]
- If you use a mercury lamp or a sodium lamp as a light source, the accurate white balance will not be obtained because of the characteristics of the light. It is recommended to shoot images using a flash or select [Custom 1] to [Custom 3].
[122] Using the shooting functionsWhite balanceCapturing a standard white color to set the white balance (custom white balance)
In a scene where the ambient light consists of multiple types of light sources, it is recommended to use the custom white balance in order to accurately reproduce the whiteness. You can register 3 settings.
- MENU → (Exposure/Color) → [White Balance] → [White Balance] → Select from among [Custom 1] to [Custom 3], and then press the right side of the control wheel.
- Select
 (custom white balance set), and then press the center of the control wheel.
 - Hold the product so that the white area fully covers the white-balance capture frame, and then press the center of the control wheel.After the shutter sound is heard and the message [Captured the custom WB data.] is displayed, the calibrated values (Color Temperature and Color Filter) are displayed.
- You can adjust the position of the white-balance capture frame by pressing the top/bottom/left/right side of the control wheel.
- You can change the size of the white-balance capture frame by pressing the Fn (function) button.
- After capturing a standard white color, you can display the fine adjustment screen by pressing the right side of the control wheel. You can finely adjust the color tones as needed.
- You can bring the white-balance capture frame back to the center by pressing the (Delete) button.
- No shutter sound is produced in the following cases.
- In the movie recording mode
- When [Silent Mode] is set to [On]
- Press the center of the control wheel.The calibrated values will be registered. The monitor returns to the MENU display while retaining the memorized custom white balance setting.
- The registered custom white balance setting will remain memorized until overwritten by the another setting.
Hint
- You can also set the size of the white-balance capture frame in [WB Capt. Frame Size].
Note
- The message [Capturing of the custom WB failed.] indicates that the value is in the unexpected range, for example when the subject is too vivid. You can register the setting at this point, but it is recommended that you set the white balance again.
When an error value is set, the indicator (custom white balance) turns orange on the recording information display. The indicator will be displayed in white when the set value is in the expected range.
- If you use a flash when capturing a basic white color, the custom white balance will be registered with the lighting from the flash. Be sure to use a flash whenever you shoot with recalled settings that were registered with a flash.
[123] Using the shooting functionsWhite balanceWB Capt. Frame Size (still image/movie)
You can change the size of the white-balance capture frame used when setting the custom white balance.
- MENU → (Exposure/Color) → [White Balance] → [WB Capt. Frame Size] → desired setting.
Menu item details
- Large/Medium/Small
Hint
- You can also change the size of the capture frame by pressing the Fn (function) button on the setting screen for the custom white balance under [White Balance].
[124] Using the shooting functionsWhite balance Priority Set in AWB (still image/movie)
Selects which tone to prioritize when shooting under lighting conditions such as incandescent light when [White Balance] is set to [Auto].
- MENU → (Exposure/Color) → [White Balance] → [Priority Set in AWB] → desired setting.
Menu item details
-
 Standard:
 - Shoots with standard auto white balance. The camera automatically adjusts the color tones.
-
 Ambience:
 - Prioritizes the color tone of the light source. This is suitable when you want to produce a warm atmosphere.
-
 White:
 - Prioritizes a reproduction of white color when the color temperature of the light source is low.
[125] Using the shooting functionsWhite balanceShutter AWB Lock
You can set whether or not to lock the white balance while the shutter button is pressed when [White Balance] is set to [Auto] or [Underwater Auto].
This function prevents unintentional changes to the white balance during continuous shooting or when shooting with the shutter button pressed halfway down.
- MENU → (Exposure/Color) → [White Balance] → [Shutter AWB Lock] → desired setting.
Menu item details
- Shutter Half Press:
- Locks the white balance while the shutter button is pressed halfway down, even in the auto white balance mode. The white balance is also locked during continuous shooting.
- Cont. Shooting:
- Locks the white balance to the setting in the first shot during continuous shooting, even in the auto white balance mode.
- Off:
- Operates with the normal auto white balance.
About [AWB Lock Hold] and [AWB Lock Toggle]
You can also lock the white balance in the auto white balance mode by assigning [AWB Lock Hold] or [AWB Lock Toggle] to the custom key. If you press the assigned key during shooting, the white balance will be locked.
The [AWB Lock Hold] function locks the white balance by stopping the automatic white balance adjustment while the button is pressed.
The [AWB Lock Toggle] function locks the white balance by stopping the automatic white balance adjustment after the button is pressed once. When you press the button again, the AWB lock is released.
- If you want to lock the white balance while recording a movie in the auto white-balance mode, also assign [AWB Lock Hold] or [AWB Lock Toggle] to the custom key.
Hint
- When you shoot with the flash while the automatic white balance is locked, the resulting color tones may be unnatural because the white balance was locked before the flash was emitted. In this case, set [Shutter AWB Lock] to [Off] or [Cont. Shooting], and do not use the [AWB Lock Hold] function or [AWB Lock Toggle] function when shooting. Alternatively, set [White Balance] to [Flash].
[126] Using the shooting functionsWhite balanceShockless WB
Sets the speed at which the white balance switches during movie recording, such as when the setting for [White Balance] or [Priority Set in AWB] is changed.
- MENU → (Exposure/Color) → [White Balance] → [Shockless WB] → desired setting.
Menu item details
- Off:
- The white balance will switch immediately if you change the white balance setting during movie recording.
- 1 (Fast)/2/3 (Slow):
- You can select the speed at which the white balance switches during movie shooting in order to make the white balance of the movie change more smoothly.
The speed settings in the order of fastest to slowest are [1 (Fast)], [2], and [3 (Slow)].
Note
- This function does not affect the speed at which the white balance changes when [White Balance] is set to [Auto] or [Underwater Auto].
- Even if a setting other than [Off] is selected, the following will be immediately applied to the movie regardless of the speed setting.
- Fine adjustments to the color tones
- Changes to the color temperature using [C.Temp./Filter]
[127] Using the shooting functionsLog shooting settingsLog shooting
Log shooting has a wider dynamic range than normal movie recording, which makes color grading more flexible, bringing advantages in terms of picture effects and exposure adjustment for editing.
For details on Log shooting, refer to the following website.
https://helpguide.sony.net/di/pp/v1/en/index.html[128] Using the shooting functionsLog shooting settingsLog Shooting Setting
Configures the settings for Log shooting.
- MENU →(Shooting) → [Image Quality/Rec] → [Log Shooting Setting] → desired setting.
Menu item details
- Log Shooting:
- Sets whether to perform Log shooting. With [On (Flexible ISO)], you can record S-Log material with the exposure set by adjusting the ISO according to the shooting scene. (Off/On (Flexible ISO))
- Color Gamut:
- Sets the color gamut. (
 /
/  )
) - Embed LUT File:
- Sets whether to embed LUT files in recorded data. (On / Off)
Note
- [Embed LUT File] is locked to [Off] when using SD cards or SDHC cards.
- When [Log Shooting] is set to [On (Flexible ISO)], this may cause an error in the white balance custom setup. In such a case, temporarily set [Log Shooting] to [Off], perform the custom setup, and then reset [Log Shooting] to [On (Flexible ISO)].
[129] Using the shooting functionsLog shooting settingsSelect LUT
Selects which LUT to apply to movies. You can choose the LUT from among three presets and 16 LUTs that you can register.
- MENU →(Exposure/Color) → [Color/Tone] → [Select LUT] → desired setting.
Menu item details
- S-Log3:
- Emphasizes the expression of gradations from shadow to mid-tone. The tone of the images is similar to the characteristics of images that have been scanned from film for shooting.
- s709:
- Selects the s709 LUT for color tones similar to the film color preferred in movie and drama productions.
- 709(800%):
- Selects the R709 LUT for contrast in color tones with true-to-life color reproduction.
- User1–User16:
- Selects registered LUTs. LUTs can be edited and registered by selecting User1–User16, and pressing the right side of the control wheel to open the setting detail screen.
[130] Using the shooting functionsLog shooting settingsManage User LUTs
You can register LUTs as User1–User16 on the camera. Also, you can change the settings for the registered LUT files.
Registering a LUT
-
Save the LUT file you want to register on a memory card.
-
Save the file to the following path.
/Private/Sony/PRO/LUT
- File format: CUBE file (.cube) for a 17-point or 33-point
- File name: 63 alphanumeric characters (single-byte code) or less including “.cube”
-
-
MENU →
(Exposure/Color) → [Color/Tone] → [Manage User LUTs] → [Import/Edit]. -
Select the user LUT area (User1–User16) in which to register the data.
-
Select the memory card on which the LUT file is stored.
-
Select the file you want to register and select [OK].
Editing a LUT
The following edits can be made to a user LUT area.
Input: Selects either [] or [].
AE Level Offset: Sets the compensation value for the AE tracking level when using this LUT. (0EV, 1/3EV, 2/3EV, 1EV, 4/3EV, 5/3EV, 2EV).
Import: Registers a LUT file to the selected User number.
Delete: Deletes the LUT file registered to the selected User number.
To delete LUTs in bulk
- MENU → (Exposure/Color) → [Color/Tone] → [Manage User LUTs] → [Delete All].
- All of the LUTs registered to User1–User16 are deleted.
Note
- When using SD cards or SDHC cards, filenames for registering LUT files are displayed in the 8.3 format.
[131] Using the shooting functionsLog shooting settingsDisplay LUT
The monitor can display images with the LUT reflected during movie shooting and playback for a preview of the image after color grading.
- MENU → (Setup) → [Display Option] → [
 Display LUT] → desired setting.
Menu item details
- On:
- Displays images with the LUT reflected during movie shooting and playback.
- Off:
- Does not display images with the LUT reflected during movie shooting and playback.
Hint
- If you assign [Display LUT Switch] to [Custom Key/Dial Set.], you can switch [Display LUT] on and off simply by pressing a button.
[132] Using the shooting functionsAdding effects to images Creative Look (still image/movie)
“Look” is a term referring to the looks and impressions of images generated by various factors, such as color, sharpness, brightness, etc. With [Creative Look], you can choose the finish of an image by selecting a preferred look from among preinstalled looks.
In addition, you can fine-tune the contrast, highlights, shadows, fade, saturation, sharpness, sharpness range, and clarity for each “Look.”
- MENU → (Exposure/Color) → [Color/Tone] → [Creative Look].
- Select the desired “Look” or [Custom Look] using the top/bottom of the control wheel.
- To adjust
 (Contrast),
  (Highlights),
  (Shadows),
  (Fade),
  (Saturation),
  (Sharpness),
  (Sharpness Range) and
  (Clarity), move to the right using the right side of the control wheel. Select the desired item using the right/left sides, and then select the value using the top/bottom sides.
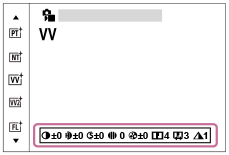
- When selecting [Custom Look], move to the right using the right side of the control wheel, and then select the desired “Look.”
- Using [Custom Look], you can recall the same “Look” presets with slightly different settings.
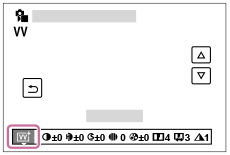
Menu item details
-
 ST (Standard):
 - Standard finish for a wide range of subjects and scenes.
-
 PT (Portrait):
 - For capturing skin in a soft tone, ideally suited for shooting portraits.
-
 NT (Neutral):
 - The saturation and sharpness are lowered for shooting images in subdued tones. This is also suitable for capturing image material to be modified with a computer.
-
 VV (Vivid):
 - The saturation and contrast are heightened for shooting striking images of colorful scenes and subjects such as flowers, spring greenery, blue sky, or ocean views.
-
 VV2 (Vivid 2):
 - Creates an image with bright and vivid colors with rich clarity.
-
 FL (Film):
 - Creates an image with moody finish by applying sharp contrast to the calm coloring as well as the impressive sky and colors of the greens.
-
 IN (Instant):
 - Creates an image with matte textures by suppressing the contrast and saturation.
-
 SH (Soft Highkey):
 - Creates an image with bright, transparent, soft, and vivid mood.
-
 BW (Black & White):
 - For shooting images in black and white monotone.
-
 SE (Sepia):
 - For shooting images in sepia monotone.
-
 Registering preferred settings (Custom Look):
-
Select the six custom look (the boxes with numbers on the left side) to register preferred settings. Then select the desired settings using the right button.
You can recall the same “Look” presets with slightly different settings.
To adjust in greater detail
Based on each “Look,” items such as contrast can be adjusted to your liking. You can adjust not only the preset “Looks,” but also each [Custom Look], a function that allows you to register your favorite settings.
Select an item to be set by pressing the right/left sides of the control wheel, then set the value using the top/bottom sides of the control wheel.
When a setting value is changed from the default value,  (star mark) is added next to the “Look” icon displayed on the shooting screen.
- Contrast:
- The higher the value selected, the more the difference of light and shadow is accentuated, and the bigger the effect on the image. (-9 to +9)
- Highlights:
- Adjusts the brightness of the bright areas. When a higher value is selected, the image becomes brighter. (-9 to +9)
- Shadows:
- Adjusts the darkness of the dark areas. When a higher value is selected, the image becomes brighter. (-9 to +9)
- Fade:
- Adjusts the degree of fade. A larger value makes the effect greater. (0 to 9)
- Saturation:
- The higher the value selected, the more vivid the color. When a lower value is selected, the color of the image is restrained and subdued. (-9 to +9)
- Sharpness:
- Adjusts the sharpness. The higher the value selected, the more the contours are accentuated, and the lower the value selected, the more the contours are softened. (0 to 9)
- Sharpness Range:
- Adjust the range where the sharpness effect is applied. A larger value makes the sharpness effect apply to finer outlines. (1 to 5)
- Clarity:
- Adjusts the degree of clarity. A larger value makes the effect greater. (0 to 9)
To reset adjusted values for each “Look”
Adjusted values such as contrast that you have changed as desired can be collectively reset for each “Look.” Press the (delete) button on the adjustment screen for the “Look” that you want to reset. All adjusted values that have been changed will return to their default values.
Hint
- For [Sharpness], [Sharpness Range], and [Clarity], take a test shot and either enlarge and play it on the camera monitor, or output it to a playback device to check the effect. Then, readjust the setting if needed.
Note
- [Creative Look] is fixed to [-] in the following situations:
-
[Picture Profile] is set to other than [Off].
- [Log Shooting] is set to [On (Flexible ISO)].
-
[
- When this function is set to [BW] or [SE], [Saturation] cannot be adjusted.
- In the movie mode, [Sharpness Range] cannot be adjusted.
[133] Using the shooting functionsAdding effects to imagesPicture Profile (still image/movie)
Allows you to change the settings for the color, gradation, etc.
For details on “Picture Profile,” refer to
https://helpguide.sony.net/di/pp/v1/en/index.html
Although [Picture Profile] can be used for both still images and movies, the function is designed mainly for movies.
Customizing the picture profile
You can customize the picture quality by adjusting picture profile items such as [Gamma] and [Detail]. When setting these parameters, connect the camera to a TV or monitor, and adjust them while observing the picture on the screen.
- MENU → (Exposure/Color) → [Color/Tone] → [Picture Profile] → the profile you want to change.
- Move to the item index screen by pressing the right side of the control wheel.
- Select the item to change using the top/bottom sides of the control wheel.
- Select the desired value using the top/bottom sides of the control wheel and press in the center.
Using the preset of the picture profile
The default settings [PP1] through [PP11] for movies have been set in advance in the camera based on various shooting conditions.MENU → (Exposure/Color) → [Color/Tone] → [Picture Profile] → desired setting.
- PP1:
- Example setting using [Movie] gamma.
- PP2:
- Example setting using [Still] gamma.
- PP3:
- Example setting of natural color tone using the [ITU709] gamma.
- PP4:
- Example setting of a color tone faithful to the ITU709 standard.
- PP5:
- Example setting using [Cine1] gamma.
- PP6:
- Example setting using [Cine2] gamma.
- PP10:
- Example setting for recording HDR movies using [HLG2] gamma.
- PP11:
- Example setting using [S-Cinetone] gamma.
- PPLUT1–PPLUT4 (only when shooting movies):
- Shoots and records movies with the user LUT applied.
To register user LUTs (PPLUT1–PPLUT4)
You can apply the LUT of your choice to the recorded images by assigning user LUTs registered using [Manage User LUTs] to PPLUT1–PPLUT4.
Setting procedure:
- Select PPLUT1–PPLUT4 on the selection screen for [Picture Profile], and then press the right side of the control wheel.
- Select [Basic Look] and press the center.
- Select a LUT to use as [Basic Look] from the listed user LUTs.
HDR movie recording
The camera can record HDR movies when a gamma from [HLG], [HLG1] to [HLG3] is selected in the picture profile. Picture profile preset [PP10] provides an example setting for HDR recording. Movies recorded using [PP10] can be viewed with a wider range of brightness than usual when played back on a TV supporting Hybrid Log-Gamma (HLG). This way, even scenes with a wide range of brightness can be recorded and displayed faithfully, without looking under or over-exposed. HLG is used in HDR TV program production, as defined in the international standard Recommendation ITU-R BT.2100.
Items of the picture profile
- Black Level
- Sets the black level. (–15 to +15)
- Gamma
- Selects a gamma curve.
- Movie: Standard gamma curve for movies
- Still: Standard gamma curve for still images
- S-Cinetone: Gamma curve designed to achieve cinematic gradations and color expressions. This setting enables shooting with softer color reproduction ideal for portrait shooting.
- Cine1: Softens the contrast in dark parts and emphasizes gradation in bright parts to produce a relaxed color movie. (equivalent to HG4609G33)
- Cine2: Similar to [Cine1] but optimized for editing with up to 100% video signal. (equivalent to HG4600G30)
- Cine3: Intensifies the contrast in light and shade more than [Cine1] and strengthens gradation in black.
- Cine4: Strengthens the contrast in dark parts more than [Cine3].
- ITU709: Gamma curve that corresponds to ITU709.
- S-Log3: Gamma curve for [S-Log3] with more similar features to film. This setting is based on the assumption that the picture will be processed after shooting.
- HLG: Gamma curve for HDR recording. Equivalent to the HDR standard Hybrid Log-Gamma, ITU-R BT.2100.
- HLG1: Gamma curve for HDR recording. Emphasizes noise reduction. However, shooting is restricted to a narrower dynamic range than with [HLG2] or [HLG3].
- HLG2: Gamma curve for HDR recording. Provides a balance of dynamic range and noise reduction.
- HLG3: Gamma curve for HDR recording. Wider dynamic range than [HLG2]. However, noise may increase.
- [HLG1], [HLG2], and [HLG3] all apply a gamma curve with the same characteristics, but each offers a different balance between dynamic range and noise reduction. Each has a different maximum video output level, as follows: [HLG1]: approx. 87%, [HLG2]: approx. 95%, [HLG3]: approx. 100%.
- Black Gamma
- Corrects gamma in low intensity areas.
- [Black Gamma] is fixed at “0” and cannot be adjusted when [Gamma] is set to [HLG], [HLG1], [HLG2], or [HLG3].
- Range: Selects the correcting range. (Wide / Middle / Narrow)
- Level: Sets the correcting level. (-7 (maximum black compression) to +7 (maximum black stretch))
- Knee
- Sets knee point and slope for video signal compression to prevent over-exposure by limiting signals in high intensity areas of the subject to the dynamic range of your camera.
When [Gamma] is set to the following, and [Mode] is set to [Auto], [Knee] is unavailable. [Knee] can be used when [Mode] is set to [Manual].- [Still]
- [Cine1]
- [Cine2]
- [Cine3]
- [Cine4]
- [S-Log3]
- [HLG]
- [HLG1]
- [HLG2]
- [HLG3]
- Mode: Selects auto/manual settings.
- Auto: The knee point and slope are set automatically.
- Manual: The knee point and slope are set manually.
- Max Point: Sets the maximum point of the knee point. (90% to 100%)
- Sensitivity: Sets the sensitivity. (High / Mid / Low)
- Point: Sets the knee point. (75% to 105%)
- Slope: Sets the knee slope. (-5 (gentle) to +5 (steep))
- Color Mode
- Sets type and level of colors.
In [Color Mode], only [BT.2020] and [709] are available when [Gamma] is set to [HLG], [HLG1], [HLG2], or [HLG3]. - Movie: Suitable colors when [Gamma] is set to [Movie].
- Still: Suitable colors when [Gamma] is set to [Still].
- S-Cinetone: Suitable colors when [Gamma] is set to [S-Cinetone].
- Cinema: Suitable colors when [Gamma] is set to [Cine1] or [Cine2].
- Pro: Similar color tones to the standard image quality of Sony professional cameras (when combined with ITU709 gamma)
- ITU709 Matrix: Colors corresponding to ITU709 standard (when combined with ITU709 gamma)
- Black & White: Sets the saturation to zero for shooting in black and white.
- S-Gamut3.Cine: Setting based on the assumption that the pictures will be processed after shooting. Used when [Gamma] is set to [S-Log3]. This setting allows you to shoot in a color space that can easily be converted for digital cinema.
- S-Gamut3: Setting based on the assumption that the pictures will be processed after shooting. Used when [Gamma] is set to [S-Log3]. This setting allows you to shoot in a wide color space.
- BT.2020: Standard color tone when [Gamma] is set to [HLG], [HLG1], [HLG2], or [HLG3].
- 709: Color tone when [Gamma] is set to [HLG], [HLG1], [HLG2], or [HLG3] and movies are recorded with HDTV color (BT.709).
- Saturation
- Sets the color saturation. (-32 to +32)
- Color Phase
- Sets the color phase. (-7 to +7)
- Color Depth
- Sets the color depth for each color phase. This function is more effective for chromatic colors and less effective for achromatic colors. The color looks deeper as you increase the setting value towards the positive side, and lighter as you decrease the value towards the negative side. This function is effective even if you set [Color Mode] to [Black & White].
- [R] -7 (light red) to +7 (deep red)
- [G] -7 (light green) to +7 (deep green)
- [B] -7 (light blue) to +7 (deep blue)
- [C] -7 (light cyan) to +7 (deep cyan)
- [M] -7 (light magenta) to +7 (deep magenta)
- [Y] -7 (light yellow) to +7 (deep yellow)
- Detail
- Sets items for [Detail].
- Level: Sets the [Detail] level. (-7 to +7)
- Adjust: The following parameters can be selected manually.
- Mode: Selects auto/manual setting. (Auto (automatic optimization) / Manual (The details are set manually.))
- V/H Balance: Sets the vertical (V) and horizontal (H) balance of DETAIL. (-2 (off to the vertical (V) side) to +2 (off to the horizontal (H) side))
- B/W Balance: Selects the balance of the lower DETAIL (B) and the upper DETAIL (W). (Type1 (off to the lower DETAIL (B) side) to Type5 (off to the upper DETAIL (W) side))
- Limit: Sets the limit level of [Detail]. (0 (Low limit level: likely to be limited) to 7 (High limit level: unlikely to be limited))
- Crispening: Sets the crispening level. (0 (shallow crispening level) to 7 (deep crispening level))
- Hi-Light Detail: Sets the [Detail] level in the high intensity areas. (0 to 4)
- To copy the settings to another picture profile number
- You can copy the settings of the picture profile to another picture profile number.
- MENU → (Exposure/Color) → [Color/Tone] → [Picture Profile] → desired setting → [Copy].
- To reset the picture profile to the default setting
- You can reset the picture profile to the default setting. You cannot reset all picture profile settings at once.
- MENU → (Exposure/Color) → [Color/Tone] → [Picture Profile] → desired setting → [Reset].
Note
- If you want to select different settings for movies and still images, add a check mark to [Picture Profile] under [Different Set for Still/Mv].
-
If you develop RAW images with shooting settings, the following settings are not reflected:
- Black Level
- Black Gamma
- Knee
- Color Depth
- If you change [Gamma], the available ISO value range changes.
- There may be more noise in dark parts depending on the gamma settings. It may improve by setting the lens compensation to [Off].
- When using the S-Log3 gamma, noise becomes more noticeable compared to when using other gammas. If the noise is still considerable even after processing the images, it may be improved by shooting with a brighter setting. However, the dynamic range becomes narrower accordingly when you shoot with a brighter setting. We recommend checking the picture in advance by test shooting when using S-Log3.
- Setting [S-Log3] may cause an error in the white balance custom setup. In this case, perform custom setup with a gamma other than [S-Log3] first, and then reselect the [S-Log3] gamma.
- Setting PPLUT1–PPLUT4 may cause an error in the white balance custom setup. In this case, first perform the custom setup with a setting other than PPLUT1–PPLUT4, and then reselect PPLUT1–PPLUT4.
- If you set [Slope] to +5 in [Manual Set] under [Knee], [Knee] will be disabled.
- S-Gamut3.Cine and S-Gamut3 are color spaces exclusive to Sony. However, this camera's S-Gamut setting does not support the whole S-Gamut color space; it is a setting to achieve a color reproduction equivalent to S-Gamut.
-
[Picture Profile] is fixed to [Off] in the following situation:
- [Log Shooting] is set to [On (Flexible ISO)]
[134] Using the shooting functionsAdding effects to imagesSoft Skin Effect (still image/movie)
Sets the effect used for shooting the skin smoothly when a face is recognized.
- MENU → (Exposure/Color) → [Color/Tone] → [Soft Skin Effect] → desired setting.
Menu item details
- Off:
- Does not use the [Soft Skin Effect] function.
- On:
- Uses the [Soft Skin Effect]. You can set the effect level by pressing the right/left side of the control wheel. ([On: High]/[On: Mid]/[On: Low])
Note
-
[Soft Skin Effect] is not available when [File Format] is set to [RAW].
-
[Soft Skin Effect] is not available for RAW images when [File Format] is set to [RAW & JPEG]/[RAW & HEIF].
-
[Soft Skin Effect] is not available when you use the digital zoom function in the still image shooting mode.
[135] Using the shooting functionsShooting with drive modes (continuous shooting/self-timer) Drive Mode
Select the appropriate mode for the subject, such as single shooting, continuous shooting or bracketing shooting.
- Select/ (Drive Mode) on the control wheel → desired setting.
-
You can also set the drive mode by selecting MENU → (Shooting) → [Drive Mode] → [Drive Mode].
-
You can also set the drive mode by selecting MENU →
- Select the desired mode using the right/left side of the control wheel.
Menu item details
-
 Single Shooting:
 - Shoots one image when you press the shutter button.
-
Cont. Shooting:
- Shoots images continuously while you press and hold down the shutter button.
-
Self-timer(Single)
:
- Shoots an image after a designated number of seconds have elapsed since the shutter button was pressed.
-
 Self-timer(Cont):
 - Shoots a designated number of images after a designated number of seconds have elapsed since the shutter button was pressed.
-
 Cont. Bracket:
 - Shoots images while holding the shutter button down, each with different degrees of exposure.
-
 Single Bracket:
 - Shoots a specified number of images, one by one, each with a different degrees of exposure.
 Focus Bracket:
- Shoots multiple images while shifting the focus position.
-
 WB bracket:
 - Shoots a total of three images, each with different color tones according to the selected settings for white balance, color temperature and color filter.
-
 DRO Bracket:
 - Shoots a total of three images, each at a different degree of D-Range Optimizer.
Note
- When the shooting mode is set to [Scene Selection] and [Sports Action] is selected, [Single Shooting] cannot be performed.
[136] Using the shooting functionsShooting with drive modes (continuous shooting/self-timer) Cont. Shooting
Shoots images continuously while you press and hold down the shutter button.
- Select/ (Drive Mode) of the control wheel → [Cont. Shooting].
-
You can also set the continuous shooting by selecting MENU → (Shooting) → [Drive Mode] → [Drive Mode].
-
You can also set the continuous shooting by selecting MENU →
- Select the desired mode using the right/left side of the control wheel.
Menu item details
-
 Continuous Shooting: Hi+ /
 Continuous Shooting: Hi /
 Continuous Shooting: Mid/
 Continuous Shooting: Lo
Number of still images recordable with continuous shooting
The following table shows estimated numbers of recordable still images with [Drive Mode] set to [Continuous Shooting: Hi+]. The numbers may vary depending on the shooting conditions and the memory card.
Image Size:[L: 26M]
| File Format |
Number of images when JPEG is selected | Number of images when HEIF is selected |
|---|---|---|
| JPEG/HEIF (Fine) | Approx. 1 000 images or more | Approx. 1 000 images or more |
| RAW (Compressed RAW) | Approx. 59 images | Approx. 59 images |
| RAW & JPEG/RAW & HEIF (Compressed RAW)* | Approx. 44 images | Approx. 48 images |
| RAW (Lossless compression RAW) | Approx. 22 images | Approx. 22 images |
| RAW & JPEG/RAW & HEIF (Lossless compression RAW)* | Approx. 17 images | Approx. 18 images |
* When [JPEG Quality]/[HEIF Quality] is set to [Fine].
Hint
- To continuously adjust the focus and exposure during continuous shooting, set as follows:
-
[Focus Mode]: [Continuous AF]
- [AEL w/ Shutter]: [Off] or [Auto]
-
[
Note
- When the F-value is greater than F22 in [Continuous Shooting: Hi+], [Continuous Shooting: Hi] or [Continuous Shooting: Mid] mode, the focus is locked to the setting in the first shot.
- The subject is not displayed in real time on the monitor during continuous shooting in the [Continuous Shooting: Hi+] mode.
-
Continuous shooting is unavailable in the following situations:
- The shooting mode is set to [Scene Selection] and a scene other than [Sports Action] is selected.
- The speed of continuous shooting decreases when you shoot with a flash.
[137] Using the shooting functionsShooting with drive modes (continuous shooting/self-timer)Selection/Memo Shot
When performing continuous shooting or interval shooting, you can automatically set a rating (ranking) for the first shot or automatically insert a divider frame before the first shot.
- MENU → (Shooting) → [Shooting Option] → [Selection/Memo Shot] → desired setting item.
Menu item details
- Top Image:
- Sets whether to automatically set a rating for the first shot or whether to insert a divider frame before the first shot in continuous shooting. ([Off]/[Divider Frame (
 )]/[Rating (
 )] – [Rating (
 )])
)])
[138] Using the shooting functionsShooting with drive modes (continuous shooting/self-timer) Self-timer(Single)
Shoots an image using the self-timer after a designated number of seconds have elapsed since the shutter button was pressed. Use the 5-second/10-second self-timer when you are going to be in the picture, and use the 2-second self-timer to reduce camera-shake caused by pressing the shutter button.
- Press/ (Drive Mode) of the control wheel → [Self-timer(Single)].
-
You can also set the drive mode by selecting MENU → (Shooting) → [Drive Mode] → [Drive Mode].
-
You can also set the drive mode by selecting MENU →
- Select the desired mode using the right/left side of the control wheel.
- Adjust the focus and shoot the image.The self-timer lamp flashes, a beep sounds, and a picture is taken after the designated number of seconds have elapsed.
Menu item details
The mode determines the number of seconds until a picture is taken after the shutter button is pressed.
-
 Self-timer(Single): 10 sec
  Self-timer(Single): 5 sec
  Self-timer(Single): 2 sec
Hint
-
Press the shutter button again or press / (Drive Mode) on the control wheel to stop the count of the self-timer.
-
Press / (Drive Mode) on the control wheel and select (Single Shooting) to cancel the self-timer.
- Set [Audio Signal(Shooting)] to [Off] to turn off the beeping sound during the self-timer countdown.
-
To use the self-timer in the bracket mode, set the drive mode to bracket, then select MENU → (Shooting) → [Drive Mode] → [Bracket Settings] → [Selftimer during Bracket].
Note
- The self-timer is unavailable in the following situations:
- [Sports Action] under [Scene Selection]
[139] Using the shooting functionsShooting with drive modes (continuous shooting/self-timer) Self-timer(Cont)
Shoots a designated number of images using the self-timer after a designated number of seconds have elapsed since the shutter button was pressed. You can choose the best from multiple shots.
- Press/ (Drive Mode) of the control wheel → [Self-timer(Cont)].
-
You can also set the drive mode by selecting MENU → (Shooting) → [Drive Mode] → [Drive Mode].
-
You can also set the drive mode by selecting MENU →
- Select the desired mode using the right/left side of the control wheel.
- Adjust the focus and shoot the image.
The self-timer lamp flashes, a beep sounds, and pictures are taken after the designated number of seconds has elapsed. The designated number of pictures are taken continuously.
Menu item details
For example, three images are shot when 10 seconds have elapsed after the shutter button is pressed when [Self-timer(Cont.): 10 Sec. 3 Img.] is selected.
 Self-timer(Cont.): 10 Sec. 3 Img.
 Self-timer(Cont.): 10 Sec. 5 Img.
 Self-timer(Cont.): 5 Sec. 3 Img.
 Self-timer(Cont.): 5 Sec. 5 Img.
 Self-timer(Cont.): 2 Sec. 3 Img.
 Self-timer(Cont.): 2 Sec. 5 Img.
Hint
- Press the shutter button again or press / (Drive Mode) on the control wheel to stop the count of the self-timer.
- Press / (Drive Mode) on the control wheel and select (Single Shooting) to cancel the self-timer.
[140] Using the shooting functionsShooting with drive modes (continuous shooting/self-timer) Cont. Bracket
Shoots multiple images while automatically shifting the exposure from base to darker and then to lighter. You can select an image that suits your purpose after recording.
- Press/ (Drive Mode) of the control wheel → [Cont. Bracket].
-
You can also set the drive mode by selecting MENU → (Shooting) → [Drive Mode] → [Drive Mode].
-
You can also set the drive mode by selecting MENU →
- Select the desired mode using the right/left side of the control wheel.
- Adjust the focus and shoot the image.
- Keep pressing and holding the shutter button until bracket shooting is finished.
Menu item details
For example, the camera shoots a total of three images continuously with an exposure value shifted by plus or minus 0.3 EV when [Cont. Bracket: 0.3EV 3 Image] is selected.
Hint
- The last shot is shown on the auto review.
Note
- When [ISO AUTO] is selected in [Manual Exposure] mode, the exposure is changed by adjusting the ISO value. If a setting other than [ISO AUTO] is selected, the exposure is changed by adjusting the shutter speed.
- When the exposure is compensated, the exposure is shifted based on the compensated value.
- Bracket shooting is unavailable in the following shooting modes:
- [Intelligent Auto]
- [Scene Selection]
- When [Picture Profile] is set to other than [Off]
- When the flash is used, the product performs flash bracket shooting, which shifts the amount of flash light even if [Cont. Bracket] is selected. Press the shutter button for each image.
[141] Using the shooting functionsShooting with drive modes (continuous shooting/self-timer) Single Bracket
Shoots multiple images while automatically shifting the exposure from base to darker and then to lighter. You can select the image that suits your purpose after recording.
Since a single picture is taken each time you press the shutter button, you can adjust the focus or the composition for each shot.
- Select/ (Drive Mode) of the control wheel → [Single Bracket].
-
You can also set the drive mode by selecting MENU → (Shooting) → [Drive Mode] → [Drive Mode].
-
You can also set the drive mode by selecting MENU →
- Select the desired mode using the right/left side of the control wheel.
- Adjust the focus and shoot the image.
- Press the shutter button for each image.
Menu item details
For example, when [Single Bracket: 0.3EV 3 Image] is selected, three images are shot one at a time with the exposure value shifted up and down in increments of 0.3 EV.
Note
- When [ISO AUTO] is selected in [Manual Exposure] mode, the exposure is changed by adjusting the ISO value. If a setting other than [ISO AUTO] is selected, the exposure is changed by adjusting the shutter speed.
- When the exposure is compensated, the exposure is shifted based on the compensated value.
- Bracket shooting is unavailable in the following shooting modes:
- [Intelligent Auto]
- [Scene Selection]
- When [Picture Profile] is set to other than [Off]
[142] Using the shooting functionsShooting with drive modes (continuous shooting/self-timer)Indicator during bracket shooting
On the [Display All Info.] or [Histogram] screen, you can use the bracket indicator to confirm the bracket shooting settings.
-
Ambient light* bracketing
3 images shifted by 0.3 EV steps
Exposure compensation ±0.0 EV -
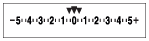
- Flash bracketing
3 images shifted by 0.7 EV steps
Flash compensation -1.0 EV -

*Ambient light: A generic term for non-flash light including natural light, electric bulb and fluorescent lighting. Whereas the flash light blinks for a moment, ambient light is constant, so this kind of light is called "ambient light."
Hint
- During bracket shooting, guides equal to the number of images to be shot are displayed over/under the bracket indicator.
- When you start single bracket shooting, the guides will disappear one by one as the camera records images.
[143] Using the shooting functionsShooting with drive modes (continuous shooting/self-timer)Focus Bracket
Performs continuous shooting automatically while shifting the focus position. This function can be used to shoot images for depth-of-field composite images that are in focus at all points (focus stacking), or to select the optimum focus position from among multiple images.
- Select/ (Drive Mode) on the control wheel → [Focus Bracket].
-
You can also set the focus bracket by selecting MENU → (Shooting) → [Drive Mode] → [Drive Mode].
-
You can also set the focus bracket by selecting MENU →
- Press the right side of the control wheel and set [Step Width] and [Number of Shots].
- Step Width: Selects the degree to which the focus is shifted within the range of 1 to 10. The higher the number, the more the focus will shift.
- Number of Shots: Sets the number of shots taken with one release within the range of 2 to 299 for each position.
- Point the cursor at the ones place of the number of shots and press the right side of the control wheel to open [Focus Bracket Settings]. Then select [Focus Bracket Order].
- [0→+]: Shifts the focus from the current focus position toward infinity. When the focus reaches infinity, shooting ends even if the set number of shots has not been reached.
- [0→-→+]: Takes three images in the order of the current focus position, front focus, and rear focus. At this time, the number of shots set in Step 2 becomes invalid.
- You can also set [Focus Bracket Order] from [Drive Mode] → [Bracket Settings] → [Focus Bracket Settings] → [Focus Bracket Order].
- Press down the shutter button to shoot.
Hint
- The [Step Width] value is a relative value, and the focus interval varies depending on shooting conditions such as the aperture of the lens and the initial focus position. It is recommended that you take a test shot to find the appropriate focus width.
- [Shooting Interval], [Exposure Smoothing], and [Focus Brckt Saving Dest] for the focus bracket can be set from [Bracket Settings].
Note
- If the camera or lens moves while shooting with the focus bracket, focus stacking may not be successful. Use a tripod when shooting for focus stacking.
[144] Using the shooting functionsShooting with drive modes (continuous shooting/self-timer) WB bracket
Shoots a total of three images, each with different color tones according to the selected settings for white balance, color temperature and color filter.
- Select/ (Drive Mode) of the control wheel → [WB bracket].
-
You can also set the drive mode by selecting MENU → (Shooting) → [Drive Mode] → [Drive Mode].
-
You can also set the drive mode by selecting MENU →
- Select the desired mode using the right/left side of the control wheel.
- Adjust the focus and shoot the image.
Menu item details
 White Balance Bracket: Lo:
- Records a series of three images with small changes in the white balance (within the range of 10MK-1*).
 White Balance Bracket: Hi:
- Records a series of three images with large changes in the white balance (within the range of 20MK-1*).
* MK-1 is the unit that indicates the capability of color temperature conversion filters and indicates the same value as "mired."
Hint
- The last shot is shown on the auto review.
[145] Using the shooting functionsShooting with drive modes (continuous shooting/self-timer) DRO Bracket
You can record a total of three images, each at a different degree of D-Range Optimizer value.
- Select/ (Drive Mode) of the control wheel → [DRO Bracket].
-
You can also set the drive mode by selecting MENU → (Shooting) → [Drive Mode] → [Drive Mode].
-
You can also set the drive mode by selecting MENU →
- Select the desired mode using the right/left side of the control wheel.
- Adjust the focus and shoot the image.
Menu item details
 DRO Bracket: Lo:
- Records a series of three images with small changes in the D-Range Optimizer value (Lv 1, Lv 2, and Lv 3).
 DRO Bracket: Hi:
- Records a series of three images with large changes in the D-Range Optimizer value (Lv 1, Lv 3, and Lv 5).
Hint
- The last shot is shown on the auto review.
[146] Using the shooting functionsShooting with drive modes (continuous shooting/self-timer)Bracket Settings
Sets self-timer shooting, the shooting order for the exposure bracket / white balance bracket, and the shooting method for the focus bracket in the bracket shooting mode.
- MENU → (Shooting) → [Drive Mode] → [Bracket Settings] → desired setting.
Menu item details
- Selftimer during Bracket:
- Sets whether to use the self-timer during bracket shooting. Also sets the number of seconds until the shutter is released if using the self-timer.
(Off/2 Sec/5 Sec/10 Sec) - Bracket order:
- Sets the order of exposure bracketing and white balance bracketing.
(0→-→+/-→0→+)
- Focus Bracket Order:
- Sets the shooting order for the focus bracket. ([0→+]/[0→-→+])
- Exposure Smoothing:
- Sets whether to automatically adjust the exposure while shooting with the focus bracket. ([On]/[Off])
- Shooting Interval:
- Sets the shooting interval when shooting with the focus bracket. ([Shortest]/[1 Sec]/[2 Sec]/[3 Sec]/[5 Sec]/[10 Sec]/[15 sec]/[30 Sec])
- Focus Brckt Saving Dest:
- Sets the save destination folder for still images taken with the focus bracket. ([Current Folder]/[New Folder])
Note
- When [0→-→+] is selected for [Focus Bracket Order], the number of shots taken with the focus bracket is fixed at three.
[147] Using the shooting functionsSelf-timer (movie)
You can start shooting with the self-timer when recording a movie.
- Press/(Drive Mode) of the control wheel.
The [Self-timer] setting screen will be displayed.
- You can also set the drive mode by selecting MENU → (Shooting) → [Shooting Option] → [Self-timer].
- You can also set the drive mode by selecting MENU →
- Select [On] using the control wheel and set the desired countdown time.
-
Rec Start delay: Sets the count time until the start of movie recording. (3 s/5 s/10 s)
-
Repetition: Sets whether to repeat the movie self-timer. (Repeat/Only Once)
If you select [Repeat], the movie self-timer will be activated repeatedly even after movie recording is completed. If you select [Only Once], the movie self-timer will be canceled after movie recording is completed, and the camera will return to the normal movie recording standby mode.
-
- Adjust the focus and press the MOVIE (movie) button.When the countdown appears on the recording standby screen, the self-timer lamp flashes, a beep sounds, and recording starts after the designated number of seconds has elapsed.
- Press the MOVIE button again to end recording.
Menu item details
- On:
- Uses the movie self-timer function.
- Off:
- Does not use the movie self-timer function.
Hint
- To stop the self-timer countdown, press the MOVIE button again or press the button to which the [Self-timer] function is assigned.
Note
- If you press the MOVIE button in the still image shooting mode to start movie recording, [Self-timer] will not work.
[148] Using the shooting functionsInterval Shoot Func.
You can automatically shoot a series of still images with the shooting interval and number of shots that you set in advance (Interval shooting). You can then create a time-lapse movie from the still images produced by interval shooting using the computer software Imaging Edge Desktop (Viewer).
For details on time-lapse movies, refer to the support page for Imaging Edge Desktop.
https://www.sony.net/disoft/help/
For details on time-lapse movies recorded with this camera, refer to “ Shoot Mode (still image)/Shoot Mode (movie)/Shoot Mode (S&Q/time-lapse) ” and “Time-lapse Settings.”
- MENU → (Shooting) → [Drive Mode] → [Interval Shoot Func.] → [Interval Shooting] → [On].
- MENU → (Shooting) → [Drive Mode] → [Interval Shoot Func.] → Select an item to set, and then select the desired setting.
- Press the shutter button.
When the time set for [Shooting Start Time] has elapsed, shooting will start.
- When the number of shots set for [Number of Shots] is completed, the camera will return to the standby screen for interval shooting.
Menu item details
- Interval Shooting:
- Sets whether to perform interval shooting. ([Off]/[On])
- Shooting Start Time:
- Sets the time from when you press the shutter button to when interval shooting starts. (1 second to 99 minutes 59 seconds)
- Shooting Interval:
- Sets the shooting interval (time from when one exposure starts to when the exposure for the next shot starts). (1 second to 60 seconds)
- Number of Shots:
- Sets the number of shots for interval shooting. (1 shot to 9 999 shots)
- AE Tracking Sensitivity:
- Sets the tracking sensitivity of the auto exposure against the change in luminance during interval shooting. If you select [Low], exposure changes during interval shooting will be smoother. ([High]/[Mid]/[Low])
- Shoot Interval Priority:
- Sets whether or not to prioritize the shooting interval when the exposure mode is [Program Auto] or [Aperture Priority] and the shutter speed becomes longer than the time set for [Shooting Interval]. ([Off]/[On])
Hint
- If you press the shutter button during interval shooting, interval shooting will end and the camera will return to the standby screen for interval shooting.
- To return to the normal shooting mode, set [Interval Shooting] to [Off].
- If you press a key to which one of the following functions has been assigned at the moment when shooting starts, the function will remain active during interval shooting even without you holding down the button.
- [AEL hold]
- [ AEL hold]
- [AF/MF Selector Hold]
- [Regist. AF Area hold]
- [AWB Lock Hold]
- [FEL Lock hold]
- [FEL Lock/AEL hold]
- If you set [Display as Group] to [On], still images shot with the interval shooting function will be displayed in groups.
- Still images shot with interval shooting can be played back continuously on the camera. If you intend to create a movie using the still images, you can preview the result.
Note
- You may not be able to record the set number of images depending on the remaining battery level and the amount of free space on the recording medium. Supply power via USB while shooting, and use a memory card with sufficient space.
- When the shooting interval is short, the camera may get hot easily. Depending on the ambient temperature, you may not be able to record the set number of images because the camera may stop recording to protect the equipment.
- During interval shooting (including the time between pressing the shutter button and the start of shooting), you cannot operate the dedicated shooting setting screen or MENU screen. However, you can adjust some settings such as the shutter speed with using the customized dial or control wheel.
- During interval shooting, auto review is not displayed.
-
Interval shooting is unavailable in the following situations:
- The shooting mode is set to [Intelligent Auto]
[149] Using the shooting functionsSetting the image quality and recording formatFile Format (still image)
Sets the file format for still images.
- MENU → (Shooting) → [Image Quality/Rec] → [File Format] → desired setting.
Menu item details
- RAW:
- Digital processing is not performed on this file format. Select this format to process images on a computer for professional purposes.
- RAW & JPEG/RAW & HEIF:
- A RAW image and a JPEG or HEIF image are created at the same time. This is suitable when you need two image files, a JPEG or HEIF for viewing, and a RAW for editing.
- JPEG/HEIF:
- The image is recorded in the JPEG or HEIF format.
About RAW images
- To open a RAW image file recorded with this camera, the software Imaging Edge Desktop is needed. With Imaging Edge Desktop, you can open a RAW image file, then convert it into a popular image format such as JPEG or TIFF, or readjust the white balance, saturation or contrast of the image.
- RAW images recorded with this camera have a resolution of 12 bits per pixel.
- You can set the compression format for RAW images using [RAW File Type].
Note
- If you do not intend to edit the images on your computer, we recommend that you record in JPEG or HEIF format.
- An environment supporting the HEIF format is required to play back HEIF images.
[150] Using the shooting functionsSetting the image quality and recording format RAW File Type
Selects the file type for RAW images.
- MENU → (Shooting) → [Image Quality/Rec] → [RAW File Type] → desired setting.
Menu item details
- Lossless Comp:
- Records images in lossless compression format with high compression ratio without deterioration of image quality. The file size of the image will be larger than if it were recorded in [Compressed].
- Compressed:
- Records images in compressed RAW format.
Hint
- Icons for RAW file type are displayed as follows:
-
Lossless Comp:

- Compressed:

-
Lossless Comp:
- The aspect ratio for RAW images is always 3:2. JPEG/HEIF images are recorded with the aspect ratio set in [Aspect Ratio] when RAW images and JPEG/HEIF images are recorded at the same time.
- The image size for RAW images corresponds to the “L” size for JPEG images.
[151] Using the shooting functionsSetting the image quality and recording formatJPEG/HEIF Switch
Switches the file format (JPEG / HEIF) of the still image to be recorded.
The JPEG format has general compatibility. You can view and edit JPEG files in various environments. The HEIF format has high compression efficiency. The camera can record with high image quality and small file sizes in the HEIF format. Depending on the computer or software, you may not be able to view or edit HEIF files. In addition, a HEIF-compatible environment is required to play back still images in the HEIF format. You can enjoy high-quality still images by connecting the camera and the TV via HDMI.
- MENU → (Shooting) → [Image Quality/Rec] → [JPEG/HEIF Switch] → desired setting.
Menu item details
- JPEG:
- Performs digital processing on the RAW file and records it in the JPEG format. This setting gives priority to compatibility.
- HEIF(4:2:0):
- Performs digital processing on the RAW file and records it in the HEIF (4:2:0) format. This setting gives priority to image quality and compression efficiency.
- HEIF(4:2:2):
- Performs digital processing on the RAW file and records it in the HEIF (4:2:2) format. This setting gives priority to image quality.
Hint
- Depending on the setting for [JPEG/HEIF Switch], items related to the file format ([File Format], etc.) will switch to JPEG or HEIF.
Note
- HEIF image files recorded with this camera cannot be displayed on other cameras that do not support the HEIF file format. Be careful not to accidentally erase HEIF image files by formatting the memory card or deleting the files.
- When recording in the HEIF format with [HLG Still Image] set to [Off], the color space is recorded in sRGB. When [HLG Still Image] is set to [On], it is recorded in the BT.2100 color space (BT.2020 color gamut).
[152] Using the shooting functionsSetting the image quality and recording format JPEG Quality/HEIF Quality
Selects the image quality when recording JPEG or HEIF images.
- MENU→ (Shooting) → [Image Quality/Rec] → [JPEG Quality]/[HEIF Quality] → desired setting.
Menu item details
- Extra fine/Fine/Standard/Light:
- Since the compression rate increases from [Extra fine] to [Fine] to [Standard] to [Light], the file size decreases in that same order. This allows more files to be recorded on one memory card, but the image quality is lower.
[153] Using the shooting functionsSetting the image quality and recording format JPEG Image Size/HEIF Image Size
The larger the image size, the more detail will be reproduced when the image is printed on large-format paper. The smaller the image size, the more images can be recorded.
- MENU → (Shooting) → [Image Quality/Rec] → [JPEG Image Size]/[HEIF Image Size] → desired setting.
Menu item details
When [Aspect Ratio] is set to 3:2
| Setting values | Pixel number (horizontal×vertical) |
|---|---|
| L: 26M | 6192×4128 pixels |
| M: 13M | 4384×2920 pixels |
| S: 6.4M | 3104×2064 pixels |
When [Aspect Ratio] is set to 4:3
| Setting values | Pixel number (horizontal×vertical) |
|---|---|
| L: 23M | 5504×4128 pixels |
| M: 11M | 3888×2920 pixels |
| S: 5.7M | 2752×2064 pixels |
When [Aspect Ratio] is set to 16:9
| Setting values | Pixel number (horizontal×vertical) |
|---|---|
| L: 22M | 6192×3480 pixels |
| M: 11M | 4384×2464 pixels |
| S: 5.4M | 3104×1744 pixels |
When [Aspect Ratio] is set to 1:1
| Setting values | Pixel number (horizontal×vertical) |
|---|---|
| L: 17M | 4128×4128 pixels |
| M: 8.5M | 2912×2912 pixels |
| S: 4.3M | 2064×2064 pixels |
Note
- The image size for RAW images corresponds to “L.”
[154] Using the shooting functionsSetting the image quality and recording formatAspect Ratio
- MENU → (Shooting) → [Image Quality/Rec] → [Aspect Ratio] → desired setting.
Menu item details
- 3:2:
- Same aspect ratio as 35 mm film
- 4:3:
- The aspect ratio is 4:3.
- 16:9:
- The aspect ratio is 16:9.
- 1:1:
- The aspect ratio is 1:1.
[155] Using the shooting functionsSetting the image quality and recording formatHLG Still Image
By using gamma characteristics equivalent to HLG (Hybrid Log-Gamma: standard for HDR images), you can shoot still images with a wide dynamic range and a wide color gamut compatible with BT.2020.
[HLG Still Image] can only be set when shooting in the HEIF format.
Set [JPEG/HEIF Switch] to [HEIF(4:2:0)] or [HEIF(4:2:2)], and [File Format] to [HEIF] beforehand.
- MENU → (Shooting) → [Image Quality/Rec] → [HLG Still Image] → desired setting.
Menu item details
- On:
- Shoots HLG still images.
- Off:
- Shoots normal still images.
Hint
- You can reproduce a wider range of brightness by playing back HLG still images on an HLG-compatible TV or monitor.
- You can display HLG still images on the camera’s monitor in almost the same quality as when they are displayed on an HLG- (BT.2020-) compatible monitor by setting as follows.
- [Gamma Display Assist]: [On]
- [Gamma Disp. Assist Typ.]: [Auto] or [HLG(BT.2020)]
Note
- In the following situations, [HLG Still Image] is fixed to [Off]:
- [JPEG/HEIF Switch] is set to [JPEG]
-
[File Format] is set to [RAW] or [RAW & HEIF]
- When a shooting mode other than P / A / S / M is set during still image shooting
- When [HLG Still Image] is set to [On], the following functions are not available.
- [D-Range Optimizer]
- [Creative Look]
- [DRO Bracket] under [Drive Mode]
- [Picture Profile]
- When [HLG Still Image] is set to [On], the available ISO range changes.
[156] Using the shooting functionsSetting the image quality and recording formatColor Space
The way colors are represented using combinations of numbers or the range of color reproduction is called “color space.” You can change the color space depending on the purpose of the image.
- MENU → (Shooting) → [Image Quality/Rec] → [Color Space] → desired setting.
Menu item details
- sRGB:
- This is the standard color space of the digital camera. Use [sRGB] in normal shooting, such as when you intend to print out the images without any modification.
- AdobeRGB:
- This color space has a wide range of color reproduction. When a large part of the subject is vivid green or red, Adobe RGB is effective. The file name of the recorded image starts with “_.”
Note
- The [Color Space] setting is invalid when shooting images in the HEIF format. If [HLG Still Image] is set to [Off], images will be recorded with the sRGB color space. When [HLG Still Image] is set to [On], it is recorded in the BT.2100 color space (BT.2020 color gamut).
- [AdobeRGB] is for applications or printers that support color management and DCF2.0 option color space. Images may not be printed or viewed in the correct colors if you use applications or printers that do not support Adobe RGB.
- When displaying images that were recorded with [AdobeRGB] on non-Adobe RGB-compliant devices, the images will be displayed with low saturation.
[157] Using the shooting functionsSetting the image quality and recording formatFile Format (movie)
Selects the movie file format.
- MENU → (Shooting) → [Image Quality/Rec] → [File Format] → desired setting.
Menu item details
| File Format |
Characteristics |
|---|---|
| XAVC HS 4K | Records 4K movies in the XAVC HS format. The XAVC HS format uses the HEVC codec, which has high compression efficiency. The camera can record movies with higher image quality than XAVC S movies but the same data volume. Long GOP compression is used for movies. |
| XAVC S 4K | Records movies in 4K resolution (3840×2160). Long GOP compression is used for movies. |
| XAVC S HD | Records movies in HD resolution (1920×1080). Long GOP compression is used for movies. |
| XAVC S-I 4K | Records movies in the XAVC S-I format. The XAVC S-I format uses Intra compression for movies. This format is more suitable for editing than Long GOP compression. |
| XAVC S-I HD | Records movies in the XAVC S-I format. The XAVC S-I format uses Intra compression for movies. This format is more suitable for editing than Long GOP compression. |
- Intra/Long GOP is a movie compression format. Intra compresses the movie by frame, and Long GOP compresses multiple frames. Intra compression has better response and flexibility when editing, but Long GOP compression has better compression efficiency.
Note
- To play back XAVC HS 4K movies on a smartphone or computer, you need a device or software with high processing capability that supports the HEVC codec.
[158] Using the shooting functionsSetting the image quality and recording format Movie Settings (movie)
Sets the frame rate, bit rate, color information, etc.
- MENU → (Shooting) → [Image Quality/Rec] → [Movie Settings] → [Rec Frame Rate] → desired setting.
- MENU → (Shooting) → [Image Quality/Rec] → [Movie Settings] → [Record Setting] → desired setting.
Example of setting values

(A): Bit rate
(B): Color sampling
(C): Bit depth
- The higher the bit rate, the higher the image quality.
- Color sampling (4:2:2, 4:2:0) is the recording ratio of color information. The more uniform this ratio is, the better the color reproducibility, and it is possible to remove colors neatly even when compositing using a green screen.
- Bit depth represents the gradation of luminance information. When the bit depth is 8 bits, 256 levels of gradation can be obtained. When the bit depth is 10 bits, 1024 levels of gradation can be obtained. A larger value enables smoother expression from dark to bright areas.
- [4:2:2 10 bit] is a setting that assumes that the recorded movie will be edited on a computer. The playback environment for [4:2:2 10 bit] is limited.
Menu item details
When [File Format] is set to [XAVC HS 4K]
| Rec Frame Rate | Record Setting | Size | Movie compression format |
|---|---|---|---|
| 60p/50p | 200M 4:2:2 10bit | 3840×2160 | Long GOP |
| 60p/50p | 150M 4:2:0 10bit | 3840×2160 | Long GOP |
| 60p/50p | 100M 4:2:2 10bit | 3840×2160 | Long GOP |
| 60p/50p | 75M 4:2:0 10bit | 3840×2160 | Long GOP |
| 60p/50p | 45M 4:2:0 10bit | 3840×2160 | Long GOP |
| 24p* | 100M 4:2:2 10bit | 3840×2160 | Long GOP |
| 24p* | 100M 4:2:0 10bit | 3840×2160 | Long GOP |
| 24p* | 50M 4:2:2 10bit | 3840×2160 | Long GOP |
| 24p* | 50M 4:2:0 10bit | 3840×2160 | Long GOP |
| 24p* | 30M 4:2:0 10bit | 3840×2160 | Long GOP |
* Only when [NTSC/PAL Selector] is set to NTSC.
When [File Format] is set to [XAVC S 4K]
| Rec Frame Rate | Record Setting | Size | Movie compression format |
|---|---|---|---|
| 60p/50p | 200M 4:2:2 10bit | 3840×2160 | Long GOP |
| 60p/50p | 150M 4:2:0 8bit | 3840×2160 | Long GOP |
| 30p/25p | 140M 4:2:2 10bit | 3840×2160 | Long GOP |
| 30p/25p | 100M 4:2:0 8bit | 3840×2160 | Long GOP |
| 30p/25p | 60M 4:2:0 8bit | 3840×2160 | Long GOP |
| 24p* | 100M 4:2:2 10bit | 3840×2160 | Long GOP |
| 24p* | 100M 4:2:0 8bit | 3840×2160 | Long GOP |
| 24p* | 60M 4:2:0 8bit | 3840×2160 | Long GOP |
* Only when [NTSC/PAL Selector] is set to NTSC.
When [File Format] is set to [XAVC S HD]
| Rec Frame Rate | Record Setting | Size | Movie compression format |
|---|---|---|---|
| 60p/50p | 50M 4:2:2 10bit | 1920×1080 | Long GOP |
| 60p/50p | 50M 4:2:0 8bit | 1920×1080 | Long GOP |
| 60p/50p | 25M 4:2:0 8bit | 1920×1080 | Long GOP |
| 30p/25p | 50M 4:2:2 10bit | 1920×1080 | Long GOP |
| 30p/25p | 50M 4:2:0 8bit | 1920×1080 | Long GOP |
| 30p/25p | 16M 4:2:0 8bit | 1920×1080 | Long GOP |
| 24p* | 50M 4:2:2 10bit | 1920×1080 | Long GOP |
| 24p* | 50M 4:2:0 8bit | 1920×1080 | Long GOP |
| 120p/100p | 100M 4:2:0 8bit | 1920×1080 | Long GOP |
| 120p/100p | 60M 4:2:0 8bit | 1920×1080 | Long GOP |
* Only when [NTSC/PAL Selector] is set to NTSC.
When [File Format] is set to [XAVC S-I 4K]
| Rec Frame Rate | Record Setting | Size | Movie compression format |
|---|---|---|---|
| 60p/50p | 600M 4:2:2 10bit/500M 4:2:2 10bit | 3840×2160 | Intra |
| 30p/25p | 300M 4:2:2 10bit/250M 4:2:2 10bit | 3840×2160 | Intra |
| 24p* | 240M 4:2:2 10bit | 3840×2160 | Intra |
* Only when [NTSC/PAL Selector] is set to NTSC.
When [File Format] is set to [XAVC S-I HD]
| Rec Frame Rate | Record Setting | Size | Movie compression format |
|---|---|---|---|
| 60p/50p | 222M 4:2:2 10bit/185M 4:2:2 10bit | 1920×1080 | Intra |
| 30p/25p | 111M 4:2:2 10bit/93M 4:2:2 10bit | 1920×1080 | Intra |
| 24p* | 89M 4:2:2 10bit | 1920×1080 | Intra |
* Only when [NTSC/PAL Selector] is set to NTSC.
Note
- Recording frame rates are indicated as the closest integer values. The actual corresponding frame rates are as follows:
24p: 23.98 fps, 30p: 29.97 fps, 60p: 59.94 fps, and 120p: 119.88 fps.
[159] Using the shooting functionsSetting the image quality and recording formatS&Q Settings
You can record a moment that cannot be captured by the naked eye (slow-motion recording), or record a long-term phenomenon into a compressed movie (quick-motion recording). For example, you can record an intense sports scene, the moment when a bird starts to fly, a blooming flower, and a changing view of clouds or a starry sky. Sound will not be recorded.
- Set the Still/Movie/S&Q switch to S&Q (S&Q Motion).
- Select [S&Q Motion] on the [Shoot Mode] screen, and then use the left/right side of the control wheel to select the desired shooting mode (Intelligent Auto, Program Auto, Aperture Priority, Shutter Priority, or Manual Exposure).
- The [Shoot Mode] screen is not displayed when [Shoot Mode Sel. Screen] is set to [Not Displayed]. Select MENU → (Shooting) → [Shooting Mode] → [Shoot Mode], and then select the desired shooting mode for [S&Q Motion].
- The [
- Select MENU → (Shooting) → [Image Quality/Rec] → [S&Q Settings] → Select an item to set, and then select the desired setting.
- Press the MOVIE (movie) button to start recording.
- Press the MOVIE button again to stop recording.
Menu item details
- Frame Rate Settings:
- Selects the frame rate of the movie and the shooting frame rate.
- Record Setting:
- Selects the bit rate, color sampling, and bit depth of the movie.
-
The format of the recorded movie will be the same as the [File Format] setting.
Playback speed
The playback speed will vary as below depending on the value set for [Frame Rate Settings].
When [NTSC/PAL Selector] is set to NTSC
| Frame Rate |
Rec Frame Rate: 24p |
Rec Frame Rate: 30p*1 |
Rec Frame Rate: 60p |
Rec Frame Rate: 120p*2 |
|---|---|---|---|---|
| 120fps*3 | 5 times slower | 4 times slower | 2 times slower | Normal playback speed |
| 60fps | 2.5 times slower | 2 times slower | Normal playback speed | 2 times quick |
| 30fps | 1.25 times slower | Normal playback speed | 2 times quick | 4 times quick |
| 15fps | 1.6 times quick | 2 times quick | 4 times quick | 8 times quick |
| 8fps | 3 times quick | 3.75 times quick | 7.5 times quick | 15 times quick |
| 4fps | 6 times quick | 7.5 times quick | 15 times quick | 30 times quick |
| 2fps | 12 times quick | 15 times quick | 30 times quick | 60 times quick |
| 1fps | 24 times quick | 30 times quick | 60 times quick | 120 times quick |
When [NTSC/PAL Selector] is set to PAL
| Frame Rate |
Rec Frame Rate: 25p*1 |
Rec Frame Rate: 50p |
Rec Frame Rate: 100p*2 |
|---|---|---|---|
| 100fps*3 | 4 times slower | 2 times slower | Normal playback speed |
| 50fps | 2 times slower | Normal playback speed | 2 times quick |
| 25fps | Normal playback speed | 2 times quick | 4 times quick |
| 12fps | 2.08 times quick | 4.16 times quick | 8.33 times quick |
| 6fps | 4.16 times quick | 8.33 times quick | 16.66 times quick |
| 3fps | 8.33 times quick | 16.66 times quick | 33.33 times quick |
| 2fps | 12.5 times quick | 25 times quick | 50 times quick |
| 1fps | 25 times quick | 50 times quick | 100 times quick |
*1[30p]/[25p] cannot be selected when [File Format] is set to [XAVC HS 4K].
*2[120p]/[100p] cannot be selected when [File Format] is set to [XAVC S-I 4K] or [XAVC S-I HD].
*3[120fps]/[100fps] cannot be selected when [File Format] is set to following items:
- XAVC HS 4K
- XAVC S 4K
- XAVC S-I 4K
Hint
- For an estimation of recordable time, refer to “Recordable movie times.”
Note
- In slow-motion/quick-motion recording, the actual shooting time differs from the time recorded in the movie. The recordable time displayed toward the top of the monitor shows the remaining recording time for the movie, not the remaining recording time on the memory card.
- In slow-motion recording, the shutter speed becomes faster and you may not be able to obtain the proper exposure. If this happens, decrease the aperture value or set the ISO sensitivity to a higher value.
-
During slow-motion/quick-motion recording, the following functions are not available.
- [Time Code Run] under [TC/UB]
- [Time Code Output] under [HDMI Output Settings]
[160] Using the shooting functionsSetting the image quality and recording formatTime-lapse Settings
You can record movies by condensing changes over a period of time of up to several dozen minutes. Unlike quick-motion movie recording, you can set a shooting interval longer than 1 second. This enables you to record movies with a larger time compression ratio. Sound will not be recorded. When creating longer time-lapse movies, use the “Interval Shoot Func..”
Configure settings such as the recording frame rate and shooting interval in [Time-lapse Settings].
When shooting a time-lapse movie, set the Still/Movie/S&Q switch to S&Q, and select the shooting mode for time-lapse shooting from MENU → (Shooting) → [Shooting Mode] → [Shoot Mode].
- MENU → (Shooting) → [Image Quality/Rec] → [Time-lapse Settings] → Select an item to set, and then select the desired setting.
Menu item details
- Frame Rate Settings:
-
Sets the recording frame rate and shooting interval.
Rec Frame Rate: Sets the recording frame rate for a time-lapse movie. (60p/50p/30p*/25p*/24p)*[30p]/[25p] cannot be selected when [
File Format] is set to [XAVC HS 4K].Interval Time: Sets the shooting interval for a time-lapse movie. (1 to 60 seconds)- For the first 10 seconds, the interval can be set in units of 1 second. For the 10th to 60th second, the interval can be set in units of 10 seconds.
- When the file format is set to 4K, you cannot select a value of 6 seconds or longer.
- The interval time is the interval from the start of exposure to the start of the next exposure, regardless of shutter speed.
- Record Setting:
-
Selects the bit rate, color sampling, and bit depth of the movie.
- Video Light Setting:
- When a video light (sold separately) is attached, you can turn the video light on before each frame for the time-lapse movie is recorded. Sets how many seconds before the light turns on. (Off/2 Sec/5 Sec/10 Sec)
About the recordable time
Approximate times for continuous shooting in the time-lapse shooting mode are as follows. (When [Auto Power OFF Temp.] is set to [High] and the ambient temperature is 25°C (77°F))
When [File Format] is set to HD: approx. 120 minutes
When [File Format] is set to 4K: approx. 120 minutes
HD: XAVC S HD (60p 50M/50p 50M 4:2:0 8bit, when the camera is not connected via Wi-Fi; when the monitor is open)
4K: XAVC S 4K (60p 150M/50p 150M 4:2:0 8bit, when the camera is not connected via Wi-Fi; when the monitor is open)
Using a video light
When a video light is attached in the time-lapse shooting mode, the video light will turn on before recording starts in order to control the light correctly from the first frame.
After recording starts, the video light will turn on/off repeatedly in conjunction with shooting/standby for each frame.
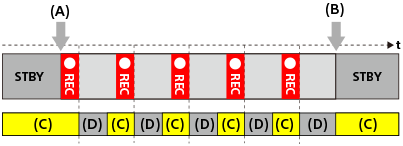
(A) Start of recording
(B) End of recording
(C) Video light on (At the start of recording, the video light turns on earlier than the number of seconds set in [Video Light Setting])
(D) Video light off (The video light remains dimly lit when [Video Light Mode] is set to [REC Link&STBY])
In the following cases, however, the video light will remain lit even during shooting standby:
- When [Video Light Setting] is set to [Off].
- When the time from the end of the frame shooting to the start of the next lighting is 5 seconds or less according to the settings for [Interval Time] and [Video Light Setting].
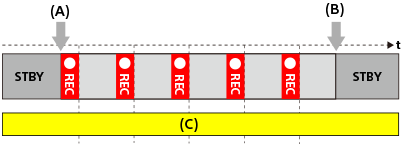
(A) Start of recording
(B) End of recording
(C) Video light on
Hint
- When [Video Light Mode] is set to [Power Link], the video light turns on/off in conjunction with the power, regardless of the [Video Light Setting] setting.
- To enable interval operation with [Video Light Setting], set [Video Light Mode] to [REC Link] or [REC Link&STBY].
- When you shoot a long time-lapse movie, it is recommended that you use an external power supply for the camera.
- When [Auto Power OFF Temp.] is set to [High], the camera can continue movie recording even when the temperature of the camera becomes high.
- At the end of the time-lapse movie, a normal-speed movie may be recorded for about 1 second.
[161] Using the shooting functionsSetting the image quality and recording formatProxy Settings
You can simultaneously record a low-bit-rate proxy movie while recording a movie, slow-motion/quick-motion movie, or time-lapse movie.
Since proxy movies are small in file size, they are suitable for transferring to smartphones or uploading to websites.
- MENU → (Shooting) → [Image Quality/Rec] → [Proxy Settings] → Select an item to set, and then select the desired setting.
Menu item details
- Proxy Recording:
- Selects whether to simultaneously record proxy movies. ([On] / [Off])
- Proxy File Format:
- Selects the recording format of the proxy movie. ([XAVC HS HD] / [XAVC S HD])
- Proxy Rec. Settings:
- Selects the bit rate, color sampling and bit depth of the proxy movie. ([16M 4:2:0 10bit] / [9M 4:2:0 10bit] / [6M 4:2:0 8bit])
Selectable proxy recording settings
| Proxy File Format |
Recording size | Recording frame rate | Proxy Rec. Settings |
Compression codec |
|---|---|---|---|---|
| XAVC HS HD | 1920×1080 | Max. 60p/Max. 50p | 16Mbps 4:2:0 10bit 9Mbps 4:2:0 10bit |
MPEG-H HEVC/H.265 |
| XAVC S HD | 1280×720 | Max. 60p/Max. 50p | 6Mbps 4:2:0 8bit | MPEG-4 AVC/H.264 |
Hint
- Proxy movies are not displayed on the playback screen (single-image playback screen or image index screen).
 (proxy) is displayed over movies for which a proxy movie was simultaneously recorded.
Note
- Proxy movies cannot be played back on this camera.
- Proxy recording is not available in the following situations.
Normal movie recording
- [Rec Frame Rate] is set to [120p]/[100p]
Slow-motion recording/quick-motion recording
- The recording frame rate is set to [120p]/[100p]
- The frame rate is set to [120fps]/[100fps]
- Deleting/protecting movies that have proxy movies removes/protects both the original and proxy movies. You cannot delete/protect only original movies or proxy movies.
- Movies cannot be edited on this camera.
[162] Using the shooting functionsSetting the image quality and recording formatAngle of view
When [SteadyShot] is set to [Active]
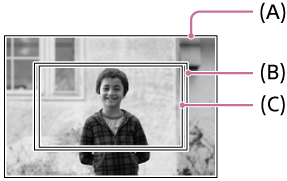
(A) When shooting still images*
(B) When recording movies (other than 4K 60p/50p)
The angle of view becomes approximately 1.4 times the focal length indicated on the lens.
(C) When recording movies (4K 60p/50p)
The angle of view becomes approximately 1.5 times the focal length indicated on the lens.
When [SteadyShot] is set to [Standard] or [Off]
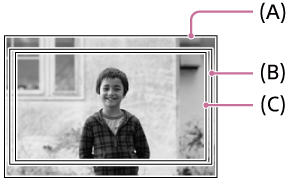
(A) When shooting still images*
(B) When recording movies (other than 4K 60p/50p)
The angle of view becomes approximately 1.0 times the focal length indicated on the lens.
(C) When recording movies (4K 60p/50p)
The angle of view becomes approximately 1.1 times the focal length indicated on the lens.
*When shooting still images, the angle of view does not change according to the setting for [SteadyShot] ([On]/[Off]).
[163] Using the shooting functionsUsing touch functionsTouch Operation
Sets whether or not to activate touch operations on the monitor.
- MENU → (Setup) → [Touch Operation] → [Touch Operation] → desired setting.
Menu item details
- On:
- Activates touch operations.
- Off:
- Deactivates touch operations.
[164] Using the shooting functionsUsing touch functionsShooting Screen
Configures touch operations on the shooting screen.
- MENU → (Setup) → [Touch Operation] → [Shooting Screen] → desired setting item.
Menu item details
- Shooting Screen:
- Sets whether to enable touch operations on the shooting screen. ([On]/[Off])
- Footer Icon Touch:
- Sets whether to enable touch operations for the footer icons at the bottom of the shooting standby screen. ([On]/[Off])
- Swipe Right:
- Sets the operation when swiping right on the shooting standby screen. ([Icon Display: Left]/[Icon Display: L&R]/[Off])
- Swipe Left:
- Sets the operation when swiping left on the shooting standby screen. ([Icon Display: Right]/[Icon Display: L&R]/[Off])
- Swipe Up:
- Sets the operation when swiping up on the shooting standby screen. ([Open the Fn Menu]/[Off])
- Touch Func. in Shooting:
- Sets the operation activated by touching the screen during shooting.
[Touch Focus]: Specifies the position to focus.
[Touch Tracking]: Selects a subject to start tracking.
[Touch Shutter]: Focuses on the touched subject and shoots images (only during still image shooting).
[Touch AE]: Specifies the position to adjust the brightness.
[Off]: Disables touch operations.
- Icon When Monitor Flipped:
- Sets whether to flip the positions of the touch function icons on the left and right in accordance with the monitor when the monitor is flipped. ([Flip]/[Do Not Flip])
Hint
- You can select whether to simultaneously perform [Touch AE] by pressing the left/right sides of the control wheel when [Touch Func. in Shooting] is set to [Touch Focus]/[Touch Tracking]/[Touch Shutter]. When you perform [Touch AE], you can fine-tune the brightness by sliding the brightness adjustment bar that appears after touching.
Note
- You cannot fine-tune the brightness using the brightness adjustment bar when [Touch Func. in Shooting] is set to [Touch Shutter+AE].
[165] Using the shooting functionsUsing touch functionsPlayback Screen
Configures touch operations on the playback screen.
- MENU → (Setup) → [Touch Operation] → [Playback Screen] → desired setting.
Menu item details
- On:
- Enables touch operations on the playback screen.
- Off:
- Disables touch operations on the playback screen.
[166] Using the shooting functionsUsing touch functionsMenu Screen
Configures touch operations on the menu screen.
- MENU → (Setup) → [Touch Operation] → [Menu Screen] → desired setting.
Menu item details
- On:
- Enables touch operations on the menu screen.
- Off:
- Disables touch operations on the menu screen.
[167] Using the shooting functionsUsing touch functionsFocusing using touch operations (Touch Focus)
[Touch Focus] allows you to specify a position where you want to focus using touch operations.
Configure the settings as follows from MENU → (Setup) → [Touch Operation] in advance:
- [Touch Operation]: [On]
- [Shooting Screen] → [Shooting Screen]: [On]
This function is available when [Focus Area] is set to one of following parameters. However, the function may not be available depending on the setting for [Focus Area Limit].
- [Wide]
- [Zone]
- [Center Fix]
- [Tracking: Wide]
- [Tracking: Zone]
- [Tracking: Center Fix]
- MENU → (Setup) → [Touch Operation] → [Shooting Screen] → [Touch Func. in Shooting] → [Touch Focus].
Specifying the position where you want to focus in the still image mode
When performing auto-focusing, you can specify the position where you want to focus using touch operations. After touching the monitor and specifying a position, press the shutter button halfway down to focus.
- Touch the monitor.
- Touch the subject to focus.
-
To cancel focusing with touch operations, touch
 (Touch focus release) icon or press the center of the control wheel.
- Press the shutter button halfway down to focus.
- Press the shutter button all the way down to shoot images.
Specifying the position where you want to focus in the movie recording mode
The camera will focus on the touched subject.
- Touch the subject on which you want to focus before or during recording.
-
When [Focus Mode] is set to [Continuous AF], the focus mode temporarily switches to manual focus, and the focus can be adjusted using the focus ring (spot focus).
- To cancel spot focus, touch (Touch focus release) icon or press the center of the control wheel.
-
When [Focus Mode] is set to [Manual Focus], the focus mode temporarily switches to [Continuous AF].
When the touched area is in focus, the focus mode returns to manual focus.
-
When [
Hint
- If you set [Touch Func. in Shooting] to [Touch Focus+AE], the brightness will be set according to the subject you touched. This will also allow you to fine-tune the brightness by sliding the brightness adjustment bar that appears after touching.
- In addition to the touch focus function, touch operations such as the following are also available.
- The focusing frame for [Spot]/[Expand Spot]/[Custom] can be moved by dragging.
- When shooting still images in the manual focusing mode, the focus magnifier can be used by double-tapping the monitor.
Note
- The touch focus function is not available in the following situations:
- When shooting still images in the manual focusing mode
- When using the digital zoom in the still image shooting mode
- When using the LA-EA4
[168] Using the shooting functionsUsing touch functionsStarting tracking with touch operations (Touch Tracking)
You can use touch operations to select a subject you want to track in the still image shooting mode and movie recording mode.
Configure the settings as follows from MENU → (Setup) → [Touch Operation] in advance:
- [Touch Operation]: [On]
- [Shooting Screen] → [Shooting Screen]: [On]
- MENU → (Setup) → [Touch Operation] → [Shooting Screen] → [Touch Func. in Shooting] → [Touch Tracking].
- Touch the subject that you want to track on the monitor.
Tracking will start.
Hint
- To cancel tracking, touch
 (Tracking release) icon or press the center of the control wheel.
 - If you set [Touch Func. in Shooting] to [TouchTracking+AE], the brightness will be set according to the subject you touched. This will also allow you to fine-tune the brightness by sliding the brightness adjustment bar that appears after touching.
Note
- [Touch Tracking] is unavailable in the following situations:
-
When [Focus Mode] is set to [Manual Focus] in still image shooting mode.
- When using Smart Zoom, Clear Image Zoom, or Digital Zoom in the still image shooting mode
-
When [
- If the focus mode is switched to [Manual Focus] while [Touch Func. in Shooting] is set to [Touch Tracking] in still image shooting mode, the setting value for [Touch Func. in Shooting] will be changed to [Touch Focus].
[169] Using the shooting functionsUsing touch functionsShooting with touch operations (Touch Shutter)
The camera automatically focuses on the point you touch and shoots a still image.
Configure the settings as follows from MENU → (Setup) → [Touch Operation] in advance:
- [Touch Operation]: [On]
- [Shooting Screen] → [Shooting Screen]: [On]
- MENU → (Setup) → [Touch Operation] → [Shooting Screen] → [Touch Func. in Shooting] → [Touch Shutter].
- Touch the subject on which you would like to focus.
The camera focuses on the subject you touched, and a still image is recorded.
Hint
- If you set [Touch Func. in Shooting] to [Touch Shutter+AE], the brightness will be set according to the subject you touched.
- You can operate the shooting functions below by touching the monitor:
- Shooting burst images using the touch shutter
When [Drive Mode] is set to [Cont. Shooting], you can record burst images while touching the monitor. -
Shooting continuous bracket images using the touch shutter
The product shoots three images while automatically shifting the exposure from base, to darker, and then to lighter. When [Drive Mode] is set to [Cont. Bracket], keep touching the monitor until the shooting ends. After the recording you can select the image you prefer.
- Shooting burst images using the touch shutter
Note
- The [Touch Shutter] function is unavailable in the following situations:
- When shooting movies
- When shooting slow-motion/quick-motion movies
-
When [Focus Mode] is set to [Manual Focus]
-
When [Focus Area] is set to [Spot] / [Expand Spot] / [Custom] / [Tracking: Spot XL] / [Tracking: Spot L] / [Tracking: Spot M] / [Tracking: Spot S] / [Tracking: Expand Spot] / [Tracking: Custom 1] / [Tracking: Custom 2] / [Tracking: Custom 3]
- While using the digital zoom function
- While using the Clear Image Zoom
- While using the Smart Zoom
- When a Mount Adaptor is attached
- When using Clear Image Zoom or Digital Zoom while [Touch Func. in Shooting] is set to [Touch Shutter], the setting value temporarily changes from [Touch Shutter] to [Off].
- If the focus mode is switched to [Manual Focus] while [Touch Func. in Shooting] is set to [Touch Shutter], the setting value for [Touch Func. in Shooting] will change to [Touch Focus].
[170] Using the shooting functionsUsing touch functionsAdjusting the exposure with touch operations (Touch AE)
You can automatically set the exposure based on the brightness of a point you touch.
Configure the settings as follows from MENU → (Setup) → [Touch Operation] in advance:
- [Touch Operation]: [On]
- [Shooting Screen] → [Shooting Screen]: [On]
- MENU → (Setup) → [Touch Operation] → [Shooting Screen] → [Touch Func. in Shooting] → select [Touch AE].
- Touch the point that you want to set as the basis for the exposure.
The camera will set the exposure based on the brightness of the point you touched.
- You can fine-tune the brightness with sliding the brightness adjustment bar that appears after touching.
Hint
- The adjustment using the brightness adjustment bar is reflected in the exposure compensation value.
- When [Touch Func. in Shooting] is set to [Touch Focus]/[Touch Tracking]/[Touch Shutter], you can select whether or not to perform [Touch AE] at the same time by pressing the left or right side of the control wheel.
Note
- [Touch AE] is not available in the following situations:
- When using digital zoom function
- If the subject is extremely bright or dark, the adjustment bar may not be sufficiently effective.
[171] Using the shooting functionsShutter settingsSilent Mode Settings (still image/movie)
You can configure settings related to the silent mode, which allows you to shoot without shutter sounds or electronic sounds. You can also set whether or not to change the settings for other functions that emit sounds from the camera when the camera is set to the silent mode.
- MENU → (Shooting) → [Shutter/Silent] → [Silent Mode Settings] → desired setting.
Menu item details
- Silent Mode:
- Sets whether or not to shoot without shutter sounds or electronic sounds. ([On]/[Off])
When set to [On], [Audio Signal(Shooting)] becomes locked to [Off]. - Target Function Settings:
- Sets whether or not to simultaneously change the settings for other functions that emit sounds from the camera when the camera is set to the silent mode.
([Aperture Drive in AF])
If you select [Not Target], the setting values for each function will be retained even in the silent mode.
Note
- Use the [Silent Mode] function on your own responsibility, while taking sufficient consideration to the privacy and portrait rights of the subject.
- Even if [Silent Mode] is set to [On], it will not be completely silent.
- Even if [Silent Mode] is set to [On], the operating sound of the aperture and focus will sound.
[172] Using the shooting functionsShutter settingsRelease w/o Lens (still image/movie)
Sets whether or not the shutter can be released when no lens is attached.
- MENU → (Shooting) → [Shutter/Silent] → [Release w/o Lens] → desired setting.
Menu item details
- Enable:
- Releases the shutter when no lens is attached. Select [Enable] when attaching the product to an astronomical telescope, etc.
- Disable:
- Does not release the shutter when a lens is not attached.
Note
- Correct metering cannot be achieved when you use lenses that do not provide a lens contact, such as the lens of an astronomical telescope. In such cases, adjust the exposure manually by checking it on the recorded image.
[173] Using the shooting functionsShutter settingsRelease w/o Card
Sets whether the shutter can be released when no memory card has been inserted.
- MENU → (Shooting) → [Shutter/Silent] → [Release w/o Card] → desired setting.
Menu item details
- Enable:
- Releases the shutter even if no memory card has been inserted.
- Disable:
- Does not release the shutter when no memory card has been inserted.
Note
- When no memory card has been inserted, the images shot will not be saved.
- The default setting is [Enable]. It is recommended that you select [Disable] prior to actual shooting.
[174] Using the shooting functionsShutter settingsAnti-flicker Set.
To reduce the impact of flickering from artificial light sources (such as fluorescent or LED light), you can set the shutter speed more finely than usual.
This function reduces differences in exposure and color tone between the upper and lower area of an image during continuous shooting under artificial light sources.
- MENU → (Shooting) → [Shutter/Silent] → [Anti-flicker Set.] → desired setting item.
Menu item details
- Var. Shutter:
- Reduces the differences in brightness between each image by finely adjusting the shutter speed according to the flickering frequency. ([On]/[Off])
[Var. Shutter] can only be selected when the camera is in an exposure mode that allows you to manually adjust the shutter speed (both still images and movies). -
When [
Var. Shutter] is set to [On], the shutter-speed denominator is displayed in the decimal format (high-resolution shutter speed).
For example, if the normal shutter speed is set to 1/250 second, the value will be displayed as 250.6. (The numbers may differ from the actual ones.)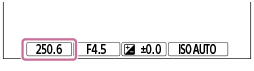
- Set [Var. Shutter] to [Off] to return to the original display.
- Set [
- Var. Shutter Set.:
- Sets the shutter speed when [Var. Shutter] is set to [On].
Select a shutter speed that reduces the impact of flickering while checking the monitor. Press the center of the control wheel to automatically set the shutter speed so that the impact of flickering is reduced. The faster you set the shutter speed, the more likely there is to be a difference between the monitor display before shooting and the recorded image. Make sure that the impact of flickering is reduced in the recorded image.
Hint
-
When [Var. Shutter Select] is assigned to a custom key, you can switch the [Var. Shutter] function on and off by pressing the key.
- When [Anti-flicker Tv Scan] is assigned to a custom key, you can make the camera automatically set the shutter speed to reduce the impact of flickering by pressing the key while shooting.
- When [Var. Shutter] is set to [On], the high-resolution shutter speed can be finely adjusted on the shooting standby screen. If you want to change the high-resolution shutter speed to an integral multiple value even on the shooting standby screen, assign [Shutter Speed(step)] to a custom key or the “My Dial” setting.
- When you change the [Var. Shutter] setting from [On] to [Off], the high-resolution shutter speed switches to the closest value among normal shutter speeds.
Note
-
You cannot use [Var. Shutter] and [Anti-flicker Tv Scan] when using a flash with [Flash Mode] set to an item other than [Flash Off].
- When [Var. Shutter] is set to [On], the release time lag may be longer.
- Even when [Var. Shutter] is set to [On], depending on the frequency of the light source, you may be unable to set the appropriate shutter speed and eliminate the impact of flickering. In that case, try the following.
- Setting a slower shutter speed
- When you press the shutter button halfway down, flickering may appear temporarily.
[175] Using the shooting functionsUsing the zoomThe zoom features available with this product
The zoom feature of the product provides a higher magnification zoom by combining various zoom features. The icon displayed on the screen changes, according to the selected zoom feature.
When a power zoom lens is mounted:
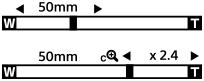
When a lens other than a power zoom lens is mounted:

-
Optical zoom:
Zoom images in the zoom range of a lens.
When a power zoom lens is mounted, the focal length of the optical zoom is displayed.
-
Smart Zoom (
 ):
):Zoom images without causing the original quality to deteriorate by partially cropping an image (only when [JPEG Image Size]/[HEIF Image Size] is set to [M] or [S]).
-
Clear Image Zoom (
 ):
):Zoom images using an image process with less deterioration. When you set [
Zoom Range] to [Clear Image Zoom] or [Digital Zoom], you can use this zoom function. -
Digital Zoom (
 ):
):You can magnify images using an image process. When you set [
Zoom Range] to [Digital Zoom], you can use this zoom function.
Hint
- The default setting for the [JPEG Image Size]/[HEIF Image Size] is [L]. To use the smart zoom, change [JPEG Image Size]/[HEIF Image Size] to [M] or [S].
Note
- The Smart Zoom, Clear Image Zoom and Digital Zoom functions are not available when shooting in the following situations:
-
[File Format] is set to [RAW] or [RAW & JPEG]/[RAW & HEIF].
- [Rec Frame Rate] is set to [120p]/[100p].
- During slow-motion/quick-motion shooting with the frame rate set to [120fps]/[100fps]
-
[
- You cannot use the Smart Zoom function with movies.
-
When you use a zoom function other than the optical zoom in the still image shooting mode, the [Focus Area] setting is disabled and the AF operates with priority on and around the center area.
- When you use the Smart Zoom, Clear Image Zoom or Digital Zoom function, [Metering Mode] is locked to [Multi].
-
When using the Smart Zoom, Clear Image Zoom or Digital Zoom function in the still image shooting mode, the following functions are not available:
- Subject Recognition AF
- Face Priority in Multi Metering
- Tracking function
[176] Using the shooting functionsUsing the zoom Clear Image Zoom/Digital Zoom
When you use a zoom function other than the optical zoom, you can exceed the zoom range of the optical zoom.
- MENU → (Shooting) → [Zoom] → [Zoom Range] → Select [Clear Image Zoom] or [Digital Zoom].
- Zoom using the W/T (zoom) lever.
- If you assign [Zoom Operation (T)] or [Zoom Operation (W)] to the desired key in advance by selecting MENU → (Setup) → [Operation Customize] → [Custom Key/Dial Set.] or [Custom Key/Dial Set.], you can zoom in and out simply by pressing that key.
- If you assign [Zoom Operation (T)] or [Zoom Operation (W)] to the desired key in advance by selecting MENU →
To zoom using the zoom icon displayed on the screen
- MENU → (Setup) → [Touch Operation] → [Shooting Screen] → [On].
- Swipe in from the left or right edge of the screen to display the touch icons.
- Touch
 (Zoom) icon (A), and then select the magnification scale (B). Alternatively, touch and hold the W or T icon (C).
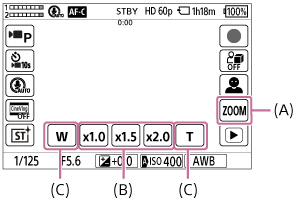
(A):
(Zoom) icon(B): Magnification scale
(C): W/T icon
Hint
- When a power zoom lens is attached, you can use the zoom lever or zoom ring to magnify the image. If you exceed the optical zoom magnification, you can switch to a zoom function other than the optical zoom with the same operation.
-
When using step zoom, a zoom function set in [Zoom Range] (Smart Zoom, Clear Image Zoom, or Digital Zoom) may be used even within the optical zoom range.
[177] Using the shooting functionsUsing the zoomZoom Range (still image/movie)
You can select the zoom setting of the product.
- MENU → (Shooting) → [Zoom] → [Zoom Range] → desired setting.
Menu item details
- Optical zoom only:
- Limits the zoom range to the optical zoom. You can use the Smart Zoom function if you set [JPEG Image Size]/[HEIF Image Size] to [M] or [S].
- Clear Image Zoom :
- Select this setting to use Clear Image Zoom. The product magnifies images using an image process with less deterioration.
- Digital Zoom :
- The product magnifies images to the largest scale. However, the image quality will deteriorate.
Note
- Set [Optical zoom only] if you want to magnify images within the range in which image quality does not deteriorate.
[178] Using the shooting functionsUsing the zoomZoom Lever Speed (still image/movie)
Sets the zoom speed with the W/T (zoom) lever of the camera. This can be set separately for shooting standby and movie recording.
- MENU → (Shooting) → [Zoom] → [Zoom Lever Speed] → desired setting.
Menu item details
- Zoom Speed
 :
: - Sets the zoom speed during shooting standby. ([1 (Slow)] to [8 (Fast)])
- Zoom Speed
 :
: - Sets the zoom speed during movie recording. ([1 (Slow)] to [8 (Fast)])
Hint
- If a high speed is set for shooting standby and a slow speed is set for movie recording, the angle of view can be changed quickly during shooting standby and slowly during movie recording.
Note
- The zoom speed does not change when you operate the zoom ring of the lens or the zoom lever of the power zoom lens.
- If you increase the zoom speed, the sound of zoom operations may be recorded.
[179] Using the shooting functionsUsing the zoomCustom Key Z. Speed (still image/movie)
Sets the zoom speed when using the custom key to which [Zoom Operation (T)] / [Zoom Operation (W)] is assigned. This can be set separately for shooting standby and movie recording.
- MENU → (Shooting) → [Zoom] → [Custom Key Z. Speed] → desired setting item.
Menu item details
- Fixed Speed:
- Sets the zoom speed during shooting standby. (1 (Slow) to 8 (Fast))
- Fixed Speed:
- Sets the zoom speed during movie recording. (1 (Slow) to 8 (Fast))
Hint
- If a high speed is set for [Fixed Speed] and a slow speed is set for [Fixed Speed], the angle of view can be changed quickly during shooting standby and slowly during movie recording.
Note
- The zoom speed does not change when you operate the zoom ring of the lens or the zoom lever of the power zoom lens.
- If you increase the zoom speed, the sound of zoom operations may be recorded.
[180] Using the shooting functionsUsing the zoomRemote Zoom Speed (still image/movie)
Sets the zoom speed when performing zoom operations using the remote commander (sold separately) or the remote shooting function via a smartphone. This can be set separately for shooting standby and movie recording.
- MENU → (Shooting) → [Zoom] → [Remote Zoom Speed] → desired setting item.
Menu item details
 Speed Type:
- Sets whether or not to lock the zoom speed. ([Variable]/[Fix])
- Fixed Speed:
- Sets the zoom speed during shooting standby when [Speed Type] is set to [Fix]. (1 (Slow) to 8 (Fast))
- Fixed Speed:
- Sets the zoom speed during movie recording when [Speed Type] is set to [Fix]. (1 (Slow) to 8 (Fast))
Hint
- When [Speed Type] is set to [Variable], pressing the zoom lever on the remote commander will increase the zoom speed (some remote commanders do not support variable zoom).
- If [Speed Type] is set to [Fix], a high speed is set for [Fixed Speed], and a slow speed is set for [Fixed Speed], the angle of view can be changed quickly during shooting standby and slowly during movie recording.
Note
- If you increase the zoom speed, the sound of zoom operations may be recorded.
[181] Using the shooting functionsUsing the zoomStep Zoom Magnif. (still image/movie)
Set the zoom magnification that can be selected with the touch button on the shooting screen or with the key to which the [Step Zoom] function is assigned.
- Select MENU →(Shooting) → [Zoom] → [Step Zoom Magnif.].
- Add checkmarks to the magnification values that you want to use and select [OK].
- The magnifications with (check mark) can be selected in the following cases:
- When you touch the ZOOM (Zoom) button on the shooting screen
- When you press the custom key to which [Step Zoom] is assigned
- The magnifications with
Menu item details
Add check marks to the magnification values that you want to use.
x1.0/x1.5/x2.0/x4.0
Hint
-
To select the zoom magnification with the custom key, assign [Step Zoom] to the key of your choice with [Custom Key/Dial Set.] or [Custom Key/Dial Set.] in advance.
Note
- When recording movies, the maximum magnification for the step zoom function may vary depending on the setting for [File Format] or [Zoom Range].
-
when [
File Format] is set to HD:Clear Image Zoom: up to [x2.0]
Digital Zoom: up to [x4.0]
-
when [
File Format] is set to 4K:Clear Image Zoom: up to [x1.5]
Digital Zoom: up to [x4.0]
-
- When you use the step zoom at the same time as the optical zoom of a power zoom lens, zooming with the zooming lever may not reach the wide-angle end. In this case, set the step zoom to [x1.0].
[182] Using the shooting functionsUsing the zoomAbout zoom scale
The zoom scale that is used in combination with the zoom of the lens changes according to the selected image size.
When [Aspect Ratio] is [3:2]
| JPEG Image Size/HEIF Image Size | Optical zoom only (smart zoom) | Clear Image Zoom | Digital Zoom |
|---|---|---|---|
| L: 26M | - | Approx. 2× | Approx. 4× |
| M: 13M | Approx. 1.4× | Approx. 2.8× | Approx. 5.7× |
| S: 6.4M | Approx. 2× | Approx. 4× | Approx. 8× |
[183] Using the shooting functionsUsing the zoomZoom Ring Rotate
Assigns zoom in (T) or zoom out (W) functions to the zoom ring rotation direction. Available only with power zoom lenses that support this function.
- MENU → (Setup) → [Operation Customize] → [Zoom Ring Rotate] → desired setting.
Menu item details
- Left(W)/Right(T):
- Assigns zoom out (W) function to left-handed rotation and zoom-in (T) function to right-handed rotation.
- Right(W)/Left(T):
- Assigns zoom in (T) function to left-handed rotation and zoom-out (W) function to right-handed rotation.
[184] Using the shooting functionsUsing the flash Using flash (sold separately)
In dark environments, use the flash to light up the subject while shooting. Also use the flash to prevent camera-shake.
For details on the flash, refer to the instruction manual for the flash.- Attach the flash (sold separately) to the product.
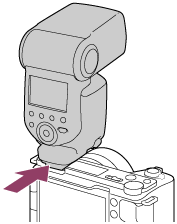
- Shoot after you have turned on the flash and it is fully charged.
 (Charging flash icon) blinking: Charging is in progress (Charging flash icon) lit up: Charging is finished
- The available flash modes depend on the shooting mode and function.
Note
- The light of the flash may be blocked if the lens hood is attached and the lower part of a recorded image may be shaded. Remove the lens hood.
- You cannot use the flash when recording movies. (You can use an LED light when using a flash (sold separately) with an LED light.)
- You cannot use the flash when the shooting mode is set to [Scene Selection] and [Sports Action] is selected.
- Before attaching/removing an accessory such as a flash to/from the Multi Interface Shoe, turn off the product first. When attaching an accessory, make sure that the accessory is fixed securely to the product.
- Do not use the Multi Interface Shoe with a commercially available flash that applies voltage of 250 V or more or has the reverse polarity of the camera. Doing so may cause a malfunction.
- When shooting with the flash and the zoom is set to W, the shadow of the lens may appear on the screen, depending on the shooting conditions. If this happens, shoot away from the subject or set the zoom to T and shoot with the flash again.
- The corners of a recorded image may be shaded, depending on the lens.
- High-speed sync (HSS) photography is not available on this camera.
- When an external flash is attached to the camera and [Flash Mode] is set to an item other than [Flash Off], [Cont. Shooting] and [Self-timer(Cont)] are not available.
-
When an external flash is attached to the camera and [Flash Mode] is set to an item other than [Flash Off], [Var. Shutter] and [Anti-flicker Tv Scan] are not available.
- For details on compatible accessories for the Multi Interface Shoe, visit the Sony website, or consult your Sony dealer or local authorized Sony service facility.
[185] Using the shooting functionsUsing the flashFlash Mode
You can set the flash mode.
- MENU → (Exposure/Color) → [Flash] → [Flash Mode] → desired setting.
Menu item details
 Flash Off:
- The flash does not operate.
 Autoflash:
- The flash works in dark environments.
 Fill-flash:
- The flash works every time you trigger the shutter.
 Slow Sync.:
- The flash works every time you trigger the shutter. Slow sync shooting allows you to shoot a clear image of both the subject and the background by slowing the shutter speed.
 Rear Sync.:
- The flash works right before the exposure is completed every time you trigger the shutter. Rear sync shooting allows you to shoot a natural image of the trail of a moving subject such as a moving car or a walking person.
Note
- The default setting depends on the shooting mode.
- Some [Flash Mode] settings are not available, depending on the shooting mode.
[186] Using the shooting functionsUsing the flashFlash Comp.
Adjusts the amount of flash light in a range of –3.0 EV to +3.0 EV. Flash compensation changes the amount of flash light only. Exposure compensation changes the amount of flash light along with the change of the shutter speed and aperture.
- MENU → (Exposure/Color) → [Flash] → [Flash Comp.] → desired setting.
- Selecting higher values (+ side) makes the flash level higher, and lower values (- side) makes the flash level lower.
Hint
- By assigning [Flash Comp.] to the desired dial in [Custom Key/Dial Set.] or [My Dial Settings], you can easily adjust the flash output when shooting with TTL exposure.
Note
- [Flash Comp.] does not work when the shooting mode is set to the following modes:
- [Intelligent Auto]
- [Scene Selection]
- The higher flash effect (+ side) may not be visible due to the limited amount of flash light available, if the subject is outside the maximum range of the flash. If the subject is very close, the lower flash effect (- side) may not be visible.
- If you attach an ND filter to the lens or attach a diffuser or a color filter to the flash, the appropriate exposure may not be achieved and images may turn out dark. In this case, adjust [Flash Comp.] to the desired value.
[187] Using the shooting functionsUsing the flashExp.comp.set
Sets whether to apply the exposure compensation value to control both flash light and ambient light, or just ambient light.
- MENU → (Exposure/Color) → [Flash] → [Exp.comp.set] → desired setting.
Menu item details
- Ambient&flash:
- Applies the exposure compensation value to control both flash light and ambient light.
- Ambient only:
- Applies the exposure compensation value to control ambient light only.
[188] Using the shooting functionsUsing the flashWireless Flash
To perform wireless flash shooting, use a flash that is compatible with radio-signal wireless flash shooting (sold separately) or the Wireless Radio Commander (sold separately). For details on how to set each method, refer to the instruction manual for the flash or the Wireless Radio Commander.
- MENU → (Exposure/Color) → [Flash] → [Wireless Flash] → [On].
- Remove the shoe cap from the camera, and then attach the flash or the Wireless Radio Commander.
-
When performing radio-signal wireless flash shooting with a flash attached to the camera, set the attached flash as the commander.
-
- Set up an off-camera flash that is set to wireless mode, or that is attached to the Wireless Radio Receiver (sold separately).
- You can perform a test flashing by assigning the [Wireless Test Flash] function to a custom key using [Custom Key/Dial Set.], and then pressing that key.
- You can perform a test flashing by assigning the [Wireless Test Flash] function to a custom key using [
Menu item details
- Off:
- Does not use the wireless flash function.
- On:
- Uses the wireless flash function to make an external flash or flashes emit light at a distance from the camera.
Note
- For the flash that is compatible with wireless flash shooting, visit the Sony website, or consult your Sony dealer or local authorized Sony service facility.
[189] Using the shooting functionsUsing the flashRed Eye Reduction
When using the flash, it is fired two or more times before shooting to reduce the red-eye phenomenon.
- MENU → (Exposure/Color) → [Flash] → [Red Eye Reduction] → desired setting.
Menu item details
- On:
- The flash is always fired to reduce the red-eye phenomenon.
- Off:
- Does not use Red Eye Reduction.
Note
- Red Eye Reduction may not produce the desired effects. It depends on individual differences and conditions, such as distance to the subject, or whether the subject looks at the pre-strobe or not.
[190] Using the shooting functionsUsing the flashFEL lock
The flash level is automatically adjusted so that the subject gets the optimum exposure during normal flash shooting. You can also set the flash level in advance.
FEL: Flash Exposure Level
- MENU → (Setup) → [Operation Customize] → [Custom Key/Dial Set.] → desired button, then assign the [FEL Lock toggle] function to the button.
- Center the subject on which FEL is to be locked, and adjust the focus.
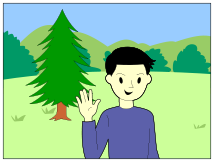
- Press the button to which [FEL Lock toggle] is registered, and set the flash amount.
- A pre-flash flashes.
- The
 (FEL lock) lights up.
- Adjust the composition and shoot the image.
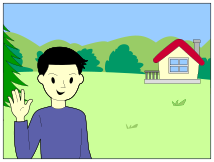
- When you want to release the FEL lock, press the button to which the [FEL Lock toggle] is registered again.
Hint
- By setting [FEL Lock hold], you can hold the setting while the button is pressed down. Also, by setting [FEL Lock/AEL hold] and [FEL Lock/AEL tggle.], you can shoot images with the AE locked in the following situations.
- When [Flash Mode] is set to [Flash Off] or [Autoflash].
- When the flash cannot go off.
- When using an external flash that is set to manual flash mode.
Note
- The FEL lock cannot be set when a flash is not attached.
- If a flash that does not support the FEL lock is attached, an error message is displayed.
- When both AE and FEL lock are fixed,
 (AE Lock/FEL Lock) icon lights up.
[191] Using the shooting functionsUsing the flashExternal Flash Set.
You can configure the settings of a flash (sold separately) attached to the camera using the monitor and control wheel of the camera.
Update the software of your flash to the latest version before using this function.
For details on flash functions, refer to the instruction manual for the flash.
- Attach the flash (sold separately) to the Multi Interface Shoe of the camera, and then turn on the camera and the flash.
- MENU → (Exposure/Color) → [Flash] → [External Flash Set.] → desired setting item.
- Configure the setting using the control wheel of the camera.
Menu item details
- Ext. Flash Firing Set.:
- Allows you to configure settings related to the firing of the flash, such as the flash mode, flash level, etc.
- Ext. Flash Cust. Set.:
- Allows you to configure other flash settings, wireless settings, and flash unit settings.
Hint
- If you assign [Ext. Flash Firing Set.] to a desired key using [Custom Key/Dial Set.], you can open the [Ext. Flash Firing Set.] screen simply by pressing that key.
- You can adjust settings by operating the flash even while you are using [External Flash Set.].
- You can also configure the settings for a Wireless Radio Commander (sold separately) attached to the camera.
Note
- You can only use [External Flash Set.] to configure the settings of a flash (sold separately) or Wireless Radio Commander (sold separately) manufactured by Sony and attached to the Multi Interface Shoe of the camera.
- You can only use [External Flash Set.] when the flash is attached directly to the camera. You cannot use this function when shooting with an off-camera flash that is connected using a cable.
- Only some of the functions of the attached flash are configurable using [External Flash Set.]. You cannot perform pairing with other flashes, reset the flash, initialize the flash, etc. via [External Flash Set.].
- [External Flash Set.] is unavailable under the following conditions:
- When the flash is not attached to the camera
- When a flash that does not support [External Flash Set.] is attached
-
When the Still/Movie/S&Q switch is set to (Movie) or S&Q (S&Q Motion), or during movie shooting
Also, [External Flash Set.] may be unavailable depending on the state of the flash.
-
For details on flashes and Wireless Radio Commanders that are compatible with this function, refer to the following support page.
https://www.sony.net/dics/zve10m2/
[192] Using the shooting functionsReducing blurSteadyShot (still image)
Sets whether or not to use the SteadyShot function.
- MENU → (Shooting) → [Image Stabilization] → [SteadyShot] → desired setting.
Menu item details
- On:
- Uses [SteadyShot].
- Off:
- Does not use [SteadyShot].
Hint
- When using a tripod, etc., make sure to turn off the SteadyShot function because this can cause any malfunction when shooting.
- If you assign [SteadyShot Select] to a desired key using [Custom Key/Dial Set.], you can switch the [SteadyShot] function on or off by pressing the key.
- When shooting in a dark place, the
 (SteadyShot) icon may blink. We recommend that you set a faster shutter speed by decreasing the aperture value or adjusting the ISO sensitivity to a higher value.
Note
- When a lens without a SteadyShot mechanism is attached, [SteadyShot] is not available.
- If a lens equipped with a SteadyShot switch is attached, the settings can only be changed using that switch on the lens. You cannot switch the settings using the camera.
[193] Using the shooting functionsReducing blurSteadyShot (movie)
Sets [SteadyShot] effect when shooting movies.
- MENU → (Shooting) → [Image Stabilization] → [SteadyShot] → desired setting.
Menu item details
- Active:
- Provides a powerful SteadyShot effect using electronic SteadyShot.
- Standard:
- Provides a SteadyShot effect using lens-side SteadyShot. Use this setting under stable movie shooting conditions.
- Off:
- Does not use [SteadyShot].
Note
- When using a tripod, etc., make sure to turn off the SteadyShot function because this can cause any malfunction when shooting.
- Slow pan/tilt movements may cause the image to become distorted when shooting handheld. If distortion occurs, try turning off the SteadyShot function.
- If you change the setting for [SteadyShot], the angle of view will change.
When [SteadyShot] is set to [Active], the angle of view becomes narrower. It is recommended that you set [SteadyShot] to [Standard] when the focal length is 200 mm or more.
- The setting range of the ISO sensitivity varies depending on the setting for [SteadyShot].
-
In the following situations, [Active] cannot be selected:
-
For normal movies: when [Rec Frame Rate] is set to [120p]/[100p]
For slow-motion/quick-motion shooting: when [Frame Rate] is set to [120fps]/[100fps]
-
For normal movies: when [Rec Frame Rate] is set to [120p]/[100p]
- When a lens without a SteadyShot mechanism is attached, [Standard] cannot be selected.
- If you intend to use the image stabilization function of the smartphone application Movie Edit add-on or the desktop application Catalyst, set [SteadyShot] to [Active] or [Off] on the camera.
- The SteadyShot effect depends on the attached lens.
[194] Using the shooting functionsReducing blurSteadyShot Adjust. (movie)
You can shoot with an appropriate SteadyShot setting for the attached lens.
- MENU → (Shooting) → [Image Stabilization] → [SteadyShot Adjust.] → desired setting.
Menu item details
- Auto:
- Performs the SteadyShot function automatically according to the information obtained from the attached lens.
- Manual:
- Performs the SteadyShot function according to the focal-length set using [
 Focal Length]. (8mm-1000mm)
Note
- The SteadyShot function may not work optimally when the power has just been turned on or right after you point the camera toward a subject.
- When the camera cannot obtain focal length information from the lens, the SteadyShot function does not work correctly. Set [SteadyShot Adjust.] to [Manual] and set [Focal Length] to match the lens you are using. The currently set SteadyShot focal length will be displayed along with the (SteadyShot) icon.
-
When using an SEL16F28 lens (sold separately) with a teleconverter, etc., set [SteadyShot Adjust.] to [Manual] and set the focal length.
[195] Using the shooting functionsReducing blurSteadyShot focal length (movie)
Sets the focal length information to be used for the SteadyShot function when [SteadyShot Adjust.] is set to [Manual].
- MENU → (Shooting) → [Image Stabilization] → [Focal Length] → desired setting.
Menu item details
- 8mm - 1000mm:
- The SteadyShot function uses the focal length that you set.
- Check the focal-length index on the lens and set the focal-length.
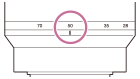
[196] Using the shooting functionsLens Compensation (still image/movie)
Compensates for shading in the corners of the screen or distortion of the screen, or reduces color deviation at the corners of the screen caused by certain lens characteristics.
- MENU → (Shooting) → [Image Quality/Rec] → [Lens Compensation] → desired setting.
Menu item details
- Shading Comp.:
- Sets whether to automatically compensate for darkness in the corners of the screen. ([Auto]/[Low]/[Off])
- Chromatic Aberration Comp.:
- Sets whether to automatically reduce color deviation at the corners of the screen. ([Auto]/[Off])
- Distortion Comp.:
- Sets whether to automatically compensate for distortion of the screen. ([Auto]/[Off])
- Breathing Comp. (only when shooting movies):
- Sets whether to automatically compensate for the phenomenon in which the angle of view changes according to the focusing distance during movie recording. ([On]/[Off])
Note
- This function is only available when using an automatic compensation compliant lens.
- Depending on the lens type, darkness in the corners of the screen may not be corrected with [Shading Comp.], or there may be no difference in the correction effect between [Auto] and [Low].
- Depending on the attached lens, [Distortion Comp.] is fixed to [Auto], and you cannot select [Off].
-
If [SteadyShot] is set to [Active] in the movie recording mode, [Distortion Comp.] will become locked to [Auto].
- When [Breathing Comp.] is set to [On], the angle of view and the image quality change slightly.
- Depending on the lens, changes in the angle of view may not be fully compensated for even when [Breathing Comp.] is set to [On].
[197] Using the shooting functionsNoise reductionHigh ISO NR
When shooting with high ISO sensitivity, the product reduces noise that becomes more noticeable when the product sensitivity is high.
- MENU → (Shooting) → [Image Quality/Rec] → [High ISO NR] → desired setting.
Menu item details
- Normal:
- Activates high ISO noise reduction normally.
- Low:
- Activates high ISO noise reduction moderately.
- Off:
- Does not activate high ISO noise reduction.
Note
-
[High ISO NR] is fixed to [Normal] in the following shooting modes:
- [Intelligent Auto]
- [Scene Selection]
- Since this camera is not equipped with a long-exposure noise reduction function, noise may be noticeable when taking long-exposure shots with high-sensitivity.
[198] Using the shooting functionsSetting the monitor display during shootingShoot Mode Sel. Screen
Set whether to display the shooting mode selection screen in the following situations:
- Selecting [S&Q Motion] or [Time-lapse] when the shooting mode is set to the S&Q (slow-motion/quick-motion) mode.
- MENU → (Setup) → [Display Option] → [Shoot Mode Sel. Screen] → desired setting.
Menu item details
- Display:
- Displays the shooting mode selection screen.
- Not Displayed:
- Does not display the shooting mode selection screen.
[199] Using the shooting functionsSetting the monitor display during shootingAuto Review (still image)
You can check the recorded image on the screen right after the shooting. You can also set the display time for Auto Review.
- MENU → (Setup) → [Display Option] → [Auto Review] → desired setting.
Menu item details
- 10 Sec/5 Sec/2 Sec:
- Displays the recorded image on the screen right after shooting for the selected duration of time. If you perform a magnifying operation during Auto Review, you can check that image using the magnified scale.
- Off:
- Does not display the Auto Review.
Note
- When you use a function that performs image processing, the image before processing may be displayed temporarily, followed by the image after processing.
- Auto Review is displayed in the mode that you have set using DISP (Display Setting) for playback.
[200] Using the shooting functionsSetting the monitor display during shootingGrid Line Display (still image/movie)
Sets whether the grid line is displayed or not during shooting. The grid line will help you to adjust the composition of images.
- MENU → (Shooting) → [Shooting Display] → [Grid Line Display] → desired setting.
Menu item details
- On:
- Displays the grid line.
- Off:
- Does not display the grid line.
Hint
-
If you assign [Grid Line Display Select] to a desired key using [Custom Key/Dial Set.] or [Custom Key/Dial Set.], you can show or hide the grid lines by pressing the assigned key.
[201] Using the shooting functionsSetting the monitor display during shootingGrid Line Type (still image/movie)
Sets the displayed type of grid line. The grid line will help you to adjust the composition of images.
- MENU → (Shooting) → [Shooting Display] → [Grid Line Type] → desired setting.
Menu item details
- Rule of 3rds Grid:
- Place main subjects close to one of the grid lines that divide the image into thirds for a well-balanced composition.
- Golden Ratio Grid:
- Place main subjects close to one of the grid lines that divide the image in the golden ratio for a well-balanced composition.
- Square Grid:
- Square grids make it easier to confirm the horizontal level of your composition. This is useful for assessing the composition when shooting landscapes, closeups, or when performing camera scanning.
- Diag. + Square Grid:
- Place a subject on the diagonal line to express an uplifting and powerful feeling.
Hint
-
If you assign [Grid Line Type] to a desired key using [Custom Key/Dial Set.] or [Custom Key/Dial Set.], you can set the type of grid line by pressing the assigned key.
[202] Using the shooting functionsSetting the monitor display during shootingLive View Display Set.
Sets whether or not to show images altered with effects of the exposure compensation, white balance, [Creative Look], etc. on the screen.
- MENU → (Shooting) → [Shooting Display] → [Live View Display Set.] → desired setting item.
Menu item details
- Live View Display:
- Sets whether to reflect all the shooting settings on the monitor and display the Live View in conditions close to what your picture will look like once the settings are applied, or to display the Live View without reflecting the settings. ([Setting Effect ON] / [Setting Effect OFF])
- If you select [Setting Effect OFF], you can easily check the composition even when shooting with the image composition on the Live View display.
- Exposure Effect:
- Sets whether or not to display the Live View with automatic correction by reflecting the exposure from the flash when [Live View Display] is set to [Setting Effect ON]. ([Exposure Set. & flash] / [Exposure Setting Only])
- When using the flash for shooting a portrait, select [Exposure Setting Only] to manually set the exposure based on the ambient lighting.
Hint
- When you use a third-party flash, such as a studio flash, Live View Display may be dark for some shutter speed settings. When [Live View Display] is set to [Setting Effect OFF], Live View Display will be displayed brightly, so that you can easily check the composition.
- If you select [Setting Effect OFF], Live View is always displayed with the appropriate brightness even in [Manual Exposure] mode.
- When [Setting Effect OFF] is selected, the
 (VIEW) icon is displayed on the Live View screen.
Note
- [Exposure Effect] is effective only when using a flash manufactured by Sony.
- [Live View Display] cannot be set to [Setting Effect OFF] in the following shooting modes:
- [Intelligent Auto]
- [Scene Selection]
- If you shoot movies in the still image shooting mode, the shooting settings will be reflected in Live View even when [Live View Display] is set to [Setting Effect OFF].
- When [Live View Display] is set to [Setting Effect OFF], the brightness of the shot image will not be the same as that of the displayed Live View.
[203] Using the shooting functionsSetting the monitor display during shootingAperture Preview
While you press and hold the key to which you assigned the [Aperture Preview] function, the aperture is stepped down to the set aperture value and you can check the blurriness prior to shooting.
- MENU → (Setup) → [Operation Customize] → [Custom Key/Dial Set.] → set the [Aperture Preview] function to the desired key.
- When shooting still images, confirm the images by pressing the key to which [Aperture Preview] is assigned.
Hint
- Although you can change the aperture value during the preview, the subject may be defocused if you select a brighter aperture. We recommend that you adjust the focus again.
[204] Using the shooting functionsSetting the monitor display during shootingShot. Result Preview
While pressing down the key to which [Shot. Result Preview] is assigned, you can check the image preview with the DRO, shutter speed, aperture and ISO sensitivity settings applied. Check the shooting result preview before shooting.
- MENU → (Setup) → [Operation Customize] → [Custom Key/Dial Set.] → set the [Shot. Result Preview] function to the desired key.
- When shooting still images, confirm the images by pressing the key to which [Shot. Result Preview] is assigned.
Hint
- The DRO settings, shutter speed, aperture and ISO sensitivity settings you have set are reflected on the image for [Shot. Result Preview], but some effects cannot be previewed depending on the shooting settings. Even in that case, the settings you have selected will be applied to the images you shoot.
[205] Using the shooting functionsSetting the monitor display during shootingBright Monitoring
Allows you to adjust the composition when shooting in dark environments. By extending the exposure time, you can check the composition on the monitor even in dark locations such as under the night sky.
- MENU → (Setup) → [Operation Customize] → [Custom Key/Dial Set.] → assign the [Bright Monitoring] function to the desired key.
- In a still image shooting mode, press the key to which you assigned the [Bright Monitoring] function, and then shoot an image.
- The brightness due to [Bright Monitoring] will continue after shooting.
- To return the monitor brightness to normal, press the key to which you assigned the [Bright Monitoring] function once again.
Note
- During [Bright Monitoring], [Live View Display] will automatically switch to [Setting Effect OFF], and setting values such as exposure compensation will not be reflected in the live view display. It is recommended that you use [Bright Monitoring] only in dark locations.
- [Bright Monitoring] will be automatically canceled in the following situations.
- When the camera is turned off.
- When the shooting mode is changed from P/A/S/M to a mode that is not P/A/S/M.
- When the focus mode is set to other than manual focus.
- While the following functions are being executed, you cannot turn [Bright Monitoring] on/off by pressing the custom key to which you have assigned [Bright Monitoring].
- [Auto Magnifier in MF]
- [Focus Magnifier]
- When using [Bright Monitoring] in dark locations, the shutter speed may be slower than during normal shooting, and the updating speed of the monitor display may be slower. Also, because the measured brightness range is expanded, the exposure may change.
[206] Using the shooting functionsSetting the monitor display during shootingEmphasized REC Display
Sets whether or not to display a red frame around the edges of the camera’s monitor while recording a movie. You can easily check whether the camera is in standby or recording, even when you are looking at the camera monitor from an angle or at a distance.
- MENU → (Shooting) → [Shooting Display] → [Emphasized REC Display] → desired setting.
Menu item details
- On:
- Displays a red frame to indicate that recording is in progress.
- Off:
- Does not display a frame to indicate that recording is in progress.
Hint
- The frame displayed by this function can also be output to an external monitor connected via HDMI. Set [HDMI Info. Display] to [On].
[207] Using the shooting functionsSetting the monitor display during shootingMarker Display (still image)
Displays a marker for the specified aspect ratio on the shooting screen when shooting still images.
If you intend to crop the image to the specified aspect ratio after shooting, the aspect marker will allow you to shoot images along with checking the angle of view after trimming.
- MENU → (Shooting) → [Marker Display] → Select a menu item and set the desired parameter.
Menu item details
- Aspect Marker:
- Sets whether or not to display the aspect marker. ([On]/[Off])
- Aspect Marker Type:
- Sets the aspect ratio of the displayed aspect marker. ([1:1]/[5:4]/[4:3]/[16:9]/[1.91:1]/[2.35:1])
- Aspect Marker Level:
- Sets the color density for the displayed aspect marker. (0 to 15)
Hint
- The aspect marker can be displayed simultaneously with grid lines. In this case, the grid lines are displayed according to the angle of view of the aspect marker.
- The aspect marker that was displayed during shooting can be displayed over the played-back image by setting [Aspect Marker Disp.] to [On].
- With [Crop], you can also trim images according to the aspect marker that was displayed at the time of shooting.
- If you want to display the aspect marker vertically, hold the camera vertically when shooting.
Note
- The aspect marker can be displayed when shooting still images with an aspect ratio of [3:2].
- When the aspect ratio for [Aspect Marker] is set to [1:1]/[5:4]/[4:3], the position of the aspect marker will be different from that of [Aspect Marker] for movie recording even if the same aspect ratio is selected.
- The aspect marker is not displayed on devices connected via HDMI.
[208] Using the shooting functionsSetting the monitor display during shootingMarker Display (movie)
While shooting movies, you can set whether or not to display markers on the monitor, and select the types of marker.
- MENU → (Shooting) → [Marker Display] → Select a menu item and set the desired parameter.
Menu item details
- Marker Display:
- Sets whether or not to display markers. ([On] / [Off])
- Center Marker:
- Sets whether or not to display the center marker in the middle of the shooting screen. ([Off] / [On])
- Aspect Marker:
- Sets the aspect marker display. ([Off] / [9:16] / [4:5] / [1:1] / [4:3] / [13:9] / [14:9] / [15:9] / [17:9] / [1.66:1] / [1.85:1] / [1.91:1] / [2:1] / [2.35:1] / [2.39:1])
- Safety Zone:
- Sets the safety zone display. This becomes the standard range that can be received by a general household TV. ([Off] / [80%] / [90%])
- Guideframe:
- Sets whether or not to display the guide frame. You can verify whether the subject is level or perpendicular to the ground. ([Off] / [On])
Hint
- You can display several markers at the same time.
- Position the subject at the cross point of [Guideframe] to ensure a balanced composition.
Note
-
The markers are displayed when the Still/Movie/S&Q switch is set to (Movie) or S&Q (S&Q Motion), or when shooting movies.
- You cannot display markers when using [Focus Magnifier].
- The markers are displayed on the monitor. (You cannot output the markers.)
[209] Using the shooting functionsSetting the monitor display during shootingGamma Display Assist
Movies with S-Log3 gamma are assumed to be processed after shooting in order to make use of the wide dynamic range. Images with the HLG gamma are assumed to be displayed on HDR-compatible monitors. They are therefore displayed in low contrast during shooting, and may be difficult to monitor. However, you can use the [Gamma Display Assist] function to reproduce contrast equivalent to that of normal gamma. In addition, [Gamma Display Assist] can also be applied when playing back movies on the camera's monitor.
- MENU → (Setup) → [Display Option] → [Gamma Display Assist] → desired setting.
Menu item details
- On:
- Uses the gamma display assist function.
- Off:
- Does not use the gamma display assist function.
Hint
-
If you assign [Gamma Disp. Assist Sel.] to a desired key using [Custom Key/Dial Set.], [Custom Key/Dial Set.], or [Custom Key Setting], you can turn the gamma display assist function on or off by pressing the assigned key.
Note
- [Gamma Display Assist] is not applied to movies when displayed on a TV or monitor connected to the camera.
-
[Gamma Display Assist] is locked to [Off] in the following situations:
- When [Log Shooting] is set to [On (Flexible ISO)]
[210] Using the shooting functionsSetting the monitor display during shootingGamma Disp. Assist Typ.
Selects the conversion type for [Gamma Display Assist].
- MENU → (Setup) → [Display Option] → [Gamma Disp. Assist Typ.] → desired setting.
Menu item details
 Auto:
Auto: -
- Displays images with effects as follows according to the gamma or color mode set in [Picture Profile].
- When the gamma is set to [S-Log3]: [S-Log3→709(800%)]
- When the gamma is set to [HLG], [HLG1], [HLG2], or [HLG3], and the color mode is set to [BT.2020]: [HLG(BT.2020)]
- When the gamma is set to [HLG], [HLG1], [HLG2], or [HLG3], and the color mode is set to [709]: [HLG(709)]
- Displays images with an [HLG(BT.2020)] effect when shooting HLG still images with [HLG Still Image] set to [On].
- Displays images with effects as follows according to the gamma or color mode set in [
 S-Log3→709(800%):
- Displays images with an S-Log3 gamma reproducing contrast equivalent to ITU709 (800%).
 HLG(BT.2020):
- Displays images after adjusting the image quality of the monitor to a quality that is almost the same as when images are displayed on an [HLG(BT.2020)] compatible monitor.
 HLG(709):
- Displays images after adjusting the image quality of the monitor to a quality that is almost the same as when images are displayed on an [HLG(709)] compatible monitor.
Hint
-
If you assign [Gamma Disp. Assist Typ.] to a desired key using [Custom Key/Dial Set.] or [Custom Key/Dial Set.], you can switch the [Gamma Disp. Assist Typ.] setting.
Note
-
When [Gamma Display Assist] is set to [Auto] during playback, an effect is applied to the image as follows:
- When playing back a movie recorded with [HLG], [HLG1], [HLG2], or [HLG3]: Displays the image with an [HLG(BT.2020)] or [HLG(709)] effect depending on the color mode.
- When playing back an HLG still image shot with [HLG Still Image] set to [On]: Displays the image with an [HLG(BT.2020)] effect.
Picture Profile].
[211] Using the shooting functionsRecording movie audioAudio Recording
Sets whether to record sounds when shooting movies. Select [Off] to avoid recording the sounds of the lens and the camera operating. This function cannot be used during slow-motion/quick-motion recording and time-lapse movie recording.
- MENU → (Shooting) → [Audio Recording] → [Audio Recording] → desired setting.
Menu item details
- On:
- Records sound.
- Off:
- Does not record sound.
[212] Using the shooting functionsRecording movie audioAudio Rec Level
You can adjust the audio recording level while checking the level meter. This function cannot be used during slow-motion/quick-motion recording and time-lapse movie recording.
- MENU → (Shooting) → [Audio Recording] → [Audio Rec Level].
- Select the desired level using the right/left sides of the control wheel.
Menu item details
- +:
- Turns up the audio recording level.
- -:
- Turns down the audio recording level.
Hint
- When you record audio movies with loud volumes, set [Audio Rec Level] to a lower sound level. Doing so enables you to record more realistic audio. When you record audio movies with lower volumes, set [Audio Rec Level] to a greater sound level to make the sound easier to hear. Check that the volume is at the appropriate level by monitoring the audio recording volume with the connected headphones or the volume level meter on the camera.
- To reset the audio recording level to the default setting, press the (Delete) button.
Note
- Regardless of the [Audio Rec Level] settings, the limiter always operates.
- [Audio Rec Level] is available only when the shooting mode is set to movie mode.
-
The [Audio Rec Level] settings are applied to the internal microphone, the (microphone) terminal input, and the analog audio input* from the Multi Interface Shoe.
*For some external microphones, [Audio Rec Level] cannot be set even when the audio input is set to analog transfer. In this case, use the function to adjust the audio recording level of the external microphone.
*When the audio input to the external microphone is set to digital transfer, [Audio Rec Level] cannot be set.
[213] Using the shooting functionsRecording movie audioAudio Out Timing
You can set echo cancellation during audio monitoring and prevent undesirable deviations between video and audio. This function cannot be used during slow-motion/quick-motion recording and time-lapse movie recording.
- MENU → (Shooting) → [Audio Recording] → [Audio Out Timing] → desired setting.
Menu item details
- Live:
- Outputs audio without delay. Select this setting when audio deviation is a problem during audio monitoring.
- Lip Sync:
- Outputs audio and video in sync. Select this setting to prevent undesirable deviations between video and audio.
Note
- Using an external microphone may result in a slight delay. For details, refer to the operating instructions supplied with the microphone.
- Audio is output with the setting for [Lip Sync] during HDMI output.
[214] Using the shooting functionsRecording movie audioWind Noise Reduct.
Sets whether or not to reduce wind noise by cutting the low-range sound of the input audio from the built-in microphone. This function cannot be used during slow-motion/quick-motion recording and time-lapse movie recording.
- MENU → (Shooting) → [Audio Recording] → [Wind Noise Reduct.] → desired setting.
Menu item details
- Auto:
- The camera automatically detects and reduces wind noise.
- On:
- Always reduces wind noise.
- Off:
- Does not reduce wind noise.
Note
- The sound quality may vary from the normal recording settings when [Wind Noise Reduct.] is set to [On].
- When an external microphone (sold separately) is used, [Wind Noise Reduct.] does not function.
- When [Wind Noise Reduct.] is set to [Auto] while [Audio Out Timing] is set to [Live], the wind noise reduction effect cannot be confirmed by audio monitoring during recording. Audio with reduced wind noise is recorded in the movie. Also, when live-streaming audio using the streaming function, audio with reduced wind noise is streamed.
- If you change the [Wind Noise Reduct.] setting while recording a movie, noise may be produced when the setting is changed and become recorded in the movie.
[215] Using the shooting functionsRecording movie audioMicrophone Directivity
Sets the direction of sound pickup when using the built-in microphone. This function cannot be used during slow-motion/quick-motion recording or time-lapse shooting.
- MENU → (Shooting) → [Audio Recording] → [Microphone Directivity] → desired setting.
Menu item details
- Auto:
- Automatically switches the direction of sound pickup (front or all directions) according to the recognized subject and tracking status.
- Front:
- Picks up sound in front of the camera.
- All Directions:
- Picks up sound from all directions around the camera.
- Rear:
- Picks up sound behind the camera.
Note
- [Microphone Directivity] is disabled when an external microphone is connected.
[216] Using the shooting functionsRecording movie audioMic Direct Select Setting
Configures the setting values to be selected when changing the directivity of the built-in microphone using the key to which [Mic Directivity Select] is assigned in [Custom Key/Dial Set.].
- MENU → (Shooting) → [Audio Recording] → [Mic Direct Select Setting].
- Add a (check) mark to the value that you want to enable.The setting values marked with (check) will be available when performing [Mic Directivity Select] with the custom key.
[217] Using the shooting functionsRecording movie audioShoe Audio Set.
Sets the digital audio transmitted from a microphone (sold separately) attached to the multi-interface shoe of the camera. Use a microphone that supports the digital audio interface. You can set the sampling frequency, the number of quantization bits, and the number of channels. This function cannot be used during slow-motion/quick-motion recording and time-lapse movie recording.
- MENU → (Shooting) → [Audio Recording] → [
 Shoe Audio Set.] → desired setting.
Menu item details
 :
:- Sets the sampling frequency of audio input to 48 kHz, the number of quantization bits to 24 bits, and the number of channels to 4.
 :
:- Sets the sampling frequency of audio input to 48 kHz, the number of quantization bits to 24 bits, and the number of channels to 2.
 :
:- Sets the sampling frequency of audio input to 48 kHz, the number of quantization bits to 16 bits, and the number of channels to 2.
Hint
- The audio level display on the monitor is for 4 channels during 4-channel audio recording.
Note
- When an external microphone (sold separately) is connected to the (microphone) terminal of the camera, the audio is recorded from the external microphone attached to the (microphone) terminal. You cannot set [Shoe Audio Set.].
- If the attached microphone is set to analog transmission, you cannot set [Shoe Audio Set.].
- When the attached microphone does not support 4-channel audio recording, you cannot select [] (48khz/24bit 4ch).
- When the attached microphone does not support 24-bit audio recording, [Shoe Audio Set.] becomes locked to [] (48khz/16bit 2ch).
- Audio cannot be recorded correctly in the following situations during movie recording:
- When you attach or remove the microphone
- When digital transmission is switched to analog transmission or vice versa on the microphone side
[218] Using the shooting functionsCreating still images while recording a movieAutomatic creation of still images from Shot Marks
If you add Shot Marks using a custom key while recording a movie, you can automatically create still images from the movie frames with Shot Marks after recording. Shot Marks can also be added using the shutter button or touch function icon.
If you want to create still images while checking the images with Shot Marks after recording a movie, use [Create Still Image].
- MENU →(Shooting) → [Shooting Option] → [AutoCreateStillImage] → desired setting.
Menu item details
- On:
- Creates still images from frames with Shot Marks after recording a movie. A message appears while still image creation is in progress, and you cannot shoot new images during this time.
- Off:
- Does not create still images from frames with Shot Marks after recording a movie.
About the still images created
- You can select either the JPEG or HEIF format for the still images to be created. You can switch the format by selecting MENU → (Shooting) → [Image Quality/Rec] → [JPEG/HEIF Switch].
- The size of the still images created will be the same size as the movie being recorded, according to the [File Format] setting.
[219] Using the shooting functionsCreating still images while recording a movieShot Marks after still image creation (shooting)
Sets whether to automatically delete Shot Marks after automatically creating still images while recording a movie using the [AutoCreateStillImage] function.
- MENU → (Shooting) → [Shooting Option] → [ after still img crt] → desired setting.
Menu item details
- Auto Delete:
- Deletes Shot Marks automatically after creating still images.
- Maintain:
- Does not delete Shot Marks automatically after creating still images.
[220] Using the shooting functionsTC/UB settingsTC/UB
The time code (TC) and the user bit (UB) information can be recorded as data attached to movies.
- MENU → (Shooting) → [TC/UB] → Select a menu item and set the desired parameter.
Menu item details
- Time Code Preset:
- Sets the time code.
- User Bit Preset:
- Sets the user bit.
- Time Code Format:
- Sets the recording method for the time code. (Only when [NTSC/PAL Selector] is set to NTSC.)
- Time Code Run:
- Sets the count up format for the time code.
- Time Code Make:
- Sets the recording format for the time code on the recording medium.
- User Bit Time Rec:
- Sets whether or not to record the time as a user bit.
How to set the time code (Time Code Preset)
- MENU → (Shooting) → [TC/UB] → [Time Code Preset].
-
Turn the control wheel and select the first two digits.
- The time code can be set between the following range.
When [60p] is selected: 00:00:00.00 to 23:59:59.29*When [24p] is selected, you can select the last two digits of the time code in multiples of four from 00 to 23 frames.
When [50p] is selected: 00:00:00.00 to 23:59:59.24
- The time code can be set between the following range.
- Set the other digits following the same procedure as in step 2, then press in the center of the control wheel.
How to reset the time code
- MENU → (Shooting) → [TC/UB] → [Time Code Preset].
- Press the (Delete) button to reset the time code (00:00:00.00).
How to set the user bit (User Bit Preset)
- MENU → (Shooting) → [TC/UB] → [User Bit Preset].
- Turn the control wheel and select the first two digits.
- Set the other digits following the same procedure as in step 2, then press in the center of the control wheel.
How to reset the user bit
- MENU → (Shooting) → [TC/UB] → [User Bit Preset].
- Press the (Delete) button to reset the user bit (00 00 00 00).
How to select the recording method for the time code (Time Code Format*1)
- MENU → (Shooting) → [TC/UB] → [Time Code Format].
- DF:
- Records the time code in Drop Frame*2 format.
- NDF:
- Records the time code in Non-Drop Frame format.
*1Only when [NTSC/PAL Selector] is set to NTSC.
*2The time code is based on 30 frames per second. However, a gap between the actual time and the time code will occur during extended periods of recording as the frame frequency of the NTSC image signal is approximately 29.97 frames per second. Drop frame corrects this gap to make the time code and actual time equal. In drop frame, the first 2 frame numbers are removed every minute except for every tenth minute. The time code without this correction is called non-drop frame.
- The setting is fixed to [-] when recording in 24p.
How to select the count up format for the time code (Time Code Run)
- MENU → (Shooting) → [TC/UB] → [Time Code Run].
- Rec Run:
- Sets the stepping mode for the time code to advance only while recording. The time code is recorded sequentially from the last time code of the previous recording.
- Free Run:
- Sets the stepping mode for the time code to advance anytime, regardless of the camera operation.
- The time code may not be recorded sequentially in the following situations even when the time code advances in [Rec Run] mode.
- When the recording format is changed.
- When the recording medium is removed.
How to select how the time code is recorded (Time Code Make)
- MENU → (Shooting) → [TC/UB] → [Time Code Make].
- Preset:
- Records the newly set time code on the recording medium.
- Regenerate:
- Reads the last time code for the previous recording from the recording medium and records the new time code consecutively from the last time code. The time code advances in [Rec Run] mode regardless of the [Time Code Run] setting.
Note
- Updating the camera’s system software will reset the time code. Set the time code again.
[221] Using the shooting functionsTC/UB settingsTC/UB Disp. Setting
Sets the display of the recording time counter, time code (TC), and user bit (UB) for movies.
- MENU → (Setup) → [Display Option] → [TC/UB Disp. Setting] → desired setting.
Menu item details
- Counter:
- Displays the time counter of movie recording.
- TC:
- Displays the time code.
- U-Bit:
- Displays the user bit.
[222] Using the shooting functionsLivestreaming video and audioNetwork Streaming (movie)
You can connect the camera to a network, via either a wired or wireless connection, and livestream video and audio from the camera.
- Connect the camera and smartphone via Bluetooth.
- Register information such as the connection destination server and stream key for the distribution service to be used in Creators' App.
- On the camera, select MENU → (Network) → [Streaming] → [Network Streaming] → Set [Streaming] to [On].
[Streaming:Standby] will appear on the camera screen. Then, the camera will switch to the streaming standby state.
- You can also select image quality settings, etc. from Creators' App.
- Press the center of the control wheel to start streaming.[Streaming:Output] will appear on the camera screen.
- You can also start streaming from Creators' App.
- Press the center again to exit streaming.
Menu item details
- Streaming:
- Sets whether to perform network streaming. ([On]/[Off])
- Stream Connect Error Display:
- Displays error information when the camera is unable to connect to the network or distribution server for network streaming.
- Output Img. Quality Set:
- Sets the image quality of video output for network streaming. ([Quality]/[Resolution]/[Frame Rate]/[Bit Rate])
- Output Information Display:
- Displays information for network streaming.
- Movie Rec During Streaming:
- Sets whether to enable recording to recording media during network streaming. ([Enable]/[Disable])
- Emphasized Output Display:
- Sets whether to display a blue frame around the entire monitor during network streaming. ([On]/[Off])
- Root Certificate Error:
- Normally it is recommended to set [Does Not Connect]. If a certificate error is displayed, update the root certificate and connect with the correct authentication.
Output image quality settings
To configure detailed settings for streaming image quality, set [Quality] to [Custom], and set [Resolution], [Frame Rate], and [Bit Rate], respectively.
The setting range of [Bit Rate] varies depending on the combination of [Resolution] and [Frame Rate].
| Resolution | Frame Rate | Bit rate setting range | Bit rate default setting |
|---|---|---|---|
| 4K (2160p) | 30p/25p | 38Mbps - 13Mbps | 34Mbps |
| 2K (1440p) | 30p/25p | 38Mbps - 6Mbps | 13Mbps |
| HD (1080p) | 60p/50p | 27Mbps - 4.5Mbps | 9Mbps |
| 30p/25p | 18Mbps - 3Mbps | 6Mbps | |
| HD (720p) | 60p/50p | 13.5Mbps - 2.3Mbps | 6Mbps |
| 30p/25p | 9Mbps - 1.5Mbps | 4Mbps |
Hint
- If you assign the zoom, network streaming, etc. to the dial or control wheel or register them to the function menu, you can adjust these values even during network streaming.
- The format of the streaming data is as follows.
- Video format: MPEG-H HEVC/H.265 or MPEG-4 AVC/H.264*
- Audio format: 48 kHz, 16 bit, 2ch
*While streaming using RTMP/RTMPS, the video format is MPEG-4 AVC/H.264.
- When using an external microphone, you can minimize deviations between your voice and the movements of your mouth by connecting the microphone to the (microphone) terminal of the camera.
Note
- While network streaming is in progress, the camera is always set to the movie recording mode regardless of the shooting mode before the start of streaming.
- You cannot do the following during network streaming.
- Transition to the menu screen
- Transition to the playback screen
- Remote shooting
- Cloud Connection
- Smartphone transfer
- The following functions are disabled while network streaming is running.
- Cinematic Vlog Set.
- Power Save Start Time
-
Auto Monitor OFF
- When recording to recording media during network streaming, the following restrictions apply to the movie file format and recording frame rate.
- If [Resolution] is set to [4K (2160p)] or [2K (1440p)], [File Format] cannot be set to [XAVC HS 4K].
- [Rec Frame Rate] is the same as [Frame Rate] for the movie when outputting.
- If [Resolution] is set to [4K (2160p)] or [2K (1440p)], [
- You cannot change the [Movie Rec During Streaming] setting during network streaming.
- Depending on the temperature environment, output image quality setting for streaming, setting for movie recording during streaming, Wi-Fi connection environment, and usage conditions before the start of streaming, the internal temperature of the camera may rise, and the time available for streaming may become shorter.
- Depending on your network environment, the distributed video/audio may be disrupted. In that case, switch to a faster and more stable network or lower the setting for [Bit Rate].
- Depending on your internet connection or network conditions, streaming may be interrupted. In this case, restart streaming.
-
To ensure secure streaming, the streaming URL must contain “rtmps://”.
RTMP is used for general streaming but does not provide sufficient security, whereas RTMPS uses SSL/TLS to encrypt data and provide secure streaming. - In SRT, you can select AES-128 or AES-256 as the encryption setting. This will encrypt streaming data and ensure secure delivery. It is possible to set [Encryption] to [None] in the SRT settings, but in this case, data will not be encrypted, and communications will not be secure. When selecting this setting, take into consideration the security requirements of the network environment and the delivery destination.
- The encryption settings of the SRT must match those of the destination. Setting the same encryption method as that used by the destination ensures proper communication.
- When using SRT, the passphrase and shared key are set in Creators' App. The types of characters that can be entered at this time are letters of the alphabet, numbers, and symbols. It is strongly recommended that the length be at least 16 characters.
About the RTMPS function
The RTMPS function supports a variety of encryption algorithms for secure RTMPS streaming. To ensure compatibility with a wide range of destination servers, several encryption algorithms are supported, including some that may not comply with current security best practices. For details, refer to the following website.
https://helpguide.sony.net/di/sftp/v1/h_zz/index.html
[223] Using the shooting functionsLivestreaming video and audioUSB Streaming (movie)
You can connect a computer, etc. to the camera and use the camera video and audio for livestreaming or web-conferencing services. Select MENU → (Setup) → [USB] → [USB Connection Mode] → [Sel. When Connect] or [USB Streaming] beforehand.
- MENU → (Network) → [Streaming] → [USB Streaming] → Set [Output Res/Frame Rate] and [Movie Rec During Streaming].
- Connect the camera to a computer or other device with a USB cable (commercially available).
[Streaming:Standby] will appear on the camera screen, and the camera will switch to the streaming standby state.
- If [USB Connection Mode] is set to [Sel. When Connect], select [Live Stream(USB Streaming)] on the selection screen for the USB connection mode.
- Use a cable or adapter that matches the terminal on the device to be connected.
- Start streaming from your livestreaming/web-conferencing service.
[Streaming:Output] will appear on the camera screen.
- To exit USB Streaming, disconnect the USB cable.
Menu item details
- Output Res/Frame Rate:
- Sets the resolution and the frame rate of the video. ([4K(2160p) 30p]/[4K(2160p) 25p]/[4K(2160p) 15p]/[4K(2160p)12.5p]/[HD(1080p) 60p]/[HD(1080p) 50p]/[HD(1080p) 30p]/[HD(1080p) 25p]/[HD(720p) 30p]/[HD(720p) 25p])
- Movie Rec During Streaming:
- Sets whether or not to enable recording of the video to the recording media during streaming. ([Enable]/[Disable])
Hint
- If you assign the shutter speed, ISO sensitivity, etc. to the dial or control wheel or register them to the function menu, you can adjust these values even during USB streaming.
- The format of the streaming data is as follows.
- Video format: MJPEG* or YUV420
*When the resolution is set to HD (720p), only MJPEG is available.
- Audio format: PCM, 48 kHz, 16 bit, 2 ch
- Video format: MJPEG* or YUV420
- During USB streaming, power is supplied to the camera from the computer. If you want to consume as little computer power as possible, set [USB Power Supply] to [Off].
- When using an external microphone, you can minimize deviations between your voice and the movements of your mouth by connecting the microphone to the (microphone) terminal of the camera.
Note
- While USB streaming is in progress, the camera is always set to the movie recording mode regardless of the position of the Still/Movie/S&Q switch.
- You cannot do the following while USB Streaming is running.
- Transition to the playback screen
- Network functions (Remote Shooting, remote operation from a smartphone, Bluetooth function, etc.)
- The following functions are disabled while USB Streaming is running.
- Picture Profile
- Power Save Start Time
-
Auto Monitor OFF
- When performing USB streaming with a resolution of 4K (2160p) or HD (1080p), use a computer that is compatible with SuperSpeed USB 5 Gbps (USB 3.2) and a commercially available USB cable. Even if the resolution is set to 4K (2160p) or HD (1080p), the actual output resolution will be HD (720p) when connected via the USB 2.0 standard.
- If you change the settings for the following items during USB streaming, the streaming screen may pause temporarily. You may also need to resume streaming from an application depending on the livestreaming service.
- [Output Res/Frame Rate] or [Movie Rec During Streaming] under [USB Streaming]
- [File Format]
- [Output Res/Frame Rate] or [Movie Rec During Streaming] under [
- Depending on the temperature environment, streaming output image-quality settings, video recording settings during streaming, Wi-Fi connection environment, and usage conditions before starting streaming, the internal temperature of the camera may rise, and the streaming time may be shortened.
[224] Customizing the cameraContents of this chapter
The following table of contents lists the features described in this chapter (“Customizing the camera”). From each item name, you can jump to the page describing the respective functions.
Customization features of the camera
Assigning frequently used functions to buttons and dials (Custom Key/Dial Set.)
Changing the function of the dial temporarily (My Dial Settings)
Registering and recalling camera settings
Registering frequently used functions to the function menu
Registering frequently used functions to My Menu
Separately adjusting the camera settings for still images and movies
Customizing the functions of the ring/dial
Using the shutter button when shooting movies
Monitor settings
[225] Customizing the cameraCustomization features of the camera
The camera has various customization features such as registration of functions and shooting settings to custom keys. You can combine your preferred settings to customize the camera for easier operation.
For details on how to configure the settings and use them, refer to the page for each function.
To assign frequently used functions to buttons (Custom Key/Dial Set., Custom Key/Dial Set., and Custom Key Setting)
You can change the functions of the buttons including the Custom Button (C1) according to your preferences. It is recommended that you assign frequently used functions to easily operable buttons so that you can call up the assigned functions simply by pressing the corresponding button.
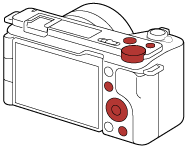
To register frequently used functions to the Fn button (Function menu)
If you register functions frequently used in the shooting mode or in the playback mode to the Function menu, you can display the registered functions on the screen simply by pressing the Fn (Function) button. On the Function menu screen, you can recall the function you want to use by selecting the icons.
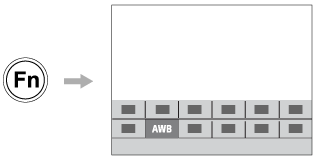
To combine frequently used functions on the menu screen (My Menu)
If you combine the frequently used items from menus such as the shooting and network menu on the “My Menu” screen, you can quickly access the desired menu items.
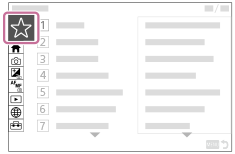
To assign different functions to the dial and switch the function of the dial (  My Dial Settings )
You can assign the desired functions to the control dial and the control wheel, and register up to three combinations of settings to the camera as the “My Dial 1 - 3” settings.
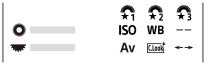
Example: [My Dial Settings] screen for models with a control dial
To change the shooting settings quickly according to the scene (Camera Set. Memory)
You can register the appropriate shooting settings* for scene to the camera or a memory card, and call up the settings easily by using the function menu, etc.
* You cannot register custom key settings.
To save the customized camera settings to a memory card (Save/Load Settings)
You can save camera settings* to a memory card using [Save/Load Settings]. This function is useful when you want to back up the settings, or to import the settings to another camera of the same model, etc.
* Some settings cannot be saved on a memory card.
[226] Customizing the camera Assigning frequently used functions to buttons and dials (Custom Key/Dial Set.)
You can use the custom key function to assign the functions you use most frequently to easily operable buttons and dials. This lets you skip the process of selecting items from MENU, so you can recall the functions more quickly.
You can separately assign functions to custom keys for the still image shooting mode, movie shooting mode, and playback mode.
- Assignable functions vary depending on the buttons or dials.
You can assign functions to the following buttons and dials.
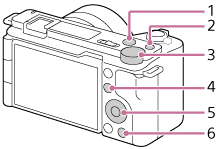
- MOVIE Button
- Custom Button 1
- Control Dial
- Fn/Button
- Control Wheel/Center Button/Left Button/Right Button/Down Button
-
 Button
The following is the procedure for assigning the [Subject Recognition AF] function to the center button.
- MENU → (Setup) → [Operation Customize] → [Custom Key/Dial Set.].
- If you want to assign a function to recall while shooting movies, select [Custom Key/Dial Set.]. If you want to assign a function to recall while playing back images, select [Custom Key Setting].
- You can also select [Custom Key/Dial Set.] and [Custom Key/Dial Set.] from MENU → (Setup) → [Dial Customize].
- If you want to assign a function to recall while shooting movies, select [
- Move to the [Rear] screen using the top/bottom side of the control wheel. Then, select [Center Button] and press the center of the control wheel.
- Select [Subject Recognition AF] using the top/bottom/left/right side of the control wheel, and then press the center.
- If you press the center button while shooting and eyes are detected, [Subject Recognition AF] will activate and the camera will focus on the eyes. Shoot images while holding down the center button.
To use different functions for the dials/wheel depending on the shooting mode
If you add a check mark to [Separate M mode and other modes.] when assigning functions to the dials/wheel, you can assign different functions for [Manual Exposure] and the other exposure modes ([Intelligent Auto]/[Program Auto]/[Aperture Priority]/[Shutter Priority]).
Hint
- By pressing a button to which a function can be assigned on the custom key setting screen, you can go to the setting screen for the pressed button (except for some buttons).
- You can also assign shooting functions to the focus hold button on the lens. However, some lenses do not have a focus hold button.
[227] Customizing the camera Changing the function of the dial temporarily (My Dial Settings)
You can assign the desired functions to the control dial and the control wheel, and register up to three combinations of settings as “My Dial” settings. You can quickly recall or switch registered “My Dial” settings by pressing the custom key you assigned in advance.
Registering functions to “My Dial”
Register the functions that you want to assign to the control dial and the control wheel as [My Dial 1] through [My Dial 3].
- MENU → (Setup) → [Dial Customize] → [My Dial Settings].
-
Select a dial or wheel for (My Dial 1), and press the center of the control wheel.
-
Select the desired function to assign using the top/bottom/left/right sides of the control wheel, and then press the center of the control wheel.
- Select “--” (Not set) for a dial or wheel to which you do not want to assign any function.
-
After you select functions for all of the dials and the wheel in
(My Dial 1) by repeating Steps 2 and 3, select [OK].The settings for
(My Dial 1) will be registered.- If you want to register
 (My Dial 2) and
  (My Dial 3) as well, follow the same procedure as described above.
- If you want to register
Assigning a key to recall “My Dial”
Assign a custom key to recall the registered “My Dial” settings.
- MENU → (Setup) → [Operation Customize] → [Custom Key/Dial Set.] or [Custom Key/Dial Set.] → Select the key that you want to use to recall “My Dial.”
- Select the number of the “My Dial” setting that you want to recall or the pattern for switching “My Dial.”
Menu item details
- My Dial 1 during Hold /My Dial 2 during Hold/My Dial 3 during Hold:
- While you hold down the key, the functions that you registered in [My Dial Settings] are assigned to the dial/wheel.
- My Dial 1→2→3 :
- Each time you press the key, the function changes in the following sequence: “Normal function → Function of My Dial 1 → Function of My Dial 2 → Function of My Dial 3 → Normal function.”
- Toggle My Dial 1 /Toggle My Dial 2/Toggle My Dial 3:
- The function registered using [My Dial Settings] is maintained even if you do not hold down the key. Press the key again to return to the normal function.
Shooting while switching “My Dial”
During shooting, you can recall “My Dial” using the custom key, and shoot as you change the shooting setting by turning the control dial/control wheel.
In the following example, the functions listed below are registered to "My Dial," and [My Dial 1→2→3] is assigned to the C1 (Custom 1) button.
| My Dial 1 | My Dial 2 | My Dial 3 | |
|---|---|---|---|
| Control wheel | ISO |
Shutter Speed | Creative Look |
| Control dial | Aperture | White Balance |
Not set |
-
Press the C1 (Custom1) button.
The functions registered to [My Dial 1] will be assigned to the control wheel/control dial.
- The icons for the functions registered to [My Dial 1] are displayed in the lower part of the screen.
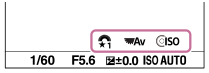
- Turn the control wheel to set the ISO value, and turn the control dial to set the aperture value.
- Press the C1 button again. The functions registered to [My Dial 2] will be assigned to the control wheel/control dial.
-
Turn the control wheel to set the shutter speed, and turn the control dial to set [White Balance].
- Press the C1 button again, and change the setting values for the functions registered to [My Dial 3].
Note
- “My Dial” settings in which every dial/wheel is set to [Not set] are not recalled when you press the custom key. They are also skipped in [My Dial 1→2→3].
- Even if a dial/wheel has been locked using the [Dial / Wheel Lock] function, it will be unlocked temporarily when “My Dial” is recalled.
[228] Customizing the cameraRegistering and recalling camera settingsCamera Set. Memory
Allows you to register up to 3 often-used modes or product settings per shooting mode (Still/Movie/S&Q Motion/time-lapse movie) to the product and up to 4 (M1 through M4) to the memory card. You can recall the settings during shooting.
- Set the product to the setting you want to register.
- MENU → (Shooting) → [Shooting Mode] → [Camera Set. Memory] → desired number.
- Press the center of the control wheel to confirm.
Items that can be registered
- You can register various functions for shooting. The items that can actually be registered are displayed on the menu of the camera.
- Aperture (F number)
- Shutter speed
To change registered settings
Change the setting to the desired one and re-register the setting to the same mode number.
Note
- M1 through M4 can be selected only when a memory card is inserted into the product.
- Program Shift cannot be registered.
[229] Customizing the cameraRegistering and recalling camera settings Recalling registered shooting settings (Cam.Set)
Allows you to shoot an image after recalling your preferred shooting settings registered with [Camera Set. Memory].
- Set the camera to the desired shooting mode using the Still/Movie/S&Q switch.
- If S&Q (slow-motion/quick-motion) is selected and [Shoot Mode Sel. Screen] is set to [Display], the [Shoot Mode] screen in Step 2 will be displayed at this point.
- If S&Q (slow-motion/quick-motion) is selected and [Shoot Mode Sel. Screen] is set to [Display], the [
- MENU → (Shooting) → [Shooting Mode] → [Shoot Mode]/[Shoot Mode]/[Shoot Mode] → [Cam.Set] → desired number.
Hint
- Settings registered to a memory card using another camera of the same model name can be recalled with this camera.
Note
-
If you perform [Cam.Set] after completing the shooting settings, the registered settings will be given priority and the original settings may become invalid. Check the indicators on the screen before shooting.
[230] Customizing the cameraRegistering frequently used functions to the function menu Fn Menu Settings (still image/movie)
The Function menu is a menu of 12 functions that is displayed at the bottom of the screen when you press the Fn (Function) button.
You can register 12 functions to the Function menus for still image shooting and movie shooting, respectively.
The following is the procedure for changing [Creative Look] in the still image function menu to [Grid Line Display].
- To change the movie function menu, select a movie function menu item in Step 2.
- MENU → (Setup) → [Operation Customize] → select [Fn Menu Settings].
- Select
 (Creative Look) from among the 12 still image function menu items using the top/bottom/left/right side of the control wheel, and then press the center.
 - Move to the screen showing [Grid Line Display] using the top/bottom/left/right side of the control wheel. Then, select [Grid Line Display] and press the center of the control wheel.
 (Grid Line Display) will be displayed in the former location of (Creative Look) in the Function menu.
Hint
-
When [Touch Operation] is set to [On] and [Shooting Screen] is set to [On], you can also open [Fn Menu Settings] by holding down the icon in the function menu.
[231] Customizing the cameraRegistering frequently used functions to the function menuFn Menu Settings (playback)
Sets the function menu for the playback mode. The Function menu is a menu of 12 functions that is displayed at the bottom of the screen when you press the key to which [Function Menu] is assigned.
The following is the procedure for changing [Send to Smartphone] to [Photo Capture].
- MENU → (Setup) → [Operation Customize] → [Fn Menu Settings].
- Select (Send to Smartphone) from among the 12 function menu items using the top/bottom/left/right side of the control wheel, and then press the center.
- Move to the screen showing [Photo Capture] using the top/bottom/left/right side of the control wheel. Then, select [Photo Capture] and press the center of the control wheel.
 (Photo Capture) will be displayed in the former location of (Send to Smartphone) in the Function menu.
Hint
- Assign [Function Menu] to the desired key using [Custom Key Setting] in advance.
-
When [Touch Operation] is set to [On] and [Playback Screen] is set to [On], you can also open [Fn Menu Settings] by holding down the icon in the function menu.
[232] Customizing the cameraRegistering frequently used functions to My MenuAdd Item
You can register the desired menu items to (My Menu) under MENU.
- MENU → (My Menu) → [My Menu Setting] → [Add Item].
- Select an item that you want to add to (My Menu) using the top/bottom/left/right sides of the control wheel.
- Select a destination using the top/bottom/left/right sides of the control wheel.
To add menu items from the menu screen
You can add the menu item currently selected on the menu screen to (My Menu).
-
Press the
(Delete) button while the cursor is over the menu item that you want to add to (My Menu).The context menu will appear.
- When [Touch Operation] is set to [On], you can display the context menu by touching and holding the menu item.
- Select [Add to My Menu].
- Select a destination using the top/bottom/left/right sides of the control wheel.
Hint
- You can add up to 42 items to (My Menu).
Note
- You cannot add the following items to (My Menu).
- Any item under MENU → (Playback)
- Any item under MENU →
[233] Customizing the cameraRegistering frequently used functions to My MenuSort Item
You can rearrange the menu items added to (My Menu) under MENU.
- MENU → (My Menu) → [My Menu Setting] → [Sort Item].
- Select an item that you want to move using the top/bottom/left/right sides of the control wheel.
- Select a destination using the top/bottom/left/right sides of the control wheel.
[234] Customizing the cameraRegistering frequently used functions to My MenuDelete Item
You can delete menu items added to (My Menu) of MENU.
- MENU → (My Menu) → [My Menu Setting] → [Delete Item].
- Select an item that you want to delete using the top/bottom/left/right sides of the control wheel, and then press the center to delete the selected item.
Hint
- To delete all the items on a page, select MENU → (My Menu) → [My Menu Setting] → [Delete Page].
- You can delete all the items added to (My Menu) by selecting MENU → (My Menu) → [My Menu Setting] → [Delete All].
[235] Customizing the cameraRegistering frequently used functions to My MenuDelete Page
You can delete all the menu items added to a page under (My Menu) in MENU.
- MENU → (My Menu) → [My Menu Setting] → [Delete Page].
- Select a page that you want to delete using the top/bottom sides of the control wheel, and then press the center of the control wheel to delete the items.
[236] Customizing the cameraRegistering frequently used functions to My MenuDelete All
You can delete all the menu items added to (My Menu) in MENU.
- MENU → (My Menu) → [My Menu Setting] → [Delete All].
- Select [OK].
[237] Customizing the cameraRegistering frequently used functions to My MenuDisplay From My Menu
You can set My Menu to appear first when you press the MENU button.
- MENU → (My Menu) → [My Menu Setting] → [Display From My Menu] → desired setting.
Menu item details
- On:
- My Menu appears first when you press the MENU button.
- Off:
- The most recently displayed menu appears when you press the MENU button.
[238] Customizing the cameraSeparately adjusting the camera settings for still images and moviesDifferent Set for Still/Mv
For each item in still image shooting and movie recording, you can select whether to use a common setting or separate settings.
- MENU → (Setup) → [Operation Customize] → Select [Different Set for Still/Mv].
The operation guide screen will appear. Select [OK] to display the setting screen.
- Add check marks to the items that you want to set separately for still image shooting and movie recording, and then select [OK].
- You can set the following items separately for still image shooting and movie recording.
- Aperture
- Shutter Speed
- ISO
- Exposure Comp.
- Metering Mode
- White Balance
- Picture Profile
- Focus Mode
- You can set the following items separately for still image shooting and movie recording.
Hint
- When you switch from a common setting to separate settings with [Different Set for Still/Mv], the current settings are applied to both still image shooting and movie recording. However, the custom white balance setting is only applied to still image shooting.
- When you switch from separate settings to a common setting with [Different Set for Still/Mv], the setting values of items return to their initial values. As an exception, the setting values for still image shooting are applied to the aperture value, shutter speed, and custom white balance settings.
[239] Customizing the cameraCustomizing the functions of the ring/dialAv/Tv Rotate
Sets the direction of rotation for the control dial or control wheel when changing the aperture value or shutter speed.
- MENU → (Setup) → [Dial Customize] → [Av/Tv Rotate] → desired setting.
Menu item details
- Normal:
- Does not change the direction of rotation for the control dial or control wheel.
- Reverse:
- Reverses the direction of rotation for the control dial or control wheel.
[240] Customizing the cameraCustomizing the functions of the ring/dialFunction Ring(Lens)
Sets the function to assign to the function ring on the lens (available only with lenses equipped with a function ring).
For details, refer to the operating instructions supplied with the lens.
- MENU → (Setup) → [Dial Customize] → [Function Ring(Lens)]→ desired setting.
Menu item details
- Power Focus:
- The focusing position moves toward infinity when you turn the function ring to the right. The focusing position moves to the closer range when you turn the function ring to the left.
- Preset Focus:
- Registers the focus position and zoom position by moving and holding the function ring on the lens on the shooting screen and recalls them by briefly flicking the function ring on the lens.
- You can register or recall the positions regardless of the direction in which you turn the function ring.
[241] Customizing the cameraCustomizing the functions of the ring/dialDial / Wheel Lock
You can set whether the dials and wheel can be locked by holding down the Fn (Function) button.
- MENU → (Setup) → [Dial Customize] → [Dial / Wheel Lock] → desired setting.To lock the dials and wheel, hold down the Fn (Function) button until the message “Locked.” appears on the monitor.
Menu item details
- Lock:
- Locks the control dial and control wheel.
- Unlock:
- Does not lock the control dial and control wheel even if you hold down the Fn (Function) button.
Hint
- You can release the lock by holding the Fn (Function) button down again.
- You can lock all buttons, dials, and wheels except the shutter button by pressing and holding the MENU button and the Fn (Function) button simultaneously for 5 seconds. Press and hold the MENU button and the Fn button simultaneously for 5 seconds again to release the lock.
Note
- If you set [AF Area Registration] to [On], [Dial / Wheel Lock] will be fixed to [Unlock].
[242] Customizing the cameraUsing the shutter button when shooting moviesREC w/ Shutter (movie)
You can start or stop recording movies by pressing the shutter button instead of the MOVIE (Movie) button.
- MENU → (Setup) → [Operation Customize] → [REC w/ Shutter] → desired setting.
Menu item details
- On:
-
Enables movie recording using the shutter button when the shooting mode is set to [Movie], [S&Q Motion], or [Time-lapse].
- Off:
- Disables movie recording using the shutter button.
Hint
- When [REC w/ Shutter] is set to [On], you can use the shutter button to start or stop recording movies on an external recording/playback device using [REC Control].
Note
- When [REC w/ Shutter] is set to [On], you cannot focus by pressing the shutter button halfway down during movie recording.
[243] Customizing the cameraUsing the shutter button when shooting moviesAdding Shot Marks with the shutter button (movies)
By pressing the shutter button deeply down while recording a movie, you can add a Shot Mark to the movie frame at the time the shutter button was pressed. The Shot Mark can be used to automatically create a still image from a scene in a movie.
- MENU → (Setup) → [Operation Customize] → [ with Shutter Button] → desired setting.
Menu item details
- Add Shot Mark1:
- While recording a movie, press the shutter button to add Shot Mark 1 to the movie frame.
- Add Shot Mark2:
- While recording a movie, press the shutter button to add Shot Mark 2 to the movie frame.
- Do not add:
- Does not add a Shot Mark by pressing the shutter button.
Note
- If [ with Shutter Button] is set to add Shot Marks by pressing the shutter button, focusing will not be performed by pressing the shutter button halfway down.
- When [REC w/ Shutter] is set to [On], [ with Shutter Button] becomes locked to [Do not add].
[244] Customizing the cameraMonitor settingsMonitor Flip Direction
The direction of image and menu screen displays can be inverted according to the camera orientation and the monitor angle/orientation.
- MENU → (Setup) → [Monitor] → [Monitor Flip Direction].
- Adjust the camera orientation and the monitor angle/orientation to the desired position.
- Select the desired setting while checking the monitor.
Menu item details
- Auto:
- Inverts the direction of the monitor display by detecting the camera orientation and the monitor angle/orientation.
- Mirror Flip:
- Flips the monitor display around the shorter edge.
- 180 Degree Flip:
- Rotates the monitor display 180 degrees.
- No Flip:
- Does not invert the display of the monitor.
Hint
- By repeatedly pressing the key to which the [Switch Monitor Flip Disp] function is assigned, you can switch the setting in the order of [Mirror Flip] → [180 Degree Flip] → [No Flip] → [Mirror Flip]. When [Monitor Flip Direction] is set to [Auto], the display method is temporarily switched while the setting value remains [Auto].
Note
- Even if [Monitor Flip Direction] is set to [Mirror Flip], the direction of the monitor display during playback will not be inverted.
[245] Customizing the cameraMonitor settingsVertical Display
Sets whether or not to automatically rotate the information display when you hold the camera vertically.
- MENU → (Setup) → [Monitor] → [Vertical Display] → desired setting.
Menu item details
- On:
- Rotates the information display according to the camera orientation.
- Off:
- Does not rotate the information display regardless of the camera orientation.
About the vertical information display
During vertical display, the same information is provided as on the horizontal shooting screen, and it is arranged to match the orientation of the monitor.
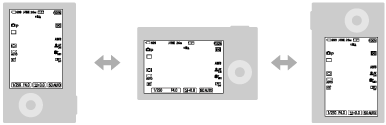
About the controls during vertical display
During vertical display, the direction of the top/bottom/left/right side of the control wheel and the touch operations are also rotated to match the orientation of the monitor so that intuitive operation is possible.
The functions assigned to the top/bottom/left/right side of the control wheel using [Custom Key/Dial Set.] or [Custom Key/Dial Set.] will not rotate during vertical display.
Hint
- You can set the information to be displayed on the screen by selecting MENU → (Setup) → [Operation Customize] → [DISP (Screen Disp) Set], and the display mode can be switched by pressing the DISP (Display Setting) button.
- During vertical display in the movie recording modes, information other than the movie recording status and recording time will be hidden after a certain period of time if the screen display mode is set to [No Disp. Info.] and [Exposure: TimeOut] is selected.
- During vertical display, the touch function icons displayed on the left and right sides of the screen will also be arranged to match the screen orientation.
Note
- The orientation of the camera cannot be detected when the lens is facing up or down.
[246] Customizing the cameraMonitor settings DISP (Screen Disp) Set
Allows you to set the screen display modes that can be selected using DISP (Display Setting) in shooting mode.
- MENU → (Setup) → [Operation Customize] → [DISP (Screen Disp) Set] → desired setting → [Enter].
The items marked with (check) are available.
Menu item details
- Display All Info. :
- Shows recording information.
- No Disp. Info. :
- Does not show recording information.
You can set whether to always display exposure information or to hide the exposure information after a certain period of time has elapsed from operation of the shutter button, etc. when shooting images. ([Exposure: On]/[Exposure: TimeOut])- During vertical display in the movie recording modes, information other than the movie recording status and recording time will be hidden after a certain period of time if the screen display mode is set to [No Disp. Info.] and [Exposure: TimeOut] is selected.
- Histogram :
- Displays the luminance distribution graphically.
- Level :
- Indicates whether the product is level in both the front-back (A) and horizontal (B) directions. When the product is level in either direction, the indicator turns to green.
-
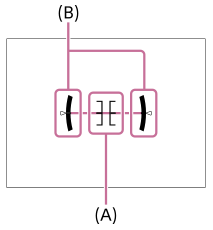
Note
- If you tilt the product forward or backward by a large degree, the level error will be great.
- The product may have a margin of error of almost ±1° even when the inclination is corrected by the level.
[247] ViewingContents of this chapter
The following table of contents lists the features described in this chapter (“Viewing”). From each item name, you can jump to the page describing the respective functions.
Viewing images
- Playing back still images
- Enlarging an image being played back (Enlarge Image)
- Enlarge Initial Mag.
- Enlarge Initial Position
- Rotating recorded images automatically (Display Rotation)
- Playing back movies
- Playback/Monitor. Vol.
- 4ch Audio Monitoring (movie)
- Playing back images using slideshow (Slide Show)
- Cont. Play for Interval
- Play Speed for Interval
Changing how images are displayed
- Playing back images on the image index screen (Image Index)
- Playback Filter Condition
- Image Order
- Display as Group
- Focus Frame Display (playback)
- Aspect Marker Disp. (still image)
- Disp Specified Time Img.
Setting how to jump between images
Protecting recorded images (Protect)
Adding information to images
Crop
Extracting still images from a movie
- Photo Capture
- Creating still images from Shot Marks
- Shot Marks after still image creation (playback)
- JPEG/HEIF Switch (Photo Capture / Creating still images from Shot Marks)
Deleting images
Viewing images on a TV
[248] ViewingViewing imagesPlaying back still images
Plays back the recorded images.
- Press the (Playback) button to switch to the playback mode.
You can touch
(Playback) on the screen to switch to the playback mode.If the touch function icons are not displayed, swipe left or right on the monitor to display them.
For details, refer to “Touch function icons.” - Select the image with the control wheel.
- When [Display as Group] is set to [On], images shot with continuous shooting or interval shooting are displayed as one group. To play back the images in the group, press the center of the control wheel.
Hint
- The product creates an image database file on a memory card to record and play back images. An image that is not registered in the image database file may not be played back correctly. To play back images shot using other devices, register those images to the image database file using MENU → (Shooting) → [Media] → [Recover Image DB].
- If you play back the images right after continuous shooting, the monitor may display an icon indicating that data is being written/the number of images left to write. During writing, some functions are not available.
- You can move to the previous/next image or group by pressing the left/right side of the control wheel even while an image in the group is being played back. In this case, the icon that indicates moving across a group is displayed.
-
When [Focus Frame Display] is set to [On], the focus frame at the time of shooting is displayed over played-back images. The focus frame that the camera used to focus during shooting is displayed in green. Even if multiple focus frames are displayed during shooting, only the one on which the camera actually tried to focus will be displayed during playback.
- When [Aspect Marker Disp.] is set to [On], the aspect marker that was displayed during shooting can also be displayed over the played-back image.
[249] ViewingViewing imagesEnlarging an image being played back (Enlarge Image)
Enlarges the still image being played back. Use this function to check the focus of the image, etc.
- Display the image you want to enlarge, and slide the W/T (zoom) lever to the T side.
- Slide the W/T (zoom) lever to the W side to adjust the zoom scale.
- By rotating the control dial, you can switch to the previous or next image while keeping the same zoom scale.
- The view will zoom in on the part of the image where the camera focused during shooting. If the focus location information cannot be obtained, the camera will zoom in on the center of the image.
- Select the portion you want to enlarge by pressing the top/bottom/right/left sides of the control wheel.
- Press the MENU button or the center of the control wheel to exit the playback zoom.
Hint
- You can also enlarge an image being played back using MENU.
-
You can change the initial magnification and initial position of enlarged images by selecting MENU → (Playback) → [Magnification] → [Enlarge Initial Mag.] or [Enlarge Initial Position].
- You can also enlarge the image by touching the monitor. Drag the monitor to move the enlarged position. Set [Touch Operation] to [On] and [Playback Screen] to [On] beforehand.
[250] ViewingViewing imagesEnlarge Initial Mag.
Sets the initial magnification scale when playing back enlarged images.
- MENU → (Playback) → [Magnification] → [Enlarge Initial Mag.] → desired setting.
Menu item details
- Standard. Mag.:
- Displays an image with the standard magnification.
- Previous Mag.:
- Displays an image with the previous magnification. The previous magnification is stored even after the enlarged display screen is closed.
[251] ViewingViewing imagesEnlarge Initial Position
Sets the initial position when enlarging an image in playback.
- MENU → (Playback) → [Magnification] → [Enlarge Initial Position] → desired setting.
Menu item details
Focused Position:
Enlarges the image from the point of focus during shooting.
Center:
Enlarges the image from the center of the screen.
[252] ViewingViewing imagesRotating recorded images automatically (Display Rotation)
Selects the orientation when playing back recorded images.
- MENU →(Playback) → [Playback Option] → [Display Rotation] → desired setting.
Menu item details
- Auto:
- When you rotate the camera, the camera detects the vertical and horizontal directions, and displays the image being played back according to the orientation.
- Manual:
- Images shot vertically are displayed vertically. If you have set the image orientation using the [Rotate] function, the image will be displayed accordingly.
- Off:
- Images are always displayed horizontally.
Note
- Movies shot vertically are played back horizontally during movie playback.
[253] ViewingViewing imagesPlaying back movies
Plays back the recorded movies.
- Press the (playback) button to switch to playback mode.
- Select the movie to be played back using the control wheel and press the center of the control wheel to start playback.
Available operations during movie playback
You can perform slow playback and sound volume adjustment, etc. by pressing the down side of the control wheel.
 : Playback
 : Pause
 : Fast-forward
 : Fast-rewind
 : Forward slow playback
 : Reverse slow playback
 : Next movie file
 : Previous movie file
 : Displays the next frame
 : Displays the previous frame
-
: Photo Capture
 : Sound volume adjustment
 : Closes the operation panel
Hint
- The product creates an image database file on a memory card to record and play back images. An image that is not registered in the image database file may not be played back correctly. To play back images shot using other devices, register those images to the image database file using MENU → (Shooting) → [Media] → [Recover Image DB].
- “Forward slow playback,” “Reverse slow playback,” “Displays the next frame” and “Displays the previous frame” are available during pause.
- Movie files recorded using other products may not be playable on this camera.
- For movies with Shot Marks, the positions of the Shot Marks are displayed on the playback bar during movie playback. In addition, the Shot Mark icon is displayed on the screen when a scene to which a Shot Mark was added is played back.
- You can jump to the positions of Shot Marks by turning the control dial while paused.
Note
- Even if you shoot the movie vertically, the movie will be displayed horizontally on the screen of the camera.
[254] ViewingViewing images Playback/Monitor. Vol.
Sets the sound volume for movie playback.
- MENU →(Setup) → [Sound Option] → [Playback/Monitor. Vol.] → desired setting.
Adjusting the volume during playback
Press the bottom side of the control wheel while playing back movies to display the operation panel, then adjust the volume. You can adjust the volume while listening to the actual sound.
[255] ViewingViewing images4ch Audio Monitoring (movie)
Sets the audio to be monitored by the device connected to the (headphone) terminal of the camera when you record movie audio in 4 channels or when playing back a movie recorded in 4 channels.
- MENU → (Setup) → [Sound Option] → [4ch Audio Monitoring] → desired setting.
Menu item details
- CH1/CH2:
- Outputs audio from channel 1 to the L (left) side and from channel 2 to the R (right) side.
- CH3/CH4:
- Outputs audio from channel 3 to the L (left) side and from channel 4 to the R (right) side.
- CH1+3/CH2+4:
- Outputs the mixed audio of channel 1 and channel 3 to the L (left) side and the mixed audio of channel 2 and channel 4 to the R (right) side.
- CH1/CH1:
- Outputs audio from channel 1 to the L (left) side and R (right) side.
- CH2/CH2:
- Outputs audio from channel 2 to the L (left) side and R (right) side.
Note
-
The [4ch Audio Monitoring] settings are enabled when an accessory for 4-channel audio recording is attached to the Multi Interface Shoe of the camera during movie recording.
- The camera cannot output audio in 4 channels to the device connected to the (headphone) terminal of the camera.
- When outputting audio through the speakers of the camera, the channels will also change depending on the [4ch Audio Monitoring] setting.
[256] ViewingViewing imagesPlaying back images using slideshow (Slide Show)
Automatically plays back images continuously.
- MENU →(Playback) → [Viewing] → [Slide Show] → desired setting.
- Select [Enter].
Menu item details
- Repeat:
- Select [On], in which images are played back in a continuous loop, or [Off], in which the product exits the slideshow when all the images are played back once.
- Interval:
- Select the display interval for images from among [1 Sec], [3 Sec], [5 Sec], [10 Sec] or [30 Sec].
To quit the slideshow in the middle of playback
Press the MENU button to quit the slideshow. You cannot pause the slideshow.
Hint
- During playback, you can display the next/previous image by pressing the right/left side of the control wheel.
[257] ViewingViewing imagesCont. Play for Interval
Continuously plays back images shot using interval shooting.
You can create movies from still images produced by interval shooting using the computer software Imaging Edge Desktop(Viewer). You cannot create movies from the still images on the camera.
- MENU →(Playback) → [Viewing] → [Cont. Play for Interval].
- Select the image group that you want to play back, and then press the center of the control wheel.
Hint
- On the playback screen, you can start continuous playback by pressing the down button while displaying an image in the group.
- You can resume play or pause by pressing the down button during playback.
-
You can change the playback speed by turning the control dial or the control wheel during playback.
You can also change the playback speed by selecting MENU → (Playback) → [Viewing] → [Play Speed for Interval].
- You can continuously play back images shot with continuous shooting as well.
[258] ViewingViewing imagesPlay Speed for Interval
Interval]. - MENU → (Playback) → [Viewing] → [Play Speed for Interval] → desired setting.
Hint
-
You can also change the playback speed by turning the control dial or the control wheel during [Cont. PB for Interval].
[259] ViewingChanging how images are displayedPlaying back images on the image index screen (Image Index)
You can display multiple images at the same time in playback mode.
- Slide the W/T (zoom) lever to the W side while the image is being played back.
- Select the image by pressing the top/bottom/right/left sides of the control wheel or turning the control wheel.
To change the number of images to be displayed
MENU → (Playback) → [Playback Option] → [Image Index] → desired setting.
Menu item details
- 9 Images/30 Images
To return to single-image playback
Select the desired image and press the center of the control wheel.
To display a desired image quickly
Select the bar on the left of the image index screen using the control wheel, then press the top/bottom sides of the control wheel. While the bar is being selected, you can display the calendar screen or folder selection screen by pressing the center.
[260] ViewingChanging how images are displayedPlayback Filter Condition
You can narrow down the images to be played back using multiple filtering conditions.
- MENU → (Playback) → [Playback Target] → [Playback Filter Condition] → Set the desired conditions, and then select [Execute Filter].
Menu item details
- Date:
- Filters the playback target by date.
- Folder :
- Filters the playback target by folder.
- Still Images/Movies :
- Sets the playback target to still images only or to movies only. ([Still Image]/[Movie])
-
 Rating:
 - Filters the playback target by rating. ([] - []/[
 ])
]) - Protect:
- Filters the playback target by the presence of protection. ([Yes]/[No])
-
 Shot Mark:
 - Filters the playback target by the presence of shot marks. ([Yes]/[Shot Mark1 Only]/[Shot Mark2 Only]/[No])
- Smartphone Trans State :
- Filters the playback target by transferring status to a smartphone. ([Non-transferred]/[Success. Trans. Img.])
- File Format :
- Filters the playback target by the file format when [Still Images/Movies] is set to [Still Image]. ([RAW]/[JPEG]/[HEIF]/[RAW & JPEG]/[RAW & HEIF]/[RAW/RAW & JPEG]/[RAW/RAW & HEIF]/[Images Incl RAW])
- File Format:
- Filters the playback target by the recorded format when [Still Images/Movies] is set to [Movie]. ([XAVC HS 4K]/[XAVC S 4K]/[XAVC S HD]/[XAVC S-I 4K]/[XAVC S-I HD])
Hint
- The white lines at the top and bottom of the playback screen indicate that the playback target is being filtered.
- When you use the filtering condition [Date] or [Folder], add check marks to the dates/folders to set as the playback target. You can also specify the range using the Fn (Function) button.
- When you perform the following functions while the playback target is filtered, the function is applied only to the filtered images.
- Delete
- Protect
- Rating
- Transferring to a smartphone
Note
- Filtering of the playback target is canceled by the following operations.
- Shooting a still image or movie
- Crop
- Photo Capture
- Turning the camera off
- Inserting/removing a memory card
[261] ViewingChanging how images are displayedImage Order
Sets the order in which to display images on the playback screen.
- MENU → (Playback) → [Playback Target] → [Image Order] → desired setting.
Menu item details
- Date Order:
- Displays images in order of date.
- Folder Order:
- Displays images in order of folder.
Hint
- When [Folder Order] is selected, the folder for movies is displayed on top.
[262] ViewingChanging how images are displayedDisplay as Group
Sets whether or not to display continuously shot images or images shot using interval shooting, etc. as a group.
- MENU → (Playback) → [Playback Option] → [Display as Group] → desired setting.
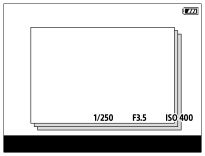
Menu item details
- On:
- Displays images as a group.
- To play back the images in a group, select the group and press the center of the control wheel.
- Off:
- Does not display images as a group.
Hint
-
The following images are grouped.
- Images shot with [Drive Mode] set to [Cont. Shooting] (One sequence of images shot continuously by holding down the shutter button during continuous shooting becomes one group.)
- Images shot with [Drive Mode] set to [Self-timer(Cont)]/[WB bracket]/[DRO Bracket] (Multiple images recorded in one shot become one group.)
- Images shot with [Interval Shoot Func.] (Images shot during one session of interval shooting become one group.)
-
On the image index screen,
 (Display as Group) icon is displayed over the group.
Note
- If you delete the group, all the images in the group will be deleted.
[263] ViewingChanging how images are displayedFocus Frame Display (playback)
Sets whether or not to display a focus frame around the area where the camera focused when you play back a still image.
- MENU → (Playback) → [Playback Option] → [Focus Frame Display] → desired setting.
Menu item details
- Off:
- Does not display a focus frame during playback.
- On:
- Displays a focus frame in green during playback. If the image is not in focus, the focus frame will be displayed in white.
Hint
- Even if multiple focus frames are displayed at the time of shooting, only the one indicating where the camera actually focused will be displayed during playback.
- Even if a focus frame is displayed around the face of the subject at the time of shooting, the focus frame will be displayed around the eye during playback when an eye is recognized.
Note
- A focus frame will not be displayed over the following images.
- Still images shot with manual focus
- Movies
- Still images created with [Photo Capture]
- The focus frame is displayed only on the single-image playback screen. The focus frame is not displayed on the image index screen or over enlarged images.
- The focus frame is not displayed during auto reviewing.
- If you shoot an image with a different composition after performing auto-focusing, the focus frame will appear offset from the subject.
- Even if the focus frame is displayed in green, it may not be in focus to the subject.
- Even if you turn off the focusing frame display while shooting using the [AF Area Auto Clear] or [AF-C Area Display] function, when [Focus Frame Display] is set to [On], the focusing frame will be displayed during playback.
[264] ViewingChanging how images are displayedAspect Marker Disp. (still image)
The aspect marker that was displayed during shooting can be displayed over the still image being played back.
- MENU → (Playback) → [Playback Option] → [Aspect Marker Disp.] → desired setting item.
Menu item details
- Aspect Marker Disp.:
- Sets whether or not to display the aspect marker. ([On]/[Off])
- Aspect Marker Level:
- Sets the color density for the displayed marker. (0 to 15)
Note
- Although the color density selected on the setting screen for [Aspect Marker Level] may not be applied to the setting screen, the marker will be displayed with the selected color density on the playback screen.
- When the display setting is [Histogram], the aspect marker is not displayed.
[265] ViewingChanging how images are displayedDisp Specified Time Img.
You can play back images by specifying the shooting date and time.
- MENU → (Playback) → [Playback Option] → [Disp Specified Time Img.].
- Set the date and time of the image to be played back using the control wheel, and then press the center.
The image shot on the specified date and time will be played back.
- If there are no images shot on the specified date and time, the image shot on the closest date and time will be played back.
Note
- For movies, the date and time when the recording was started are treated as the shooting date and time.
[266] ViewingSetting how to jump between imagesSelect Image Jump Dial
You can jump between images during playback. This function is useful when you want to find one of many recorded images. You can also quickly find protected images or images set with a particular rating. Assign this function to either the control dial or the control wheel.
- MENU →(Playback) → [Playback Option] → [Select Image Jump Dial] → desired item.
Menu item details
- Dial:
- Use the control dial to jump between images.
- Control Wheel:
- Use the control wheel to jump between images.
[267] ViewingSetting how to jump between imagesImage Jump Method
Sets the method for jumping between images during playback by operating a dial.
- MENU → (Playback) → [Playback Option] → [Image Jump Method] → desired setting item.
Menu item details
- One by one / By 10 images / By 100 images:
- Jumps in units of the specified number of images.
- Top Image:
- Plays back the first images of scenes (images shot with single shooting and the first shot of continuous shooting, etc.).
- By 3 minutes / By 5 minutes / By 10 minutes / By 30 minutes / By 1 hour / By 3 hours / By 6 hours / By 12 hours / By 24 hours:
- Jumps between images by the specified time unit based on the shooting date and time of the images.
- Protect Only:
- Plays back only protected images.
- Rating Only:
- Plays back all rated images.
- Rating Only () - Rating Only ():
- Plays back only images for which a rating ( to ) has been specified.
- W/O Rating Only:
- Plays back only images that are not rated.
- Shot Mark Only:
- Sets the image jump target only to images with Shot Marks.
- Shot Mark1 Only / Shot Mark2 Only:
- Sets the image jump target only to images with the specified Shot Mark.
- No Shot Mark:
- Sets the image jump target only to images without Shot Marks.
- Divider Frame Only:
- Sets the image jump target only to divider frames.
- Image After Divider:
- Sets the image jump target only to images next to divider frames.
To add a Shot Mark to a movie
If you add a Shot Mark to a movie, you can use it as a mark for selecting, transferring, or editing the movie. To add a Shot Mark during recording, swipe left or right on the screen to display the touch function icons, and then touch  (Add Shot Mark1). You can also add a Shot Mark during playback by touching (Add Shot Mark1) on the screen.
To create a divider frame
By creating a divider frame between sessions of shooting, you can use it as a mark when selecting images.
Assign [Create Divider Frame] to the desired key using [Custom Key/Dial Set.] in advance and press the custom key when you want to create a divider frame.
Hint
- To use the touch function icons, enable touch operations during shooting or playback by configuring each setting in MENU → (Setup) → [Touch Operation].
- Use a custom key or the shutter button to add a second Shot Mark (Shot Mark 2). Shot Mark 1 can also be added using a custom key or the shutter button.
- When adding a Shot Mark with a custom key: assign [Add Shot Mark1] or [Add Shot Mark2] in [Custom Key/Dial Set.] and press the assigned button while shooting.
- When adding a Shot Mark with the shutter button: set [ with Shutter Button] to [Add Shot Mark1] or [Add Shot Mark2] and press the shutter button while shooting.
- When adding a Shot Mark while playing back a movie: assign [Add/Delete Shot Mark1] or [Add/Delete Shot Mark2] in [Custom Key Setting] and press the assigned button during playback.
- When adding a Shot Mark with a custom key: assign [Add Shot Mark1] or [Add Shot Mark2] in [
[268] ViewingProtecting recorded images (Protect)
Protects recorded images against accidental erasure. The  (protect) mark is displayed on protected images.
- MENU →(Playback) → [Selection/Memo] → [Protect] → desired setting.
Menu item details
- Multiple Img.:
-
Applies the protection of the selected multiple images.
(1) Select the image to be protected, then press the center of the control wheel. The
(check) mark is displayed in the check box. To cancel the selection, press the center again to remove the (check) mark.
(2) To protect other images, repeat step (1).
You can also specify the range using the Fn (Function) button.(3) MENU → [OK].
- All in this Folder:
- Protects all images in the selected folder.
- Cancel All in this Folder:
- Cancels the protection of all images in the selected folder.
- All with this date:
- Protects all images taken on the selected date.
- Cancel All with this date:
- Cancels the protection of all images taken on the selected date.
- All Images in This Group:
- Protects all the images in the selected group.
- Cancel All in This Group:
- Cancels the protection of all the images in the selected group.
- All Filtered:
- Protects all the images filtered using the playback filter function.
- Cancel All Filtered:
- Cancels the protection of all the images filtered using the playback filter function.
Hint
- If you assign [Protect] to the key of your choice using MENU → (Setup) → [Operation Customize] → [Custom Key Setting], you can protect images or cancel protection by simply pressing the key.
- If you select a group in [Multiple Img.], all the images in the group will be protected. To select and protect particular images within the group, execute [Multiple Img.] while displaying the images within the group.
Note
- The menu items that can be selected vary according to the setting for [Playback Filter Condition] and [Image Order] and the selected content.
[269] ViewingAdding information to imagesRating
You can assign ratings to recorded images on a scale of the number of stars ( -
- ) to make it easier to find images.
- MENU →(Playback) → [Selection/Memo] → [Rating].The image rating selection screen will appear.
- Press the left/right sides of the control wheel to display an image to which you want to assign a rating, and then press the center.
- Select the level of (Rating) by pressing the left/right side of the control wheel, and then press the center.
- Press the MENU button to exit the rating setting screen.
To set ratings to multiple images at a time using the playback filter function
By using the playback filter function, you can set ratings to multiple images at a time. Perform [Rating] after narrowing down the images using [Playback Filter Condition], and then select [All Filtered].
- When you select [Multiple Img.], you can rate images one by one from among the narrowed down images only.
To set ratings when shooting still images
Assign [Add Rating ()] through [Add Rating ()] to the desired keys using [Custom Key/Dial Set.] in advance and press the custom keys after shooting a still image. You can set the rating for the last shot still image.
- Ratings cannot be set when shooting movies.
Hint
- You can also assign ratings when playing back images by using the custom key. Assign [Rating] to the desired key using [Custom Key Setting] beforehand, and then press the custom key while playing back an image to which you want to assign a rating. The level of (Rating) changes each time you press the custom key.
- By specifying ratings with the [Image Jump Method] function, you can quickly find the desired image.
[270] ViewingAdding information to imagesRating Set(Custom Key)
Sets the available number of (rating) when rating (ranking) images with the key to which you have assigned [Rating] using [Custom Key Setting].
- MENU → (Playback) → [Selection/Memo] → [Rating Set(Custom Key)].
- Add a (check) mark to the number of (rating) that you want to activate.You can select the checked number when setting [Rating] using the custom key.
[271] ViewingAdding information to imagesRotating an image (Rotate)
Rotates a recorded image counter-clockwise.
- Display the image to be rotated, then select MENU →(Playback) → [Edit] → [Rotate].
- Press the center of the control wheel.The image is rotated counter-clockwise. The image rotates as you press the center.
If you rotate the image once, the image remains rotated even after the product is turned off.
Note
- Even if you rotate a movie file, it will be played back horizontally on the monitor of the camera.
- You may not be able to rotate images shot using other products.
- When viewing rotated images on a computer, the images may be displayed in their original orientation depending on the software.
[272] Viewing Crop
Crops recorded images.
- MENU → (Playback) → [Edit] → [Crop]. The image selection screen will appear.
- Select the still image that you want to crop, and then press the center of the control wheel.
- Adjust the size and position of the cropping frame.
- You can change the size of the cropping frame using the control dial or the control wheel.
- You can move the position of the cropping frame using the top/bottom/left/right side of the control wheel.
- You can preview the cropped image by pressing the Fn button.
- Press the center of the control wheel.The cropped image will be saved.
Hint
- The cropped image is saved as a separate image file. The original image remains as is.
- The file format and image quality setting of the cropped image will be the same as those of the original image.
- On the playback screen, the
 (Crop) icon is displayed with cropped images.
Note
- You cannot crop RAW images or movies.
[273] ViewingExtracting still images from a moviePhoto Capture
Captures a chosen scene in a movie to save as a still image. First shoot a movie, then pause the movie during playback to capture decisive moments that tend to be missed when shooting still images, and save them as still images.
- Display the movie that you want to capture as a still image.
- MENU → (Playback) → [Edit] → [Photo Capture].
- Play back the movie and pause it.
- Find the desired scene using forward slow playback, reverse slow playback, displays the next frame, and displays the previous frame, and then stop the movie.
- Press(Photo Capture) to capture the chosen scene. The scene is saved as a still image.
Hint
- With [JPEG/HEIF Switch], you can select either JPEG or HEIF as the recording file format for still images.
[274] ViewingExtracting still images from a movieCreating still images from Shot Marks
While playing back a movie, you can create still images from movie frames with Shot Marks.
- Play back a movie with Shot Mark(s).
- MENU →(Playback) → [Edit] → [Create Still Image].By registering [Create Still Image] to [Custom Key Setting] or [Fn Menu Settings], you can easily call up [Create Still Image].
About the still images created
- You can select either the JPEG or HEIF format for the still images to be created. You can switch the format by selecting MENU → (Playback) → [Edit] → [JPEG/HEIF Switch].
- The size of the still images created will be the same size as the movie being played back (i.e., the size depends on the recording format of the movie).
[275] ViewingExtracting still images from a movieShot Marks after still image creation (playback)
Sets whether to automatically delete Shot Marks after creating still images when playing back a movie using the [Create Still Image] function.
- MENU →(Playback) → [Edit] → [ after still img crt] → desired setting.
Menu item details
- Auto Delete:
- Deletes Shot Marks automatically after creating still images.
- Maintain:
- Does not delete Shot Marks automatically after creating still images.
[276] ViewingExtracting still images from a movieJPEG/HEIF Switch (Photo Capture / Creating still images from Shot Marks)
Switches the file format (JPEG / HEIF) for still images captured with [Photo Capture] or [Create Still Image].
You can view and edit JPEG files in various environments. The HEIF format has high compression efficiency. The camera can record with high image quality and small file sizes in the HEIF format. Depending on the computer or software, you may not be able to view or edit HEIF files. In addition, a HEIF-compatible environment is required to play back still images in the HEIF format. You can enjoy high-quality still images by connecting the camera and the TV via HDMI.
- MENU → (Playback) → [Edit] → [JPEG/HEIF Switch] → desired setting.
Menu item details
- JPEG:
- Switches the file format for still images captured to JPEG. This setting gives priority to compatibility.
- HEIF(4:2:0):
- Switches the file format for still images captured to HEIF 4:2:0 10bit. This setting gives priority to image quality and compression efficiency.
- HEIF(4:2:2):
- Switches the file format for still images captured to HEIF 4:2:2 10bit. This setting gives priority to image quality.
Note
- HEIF image files recorded with this camera cannot be displayed on other cameras that do not support the HEIF file format. Be careful not to accidentally erase HEIF image files by formatting the memory card or deleting the files.
[277] ViewingDeleting imagesDeleting multiple selected images (Delete)
You can delete multiple selected images. Once you have deleted an image, you cannot restore it. Confirm the image to be deleted beforehand.
- MENU →(Playback) → [Delete] → [Delete] → desired setting.
Menu item details
- All Other Than This Img.:
- Deletes all images in the group except the selection.
- All Images in This Group:
- Deletes all images in the selected group.
- Multiple Img.:
- Deletes the selected images.
-
(1) Select the images to be deleted, then press the center of the control wheel. The (check) mark is displayed in the check box. To cancel the selection, press the center again to remove the (check) mark.
- (2) To delete other images, repeat step (1).
You can also specify the range using the Fn (Function) button. - (3) MENU → [OK].
- All in this Folder:
- Deletes all images in the selected folder.
- All with this date:
- Deletes all images taken on the selected date.
- All Filtered:
- Deletes all the images filtered using the playback filter function.
Hint
- Perform [Format] to delete all images, including protected images.
-
To display the desired folder or date, select the desired folder or date during playback by performing the following procedure:
(Image Index) lever → select the bar on the left using the control wheel → select the desired folder or date using the top/bottom sides of the control wheel.
- If you select a group in [Multiple Img.], all the images in the group will be deleted. To select and delete particular images within the group, execute [Multiple Img.] while displaying the images within the group.
Note
- The protected images cannot be deleted.
- The menu items that can be selected vary according to the settings for [Playback Filter Condition] and [Image Order] and the selected content.
[278] ViewingDeleting imagesDelete pressing twice
Sets whether or not you can delete the image currently being played back by pressing the (Delete) button twice in sequence.
- MENU → (Playback) → [Delete] → [Delete pressing twice] → desired setting.
Menu item details
- On:
- Enables you to delete the image currently being played back by pressing the (Delete) button twice.
- Off:
- Does not enable you to delete the image currently being played back by pressing the (Delete) button twice.
[279] ViewingDeleting imagesDelete confirm.
You can set whether [Delete] or [Cancel] is selected as a default on the delete confirmation screen.
- MENU → (Playback) → [Delete] → [Delete confirm.] → desired setting.
Menu item details
"Delete" first:
[Delete] is selected as the default setting.
"Cancel" first:
[Cancel] is selected as the default setting.
[280] ViewingViewing images on a TVViewing images on a TV using an HDMI cable
To view images stored on this product using a TV, an HDMI cable (sold separately) and a TV equipped with an HDMI jack are required. For details, refer to the operating instructions supplied with the compatible TV.
- Turn off both this product and the TV.
- Connect the HDMI terminal of this product to the HDMI jack of the TV using an HDMI cable (sold separately).
Use an HDMI cable that is compatible with the HDMI Type-D micro jack of the product and the HDMI jack of the TV.
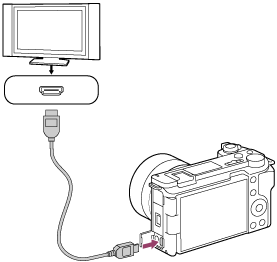
- Turn on the TV and switch the input.
- Turn on this product.
Images shot with the product appear on the TV screen.
- Select an image using the right/left sides of the control wheel.
- The monitor of this camera is not lit up on the playback screen.
- If the playback screen is not displayed, press the (Playback) button.
Note
- Do not connect this product and another device using the output terminals of both. Doing so may cause a malfunction.
- Some devices may not work properly when connected to this product. For example, they may not output video or audio.
- Use an HDMI cable with the HDMI logo or a genuine Sony cable.
- When [Time Code Output] is set to [On], the image may not be output properly to the TV or recording device. In such cases, set [Time Code Output] to [Off].
-
If images do not appear on the TV screen properly, select MENU → (Setup) → [External Output] → [
 HDMI Resolution] → [2160p], [1080p] or [1080i] according to the TV to be connected.
- During HDMI output, when you switch the movie from 4K to HD image quality or vice-versa, or change the movie to a different frame rate or different color mode, the screen may become dark. This is not a malfunction.
- If the product performs unwanted operations in response to the TV remote control, select MENU → (Setup) → [External Output] → [CTRL FOR HDMI] → [Off].
[281] Changing the camera settingsMemory card settingsFormat
When you use a memory card with this camera for the first time, we recommend that you format the card using the camera for stable performance of the memory card. Note that formatting permanently erases all data on the memory card, and is unrecoverable. Save valuable data on a computer, etc.
- MENU → (Shooting) → [Media] → [Format].
- Select [Enter]. (Quick formatting)
- If you press the (Delete) button, a message to perform full formatting will be displayed. You can launch full formatting by selecting [Enter].
- If you press the
The difference between quick formatting and full formatting
Perform full formatting when you feel like the speed of recording to the memory card or read-out from the memory card has become slow, or when you want to erase data completely, etc.
Full formatting takes longer than quick formatting, because all areas of the memory card are initialized.
Hint
-
You can also display the screen for formatting the memory card by pressing and holding the MENU button and then the (Delete) button on the shooting screen for approximately two seconds.
- You can cancel full formatting before it is completed. Even if you cancel full formatting in the middle of the process, the data will be erased, so you can use the memory card as is.
Note
- Formatting permanently erases all data including protected images and registered settings (from M1 to M4).
- The access lamp lights up during formatting. Do not remove the memory card while the access lamp is lit up.
- Format the memory card on this camera. If you format the memory card on the computer, the memory card may not be usable depending on the format type.
- It may take a few minutes to complete formatting, depending on the memory card.
- You cannot format the memory card if the remaining battery charge is less than 1%.
[282] Changing the camera settingsMemory card settingsRecover Image DB (still image/movie)
If image files were processed on a computer, problems may occur in the image database file. In such cases, the images on the memory card will not be played back on this product. Also, if you use a memory card in the camera after using it in another device, the images on the memory card may not be played back correctly. For example, the images may not be displayed as a group. If these problems happen, repair the file using [Recover Image DB].
Images recorded on the memory card are not deleted by [Recover Image DB].
- MENU → (Shooting) → [Media] → [Recover Image DB] → [Enter].
Note
- If the battery pack is extremely depleted, image database files cannot be repaired. Use a sufficiently charged battery pack.
[283] Changing the camera settingsMemory card settingsDisplay Media Info. (still image/movie)
Displays the recordable number of still images and the remaining recording time for movies on the memory card.
- MENU → (Shooting) → [Media] → [Display Media Info.].
[284] Changing the camera settingsFile settingsFile/Folder Settings
Configure settings related to the folder and file name of the still image to be shot.
- MENU → (Shooting) → [File] → [File/Folder Settings] → desired setting.
Menu item details
- File Number:
- You can set how to assign file numbers to still images.
- [Series]: Does not reset file numbers for each folder.
- [Reset]: Resets file numbers for each folder.
- Forced File Number Reset:
- Resets the still image file number and creates a new folder.
- Set File Name:
- You can specify the first three characters of the file name.
- Folder Name:
- You can set how folder names are assigned.
- [Standard Form]: Folders are named as “folder number + any 5 characters”. Example: 100MSDCF
- [Date Form]: Folders are named as “folder number + Y (the last digit of the year)/MM/DD”.
Example: 10040405 (Folder number: 100; date: 04/05/2024)
Hint
- When [Folder Name] is set to [Standard Form], the last 5 characters of the folder name can be set using [Create New Folder]. (Only uppercase letters, numbers, and underscores can be entered.)
- You can also change the last five characters of the folder name by using [Forced File Number Reset].
Note
- Only capital letters, numbers, and underscores can be used for [Set File Name]. Underscores cannot be used for the first character.
- The three characters specified using [Set File Name] are only applied to files recorded after the setting is made.
[285] Changing the camera settingsFile settingsSelect REC Folder
If [Folder Name] under [File/Folder Settings] is set to [Standard Form] and there are 2 folders or more, you can select the folder on the memory card to which images are to be recorded.
- MENU → (Shooting) → [File] → [Select REC Folder] → desired folder.
Note
- You cannot select the folder when [Folder Name] under [File/Folder Settings] is set to [Date Form].
[286] Changing the camera settingsFile settingsCreate New Folder
Creates a new folder on the memory card for recording still images. A new folder is created with a folder number one greater than the largest folder number currently used. Images are recorded in the newly created folder.
Up to 9 999 images in total can be stored in one folder. When the folder capacity is exceeded, a new folder may be automatically created.
- MENU → (Shooting) → [File] → [Create New Folder].
Hint
-
The name of the folder that is created will vary depending on the [Folder Name] setting.
[Standard Form]: In the folder name “Folder number + any 5 characters”, +1 will be added to the folder number.
Example: 100MSDCF → 101MSDCF
[Date Form]: In the folder name “Folder number + year/month/day (last digit of the year and 4 digits representing the month/day)”, +1 will be added to the folder number.
Example: 10040405 → 10140405 - When [Folder Name] is set to [Standard Form], the last 5 characters of the folder name can be set using [Create New Folder]. (Only uppercase letters, numbers, and underscores can be entered.)
- You can also set the last 5 characters of the folder name by using [Forced File Number Reset].
Note
- When you insert a memory card that was used with other equipment into this product and shoot images, a new folder may be automatically created.
- You cannot change the folder name when [Folder Name] under [File/Folder Settings] is set to [Date Form].
[287] Changing the camera settingsFile settingsFile Settings
Configure settings for the file names of recorded movies.
- MENU → (Shooting) → [File] → [File Settings] → desired setting item.
Menu item details
- File Number:
- You can set how to assign file numbers to movies.
- [Series]: Does not reset file numbers even if the memory card is changed.
- [Reset]: Resets the file number when the memory card is changed.
- Series Counter Reset:
- Resets the series counter used when [File Number] is set to [Series].
- File Name Format:
- You can set the format for movie file names.
- [Standard]: The file name of the recorded movie starts with “C.” Example: C0001
- [Title]: The file name of the recorded movie becomes “Title+File number.”
[Date + Title]: The file name of the recorded movie becomes “Date+Title+File number.”
[Title + Date]: The file name of the recorded movie becomes “Title+Date+ File number.”
- Title Name Settings:
- You can set the title when [File Name Format] is set to [Title], [Date + Title], or [Title + Date].
Note
-
When entering [Title Name Settings], the number/types of characters that can be entered are as follows.
The maximum length is 37 characters. The types of characters that can be entered are letters of the alphabet, numbers, and symbols ( . - _ @ ! # $ % + = ^ ~ ( ) , ; [ ] ). - Titles specified using [Title Name Settings] are only applied to movies recorded after the setting is made.
- You cannot set how folder names are assigned for movies.
- If you are using an SDHC memory card, [File Name Format] is locked to [Standard].
- If you insert a memory card used with [File Name Format] set to one of the following into another device, the memory card may not function properly.
- [Title]
- [Date + Title]
- [Title + Date]
- If there are unused numbers due to file deletion, etc., these numbers will be reused when the movie file number reaches “9999.”
[288] Changing the camera settingsFile settingsCopyright Info
Writes copyright information onto the still images.
- MENU → (Shooting) → [File] → [Copyright Info] → desired setting.
- When you select [Set Photographer] or [Set Copyright], a keyboard appears on the screen. Enter your desired name.
You can only enter alphanumeric characters and symbols for [Set Photographer] and [Set Copyright]. You can enter up to 46 letters.
Menu item details
- Write Copyright Info:
- Sets whether to write copyright information. ([On]/[Off])
- If you select [On], a
 (Copyright) icon will appear on the shooting screen.
- If you select [On], a
- Set Photographer:
- Sets the photographer name.
- Set Copyright:
- Sets the copyright holder name.
- Disp. Copyright Info:
- Displays the current copyright information.
Note
- A (Copyright) icon appears during the playback of images with copyright information.
-
When entering [Set Photographer] and [Set Copyright], the numbers/types of characters that can be entered are as follows.
The maximum length is 46 characters. The types of characters that can be entered are letters of the alphabet, numbers, and symbols. - In order to prevent unauthorized use of [Copyright Info], be sure to clear the [Set Photographer] and [Set Copyright] columns before lending out or handing over your camera.
- Sony is not liable for problems or damages resulting from use of [Copyright Info].
[289] Changing the camera settingsFile settingsWrite Serial Number (still image/movie)
Writes the camera's serial number when shooting.
- MENU → (Shooting) → [File] → [Write Serial Number] → desired setting.
Menu item details
- On:
- Writes the camera's serial number to the image.
- Off:
- Does not write the camera's serial number to the image.
[290] Changing the camera settingsNetwork settingsWi-Fi Connect
Sets whether to use the Wi-Fi function of the camera.
- MENU →(Network) → [Wi-Fi] → [Wi-Fi Connect] → desired setting.
- Set this function to [On] to search for connectable access points. If connectable access points are not found, use [WPS Push] or [Access Point Set.] to configure the settings.
Menu item details
- On:
- Uses the Wi-Fi function.
- Off:
- Does not use the Wi-Fi function.
Note
- The wireless access point or wireless router that relays the LAN connection is referred to as the “access point” in this manual.
- This camera can connect to an access point with WPA3-SAE or WPA2-PSK security settings or without security settings. To ensure a secure wireless LAN connection, we strongly recommend using an access point with WPA3 or WPA2 security settings.
- Connecting to an access point without security settings may result in hacking, access from malicious third parties, or attacks on vulnerabilities. Unless there is a specific reason, we do not recommend using an access point without security settings.
- It is important that you set the security settings when using a wireless LAN. If a security problem arises because no security precautions are in place or due to any inevitable circumstances when using a wireless LAN, Sony bears no responsibility for the loss or damage.
[291] Changing the camera settingsNetwork settingsWPS Push
If your access point has a Wi-Fi Protected Setup (WPS) button, you can register the access point to this product easily.
For details about the available functions and settings of your access point, see the access point operating instructions or contact the administrator of the access point.
Set [Wi-Fi Connect] to [On] in advance.
- MENU → (Network) → [Wi-Fi] → [WPS Push].
- Push the Wi-Fi Protected Setup (WPS) button on the access point to connect.
Note
- [WPS Push] works only if the security setting of your access point is set to WPA* or WPA2 and your access point supports the Wi-Fi Protected Setup (WPS) button method. If the security setting is WEP* or WPA3 only or your access point does not support the Wi-Fi Protected Setup (WPS) button method, perform [Access Point Set.].
* If the camera’s system software (firmware) is Ver.1.01 or later, wireless connections using WEP or WPA are not supported.
- To ensure a secure wireless LAN connection, we strongly recommend using an access point with WPA3 or WPA2 security settings.
- Connecting to an access point without security settings may result in hacking, access from malicious third parties, or attacks on vulnerabilities. Unless there is a specific reason, we do not recommend using an access point without security settings.
- It is important that you set the security settings when using a wireless LAN. If a security problem arises because no security precautions are in place or due to any inevitable circumstances when using a wireless LAN, Sony bears no responsibility for the loss or damage.
- A connection may not be possible or the communication distance may be shorter depending on the surrounding conditions, such as the type of wall material and the presence of obstructions or radio waves between the product and access point. In this case, change the location of the product or move the product closer to the access point.
[292] Changing the camera settingsNetwork settingsAccess Point Set.
You can register your access point manually. Before starting the procedure, check the SSID name of the access point, security system, and password. The password may be preset in some devices. For details, see the access point operating instructions, or consult the access point administrator.
Set [Wi-Fi Connect] to [On] in advance.
- MENU → (Network) → [Wi-Fi] → [Access Point Set.].
- Select the access point you want to register.
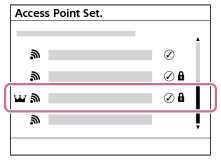
When the desired access point is displayed on the screen: Select the desired access point.
When the desired access point is not displayed on the screen: Select [Manual Setting] and set the access point.*
- If you select [Manual Registration], input the SSID name of the access point, then select the security system.
The default security method is [WPA2]. - If you select [WPS PIN], you can register the access point by entering the PIN code displayed on the camera into the connected device.
* If the camera’s system software (firmware) is Ver.1.01 or later, wireless connections using WEP or WPA are not supported.
- If you select [Manual Registration], input the SSID name of the access point, then select the security system.
- Input the password, and select [OK].
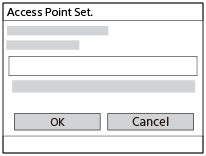
- Access points without
 (Lock mark) do not require a password.
 - Note that unmasking your password risks revealing your password to a third party. Make sure that no one is around before unmasking.
- Access points without
- Select [OK].
Other setting items
Depending on the status or the setting method of your access point, you may want to set more items.
For an unregistered access point, select the [Detail] button on the password entry screen.
For a registered access point, press the right side of the control wheel on the access point selection screen.
- Priority Connection:
- Select [On] or [Off].
- IP Address Setting:
- Select [Auto] or [Manual].
- IP Address:
- If you are entering the IP address manually, enter the set address.
- Subnet Mask/Default Gateway/Primary DNS Server/Second DNS Server:
- If you have set [IP Address Setting] to [Manual], enter each address according to your network environment.
Hint
- When you select a registered access point, [Priority Connection] for that access point becomes set to [On], prioritizing connections to that access point.
- The prioritized access point is marked with a
 (crown) icon.
Note
-
When manually setting an access point or IP address, the number and types of characters that can be entered are as follows.
- SSID : The maximum length is 32 characters. The types of characters that can be entered are letters of the alphabet (both uppercase and lowercase), numbers, and symbols.
- Password : The length must be between 8 and 64 characters. The types of characters that can be entered are letters of the alphabet (both uppercase and lowercase), numbers, and symbols.
- IP Address / Subnet Mask / Default Gateway / Primary DNS Server / Second DNS Server: The maximum length is 15 characters. The types of characters that can be entered are numbers and “.” only.
- Once an access point is registered, [Priority Connection] for that access point is set to [On]. If you want to stop preferentially connecting to a certain access point, set [Priority Connection] for the access point to [Off].
- If there are both 2.4 GHz and 5 GHz access points with the same SSID and encryption format, the access point with the stronger radio field will be displayed.
[293] Changing the camera settingsNetwork settingsWi-Fi Frequency Band (models supporting 5 GHz)
Sets the frequency band for Wi-Fi communications. [5GHz] has faster communication speeds and more stable data transfers than [2.4GHz].
The [Wi-Fi Frequency Band] setting applies to a Wi-Fi Direct connection with a smartphone or computer, which is a direct connection to the camera not via an access point.
- MENU →(Network) → [Wi-Fi] → [Wi-Fi Frequency Band] → desired setting.
Menu item details
- 2.4GHz/5GHz
[294] Changing the camera settingsNetwork settingsDisplay Wi-Fi Info.
Displays Wi-Fi information for the camera such as the MAC address, IP address, etc.
- MENU →(Network) → [Wi-Fi] → [Display Wi-Fi Info.].
Hint
- Information other than the MAC address is displayed when [Wi-Fi Connect] is set to [On].
[295] Changing the camera settingsNetwork settingsSSID/PW Reset
This product shares connection information with devices that have permission to connect when establishing a Wi-Fi Direct connection with a smartphone or a computer. If you want to change which devices have permission to connect, reset the connection information.
- MENU →(Network) → [Wi-Fi] → [SSID/PW Reset] → [OK].
Note
- If you connect this product to a smartphone after resetting the connection information, you must make the settings for the smartphone again.
- If you connect this product to a computer with Wi-Fi Direct after resetting the connection information, you must reconfigure the settings on the computer.
[296] Changing the camera settingsNetwork settingsBluetooth Settings
Controls the settings for connecting the camera to a smartphone or Bluetooth remote commander or shooting grip via a Bluetooth connection.
- MENU → (Network) → [Bluetooth] → Select a menu item and set the desired parameter.
Menu item details
- Bluetooth Function:
- Sets whether to activate or not the Bluetooth function of the camera. ([On]/[Off])
- Pairing:
- Displays the screen for pairing the camera and smartphone or Bluetooth remote commander.
- Manage Paired Device:
- Enables you to check or delete the pairing information for devices paired with the camera.
- Bluetooth Rmt Ctrl:
- Sets whether or not to use a Bluetooth compatible remote commander (sold separately). ([On]/[Off])
- Disp Device Address:
- Displays the BD address of the camera.
Note
- When establishing a Bluetooth connection, only pair with trusted devices. Avoid unsolicited pairing requests or connections to unknown devices.
- Turn off the Bluetooth function when not in use.
- Check your paired devices regularly and delete any unnecessary ones.
- After you delete the pairing information for the camera from your smartphone, delete pairing information for the smartphone from the camera using [Manage Paired Device].
[297] Changing the camera settingsNetwork settingsBluetooth Rmt Ctrl
You can operate the camera using a Bluetooth compatible remote commander (sold separately) or shooting grip (sold separately). For details on compatible remote commanders or shooting grips, visit the Sony website in your area, or consult your Sony dealer or local authorized Sony service facility.
- On the camera, select MENU → (Network) → [Bluetooth] → [Bluetooth Function] → [On].
- On the camera, select MENU → (Network) → [Bluetooth] → [Bluetooth Rmt Ctrl] → [On].
- If there is no Bluetooth device currently paired with the camera, the screen for pairing as described in Step 3 will appear.
- On the camera, select MENU → (Network) → [Bluetooth] → [Pairing] to display the screen for pairing.
- On the Bluetooth remote commander, perform pairing.
- For details, refer to the instruction manual for the Bluetooth remote commander.
- On the camera, select [OK] on the confirmation screen for the Bluetooth connection.
- Pairing is complete, and you can now operate the camera from the Bluetooth remote commander. After pairing the device once, you can connect the camera and the Bluetooth remote commander again in the future by setting [Bluetooth Rmt Ctrl] to [On].
Menu item details
- On:
- Enables Bluetooth remote commander operation.
- Off:
- Disables Bluetooth remote commander operation.
Icons for Bluetooth connection
 (Bluetooth connection available): Bluetooth connection with the Bluetooth remote commander is established.
 (Bluetooth connection unavailable): Bluetooth connection with the Bluetooth remote commander is not established.
Icons displayed when connecting to a Bluetooth remote commander
 (remote commander mark): A Bluetooth remote commander can be used.
Hint
- The Bluetooth connection is only active while you are operating the camera using the Bluetooth remote commander.
- The Bluetooth icon is not displayed when the touch function icons are displayed in the movie recording mode. To see the Bluetooth icon, swipe the touch function icons left or right to hide the touch function icons.
- If the (Bluetooth connection available) icon is displayed on the screen but (remote commander mark) is not displayed, set [Bluetooth Rmt Ctrl] to [On] and follow the on-screen instructions.
Note
- When you initialize the camera, the pairing information is also deleted. To use the Bluetooth remote commander, perform pairing again.
- If the Bluetooth connection is unstable, remove any obstacles, such as people or metal objects from between the camera and the paired Bluetooth remote commander.
- The following functions cannot be used when [Bluetooth Rmt Ctrl] is set to [On].
- Power-saving mode
- Only one Bluetooth remote commander can be connected to the camera at a time.
- If the function does not work properly, check the following notes and then try pairing again.
- Confirm that [Airplane Mode] for the camera is set to [Off].
- If the function does not work properly even after you have performed the above operations, delete the pairing information for the device that you want to connect using [Manage Paired Device] on the camera.
- When establishing a Bluetooth connection, only pair with trusted devices. Avoid unsolicited pairing requests or connections to unknown devices.
- Turn off the Bluetooth function when not in use.
- Check your paired devices regularly and delete any unnecessary ones.
- After you delete the pairing information for the camera from your smartphone, delete pairing information for the smartphone from the camera using [Manage Paired Device].
[298] Changing the camera settingsNetwork settingsWired LAN (USB-LAN)
Configures a wired LAN. You can connect this product to a network via wired LAN by connecting a commercially available USB-LAN conversion adaptor to the USB Type-C terminal on the product.
- MENU →(Network) → [Wired LAN] → desired setting.
Menu item details
- IP Address Setting:
- Sets whether to configure the IP address for the wired LAN automatically or manually. ([Auto]/[Manual])
- Display Wired LAN Info.:
- Displays wired LAN information for this product such as the MAC address or IP address.
- IP Address:
- If you are entering the IP address manually, enter the fixed address.
- Subnet Mask/Default Gateway/Primary DNS Server/Second DNS Server:
- If you have set [IP Address Setting] to [Manual], enter each address according to your network environment.
Hint
- We recommend that you use a gigabit ethernet adaptor for USB Type-C connections.
Note
- When connecting via a wired LAN, use a trusted network. We do not recommend using public networks that are not secure or networks with unknown origins.
- When using a network other than a trusted one, there is a risk of DoS (Denial of Service) attacks and loss of functionality. If you notice anything unusual, immediately disconnect the camera from the network.
-
When entering an IP address in [IP Address Setting], the number/types of characters that can be entered are as follows.
- IP Address / Subnet Mask / Default Gateway / Primary DNS Server / Second DNS Server: The maximum length is 15 characters. The types of characters that can be entered are numbers and “.” only.
- Not all types of USB-LAN conversion adaptors are guaranteed to operate properly.
[299] Changing the camera settingsNetwork settingsUSB-LAN/Tethering
Connects to the network by connecting a USB-LAN conversion adaptor to the camera or uses a tethering connection on your smartphone to connect to the network.
- MENU →(Network) → [USB-LAN/Tethering] → desired connection method.
- To disconnect from the network, select [USB-LAN Disconnection] or [Tethering Disconnection].
Menu item details
- USB-LAN Connection:
- Connects to the network using a USB-LAN conversion adaptor.
- Tethering Connection:
- Connects to the network using your smartphone’s tethering connection.
Note
- When connecting via USB-LAN, use a trusted network. We do not recommend using public networks that are not secure or networks with unknown origins.
- When using a network other than a trusted one, there is a risk of DoS (Denial of Service) attacks and loss of functionality. If you notice anything unusual, immediately disconnect the camera from the network.
- Only use trusted smartphones for tethering. We do not recommend connecting to devices of unknown origin that are not secure.
[300] Changing the camera settingsNetwork settingsAirplane Mode
When you board an airplane, etc., you can temporarily disable all the wireless-related functions including Wi-Fi.
- MENU → (Network) → [Network Option] → [Airplane Mode] → desired setting.If you set [Airplane Mode] to [On], an airplane mark will be displayed on the screen.
[301] Changing the camera settingsNetwork settingsEdit Device Name
You can change the device name for Wi-Fi, [Remote Shooting], or Bluetooth connections.
- MENU → (Network) → [Network Option] → [Edit Device Name].
- Select the input box, then input the device name → [OK].
Note
- When entering the device name, the number/types of characters that can be entered are as follows.
The maximum length is 20 characters. The types of characters that can be entered are letters of the alphabet (both uppercase and lowercase), numbers, and symbols.
[302] Changing the camera settingsNetwork settingsImporting root certification to the camera (Import Root Certificate)
Imports a root certificate needed to verify a server from a memory card.
Use this function for communications encrypted using RTMPS protocol during network streaming.
The root certificate is saved to the camera and can be updated.
- Save a root certificate to a memory card.
- Save the certificate to the root directory of the memory card in the PEM format, and name it “RTMPcert.pem.”
- Insert the memory card to which the root certificate has been saved into the camera.
- MENU → (Network) → [Network Option] → [Import Root Certificate] → [Streaming] → [OK].
- The root certificate saved to the memory card is read by the camera, and then the root certificate on the camera is updated.
Note
- Do not remove the memory card from the camera during read operations.
- When the network settings are reset, the root certificate on the camera is reset as well.
- The maximum size of a root certificate that can be loaded is 1 MB per certificate.
[303] Changing the camera settingsNetwork settingsAccess Authen. Settings
Encrypts communications between the camera and device during remote shooting or image transfer.
- MENU →(Network) → [Network Option] → [Access Authen. Settings] → desired setting item.
Menu item details
- Access Authen.:
- Sets whether to encrypt communication with access authentication. ([On] / [Off])
- User:
- Sets the username for access authentication.
- Password:
- Sets the password for access authentication.
- Generate Password:
- Automatically generates a password for access authentication.
Note
- When [Access Authen.] is set to [Off], communication is performed without SSH connection authentication or encryption, so the content may be intercepted, or the camera may be accessed by an unintended third party.
If unauthorized access is detected, the camera may stop accepting communication. In such cases, reconnect from the beginning. - Before connecting the camera to a smartphone or computer, make sure that [Access Authen.] is not unintentionally set to [Off].
- The username and password for [Access Authen. Settings] are automatically generated and set when the camera is purchased. When setting your own username and password, be careful not to be intercepted by others.
- For the password in [Access Authen. Settings], set a character string that is long enough that it is difficult for others to guess, and keep it securely.
- If you unmask your password when entering it, there is a risk that it will be revealed to a third party. Make sure that no one is around before unmasking.
- Initialize the camera before lending or giving it to others.
-
The numbers/types of characters that can be entered for the following items are as follows.
- [User]: The maximum length is 16 characters. The types of characters that can be entered are letters of the alphabet (both uppercase and lowercase), numbers, and symbols ( ! % . = _ ).
- [Password]: The number must be between 8 and 16 characters. The types of characters that can be entered are letters of the alphabet (both uppercase and lowercase), numbers, and symbols ( ! % . = _ - + , ).
[304] Changing the camera settingsNetwork settingsAccess Authen. Info
Displays the information required when connecting the camera to a computer or smartphone using access authentication.
- MENU →(Network) → [Network Option] → [Access Authen. Info].The information required to connect such as the username, password, MAC address, and fingerprint of this camera are displayed.
Note
- When displaying [Access Authen. Info] on the screen, make sure that no one is around to avoid the information on the screen being seen by others and to prevent unauthorized use of usernames, passwords, and fingerprints.
- Initialize the camera before lending or giving it to others.
[305] Changing the camera settingsNetwork settingsReset Network Set.
Resets all the network settings to default settings.
[Airplane Mode] will not be reset to [Off] even if you perform [Reset Network Set.] when [Airplane Mode] is set to [On].
- MENU → (Network) → [Network Option] → [Reset Network Set.] → [Enter].
[306] Changing the camera settingsMonitor settingsMonitor Brightness
Adjust the brightness of the screen.
- MENU →(Setup) → [Monitor] → [Monitor Brightness] → desired setting.
Menu item details
- Manual:
- Adjusts the brightness within the range of –2 to +2.
- Sunny Weather:
- Sets the brightness appropriately for shooting outdoors.
Note
- The [Sunny Weather] setting is too bright for shooting indoors. Set [Monitor Brightness] to [Manual] for indoor shooting.
[307] Changing the camera settingsPower settingsAuto Monitor OFF (still image)
Sets whether or not to turn the monitor off automatically in shooting modes for still images.
- MENU → (Setup) → [Power Setting Option] → [Auto Monitor OFF] → desired setting.
Menu item details
- Does not turn OFF:
- Does not turn the monitor off.
- 2 Sec/5 Sec/10 Sec/1 Min:
- Turns the monitor off after the designated time has been elapsed without any operation performed.
You can resume shooting by performing an operation, such as pressing the shutter button halfway down.
Note
- If you will not be using the camera for a long period of time, turn the camera off.
[308] Changing the camera settingsPower settingsPower Save Start Time
Sets the amount of time that the camera will wait before going into the power save mode if it is not in use (except when powered from a computer or smartphone). You can resume shooting by pressing the shutter button halfway down or performing other operations.
- MENU →(Setup) → [Power Setting Option] → [Power Save Start Time] → desired setting.
Menu item details
Off/30 Min/5 Min/2 Min/1 Min/10 Sec
Note
- Turn off the product when you do not use it for a long time.
- When [Power Save Start Time] is set to [Off] or [30 Min], power consumption becomes higher than usual.
- The power save function is deactivated in the following situations:
- When powered via USB from a computer or other device
- While playing back slideshows
- While recording movies
- While connected to a computer or TV
- When [Bluetooth Rmt Ctrl] is set to [On]
- While streaming
- While uploading images to Creators' Cloud
[309] Changing the camera settingsPower settingsPower Save by Monitor
Sets whether or not to enable power save linkage when the monitor is opened or closed facing inward.
- MENU → (Setup) → [Power Setting Option] → [Power Save by Monitor] → desired setting.
Menu item details
- Both Linked:
- Enables power save linkage with the monitor. The camera returns from power saving mode when the monitor is opened, and enters power saving mode when the monitor is closed facing inward.
- Open: Return:
- The camera returns from power saving mode when the monitor is opened.
- Close: Power Save:
- The camera enters power saving mode when the monitor is closed facing inward.
- Does Not Link:
- Disables power save linkage with the monitor.
[310] Changing the camera settingsPower settingsAuto Power OFF Temp.
Sets the temperature of the camera at which the camera turns off automatically during shooting. When it is set to [High], you can continue shooting even when the temperature of the camera gets hotter than normal.
- MENU → (Setup) → [Power Setting Option] → [Auto Power OFF Temp.] → desired setting.
Menu item details
- Standard:
- Sets the standard temperature for the camera to turn off.
- High:
- Sets the temperature at which the camera turns off to higher than [Standard].
Notes when [Auto Power OFF Temp.] is set to [High]
- Do not shoot while holding the camera in your hand. Use a tripod.
- Using the camera while holding it in your hand for a long period of time may cause low-temperature burns.
Continuous recording time for movies when [Auto Power OFF Temp.] is set to [High]
The duration of time available for continuous movie recording is as follows when the camera starts recording with the default settings after the power has been turned off for a while. The following values indicate the continuous time from when the camera starts recording until the camera stops recording.
- Ambient temperature: 25°C (77°F)
- Continuous recording time for movies (HD): Approx. 120 minutes
- Continuous recording time for movies (4K): Approx. 30 minutes
- Ambient temperature: 40°C (104°F)
- Continuous recording time for movies (HD): Approx. 120 minutes
- Continuous recording time for movies (4K): Approx. 10 minutes
HD: XAVC S HD (60p 50M/50p 50M 4:2:0 8bit; when the camera is not connected via Wi-Fi; when the monitor is open)
4K: XAVC S 4K (60p 150M/50p 150M 4:2:0 8bit; when the camera is not connected via Wi-Fi; when the monitor is open)
Note
- Even if [Auto Power OFF Temp.] is set to [High], depending on the conditions or the temperature of the camera, the recordable time for movies may not change.
[311] Changing the camera settingsPower settings Display Quality (still image)
You can change the display quality.
- MENU →(Setup) → [Monitor] → [Display Quality] → desired setting.
Menu item details
- High:
- Displays in high quality.
- Standard:
- Displays in standard quality.
Note
- When [High] is set, battery consumption will be higher than when [Standard] is set.
- When the temperature of the camera rises, the setting may become locked to [Standard].
[312] Changing the camera settingsUSB settingsUSB Connection Mode
Selects the USB connection method when the camera is connected to a computer, etc.
- MENU →(Setup) → [USB] → [USB Connection Mode] → desired setting.
Menu item details
- Sel. When Connect:
- Each time you connect the USB cable to the camera, select the mode you want to use from the following. ([Live Stream(USB Streaming)], [Image Transfer (MSC)], [Image Transfer (MTP)], or [Remote Shoot (PC Remote)])
- USB Streaming:
- Performs USB streaming via the connected computer or smartphone.
- MassStorage(MSC):
- Establishes a Mass Storage connection when connecting the camera to a computer, etc.
When you connect the camera to a computer or other USB device, the camera is recognized as a removable disk, and you can transfer files on the camera. - MTP:
- Establishes an MTP connection between the camera, a computer, and other USB devices.
When you connect the camera to a computer or other USB device, the camera is recognized as a media device, and you can transfer still images/movies on the camera. - Remote Shooting:
- Uses Imaging Edge Desktop (Remote) to control the product from a computer, including such functions as shooting and storing images on the computer.
[313] Changing the camera settingsUSB settingsUSB LUN Setting
Enhances compatibility by limiting of USB connection functions.
- MENU → (Setup) → [USB] → [USB LUN Setting] → desired setting.
Menu item details
- Multi:
- Normally, use [Multi].
- Single:
- Set [USB LUN Setting] to [Single] only if you cannot make a connection.
[314] Changing the camera settingsUSB settingsUSB Power Supply
Sets whether to supply power via the USB cable when the product is connected to a computer or an USB device.
- MENU → (Setup) → [USB] → [USB Power Supply] → desired setting.
Menu item details
- On:
- Power is supplied to the product via a USB cable when the product is connected to a computer, etc.
- Off:
- Power is not supplied to the product via a USB cable when the product is connected to a computer, etc.
Operations available while supplying power via a USB cable
The following table shows you which operations are available/unavailable while supplying power via a USB cable.
| Operation | Available / Unavailable |
|---|---|
| Shooting images | Available |
| Playing back images | Available |
| Wi-Fi/Bluetooth connections | Available |
| Charging a battery pack | Unavailable |
| Turning the camera on without a battery pack inserted | Unavailable |
Note
- Insert the battery pack into the product to supply power via USB cable.
[315] Changing the camera settingsExternal output settingsHDMI Resolution
When you connect the camera to a TV or monitor device using an HDMI cable (sold separately), you can select the resolution to be output from the HDMI terminal of the camera during still image shooting or playback.
- MENU →(Setup) → [External Output] → [HDMI Resolution] → desired setting.
Menu item details
- Auto:
- The camera automatically recognizes the resolution of the connected TV or output device and sets the output resolution accordingly.
- 2160p:
- Outputs signals in 2160p.
- 1080p:
- Outputs signals in HD picture quality (1080p).
- 1080i:
- Outputs signals in HD picture quality (1080i).
Note
- If images are not displayed properly using the [Auto] setting, select [1080i], [1080p], or [2160p] based on the connected TV.
[316] Changing the camera settingsExternal output settingsHDMI Output Settings (movie)
Sets the video and audio to be output to an external recorder/player connected via HDMI when shooting a movie.
Use a Premium High Speed HDMI Cable (sold separately) to output 4K movies.
- MENU → (Setup) → [External Output] → [HDMI Output Settings] → desired setting item.
Menu item details
- Rec. Media dur HDMI Output:
- Sets whether or not to record movies on the memory card of the camera during HDMI output.
- [On]: Records movies on the memory card of the camera, and outputs the movies to the HDMI-connected device at the same time.
The color depth for the output movie is based on [Record Setting] under [Movie Settings].
- [Off(HDMI Only)]: Does not record movies on the memory card of the camera, and outputs movies only to devices connected via HDMI.
- Output Resolution:
- Sets the resolution of the image that will be output to another device connected via HDMI when [Rec. Media dur HDMI Output] is set to [On]. ([Auto] / [2160p] / [1080p] / [1080i])
- 4K Output Set.(HDMI Only):
- Sets the frame rate and color depth of 4K movie output to another device connected via HDMI when [Rec. Media dur HDMI Output] is set to [Off(HDMI Only)]. ([60p 10bit] / [50p 10bit] / [30p 10bit] / [25p 10bit] / [24p 10bit])
- Time Code Output:
- Sets whether or not to output the time code and user bit to another device connected via HDMI. ([On] / [Off])
- Time code information is transmitted as digital data, not as an image displayed on the screen. The connected device can then refer to the digital data in order to recognize the time data.
- REC Control:
- Sets whether to start or stop recording on the external recorder/player remotely by operating the camera when the camera is connected to an external recorder/player. ([On] / [Off])
- 4ch Audio Output:
- When recording audio in 4 channels, set the combination of audio channels that will be output to other devices connected via HDMI.
- [CH1/CH2]: Outputs audio from channel 1 to the L (left) side and from channel 2 to the R (right) side.
- [CH3/CH4]: Outputs audio from channel 3 to the L (left) side and from channel 4 to the R (right) side.
Hint
- With [REC Control] set to [On],
 (STBY) is displayed when a recording command is ready to be sent to the external recorder/player, and
  (REC) is displayed when a recording command is being sent to the external recorder/player.
- Even when playing back a movie with 4 channels on a device connected to the HDMI terminal of the camera, the audio is output with the [4ch Audio Output] setting.
Note
- When [Rec. Media dur HDMI Output] is set to [Off(HDMI Only)], [HDMI Info. Display] becomes temporarily set to [Off].
- When [Rec. Media dur HDMI Output] is set to [Off(HDMI Only)], the counter does not move forward (the actual recording time is not counted) while the movie is being recorded on an external recorder/player.
-
Regardless of the [Output Resolution] setting, the HDMI output resolution will be 1080 in the following cases.*
- When [Log Shooting] under [Log Shooting Setting] is set to an item other than [Off]
- When [Picture Profile] is set to PPLUT1-PPLUT4
*However, when [Rec. Media dur HDMI Output] is set to [Off(HDMI Only)], the video is output in 4K.
- [REC Control] can be used with external recorders/players that support the [REC Control] function.
- When [Time Code Output] is set to [Off], you cannot set [REC Control].
- Even when (REC) is displayed, the external recorder/player may not work properly depending on the settings or status of the recorder/player. Check if the external recorder/player works properly before use.
- When [Time Code Output] is set to [On], images may not be output properly to the TV or recording device. In this case, set [Time Code Output] to [Off].
- It is not possible to output audio in 4 channels to other devices connected via HDMI.
[317] Changing the camera settingsExternal output settingsHDMI Info. Display
Selects whether or not to display shooting information on a TV or a monitor device when the camera and TV, etc. are connected via an HDMI cable (sold separately).
- MENU → (Setup) → [External Output] → [HDMI Info. Display] → desired setting.
Menu item details
- On:
- Displays the shooting information on the TV.
- The recorded image and shooting information are displayed on the TV, while nothing is displayed on the camera’s monitor.
- Off:
- Does not display the shooting information on the TV.
- Only the recorded image is displayed on the TV, while the recorded image and shooting information are displayed on the camera’s monitor.
[318] Changing the camera settingsExternal output settingsCTRL FOR HDMI
When connecting this product to a TV using an HDMI cable (sold separately), you can operate this product by aiming the TV remote control at the TV.
- MENU → (Setup) → [External Output] → [CTRL FOR HDMI] → desired setting.
- Connect this product to a TV.
The input of the TV is switched automatically and images on this product are displayed on the TV screen.
- The operation method differs depending on the TV you are using. For details, refer to the operating instructions supplied with the TV.
Menu item details
- On:
- You can operate this product with a TV’s remote control.
- Off:
- You cannot operate this product with a TV’s remote control.
Note
- If you connect this product to a TV using an HDMI cable, available menu items are limited.
- If the product performs unwanted operations in response to the TV remote control, set [CTRL FOR HDMI] to [Off].
[319] Changing the camera settingsGeneral settingsLanguage
Selects the language to be used in the menu items, warnings and messages.
- MENU →(Setup) → [Area/Date] → [Language] → desired language.
[320] Changing the camera settingsGeneral settingsArea/Date/Time Setting
You can set the area (where you are using the camera), daylight savings ([On]/[Off]), the date display format, and the date and time.
The Area/Date/Time setting screen will be displayed automatically if you did not register your smartphone in the initial setup or when the internal rechargeable backup battery has fully discharged. Select this menu to set the date and time after the first time.
- MENU → (Setup) → [Area/Date] → [Area/Date/Time Setting] → desired setting.
Menu item details
- Area Setting:
- Sets the area where you are using the camera.
- Daylight Savings:
- Selects Daylight Savings [On] / [Off].
- Date/Time:
- Sets the date and time.
-
- You can switch the time display format (24-hour or 12-hour format) by pressing the (Delete) button.
- You can switch the time display format (24-hour or 12-hour format) by pressing the
- Date Format:
- Selects the date display format.
Hint
- To charge the internal rechargeable backup battery, insert a charged battery pack, and leave the product for 24 hours or more with the power off.
- If the clock resets every time the battery is charged, the internal rechargeable backup battery may be worn out. Consult your service facility.
[321] Changing the camera settingsGeneral settingsNTSC/PAL Selector
Plays back movies recorded with the product on a NTSC/PAL system TV.
- MENU → (Setup) → [Area/Date] → [NTSC/PAL Selector] → [Enter]
[322] Changing the camera settingsGeneral settings Audio Signal(Shooting)
Selects whether or not the camera produces a sound when it focuses and during self-timer shooting.
- MENU → (Setup) → [Sound Option] → [Audio Signal(Shooting)] → desired setting.
Menu item details
- On:all:
- The shutter produces sounds, and sounds are produced for example when the focus is achieved by pressing the shutter button halfway down.
- On:w/o shutter:
- Sounds are produced when focusing by pressing the shutter button halfway down, etc. The electronic shutter does not produce any sounds.
- On:shutter only:
- Only the electronic shutter produces sounds. Sounds are not produced when focusing by pressing the shutter button halfway down, etc.
- Off:
- Sounds are not produced.
Hint
- When [Silent Mode] is set to [On], [Audio Signal(Shooting)] becomes locked to [Off].
Note
- If the focus mode is set to [Continuous AF], the camera will not beep when it focuses on a subject.
[323] Changing the camera settingsGeneral settingsAudio Signal(Start/End)
Sets whether or not the camera produces an electronic sound when it starts up and shuts down.
- MENU → (Setup) → [Sound Option] → [Audio Signal(Start/End)] → desired setting.
Menu item details
- On:
- An electronic sound is produced when the camera starts up and shuts down.
- Off:
- An electronic sound is not produced when the camera starts up and shuts down.
Note
- When [Silent Mode] is set to [On], [Audio Signal(Start/End)] is locked to [Off].
[324] Changing the camera settingsGeneral settingsAudio Signal Volume
Sets the volume of audio signals from the camera, such as the shutter sound and the sound when the focus is achieved.
- MENU → (Setup) → [Sound Option] → [Audio Signal Volume].
- Select the desired level using the left/right side of the control wheel.
- You can check the sound volume by pressing the (Delete) button while setting the sound volume level.
- You can check the sound volume by pressing the
Hint
- The camera does not output audio signals when [Audio Signal Volume] is set to [0].
Note
- You cannot check the sound volume while setting the sound volume level in the following situations.
- When [Audio signals] is set to [Off]
- When [Silent Mode] under [Silent Mode Settings] is set to [On]
- During movie recording
[325] Changing the camera settingsGeneral settingsREC Lamp
Sets whether to turn on the recording lamps during movie recording.
- MENU → (Setup) → [Setup Option] → [REC Lamp] → desired setting.
Menu item details
- On
- The recording lamp lights up during recording.
- Off
- The recording lamp does not light up during recording.
Hint
- Set [REC Lamp] to [Off] if the light of the recording lamp reflected by an object, such as glass, is captured by the camera.
[326] Changing the camera settingsGeneral settingsVideo Light Mode
Sets the illumination setting for the HVL-LBPC LED light (sold separately).
- MENU → (Setup) → [Setup Option] → [Video Light Mode] → desired setting.
Menu item details
- Power Link:
- The video light turns on/off in sync with the ON/OFF operation of this camera.
- REC Link:
- The video light turns on/off in sync with movie recording start/stop.
- REC Link&STBY:
- The video light turns on when movie recording starts and dims when not recording (STBY).
- Auto:
- The video light automatically turns on when it is dark.
Note
- When shooting time-lapse movies, the video light will turn on/off differently according to the [Time-lapse Settings] setting. For details, see “Time-lapse Settings.”
- When shooting time-lapse movies, [Video Light Mode] cannot be set to [Auto]. It will automatically switch to [REC Link].
[327] Changing the camera settingsGeneral settingsPixel Mapping
You can manually optimize the image sensor (pixel mapping). Perform [Pixel Mapping] regularly according to the following procedure. We recommend that you perform the operation once every three days.
- MENU → (Setup) → [Setup Option] → select [Pixel Mapping].
- Attach the lens cap.
- Be sure to attach the lens cap.
- Select [OK] on the confirmation screen.
Pixel mapping will be performed.
- The camera cannot be operated during pixel mapping.
- The camera will restart when pixel mapping is complete.
Hint
- When you turn the camera on, a message to perform pixel mapping will occasionally be displayed. If the message is displayed, perform [Pixel Mapping].
- If you see bright spots in a recorded image on the camera monitor, immediately perform [Pixel Mapping].
Note
- Pixel mapping cannot be performed when the battery is low.
- If [Pixel Mapping] is not performed regularly, bright spots may appear in recorded images.
[328] Changing the camera settingsGeneral settingsVersion
Displays the version of this product’s software. Check the version when updates for this product’s software are released, etc.
Also displays the version of the lens if a lens compatible with firmware updates is attached.
The version of the Mount Adaptor is displayed in the lens area if a Mount Adaptor compatible with firmware updates is attached.
- MENU → (Setup) → [Setup Option] → [Version].
- When the camera is connected to the Internet, software information is obtained. If new software is available, information about it will be displayed (when the camera's system software (firmware) is Ver.1.01 or later).
Menu item details
- Body :
- Displays the firmware version of the camera body.
- Lens :
- Displays the firmware version of the lens when a lens that supports firmware updates is attached.
Hint
- You can also save the downloaded firmware data to a memory card and use the memory card to update the firmware of the camera.
Note
- Updating can be performed only when the remaining battery level is 51% or more. Use a sufficiently charged battery pack.
[329] Changing the camera settingsGeneral settingsDisplay Serial Number
Displays the serial number of the camera.
- MENU → (Setup) → [Setup Option] → [Display Serial Number].
[330] Changing the camera settingsGeneral settingsPrivacy Notice
Displays the privacy notification screen.
- MENU → (Setup) → [Setup Option] → [Privacy Notice].
[331] Changing the camera settingsGeneral settingsScreen Reader (For some models only)
Sets the function for reading aloud information such as text on the screen.
Only some languages may be supported for this function depending on the model. This function is available only when the language set in the menu is supported by this function.
- MENU → (Setup) → [Accessibility] → [Screen Reader] → desired setting item.
Menu item details
- Screen Reader:
- Sets whether to use the function to read aloud. ([On]/[Off])
- Speed:
- Sets the speed when reading aloud.
- Volume:
- Sets the volume when reading aloud.
- Long Press to Switch:
- Sets whether to enable the function to switch the screen reader function on and off by pressing and holding the MENU button. ([On]/[Off])
Hint
- [Long Press to Switch] is set to [On] in the default settings. Therefore, you can use the screen reader function by pressing and holding the MENU button on the initial setup screen of the camera. Additionally, you can switch the screen reader function on and off by pressing and holding the MENU button after the initial setup.
- You can set the camera to make a sound when it is turned on or off by setting [Audio Signal(Start/End)] to [On].
[332] Changing the camera settingsGeneral settingsEnlarge Screen
You can enlarge the menu screen display. (Some menu screens do not support the enlarging function.)
- MENU → (Setup) → [Accessibility] → [Enlarge Screen] → Select an item to set, and then select the desired setting.
Menu item details
- Enlarge Menu Scrn:
- Sets whether or not to use the function to enlarge the screen display.
([Off]/[On (Custom Btn 1)])
When you select [On (Custom Btn 1)], the screen display is enlarged by pressing the C1 button (Custom button 1). - Magnification:
- Sets the magnification to use for the function to enlarge the screen display. ([x1.5]/[x2.0]/[x2.5])
To magnify the menu screen display
On the menu screen, press the button specified in [Enlarge Menu Scrn] to magnify the screen display.
- You can move the displayed position using the control dial or by turning the control wheel.
- Each time you press the button, the magnification scale changes.
- To cancel the magnified display, press the button repeatedly until the screen display is back to normal.
Hint
- You can move between items using the top/bottom/left/right side of the control wheel even when the screen display is magnified. You can also confirm items using the center button.
- You can move the displayed position using touch operations while the screen display is magnified when [Touch Operation] is set to [On] and [Menu Screen] is set to [On].
- You can also assign [Enlarge Menu Scrn] to some buttons using [Custom Key/Dial Set.]/[Custom Key/Dial Set.].
[333] Changing the camera settingsGeneral settingsCertification Logo (For some models only)
Displays some of the certification logos for this product.
This function is available on products sold in some countries and regions only.
- MENU →(Setup) → [Setup Option] → [Certification Logo].
[334] Changing the camera settingsGeneral settingsSave/Load Settings
You can save/load camera settings to/from a memory card. You can also load settings from another camera of the same model.
- MENU →(Setup) → [Reset/Save Settings] → [Save/Load Settings] → desired item.
Menu item details
- Load:
- Loads the settings from a memory card to this camera.
- Save:
- Saves the current settings of this camera to a memory card.
- Delete:
- Deletes the settings saved on a memory card.
Settings that cannot be saved
The following setting parameters cannot be saved using the [Save/Load Settings] function. (Menu items without setting parameters, such as, [Focus Magnifier], are not listed.)
- (Shooting)
- Copyright Info
(Exposure/Color)- External Flash Set.
- White Balance: Custom 1/Custom 2/Custom 3
(Focus)- Face Memory
(Network)- Cloud Connection
- WPS Push
- Access Point Set.
- Wi-Fi Frequency Band
- IP Address Setting
- Edit Device Name
- Import Root Certificate
- Access Authen. Settings
-
(Setup) - Language
- Area/Date/Time Setting
Note
- You can save up to 10 settings per memory card. When 10 settings have been already saved, you cannot perform [Save New]. Delete the existing settings using [Delete], or overwrite them.
- You cannot load settings from a camera of a different model.
- Even if the model name is the same, settings from a camera with a different system software version may fail to load.
-
You can use this function to save settings registered to [Camera Set. Memory]. However, [Save/Load Settings] is unavailable when the shooting mode is set to [Cam.Set]. Set the shooting mode to a mode other than MR (Cam.Set) before using this function.
[335] Changing the camera settingsGeneral settingsSetting Reset
Resets the product to the default settings. Even if you perform [Setting Reset], the recorded images are retained.
- MENU →(Setup) → [Reset/Save Settings] → [Setting Reset] → desired setting.
Menu item details
- Camera Settings Reset:
- Initializes the main shooting settings to the default settings. The setting values for both still image shooting and movie recording are initialized.
- Initialize:
- Initializes all the settings to the default settings.
Note
- Be sure not to eject the battery pack while resetting.
- If you perform [Initialize], the privacy notice agreement will also be initialized, so agree to the privacy notice again before using the camera.
-
The settings for [Picture Profile] are not reset even when [Camera Settings Reset] or [Initialize] is performed, except the settings for PPLUT 1 - 4.
- The check mark for [Picture Profile] in [Different Set for Still/Mv] is not reset when you perform either [Camera Settings Reset] or [Initialize].
- The security and network settings are not deleted when you perform [Camera Settings Reset].
- To reset the security and network settings to the default settings, perform either [Reset Network Set.] or [Initialize]. However, even if you perform [Reset Network Set.] when [Airplane Mode] is set to [On], [Airplane Mode] will not be reset to [Off].
[336] Functions available with a smartphoneFunctions available with a smartphone (Creators' App)
Using the smartphone application Creators' App, you can shoot an image while controlling the camera using a smartphone or transfer the images recorded on the camera to the smartphone.
Download and install the application Creators' App from your smartphone’s application store. If Creators' App is already installed on your smartphone, be sure to update it to the latest version.
For details on Creators' App, refer to the following website.
Hint
- You can also install Creators' App by scanning the QR Code displayed on the screen of the camera using your smartphone.
Note
- Depending on future version upgrades, the operational procedures or screen displays are subject to change without notice.
Supported smartphones
Refer to the support page for the latest information.
https://www.sony.net/ca/help/mobile/
- For details on Bluetooth versions compatible with your smartphone, check the product website for your smartphone.
[337] Functions available with a smartphonePairing the camera with a smartphone (Smartphone Connection)
Connects the camera to your smartphone (pairing) to use the smartphone application Creators' App.
If you did not connect the camera with your smartphone when you turned on the camera for the first time, perform the following procedure.
The following is the procedure for connecting the camera to your smartphone when you install Creators' App on your smartphone for the first time.
 : Operations performed on the smartphone
 : Operations performed on the camera
- : On the camera, select MENU → (Network) → [Cnct./Remote Sht.] → [Smartphone Connection].
- : Follow the instructions on the screen and set [Bluetooth Function] to [On].
A screen for waiting for a connection from the app will appear.
- If [Bluetooth Function] is already set to [On], the screen for waiting for a connection from the app will appear immediately.
- : Launch Creators' App on your smartphone.
- : Follow the instructions on the screen to pair the camera with your smartphone.
- When the connection is completed, a menu to select a function for the camera appears on the smartphone.
- : On the smartphone screen, select the desired function.
Connecting to a smartphone via a Wi-Fi access point
After pairing in steps 1 to 4, connect the camera and smartphone to the same Wi-Fi access point by selecting MENU on the camera → (Network) → [Wi-Fi] → [Wi-Fi Connect] → [On]. After that, follow the instructions on the smartphone screen to connect the camera and smartphone.
If you have used Creators' App with other cameras
Launch Creators' App after Step 2, open the [Cameras] screen, select the (Add Camera) button, and follow the instructions on the screen to continue the operation.
About the icons when connecting to a smartphone
- Bluetooth connection available / Bluetooth connection unavailable


- Connected to Wi-Fi (via a Wi-Fi access point)

- Disconnected from Wi-Fi (via a Wi-Fi access point)


- Connected to Wi-Fi/Disconnected from Wi-Fi (Wi-Fi Direct)
Connecting the camera and smartphone without pairing
If you want to connect without pairing, you need to perform the Wi-Fi connection operation every time. In addition, some functions are limited when only using a Wi-Fi connection.
- On the camera, select MENU → (Network) → [Cnct./Remote Sht.] → [Smartphone Connection].
- Press the (Delete) button on the camera to switch to the screen for Wi-Fi connections.
The SSID and password will be displayed. - Open the Wi-Fi setting screen on your smartphone.
- On the Wi-Fi setting screen on your smartphone, select the SSID displayed on the camera and enter the password.
- Launch Creators' App on your smartphone and open the [Cameras] screen.
- Select the
 (Setup) button in the upper right corner of the [Cameras] screen, and then select [Connect only via Wi-Fi].
 - On the screen of Creators' App on your smartphone, select the product name of the camera (ZV-E10M2).
The smartphone will connect to the camera.
Note
- To ensure a secure wireless LAN connection, we strongly recommend using an access point with WPA3 or WPA2 security settings. Connecting to an access point without security settings may result in hacking, access from malicious third parties, or attacks on vulnerabilities. Unless there is a specific reason, we do not recommend using an access point without security settings.
- When establishing a Bluetooth connection, only pair with trusted devices. Avoid unsolicited pairing requests or connections to unknown devices.
- Turn off the Bluetooth function when not in use.
- Check your paired devices regularly and delete any unnecessary ones.
- [Smartphone Connection] cannot be executed when [Airplane Mode] is set to [On].
- Up to 2 devices can be connected to the camera at the same time using Bluetooth communication.
- Radio wave interference may occur as Bluetooth communications and Wi-Fi (2.4 GHz) communications use the same frequency band. If your Wi-Fi connection is unstable, it may be improved by turning off the Bluetooth function of the smartphone.
- The Bluetooth icon is not displayed when the touch function icons are displayed in the movie recording mode. To see the Bluetooth icon, swipe the touch function icons left or right to hide the touch function icons.
[338] Functions available with a smartphoneUsing a smartphone as a remote commanderUsing a smartphone as a remote commander
With Creators' App, you can shoot images while checking the shooting range of the camera on the screen of the smartphone. Connect the camera and smartphone by referring to "Related Topic" at the bottom of this page. For details on functions that can be operated from a smartphone, refer to the following support page.
[339] Functions available with a smartphoneUsing a smartphone as a remote commanderRemote Shoot Setting
Configures settings for images saved when performing remote shooting using a smartphone or computer.
- MENU → (Network) → [Cnct./Remote Sht.] → [Remote Shoot Setting] → desired setting item.
Menu item details
- Still Img. Save Dest.:
- Sets the save destination. ([Destination Only]/[Dest.+Camera]/[Camera Only])
- Save Image Size:
- Selects the file size for images to be transferred to the smartphone or the computer when [Still Img. Save Dest.] is set to [Dest.+Camera]. The original-sized JPEG/HEIF file or a 2M-equivalent JPEG/HEIF file can be transferred. ([Original]/[2M])
- RAW+J Save Image:
- Selects the file type for images to be transferred to the smartphone or the computer when [Still Img. Save Dest.] is set to [Dest.+Camera] and [File Format] is set to [RAW & JPEG]. ([RAW & JPEG]/[JPEG Only]/[RAW Only])
- RAW+H Save Image:
- Selects the file type for images to be transferred to the smartphone or the computer when [Still Img. Save Dest.] is set to [Dest.+Camera] and [File Format] is set to [RAW & HEIF]. ([RAW & HEIF]/[HEIF Only]/[RAW Only])
Note
- When an unrecordable memory card is inserted into the camera, you cannot record still images even if [Still Img. Save Dest.] is set to [Camera Only] or [Dest.+Camera].
- When [Camera Only] or [Dest.+Camera] is selected for [Still Img. Save Dest.] and no memory card is inserted into the camera, the shutter will not be released even if [Release w/o Card] is set to [Enable].
- While a still image is being played back on the camera, you cannot perform remote shooting using a smartphone or a computer.
-
[RAW+J Save Image] and [RAW+H Save Image] can be set only when [File Format] is set to [RAW & JPEG] or [RAW & HEIF].
[340] Functions available with a smartphoneTransferring images to a SmartphoneSelect on Cam & Send (transferring to a smartphone)
You can transfer images to a smartphone by selecting images on the camera.
Refer to “Pairing the camera with a smartphone (Smartphone Connection) ” to pair the camera and smartphone in advance.
The following is the procedure for transferring the image currently displayed on the camera.
- MENU → (Network) → [Cnct./Remote Sht.] → [Select on Cam & Send] → [Size of Sending Image], [RAW+J/H Send Target], [Sending Target] and [Movie with Shot Mark] → desired setting.
- Display the image to be transferred on the playback screen.
- MENU → (Network) → [Cnct./Remote Sht.] → [Select on Cam & Send] → [Send] → [This Image].
- You can also display the [Send] screen by pressing the (Send to Smartphone) button.
- You can also display the [
- Launch Creators' App on your smartphone.
A message indicating that the transfer has started will appear.
- Select [OK] on the smartphone.The image will be transferred to the smartphone.
- When the image is transferred, the
 (transferred) icon will appear on the screen of the camera.
 - You can transfer multiple images at once by selecting a setting other than [This Image] under [Send].
- When the image is transferred, the
Menu item details
- Send:
- Selects images and transfers them to a smartphone.
([This Image]/[All Images in This Group]/[All with this date]/[All Filtered]/[Filtered Images]/[Multiple Images])
- The options displayed may differ depending on the setting for [Playback Filter Condition] and the selected content.
- If you select [Multiple Images], select the desired images using the center of the control wheel, then press MENU → [Enter]. You can also specify the range using the Fn (Function) button.
- Size of Sending Image:
- Selects the file size for images to be transferred to the smartphone. The original-sized JPEG/HEIF file or a 2M-equivalent JPEG/HEIF file can be transferred. ([Original]/[2M])
- RAW+J/H Send Target:
- Selects the file type for images to be transferred to a smartphone when the images are shot with [File Format] set to [RAW & JPEG] or [RAW & HEIF]. ([JPEG & HEIF]/[RAW]/[RAW+J & RAW+H])
- Sending Target:
- Sets whether to transfer the low-bit-rate proxy movie or the high-bit-rate original movie when transferring a movie to a smartphone. ([Proxy Only]/[Original Only]/[Proxy & Original])
- When you select [Proxy Only], movies can be transferred faster than when transferring the original movies.
- Movie with Shot Mark:
- Cuts and transfers a specified number of seconds from a movie with the position of a Shot Mark set as the center. ([Cut to 60 seconds]/[Cut to 30 seconds]/[Cut to 15 seconds]/[Don't Cut])
To filter the images to be transferred (Filtered Images)
Images to be transferred can be filtered by the following conditions:
- Target Group: [This Date]/[This Media]
- Still Images/Movies: [All]/[Only Still Images]/[Only Movies]
- Target Img (Rating): []-[], []
- Target Movie (): [All]/[Only Shot Mark Mov.]
- Target Img (Protect): [All]/[Only Protected Img.]
-
Transfer Status*: [All]/[Only Non-transfer]
*Images transferred by selecting them on the smartphone are treated as not yet transferred.
*When [Movie with Shot Mark] is set to an item other than [Don't Cut], even if you have already transferred a clip by using a Shot Mark and then set another Shot Mark to the movie, all of the Shot Marks will create clips which will be retransferred as not-yet transferred images.
To add a Shot Mark to a movie
If you add a Shot Mark to a movie, you can use it as a mark for selecting, transferring, or editing the movie. To add a Shot Mark during recording, swipe left or right on the screen to display the touch function icons, and then touch (Add Shot Mark1). You can also add a Shot Mark during playback by touching (Add Shot Mark1) on the screen.
Hint
-
To use the touch function icons, enable touch operations during shooting or playback by configuring each setting in MENU → (Setup) → [Touch Operation].
-
While the playback filter function is used, you can set the filtered images as the target to transfer by selecting [All Filtered] in [Send].
- Use a custom key or the shutter button to add a second Shot Mark (Shot Mark 2). Shot Mark 1 can also be added using a custom key or the shutter button.
- When adding a Shot Mark with a custom key: assign [Add Shot Mark1] or [Add Shot Mark2] in [Custom Key/Dial Set.] and press the assigned button while shooting.
- When adding a Shot Mark with the shutter button: set [ with Shutter Button] to [Add Shot Mark1] or [Add Shot Mark2] and press the shutter button while shooting.
- When adding a Shot Mark while playing back a movie: assign [Add/Delete Shot Mark1] or [Add/Delete Shot Mark2] in [Custom Key Setting] and press the assigned button during playback.
- When adding a Shot Mark with a custom key: assign [Add Shot Mark1] or [Add Shot Mark2] in [
- For movies with a Shot Mark, you can jump to the position with the Shot Mark by touching the touch function icon while paused.
Note
- For images transferred by selecting them on the smartphone, the (transferred) icon will not appear.
- Depending on the smartphone, the transferred movie may not be played back correctly. For example, the movie may not play smoothly, or there may be no sound.
- Depending on the format of the still image, movie, slow-motion movie, or quick-motion movie, it may not be possible to play it back on a smartphone.
- When [Airplane Mode] is set to [On], you cannot connect this product and the smartphone. Set [Airplane Mode] to [Off].
- When establishing a Bluetooth connection, only pair with trusted devices. Avoid unsolicited pairing requests or connections to unknown devices.
- Turn off the Bluetooth function when not in use.
- Check your paired devices regularly and delete any unnecessary ones.
- After you delete the pairing information for the camera from your smartphone, delete pairing information for the smartphone from the camera using [Manage Paired Device].
[341] Functions available with a smartphoneTransferring images to a SmartphoneReset Transfer Status (transferring to a smartphone)
You can reset the transfer status of images that have been transferred to your smartphone. Use this function if you want to retransfer images that have previously been transferred. The transferred images will not be deleted even if you reset the transfer status.
- MENU → (Network) → [Cnct./Remote Sht.] → [Reset Transfer Status].
- If you press [OK] on the confirmation screen, all images that have been transferred to your smartphone will become untransferred images.
[342] Functions available with a smartphoneConnecting while the camera is turned OFFCnct. while Power OFF (smartphone)
Sets whether or not to accept Bluetooth connections from a smartphone while the camera is turned off. When [Cnct. while Power OFF] is set to [On], you can browse images on the camera's memory card and transfer images from the camera to a smartphone by operating the smartphone.
- MENU → (Network) → [Cnct./Remote Sht.] → [Cnct. while Power OFF] → desired setting.
Menu Item Details
- On:
- Accepts Bluetooth connections from a smartphone while the camera is turned off.
The battery level is depleted gradually while the camera is turned off. If you do not want to use [Cnct. while Power OFF], turn it off. - Off:
- Does not accept Bluetooth connections from a smartphone while the camera is turned off.
How to browse/transfer images on the smartphone
Refer to “Pairing the camera with a smartphone (Smartphone Connection) ” to pair the camera and smartphone in advance.
- Set [Cnct. while Power OFF] to [On].
- Turn off the camera.
- Launch Creators' App on the smartphone.
- Select [View and Import] on the smartphone.
- The images saved on the memory card of the camera can be viewed and are ready to be transferred.
Note
- If the smartphone is not operated for a certain period of time, the Bluetooth connection will become deactivated. Select [View and Import] again on the smartphone.
- When the camera is turned on, the camera will switch to the shooting screen, and the connection with the smartphone will be terminated.
- [Cnct. while Power OFF] will be set to [Off] if you cancel pairing between the camera and the smartphone or pairing fails.
- If the function does not work properly, check the following notes and then try pairing again.
- Ensure that the camera is either not connected to any other device or connected to only one device using Bluetooth communication. (Up to 2 devices can be connected to the camera at the same time.)
- Confirm that [Airplane Mode] for the camera is set to [Off].
- Delete the pairing information for the camera registered in the Bluetooth settings on your smartphone.
- If the function does not work properly even after you have performed the above operations, delete the pairing information for the device that you want to connect using [Manage Paired Device] on the camera.
- When establishing a Bluetooth connection, only pair with trusted devices. Avoid unsolicited pairing requests or connections to unknown devices.
- Turn off the Bluetooth function when not in use.
- Check your paired devices regularly and delete any unnecessary ones.
- After you delete the pairing information for the camera from your smartphone, delete pairing information for the smartphone from the camera using [Manage Paired Device].
[343] Functions available with a smartphoneReading location information from a smartphone
You can use the application Creators' App to obtain location information from a smartphone that is connected with your camera using Bluetooth communication. You can record the obtained location information when shooting images.
Refer to “Pairing the camera with a smartphone (Smartphone Connection) ” to pair the camera and smartphone in advance.
- Launch Creators' App on your smartphone, open the [Cameras] screen, and tap [Setup] → [Location Information Linkage].
- Activate [Location Information Linkage] on the [Location Information Linkage] setting screen of Creators' App.
 (obtaining location information icon) will be displayed on the monitor of the camera. Location information obtained by your smartphone using GPS, etc., will be recorded when shooting images.
 - When you activate [Auto Time Correction] or [Auto Area Adjustment] on a linked smartphone, the camera automatically corrects the date setting or area setting using information from the smartphone.
Icons displayed when obtaining the location information
(Obtaining location information): The camera is obtaining the location information.
 (Location information cannot be obtained): The camera cannot obtain the location information.
Hint
- Location information can be linked when Creators' App is running on your smartphone even if the smartphone monitor is off. However, if the camera has been turned off for a while, location information may not be linked immediately when you turn the camera back on. In this case, location information will be linked immediately if you open the Creators' App screen on the smartphone.
- When Creators' App is not operating, such as when the smartphone is restarted, launch Creators' App to resume location information linking.
- If the location information linking function does not work properly, see the following notes and perform pairing again.
- Confirm that the Bluetooth function of your smartphone is activated.
- Ensure that the camera is either not connected to any other device or connected to only one device using Bluetooth communication. (Up to 2 devices can be connected to the camera at the same time.)
- Confirm that [Airplane Mode] for the camera is set to [Off].
- Delete the pairing information for the camera registered in Creators' App.
- Delete the pairing information for the camera registered in the Bluetooth settings on your smartphone.
- Delete the pairing information for your smartphone registered in [Manage Paired Device] on the camera.
- The Bluetooth icon is not displayed when the touch function icons are displayed in the movie recording mode. To see the Bluetooth icon, swipe the touch function icons left or right to hide the touch function icons.
Note
- If you publish or share still images or movies taken with this camera on the internet while location information is linked using Creators' App, the shooting location may be unintentionally made known to third parties. In this case, turn off [Location Information Linkage] in Creators' App before shooting the images.
- When you initialize the camera, the pairing information is also deleted. Before performing pairing again, first delete the pairing information for the camera registered in the smartphone's Bluetooth settings and Creators' App.
- The location information will not be recorded when it cannot be obtained, such as when the Bluetooth connection is disconnected.
- The camera can be paired with up to 15 Bluetooth devices, but can link the location information with that of only one smartphone. If you want to link the location information with that of another smartphone, turn off the [Location Information Linkage] function under [Setup] in Creators' App on the smartphone that is already linked.
- If the Bluetooth connection is unstable, remove any obstacles, such as people or metal objects from between the camera and the paired smartphone.
- The communication distance for the Bluetooth connection or Wi-Fi may vary depending on the conditions of use.
[344] Using a computerRecommended computer environment
You can confirm the operating computer environment of the software from the following URL:
https://www.sony.net/pcenv/
[345] Using a computerConnecting/disconnecting the camera and a computerConnecting the camera to a computer
- Insert a sufficiently charged battery pack into the camera.
- Turn on the camera and the computer.
- (Setup) → [USB] → Set [USB Connection Mode] to [MassStorage(MSC)].
- Connect the USB Type-C terminal on the camera to the computer with a USB cable (commercially available).
- When you connect the camera to the computer for the first time, the procedure for recognizing the camera may start automatically on the computer. Wait until the procedure is finished.
- If you connect the camera to your computer using the USB cable when [USB Power Supply] is set to [On], power is supplied from your computer. (Default setting: [On])
- Use a cable that complies with the USB standard.
- Use a SuperSpeed USB 5 Gbps (USB 3.2)-compatible computer and a commercially available USB cable for higher-speed communications.
Note
- Do not turn on/off or restart the computer, or wake the computer from sleep mode when a USB connection has been established between the computer and the camera. Doing so may cause a malfunction. Before turning on/off or restarting the computer, or waking the computer from sleep mode, disconnect the camera from the computer.
[346] Using a computerConnecting/disconnecting the camera and a computerDisconnecting the camera from the computer
Perform the following operations on the computer before disconnecting the camera from the computer.
- Click
 (Safely Remove Hardware and Eject Media ) in the taskbar.
 - Click the displayed message.The following operations are available after you have completed the steps above.
- Disconnecting the USB cable.
- Removing a memory card.
- Turning off the camera.
Note
- On Mac computers, drag and drop the memory card icon or the drive icon into the “Trash” icon. The camera will be disconnected from the computer.
- On some computers, the disconnection icon may not appear. In this case, you can skip the steps above.
- Do not remove the USB cable from the camera while the access lamp is lit. The data may be damaged.
[347] Using a computerManaging and editing images on a computer Introduction to computer software (Imaging Edge Desktop/Catalyst)
Imaging Edge Desktop
Imaging Edge Desktop is a software suite that includes functions such as remote shooting from a computer, and adjusting or developing RAW images recorded with the camera.
For details on how to use Imaging Edge Desktop, refer to the support page.
https://www.sony.net/disoft/help/
Installing Imaging Edge Desktop on your computer
Download and install the software by accessing the following URL:
https://www.sony.net/disoft/d/
Catalyst Browse (free software)/Catalyst Prepare (paid software)
Catalyst Browse is software for previewing clips. You can preview recorded XAVC S/XAVC HS clips, view and edit media metadata, apply image stabilization* using metadata, apply color calibration, copy to the local hard drive, or transcode to a variety of formats and so on with Catalyst Browse.
Catalyst Prepare adds to the functions of Catalyst Browse allowing you to organize clips using bins, perform basic timeline editing with storyboards, and so on.
* For the conditions of use of the image stabilization function, refer to the support page.
Installing Catalyst Browse/Catalyst Prepare on your computer
Download and install the software by accessing the following URL:
https://www.sony.net/catalyst/
[348] Using a computerManaging and editing images on a computerImporting images to the computer
You can import images from the camera to a computer by connecting the camera to the computer with a USB cable (commercially available), or by inserting the memory card of the camera into the computer.
Open the folder in which the images you want to import are stored on the computer, and then copy the images to the computer.
Example: Folder tree during USB Mass Storage connection
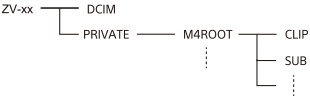
DCIM: still images
CLIP: movies
SUB: proxy movies
Note
- Do not edit or otherwise process movie files/folders from the connected computer. Movie files may be damaged or become unplayable. Do not delete movies on the memory card from the computer. Sony is not held liable for consequences resulting from such operations via the computer.
- If you delete images or perform other operations from the connected computer, the image database file may become inconsistent. In this case, repair the image database file.
- The folder tree is different during MTP connection.
[349] Using a computerOperating the camera from a computer Operating the camera from a computer (Remote Shoot Function)
Uses a Wi-Fi or USB connection, etc. to control the camera from a computer, including such functions as shooting and storing images on the computer.
When the camera and a smartphone are connected, you cannot control the camera from a computer. Make sure that the camera is not connected to a smartphone beforehand.
For details on [Remote Shoot Function], refer to the following URL:
https://support.d-imaging.sony.co.jp/app/imagingedge/l/instruction/4_1_connection/index.php
The following is the procedure for connecting the camera to your computer using a Wi-Fi connection via a Wi-Fi access point. If you will use another connection method, refer to “How to connect the camera and the computer using a method other than a Wi-Fi access point.”
- Select MENU → (Network) → [Wi-Fi] → [Wi-Fi Connect] → [On] to connect the camera to the Wi-Fi access point.
- Connect the computer to the same Wi-Fi access point.
- Select MENU → (Network) → [Cnct./Remote Sht.] → [Remote Shoot Function] → [Remote Shooting] → [On].
- Select [Access Authen. Info] to display the information such as the username, password, and fingerprint.
- You can check the information by selecting MENU → (Network) → [Network Option] → [Access Authen. Info].
- You can check the information by selecting MENU →
- Launch Imaging Edge Desktop (Remote) on the computer, and then enter and confirm the access authentication information.You can now operate the camera using Imaging Edge Desktop (Remote).
Menu item details
- Remote Shooting:
- Sets whether or not to use the Remote Shooting function. ([On] / [Off])
- Pairing:
- When connecting via a Wi-Fi access point without using the [Access Authen.] function, pair the camera with the computer.
- Wi-Fi Direct Info.:
- Displays information for connecting the computer and the camera via Wi-Fi Direct.
How to connect the camera and the computer using a method other than a Wi-Fi access point
When connecting with Wi-Fi Direct
Use the camera as an access point, and connect the computer to the camera directly via Wi-Fi.
Select MENU → (Network) → [Cnct./Remote Sht.] → [Remote Shoot Function] → [Wi-Fi Direct Info.] to display the Wi-Fi connection information (SSID and password) for the camera. Connect the computer and the camera using the Wi-Fi connection information displayed on the camera.
When connecting with a USB cable
Connect the USB Type-C terminal on the camera to the computer with a USB cable (commercially available).
Next, select [Remote Shoot (PC Remote)] on the screen displayed on the camera.
Hint
- In [Remote Shoot Setting] under [Cnct./Remote Sht.], you can set the save destination and saved format of still images for remote shooting.
-
When [Access Authen.] is set to [Off] and you are connecting via a Wi-Fi access point, you need to pair the camera with the computer. Select MENU → (Network) → [Cnct./Remote Sht.] → [Remote Shoot Function] → [Pairing] after Step 1, and then pair the camera and the computer using Imaging Edge Desktop (Remote) on the computer. Pairing information is deleted when you initialize the camera.
Note
- When shooting continuously using [Remote Shoot Function], the update interval of the live view display on the computer may become longer.
- To ensure a secure wireless LAN connection, we strongly recommend using an access point with WPA3 or WPA2 security settings. Connecting to an access point without security settings may result in hacking, access from malicious third parties, or attacks on vulnerabilities. Unless there is a specific reason, we do not recommend using an access point without security settings.
- If you set [Access Authen.] to [Off], communication will be performed without authentication or encryption via SSH connection. This may result in the content being intercepted or the camera being accessed by an unintended third party. If you use the remote shooting function, we recommend setting [Access Authen.] to [On].
[350] Using a computerOperating the camera from a computerRemote Shoot Setting
Configures settings for images saved when performing remote shooting using a smartphone or computer.
- MENU → (Network) → [Cnct./Remote Sht.] → [Remote Shoot Setting] → desired setting item.
Menu item details
- Still Img. Save Dest.:
- Sets the save destination. ([Destination Only]/[Dest.+Camera]/[Camera Only])
- Save Image Size:
- Selects the file size for images to be transferred to the smartphone or the computer when [Still Img. Save Dest.] is set to [Dest.+Camera]. The original-sized JPEG/HEIF file or a 2M-equivalent JPEG/HEIF file can be transferred. ([Original]/[2M])
- RAW+J Save Image:
- Selects the file type for images to be transferred to the smartphone or the computer when [Still Img. Save Dest.] is set to [Dest.+Camera] and [File Format] is set to [RAW & JPEG]. ([RAW & JPEG]/[JPEG Only]/[RAW Only])
- RAW+H Save Image:
- Selects the file type for images to be transferred to the smartphone or the computer when [Still Img. Save Dest.] is set to [Dest.+Camera] and [File Format] is set to [RAW & HEIF]. ([RAW & HEIF]/[HEIF Only]/[RAW Only])
Note
- When an unrecordable memory card is inserted into the camera, you cannot record still images even if [Still Img. Save Dest.] is set to [Camera Only] or [Dest.+Camera].
- When [Camera Only] or [Dest.+Camera] is selected for [Still Img. Save Dest.] and no memory card is inserted into the camera, the shutter will not be released even if [Release w/o Card] is set to [Enable].
- While a still image is being played back on the camera, you cannot perform remote shooting using a smartphone or a computer.
-
[RAW+J Save Image] and [RAW+H Save Image] can be set only when [File Format] is set to [RAW & JPEG] or [RAW & HEIF].
[351] Using a computerUSB Streaming (movie)
You can connect a computer, etc. to the camera and use the camera video and audio for livestreaming or web-conferencing services. Select MENU → (Setup) → [USB] → [USB Connection Mode] → [Sel. When Connect] or [USB Streaming] beforehand.
- MENU → (Network) → [Streaming] → [USB Streaming] → Set [Output Res/Frame Rate] and [Movie Rec During Streaming].
- Connect the camera to a computer or other device with a USB cable (commercially available).
[Streaming:Standby] will appear on the camera screen, and the camera will switch to the streaming standby state.
- If [USB Connection Mode] is set to [Sel. When Connect], select [Live Stream(USB Streaming)] on the selection screen for the USB connection mode.
- Use a cable or adapter that matches the terminal on the device to be connected.
- Start streaming from your livestreaming/web-conferencing service.
[Streaming:Output] will appear on the camera screen.
- To exit USB Streaming, disconnect the USB cable.
Menu item details
- Output Res/Frame Rate:
- Sets the resolution and the frame rate of the video. ([4K(2160p) 30p]/[4K(2160p) 25p]/[4K(2160p) 15p]/[4K(2160p)12.5p]/[HD(1080p) 60p]/[HD(1080p) 50p]/[HD(1080p) 30p]/[HD(1080p) 25p]/[HD(720p) 30p]/[HD(720p) 25p])
- Movie Rec During Streaming:
- Sets whether or not to enable recording of the video to the recording media during streaming. ([Enable]/[Disable])
Hint
- If you assign the shutter speed, ISO sensitivity, etc. to the dial or control wheel or register them to the function menu, you can adjust these values even during USB streaming.
- The format of the streaming data is as follows.
- Video format: MJPEG* or YUV420
*When the resolution is set to HD (720p), only MJPEG is available.
- Audio format: PCM, 48 kHz, 16 bit, 2 ch
- Video format: MJPEG* or YUV420
- During USB streaming, power is supplied to the camera from the computer. If you want to consume as little computer power as possible, set [USB Power Supply] to [Off].
- When using an external microphone, you can minimize deviations between your voice and the movements of your mouth by connecting the microphone to the (microphone) terminal of the camera.
Note
- While USB streaming is in progress, the camera is always set to the movie recording mode regardless of the position of the Still/Movie/S&Q switch.
- You cannot do the following while USB Streaming is running.
- Transition to the playback screen
- Network functions (Remote Shooting, remote operation from a smartphone, Bluetooth function, etc.)
- The following functions are disabled while USB Streaming is running.
- Picture Profile
- Power Save Start Time
-
Auto Monitor OFF
- When performing USB streaming with a resolution of 4K (2160p) or HD (1080p), use a computer that is compatible with SuperSpeed USB 5 Gbps (USB 3.2) and a commercially available USB cable. Even if the resolution is set to 4K (2160p) or HD (1080p), the actual output resolution will be HD (720p) when connected via the USB 2.0 standard.
- If you change the settings for the following items during USB streaming, the streaming screen may pause temporarily. You may also need to resume streaming from an application depending on the livestreaming service.
- [Output Res/Frame Rate] or [Movie Rec During Streaming] under [USB Streaming]
- [File Format]
- [Output Res/Frame Rate] or [Movie Rec During Streaming] under [
- Depending on the temperature environment, streaming output image-quality settings, video recording settings during streaming, Wi-Fi connection environment, and usage conditions before starting streaming, the internal temperature of the camera may rise, and the streaming time may be shortened.
[352] Using the cloud serviceCreators' Cloud
Creators' Cloud is a cloud solution that integrates production applications and services.
Creators' Cloud provides services and applications to creators of various productions.
The availability of Creators' Cloud and the supported services differ depending on the country/region.
For details on Creators' Cloud and the support status of each service, refer to the following website.
[353] Using the cloud serviceCreating an account for Creators' Cloud and linking your camera to the account (Cloud Connection)
Create an account for the cloud service Creators' Cloud and link your camera to the account using Creators' App on your smartphone.
Note
- This function may only be available in certain countries and regions.
For information about countries/regions where the service is supported, refer to the following website.
https://creatorscloud.sony.net/catalog/servicearea.html
: Operations performed on the smartphone
: Operations performed on the camera
Preparing in advance
-
Create an account for Creators' Cloud.
Follow the instructions in the smartphone application Creators' App to create an account for Creators' Cloud.
-
Pair the camera and smartphone.
For detailed instructions, see “Pairing the camera with a smartphone (Smartphone Connection) .”
-
Confirm that [Wi-Fi Connect] and [Bluetooth Function] are set to [On] on the camera.
Linking the camera to the account
-
Set the camera to shooting mode.
-
Launch Creators' App on your smartphone, and then open the [Cameras] screen.
-
Select [Cloud Function], and then follow the instructions on the screen to start setup.
-
When you register the access point, select the access point you use and enter the password, and then select [OK].
The settings for the access point (the SSID and the password) are loaded to the camera.
- If the access point to be used is already registered on the camera, select [Skip] and proceed to step 5.
-
Select [Start linking] on the smartphone screen.
- The camera and the account will be linked. Then, follow the instructions on the screen to configure the image upload settings.
- The camera may not be linked to the account if there is already account information on the camera or there is already camera information in Creators' Cloud. Remove the account and camera information before linking the camera to the account.
Note
- The camera may not be linked to the account properly if the procedure is canceled, the camera is powered off, or a network error, etc. occurs during the procedure. In this case, make sure that the account information on the camera or the camera information in Creators' Cloud is correct. If the information is not correct, remove the information and link the camera to the account again.
- Linking the camera to the account or connecting to Creators' Cloud may fail if the time setting on the camera is not correct. Make sure that the time setting is correct.
Connecting the camera to Creators' Cloud
- MENU → (Network) → [Creators' Cloud] → [Cloud Connection] → [On].
To upload images on the camera to Creators' Cloud
Once the camera has been linked to the account for Creators' Cloud and [Cloud Upload] is turned on in Creators' App, you can connect to the server and upload images by simply setting [Cloud Connection] to [On].
Newly recorded images will be uploaded the next time you turn on the camera and connect to Creators' Cloud. Turn on the camera at the timing you want to upload.
For details, refer to the following support page.
To cancel the linkage of the camera with Creators' Cloud
You need to cancel the linkage of the camera with the account both on the camera and in Creators' Cloud.
Operations on the camera:
-
MENU →
(Network) → [Creators' Cloud] → [Cloud Information]. -
Select [Detail] in [Account Info.].
-
Select [Delete account info.].
-
Check the message displayed on the screen and select [OK].
The information for the account will be removed from the camera.
Operations on the Creators' Cloud:
-
Open [Cameras] screen on Creators' App.
-
Select [Cloud Function] → [Disconnect the Link].
The information for the camera will be removed from the account.
Hint
- You can also perform the following operations in Creators’ Cloud Web (https://www.sony.net/capp/).
- Creating an account for Creators' Cloud
- Removing information of the camera from Creators' Cloud
Note
- To ensure a secure wireless LAN connection, we strongly recommend using an access point with WPA3 or WPA2 security settings. Connecting to an access point without security settings may result in hacking, access from malicious third parties, or attacks on vulnerabilities. Unless there is a specific reason, we do not recommend using an access point without security settings.
[354] Using the cloud serviceDisplaying cloud connection information (Cloud Information)
Displays information about the camera and Creators' Cloud linkage account and the cloud connection.
Note
- This function may only be available in certain countries and regions.
For information about countries/regions where the service is supported, refer to the following website.
https://creatorscloud.sony.net/catalog/servicearea.html
- MENU →(Network) → [Creators' Cloud] → [Cloud Information].
Displayed item details
- Account Info.:
- Displays detailed information about the linked account when [Detail] is selected. Selecting [Delete account info.] on the displayed screen removes the account information from the camera.
If you delete the Creators' Cloud account information from the camera, be sure to delete the camera information from Creators' Cloud as well. - Error Info.:
- Displays error details when a network connection error occurs.
- SSID:
- The SSID of the connected access point is displayed.
[355] Using the cloud serviceNotes on using the cloud service (Creators' Cloud)
Before lending or transferring the camera, make sure that the camera linkage information and upload settings are appropriate to prevent damage such as the content on the camera being uploaded to an unintended third party’s Creators' Cloud. If the settings are not appropriate, be sure to perform the following operations.
- If you will transfer or lend the camera: initialize the camera or cancel the linkage with Creators' Cloud on the camera. Also, cancel the camera linkage in Creators' Cloud.
- If the camera is transferred to you or you borrow the camera: initialize the camera or cancel the linkage with Creators' Cloud on the camera.
Note that Creators' Cloud may only be available in certain countries and regions.
Notes on the network environment
The following network environments may interfere with the use of Creators' Cloud.
- Connecting to a network via a proxy server
- Configuring a firewall to your network
If a firewall is configured, open the following outbound ports in the firewall settings.- TCP Source Port 32768-60999, Destination Port 443
- TCP Source Port 32768-60999, Destination Port 80
- UDP Source Port 32768-60999, Destination Port 53
- UDP Source Port 32768-60999, Destination Port 443
- UDP Source Port 32768-60999, Destination Port 32768-60999
- TCP destination port 80 is used unencrypted to obtain revocation information needed for destination server validation when connecting to the server. However, no personal information is sent.
- UDP destination port 53 is used unencrypted to obtain information needed to verify the server's address on the internet when connecting to the server. However, no personal information is sent.
[356] AppendixAudio accessories compatible with the Multi Interface Shoe
If you shoot movies with an audio accessory (sold separately) attached to the Multi Interface Shoe of the camera, analog or digital audio will be recorded via the Multi Interface Shoe.
If you use an audio accessory that supports the digital audio interface, the sound signals will be transmitted in a digital format. This will allow you a wider range of recordable audio quality, such as the following.
- High-quality audio recording with less deterioration
- 4-channel or 24-bit audio recording
The recordable audio quality differs depending on the audio accessory. For details, refer to the instruction manual for the audio accessory.
Hint
- You can change the audio settings for audio accessories that support the digital audio interface using [Shoe Audio Set.].
Note
- Movies recorded with 24-bit audio may not be played back normally on devices or software incompatible with 24-bit audio, resulting in unexpectedly loud volumes or no sound.
[357] AppendixMount AdaptorMount Adaptor
Using a Mount Adaptor (sold separately), you can attach an A-mount lens (sold separately) to this product.
For details, refer to the operating instructions supplied with the Mount Adaptor.
Note
- You may not be able to use the Mount Adaptor or auto-focus with certain lenses. Consult your Sony dealer or local authorized Sony service facility on compatible lenses.
- The sound of the lens and the product in operation may be recorded during movie recording.
You can turn the sound off by selecting MENU → (Shooting) → [Audio Recording] → [Audio Recording] → [Off]. - It may take a long time or may be difficult for the product to focus, depending on the lens used or the subject.
[358] AppendixMount AdaptorLA-EA3/LA-EA5 Mount Adaptor
If you use the LA-EA3 Mount Adaptor (sold separately) or LA-EA5 Mount Adaptor (sold separately), the following functions are available.
Autofocus:
LA-EA3: Available with SAM/SSM lens only
LA-EA5: Available with A-mount AF lenses* (For lenses other than SAM and SSM, autofocus is driven by the LA-EA5 AF coupler.)
*Autofocus is not available with some Minolta/Konica Minolta lenses and teleconverters.
AF system:
Phase Detection AF
AF/MF select:
Can be changed using the operating switch on the lens.
Focus Mode:
Single-shot AF/Automatic AF/Continuous AF/Direct manual focus (DMF)/Manual Focus
- When using a Mount Adaptor in the movie mode, adjust the aperture value and the focus manually.
Available focus area:
[Wide]/[Zone]/[Center Fix]/[Spot]/[Expand Spot]/[Custom]/[Tracking]
[359] AppendixMount AdaptorLA-EA4 Mount Adaptor
If you use the LA-EA4 Mount Adaptor (sold separately), the following functions are available.
Autofocus:
Not available.
- Only the manual focusing mode is supported.
[360] AppendixMulti Battery Adaptor Kit
You can use the Multi Battery Adaptor Kit (sold separately) with this camera to shoot for long periods.
When using the Multi Battery Adaptor Kit, insert the plug-in plate into the battery insertion slot, and then pass the cord through the connection plate cover.
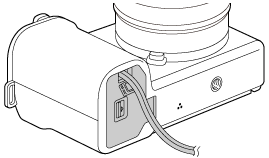
- Make sure that the cord is not pinched when you close the cover.
For details, refer also to the operating instructions supplied with the Multi Battery Adaptor Kit.
[361] AppendixBattery life and number of recordable images
Number of recordable images when shooting still images
Approx. 610 images
Battery life when shooting movies
| Actual shooting of movies | Approx. 130 min. |
| Continuous shooting of movies | Approx. 195 min. |
- The above estimates for battery life and number of recordable images apply when the battery pack has been fully charged. The battery life and number of images may decrease depending on the conditions of use.
- The battery life and number of recordable images are estimates based on shooting with the default settings under the following conditions:
- Using the battery pack at an ambient temperature of 25°C (77°F).
- Using a Sony SDXC memory card (U3) (sold separately)
- Using a E PZ 16-50mm F3.5-5.6 OSSⅡ lens
- The numbers of recordable still images are based on the CIPA standard and shooting under the following conditions:
(CIPA: Camera & Imaging Products Association)- One picture is taken every 30 seconds.
- The power is turned on and off once every ten times.
- The zoom is switched alternately between the W and T ends.
- The number of minutes for movie shooting is based on the CIPA standard and shooting under the following conditions:
- The image quality is set to XAVC S HD 60p 50M /50p 50M 4:2:0 8bit.
- Actual shooting (movies): Battery life based on repeated shooting, zooming, shooting stand-by, turning on/off, etc.
- Continuous shooting (movies): No operations other than starting and ending shooting are performed.
[362] AppendixNumber of recordable images
When you insert a memory card into the camera and turn the camera on, the number of images that can be recorded (should you continue to shoot using the current settings) is displayed on the screen.
Note
- A maximum of 40 000 still images can be recorded to each memory card. If the number of recorded images reaches the upper limit, replace the memory card.
- When “0” (the number of recordable images) flashes in orange, the memory card is full or the number of recorded images exceeds the number that can be managed using the database file. Replace the memory card with another one, or delete images from the current memory card. When you transfer images on a memory card to a computer, etc., the number of recordable images may be displayed as “0”. In this case, you may be able to record images by executing [Recover Image DB].
- When “NO CARD” flashes in orange, it means no memory card has been inserted. Insert a memory card.
The number of images that can be recorded on a memory card
The table below shows the approximate number of images that can be recorded on a memory card formatted with this camera.
The numbers shown reflect the following conditions:
- Using a Sony memory card
- [Aspect Ratio] is set to [3:2], and [JPEG Image Size]/[HEIF Image Size] is set to [L: 26M]. *1
The values may vary depending on the shooting conditions and the type of memory card used.
(Unit: images)
| JPEG Quality/HEIF Quality/File Format |
SD memory card | |
|---|---|---|
| 64 GB | 128 GB | |
| JPEG Light | 10 000 | 22 000 |
| JPEG Standard | 7 700 | 15 000 |
| JPEG Fine | 5 400 | 10 000 |
| JPEG Extra fine | 2 900 | 5 800 |
| HEIF Light | 15 000 | 30 000 |
| HEIF Standard | 11 000 | 23 000 |
| HEIF Fine | 8 600 | 17 000 |
| HEIF Extra fine | 6 000 | 12 000 |
| RAW & JPEG (Compressed RAW)*2 | 1 200 | 2 500 |
| RAW & HEIF (Compressed RAW)*2 | 1 400 | 2 800 |
| RAW (Compressed RAW) | 1 600 | 3 300 |
| RAW & JPEG (Lossless Compressed RAW)*2 | 1 100 | 2 400 |
| RAW & HEIF (Lossless Compressed RAW)*2 | 1 300 | 2 600 |
| RAW (Lossless Compressed RAW) | 1 500 | 3 000 |
*1 When [Aspect Ratio] is set to other than [3:2], you can record more images than the numbers shown in the table above. (except when [RAW] is selected)
*2 JPEG image quality when [RAW & JPEG] is selected: [Fine]
HEIF image quality when [RAW & HEIF] is selected: [Fine]
Note
- Even if the number of recordable images is higher than 9 999 images, “9999” will appear.
[363] AppendixRecordable movie times
The table below shows the approximate total recording times using a memory card formatted with this camera. The values may vary depending on the shooting conditions and the type of memory card used.
(h (hour), min (minute))
| File Format |
Rec Frame Rate | Record Setting | SD memory card | |
|---|---|---|---|---|
| 64 GB | 128 GB | |||
| XAVC HS 4K | 60p/50p | 200M | 35 min | 1 h 10 min |
| 150M | 45 min | 1 h 35 min | ||
| 100M | 1 h 5 min | 2 h 10 min | ||
| 75M | 1 h 25 min | 2 h 50 min | ||
| 45M | 2 h 10 min | 4 h 30 min | ||
| XAVC S 4K | 60p/50p | 200M | 35 min | 1 h 10 min |
| 150M | 45 min | 1 h 35 min | ||
| XAVC S HD | 60p/50p | 50M | 2 h | 4 h 10 min |
| 25M | 3 h 20 min | 7 h | ||
| XAVC S-I 4K | 60p | 600M | 10 min | 25 min |
| 50p | 500M | 10 min | 25 min | |
| XAVC S-I HD | 60p | 222M | 30 min | 1 h 5 min |
| 50p | 185M | 30 min | 1 h 5 min | |
The recording times when [Proxy Recording] is set to [Off].
- The times shown are recordable times using a Sony memory card.
- The duration of time available for movie recording varies depending on the file format/recording settings for movies, memory card, ambient temperature, Wi-Fi network environment, condition of the camera before you start recording, and condition of the charging of the battery.
The maximum continuous recording time for a single movie shooting session is approximately 13 hours (a product specification limit).
Note
- The recordable time of movies varies because the camera is equipped with VBR (Variable Bit-Rate), which automatically adjusts image quality depending on the shooting scene. When you record a fast-moving subject, the image is clearer but the recordable time is shorter because more memory is required for recording. The recordable time also varies depending on the shooting conditions, the subject or the image quality/size settings.
Notes on continuous movie recording
- High-quality movie recording and high-speed continuous shooting require large amounts of power. Therefore, if you continue to shoot, the temperature inside the camera will rise, especially that of the image sensor. In such cases, the camera will turn off automatically because the surface of the camera is heated to a high temperature or the high temperature affects the quality of the images or the internal mechanism of the camera.
-
The duration of time available for continuous movie recording when the camera records with the default settings after the power has been turned off for a while is as follows. The values indicate the continuous time from when the camera starts recording until the camera stops recording.
When [Auto Power OFF Temp.] is set to [Standard]
File FormatXAVC S HD XAVC S 4K Ambient temperature: 25°C (77°F) Approx. 120 minutes Approx. 5 minutes Ambient temperature: 40°C (104°F) Approx. 30 minutes Approx. 5 minutes
When [Auto Power OFF Temp.] is set to [High]
File FormatXAVC S HD XAVC S 4K Ambient temperature: 25°C (77°F) Approx. 120 minutes Approx. 30 minutes Ambient temperature: 40°C (104°F) Approx. 120 minutes Approx. 10 minutes
XAVC S HD: 60p 50M/50p 50M 4:2:0 8bit; when the camera is not connected via Wi-Fi; when the monitor is open
XAVC S 4K: 60p 150M/50p 150M 4:2:0 8bit; when the camera is not connected via Wi-Fi; when the monitor is open
- The duration of time available for movie recording varies with the temperature, file format/record setting for movies, Wi-Fi network environment, or condition of the camera before you start recording. If you frequently recompose or shoot images after the power is turned on, the temperature inside the camera will rise and the recording time available will be shorter.
- If the (Overheating warning) icon appears, the temperature of the camera has risen.
- If the camera stops movie recording due to a high temperature, leave it for some time with the power turned off. Start recording after the temperature inside the camera drops fully.
- If you observe the following points, you will be able to record movies for longer periods of time.
- Keep the camera out of direct sunlight.
- Turn the camera off when it is not being used.
[364] AppendixList of icons on the monitorList of icons on the screen for shooting movies
The displayed contents and their positions in the illustrations are just guidelines, and may differ from the actual displays. Also, the displayed contents may vary depending on your camera’s system software (firmware) version.
Descriptions are given below the indications of the icons.
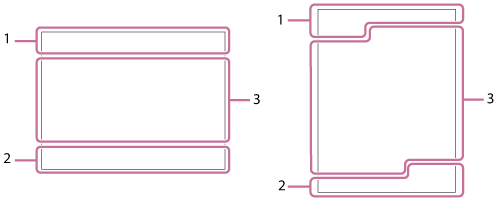
In addition to the icons described on this page, there are more icons for touch operations (touch function icons) that are displayed on the left or right side of the screen when you swipe the monitor. For details, refer to “Touch function icons.”
- Basic camera settings
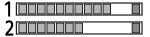
- Audio level

- Audio recording off


- Microphone Directivity
-
- Focus Mode
-
- Clear Image Zoom/Digital Zoom
-
- Gamma Disp. Assist Typ.
- S-log3 s709 709(800%) User1 LUT OFF
- LUT
- STBY REC
- Movie recording standby/Movie recording in progress
- 1:00:12
- Actual movie recording time (hours: minutes: seconds)
- 4K HD
- File format of movies
- 120p 100p 60p 50p 30p 25p 24p
- Frame rate of movies
-

- A memory card is inserted
- NO CARD
- No memory card inserted
-
- Nearing the rewriting upper limit of the memory card / Rewriting upper limit of the memory card reached
- 1h 30m
- Recordable time of movies
-

- Writing data / Number of images left to write
-

- Remaining battery
-

- Remaining battery warning
- USB power supply
- Exposure and other settings
- 1/250
- Shutter speed
- F3.5
- Aperture value
-

- Exposure compensation/Metered Manual
- ISO400
 ISO 400
 - ISO sensitivity
- 7500K A5 G5
- White Balance (Auto, Preset, Underwater Auto, Custom, Color temperature, Color filter)
-

- AE lock/AWB lock
- Other settings (displayed during recording standby)
-


- Shooting mode
-


-
Shooting mode (Cam.Set)
-
- Scene Recognition icons
- Tripod recognition
-
- REC Control


- 4K external output
- 00:00:00.00
- Time code (hours: minutes: seconds. frames)
- 00 00 00 00
- User Bit
- Spot Focus
- Performing [Spot Focus]
- x4 Slow x4 Quick
- Slowness/quickness scale during slow-motion/quick-motion shooting

- Movie self-timer

- Product Showcase Set


- Starting/stopping network streaming output
- High / Standard / Low / HD (1080p) 60p 9.0M
- Image quality setting for network streaming output
- Streaming : Standby / Output / Connecting / Connect. Err. / Not Connect
- Network streaming status

- USB connection mode (USB streaming)
- 4K(2160p) 30p / 4K(2160p) 25p /4K(2160p) 15p / 4K(2160p) 12.5p / HD(1080p) 60p / HD(1080p) 50p / HD(1080p) 30p / HD(1080p) 25p / HD(720p) 30p / HD(720p) 25p
- USB streaming output format
- Streaming:Standby / Streaming:Output
- USB streaming status
- Select Focus Point On/Off
- Guide display for setting Focus Area
- Tracking Cancel
- Guide display for tracking
- Focus Cancel
- Guide display for canceling focusing
- Tracking+AE Cancel
- Guide display for tracking+AE
- Focus+AE Cancel
- Guide display for focus+AE
- Touch AE Cancel
- Guide display for touch AE
-
- Audio format
-

- Guide display for dials

- Anti-flicker Tv Scan
-
- Focus Cancel


- Touch Focus+AE cancel/TouchTracking+AE cancel/Touch AE cancel
-
- Tracking Cancel
-


- Remote Shooting (connected) / Remote Shooting (connection error)
-


- Connected to the cloud/Communicating with the cloud/Cloud connection error
-

- Airplane Mode
-
- Connected to Wi-Fi (via a Wi-Fi access point)
- Disconnected from Wi-Fi (via a Wi-Fi access point)
-
- Connected to Wi-Fi/Disconnected from Wi-Fi (Wi-Fi Direct)
-


- Connected to LAN/Disconnected from LAN (When using a USB-LAN conversion adaptor)
-
- Bluetooth connection available / Bluetooth connection unavailable
-
- Remote control
-
- Obtaining location information / Location information cannot be obtained
-


- Metering Mode
-


- D-Range Optimizer
-

- Histogram
-

- Digital level gauge
-
- Overheating warning
-


- Database file full / Database file error
-
Hint
- Area 3 icons may not be displayed while the touch function icons are displayed. To see hidden icons, swipe the touch function icons left or right to hide the touch function icons.
[365] AppendixList of icons on the monitorList of icons on the screen for shooting still images
The displayed contents and their positions in the illustrations are just guidelines, and may differ from the actual displays. Also, the displayed contents may vary depending on your camera’s system software (firmware) version.
Descriptions are given below the indications of the icons.
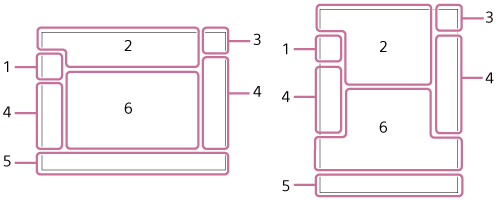
In addition to the icons described on this page, there are more icons for touch operations (touch function icons) that are displayed on the left or right side of the screen when you swipe the monitor. For details, refer to “Touch function icons.”
-
Shooting mode/Scene recognition
-


- Shooting mode
-
- Shooting mode (Scene Selection)
-

-
Shooting mode (Cam.Set)
-
- Scene Recognition icons
-
- Camera settings
-
- A memory card is inserted
- NO CARD
- No memory card inserted
-
- Nearing the rewriting upper limit of the memory card / Rewriting upper limit of the memory card reached
- 100
- Remaining number of recordable images
-
- Writing data / Number of images left to write
- 26M / 23M / 22M / 17M / 13M / 11M / 8.5M / 6.4M / 5.7M / 5.4M / 5.3M
- Image size of still images

- RAW recording (compressed/lossless compression)
- J-X.FINE J-FINE J-STD J-LIGHT H-X.FINE H-FINE H-STD H-LIGHT
- JPEG Quality / HEIF Quality
- 4:2:2
- Color sampling for HEIF
-
- Focus Mode
-
- Flash charging in progress
-
- Setting Effect OFF
-

- Exposure Effect (Exposure Setting Only)
- Anti-flicker Tv Scan
- Product Showcase Set
*Displayed at position 5 during vertical display
-


- SteadyShot off/on, Camera shake warning
*Displayed at position 6 during vertical display
-
- Smart Zoom/Clear Image Zoom/Digital Zoom
-
- Remote Shooting (connected) / Remote Shooting (connection error)
- USB connection mode (USB streaming)
-

- Bright Monitoring
-

- Silent mode
-
- Remote control
-
- Connected to the cloud/Communicating with the cloud/Cloud connection error
-
- Connected to Wi-Fi (via a Wi-Fi access point)
- Disconnected from Wi-Fi (via a Wi-Fi access point)
-
- Connected to Wi-Fi/Disconnected from Wi-Fi (Wi-Fi Direct)
-
- Connected to LAN/Disconnected from LAN (When using a USB-LAN conversion adaptor)
-
- Writing copyright information [On]
-
- Focus Cancel
-
- Touch Focus+AE cancel/TouchTracking+AE cancel/Touch AE cancel
-
- Tracking Cancel
-
- Bluetooth connection available / Bluetooth connection unavailable
-
- Obtaining location information / Location information cannot be obtained
-
- Airplane Mode
-
- Overheating warning
-
- Database file full / Database file error
-
- Tripod recognition
-
- Battery
-
- Remaining battery
-
- Remaining battery warning
-
- USB power supply
-
- Shooting settings
-


- Drive Mode
-


- Flash Mode / Wireless Flash / Red Eye Reduction
-
 ±0.0
±0.0 - Flash Comp.
-
- Focus Area
-
- Metering Mode
-
7500K A5 G5
- White Balance (Auto, Preset, Underwater Auto, Custom, Color temperature, Color filter)
-
- D-Range Optimizer
-
- Creative Look
-


- Subject Recog in AF/Recognition Target
-
 –
–


- Picture Profile
-
- Focus indicator/exposure settings
-
- Focus indicator
- 1/250
- Shutter speed
- F3.5
- Aperture value
-
- Background Defocus
-
- Exposure compensation/Metered Manual
- ISO400 ISO AUTO
- ISO sensitivity
-
- AE lock/FEL lock/AWB lock
-
- Guides/other
- Select Focus Point On/Off
- Guide display for setting Focus Area
- Tracking Cancel
- Guide display for tracking
- Focus Cancel
- Guide display for canceling focusing
- Tracking+AE Cancel
- Guide display for tracking+AE
- Focus+AE Cancel
- Guide display for focus+AE
- Touch AE Cancel
- Guide display for touch AE
-
- Guide display for dials

Bracket indicator-

- Spot metering area
-
- Histogram
-
- Digital level gauge
[366] AppendixList of icons on the monitorList of icons on the playback screen
The displayed contents and their positions in the illustrations are just guidelines, and may differ from the actual displays. Also, the displayed contents may vary depending on your camera’s system software (firmware) version.
Descriptions are given below the indications of the icons.
Single-image playback
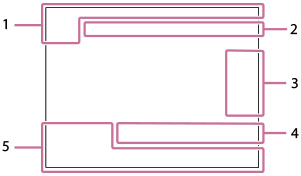
Histogram display
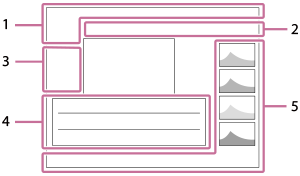
- Basic information
-
- A memory card is inserted
-


- Rating
-
- Protect
- 3/7
- File number/Number of images in the view mode
-
- Remaining battery
-
- Display as Group
-
- Cropped image
-
- Proxy movie included
-

- Shot Mark included
-
- Smartphone transfer status (when using [Select on Cam & Send])
-
- Camera settings
-
- Connected to the cloud/Communicating with the cloud/Cloud connection error
-
- Connected to Wi-Fi (via a Wi-Fi access point)
- Disconnected from Wi-Fi (via a Wi-Fi access point)
-
- Connected to Wi-Fi/Disconnected from Wi-Fi (Wi-Fi Direct)
-
- Connected to LAN/Disconnected from LAN (When using a USB-LAN conversion adaptor)
-
- Bluetooth connection available / Bluetooth connection unavailable
-
- Airplane Mode
-
- Overheating warning
-
- Database file full / Database file error
-
- Touch operation icons

- Shooting mode switching
- Add/Delete Shot Mark1


- Jump to the positions of Shot Marks
- Shooting settings


- Aspect ratio
- 26M / 23M / 22M / 17M / 13M / 11M / 8.5M / 6.4M / 5.7M / 5.4M / 4.3M
- Image size of still images
-
- RAW recording
- J-X.FINE J-FINE J-STD J-LIGHT H-X.FINE H-FINE H-STD H-LIGHT
- JPEG Quality/HEIF Quality
- 4:2:2
- Color sampling for HEIF
- XAVC HS 4K XAVC S 4K XAVC S HD XAVC S-I 4K XAVC S-I HD
- File format of movies
- 120p 100p 60p 50p 30p 25p 24p
- Frame rate of movies
-


- Record setting of movies
- 1/250
- Shutter speed
- F3.5
- Aperture value
- ISO400
- ISO sensitivity
- P A S M
- Exposure mode
-
- Exposure compensation
-
- Metering Mode
- 35mm
- Lens focal length
-
- Creative Look
-
7500K A5 G5
- White Balance (Auto, Preset, Underwater Auto, Color temperature, Color filter)
-


- D-Range Optimizer
- HLG
- HDR recording (Hybrid Log-Gamma)
-
- Copyright information exists for image
- Image information
-

- Latitude/longitude information
- 2024-1-1 10:37:00PM
- Date of recording
-
 100-0003
 - Folder number - file number
- C0003
- Movie file number
-


- Histogram (Luminance/R/G/B)
-
[367] AppendixSpecifications
System
- Camera Type
- Interchangeable Lens Digital Camera
- Lens
- Sony E-mount lens
Image sensor
- Image format
- APS-C size (23.3 mm × 15.5 mm), CMOS image sensor
- Number of effective pixels on camera
- Approx. 26 000 000 pixels (still images) / approx. 19 900 000 pixels (movies)
- Total number of pixels on camera
- Approx. 27 000 000 pixels
Auto focus system
- Detection system
- Phase-detection system/Contrast detection system
- Sensitivity Range
- –3 EV to +20 EV (at ISO 100 equivalent, F2.0)
Monitor
- LCD monitor
- 7.5 cm (3.0 type) TFT drive, touch panel
- Total number of dots
- 1 036 800 dots
Exposure control
- Metering method
- 1 200-zone evaluative metering
- Metering Range
- –3 EV to +20 EV (at ISO 100 equivalent with F2.0 lens)
- ISO sensitivity (Recommended exposure index)
- Still images: ISO 100 to ISO 32 000 (Extended ISO: Minimum ISO 50, maximum ISO 102 400), [ISO AUTO] (ISO 100 to ISO 6 400, Maximum/Minimum can be set.)
Movies: ISO 100 to ISO 32 000 equivalent*, [ISO AUTO] (ISO 100 to ISO 6 400 equivalent, Maximum/Minimum can be set.)
*Values are those when [SteadyShot] is set to [Standard] or [Off]. When [SteadyShot] is set to [Active], the values are ISO 100 to ISO 6 400 equivalent.
- Exposure compensation
- ±5.0 EV (switchable between 1/3 EV and 1/2 EV steps)
Shutter
- Type
- Electronic shutter
- Speed range
-
Still images: 1/8000 second to 30 seconds
Movies: 1/8000 second to 1 second (1/3 EV step)
60p-compatible devices: up to 1/60 second in AUTO mode (up to 1/30 second in Auto slow shutter mode)
50p-compatible devices: up to 1/50 second in AUTO mode (up to 1/25 second in Auto slow shutter mode) - Flash sync speed (when using a flash manufactured by Sony)
- 1/30 second
Continuous shooting
- Continuous shooting speed
- (Continuous Shooting: Hi+) : Maximum of approx. 11 images per second/ (Continuous Shooting: Hi): Maximum of approx. 8 images per second/ (Continuous Shooting: Mid): Maximum of approx. 6 images per second/ (Continuous Shooting: Lo): Maximum of approx. 3 images per second
- Based on our measurement conditions. The speed of continuous shooting can be slower, depending on the shooting conditions.
Recording format
- File format
- JPEG (compliant with DCF Ver. 2.0, Exif Ver. 2.32, and MPF Baseline), HEIF (MPEG-A MIAF compliant), RAW (Sony ARW 5.0 format compliant)
- Movie (XAVC HS format)
- XAVC Ver2.1: MP4 format compliant
- Video: MPEG-H HEVC/H.265
- Audio: LPCM 2ch (48 kHz 16 bit), LPCM 4ch (48 kHz 24 bit)*1, LPCM 2ch (48 kHz 24 bit)*1, MPEG-4 AAC-LC 2ch*2
- Movie (XAVC S format)
- XAVC Ver2.1: MP4 format compliant
- Video: MPEG-4 AVC/H.264
- Audio: LPCM 2ch (48 kHz 16 bit), LPCM 4ch (48 kHz 24 bit)*1, LPCM 2ch (48 kHz 24 bit)*1, MPEG-4 AAC-LC 2ch*2
*1 When using accessories that can support 4ch output and 24 bits with the multi-interface shoe
*2 Proxy movies
Recording media
SD cards (UHS-I and UHS-II compatible)
Input/output terminals
- USB Type-C terminal
- SuperSpeed USB 5Gbps (USB 3.2)
- Compatible with USB Power Delivery
- HDMI
- HDMI type D micro jack
- (Microphone) terminal
- Ø 3.5 mm Stereo mini jack
- (Headphones) terminal
- Ø 3.5 mm Stereo mini jack
Power, general
- Rated input
- 7.2 V

- Power consumption
- Using an E PZ 16-50mm F3.5-5.6 OSSⅡ
Approx. 3.2 W (while shooting still images)/approx. 5.0 W (while shooting movies) - Operating temperature
- 0 °C to 40 °C (32 °F to 104 °F)
- Storage temperature
- –20 °C to 55 °C (–4 °F to 131 °F)
- Dimensions (W/H/D) (Approx.)
- 114.8 × 67.5 × 54.2 mm
4 5/8 × 2 3/4 × 2 1/4 in. - Mass (Approx.)
- 377 g (13.3 oz) (including battery pack, SD card)
- Microphone
- Stereo
- Speaker
- Monaural
- Exif Print
- Compatible
- PRINT Image Matching III
- Compatible
Eco and energy saving
- Power consumption (Off mode)
- Not available
- Power consumption (Standby mode/Low power mode)
- 0.5 W
- Power consumption (Networked standby mode)
- 2.0 W (Bluetooth) / 2.0 W (all terminals and networks connected)
- Low power mode activated
- Within 20 minutes (default)
- Networked standby mode activated
- Within 20 minutes (default)
Wireless LAN
- WW293541 (see name plate on the bottom of camera)
- Supported format
- IEEE 802.11 a/b/g/n/ac
- Frequency band
- 2.4 GHz / 5 GHz
- Security
- WEP*/WPA-PSK*/WPA2-PSK/WPA3-SAE
* If the camera’s system software (firmware) is Ver.1.01 or later, wireless connections using WEP or WPA are not supported.
- Connection method
- Wi-Fi Protected Setup™ (WPS)/Manual
- Access method
- Infrastructure mode
- WW751104 (see name plate on the bottom of camera)
- Supported format
- IEEE 802.11 b/g/n
- Frequency band
- 2.4 GHz
- Security
- WEP*/WPA-PSK*/WPA2-PSK/WPA3-SAE
* If the camera’s system software (firmware) is Ver.1.01 or later, wireless connections using WEP or WPA are not supported.
- Connection method
- Wi-Fi Protected Setup™ (WPS)/Manual
- Access method
- Infrastructure mode
Bluetooth communications
Bluetooth standard Ver. 4.2
- Frequency band
- 2.4 GHz
Rechargeable battery pack NP-FZ100
- Rated voltage
- 7.2 V
Recommended USB-PD-compatible AC adaptor
- Input
- 100 – 240 V
 , 50/60 Hz
 - Output
- 9 V / 2 A or more
Design and specifications are subject to change without notice.
[368] AppendixTrademarks
- XAVC S and
 are trademarks of Sony Group Corporation.
 -
XAVC HS and
 are trademarks of Sony Group Corporation.
- Mac is a trademark of Apple Inc., registered in the United States and other countries.
- USB Type-C® and USB-C® are registered trademarks of USB Implementers Forum.
- The terms HDMI, HDMI High-Definition Multimedia Interface, and the HDMI Logo are trademarks or registered trademarks of HDMI Licensing Administrator, Inc.
- Microsoft and Windows are registered trademarks or trademarks of Microsoft Corporation in the United States and/or other countries.
- SDXC logo is a trademark of SD-3C, LLC.
- Wi-Fi, the Wi-Fi logo and Wi-Fi Protected Setup are registered trademarks or trademarks of the Wi-Fi Alliance.
- The Bluetooth® word mark and logos are registered trademarks owned by Bluetooth SIG, Inc. and any use of such marks by Sony Group Corporation and its subsidiaries is under license.
- QR Code is a trademark of Denso Wave Inc.
- In addition, system and product names used in this manual are, in general, trademarks or registered trademarks of their respective developers or manufacturers. However, the ™ or ® marks may not be used in all cases in this manual.
[369] AppendixLicense
Notes on the License
This product comes with software that are used based on licensing agreements with the owners of that software. Based on requests by the owners of copyright of these software applications, we have an obligation to inform you of the following. Licenses (in English) are recorded in the internal memory of your product. Establish a Mass Storage connection between the product and a computer to read licenses in the “PMHOME” - “LICENSE” folder.
THIS PRODUCT IS LICENSED UNDER THE AVC PATENT PORTFOLIO LICENSE FOR THE PERSONAL USE OF A CONSUMER OR OTHER USES IN WHICH IT DOES NOT RECEIVE REMUNERATION TO
(i) ENCODE VIDEO IN COMPLIANCE WITH THE AVC STANDARD (“AVC VIDEO”)
AND/OR
(ii) DECODE AVC VIDEO THAT WAS ENCODED BY A CONSUMER ENGAGED IN A PERSONAL ACTIVITY AND/OR WAS OBTAINED FROM A VIDEO PROVIDER LICENSED TO PROVIDE AVC VIDEO.
NO LICENSE IS GRANTED OR SHALL BE IMPLIED FOR ANY OTHER USE. ADDITIONAL INFORMATION INCLUDING THAT RELATING TO PROMOTIONAL, INTERNAL AND COMMERCIAL USES AND LICENSING MAY BE OBTAINED FROM MPEG LA, L.L.C.
Covered by one or more claims of the HEVC patents listed at patentlist.accessadvance.com.

On GNU GPL/LGPL applied software
The software included in this product contains copyrighted software that is licensed under the GPLv2 and other licenses which may require access to source code. You may find a copy of the relevant source code as required under the GPLv2 (and other licenses) at https://www.sony.net/Products/Linux/.
You may obtain the source code as required by the GPLv2 on a physical medium from us for a period of three years after our last shipment of this product by applying through the form at https://www.sony.net/Products/Linux/.
This offer is valid to anyone in receipt of this information.
[370] If you have problemsTroubleshooting
If you experience trouble with the product, try the following solutions.
- Remove the battery pack, wait for about one minute, re-insert the battery pack, then turn on the power.
- Initialize the settings.
- Consult your dealer or local authorized service facility. Additional information on this product and answers to frequently asked questions can be found at our Customer Support Website.
https://www.sony.net/
[371] If you have problemsWarning messages
Set Area/Date/Time.
- Set the area, date and time. If you have not used the product for a long time, charge the internal rechargeable backup battery.
Unable to use memory card. Format?
- The memory card was formatted on a computer and the file format was modified. Select [Enter] and then format the memory card. You can use the memory card again, however, all previous data in the memory card is erased. It may take some time to complete the format. If the message still appears, change the memory card.
Memory Card Error
- An incompatible memory card is inserted.
- Formatting has failed. Format the memory card again.
Unable to read memory card. Reinsert memory card.
- An incompatible memory card is inserted.
- The memory card is damaged.
- The terminal section of the memory card is dirty.
Memory card locked.
- You are using a memory card with a write-protect switch or a delete-protect switch with the switch set to the LOCK position. Set the switch to the record position.
Cannot open the shutter since the memory card is not inserted.
- No memory card has been inserted.
- To release the shutter without inserting a memory card into the camera, set [Release w/o Card] to [Enable]. In this case, images will not be saved.
This memory card may not be capable of recording and playing normally.
- An incompatible memory card is inserted.
Unable to display.
- Images recorded with other products or images modified with a computer may not be displayed.
- Processing on the computer such as deletion of the image files may cause inconsistencies in the image database files. Repair the image database files.
Check that a lens is mounted. For an unsupported lens, set "Release w/o Lens" in the menu to "Enable".
- The lens is not attached properly, or the lens is not attached. If the message appears when a lens is attached, reattach the lens. If the message appears frequently, check whether the contacts of the lens and product are clean or not.
- When attaching the product to an astronomical telescope or similar instrument, or using an unsupported lens, set [Release w/o Lens] to [Enable].
- The SteadyShot function does not work. You can continue to shoot but the SteadyShot function will not work. Turn the product off and on again. If this icon does not disappear, consult your Sony dealer or local authorized Sony service facility.
- The retractable lens with power zoom is retracted. Turn off the product and eject the battery pack, then reinsert the battery pack.
Internal temp. high. Allow it to cool.
- The product has become hot because you have been shooting continuously. Turn the power off and cool the product and wait until the product is ready to shoot again.
(Overheating warning)
- You have been recording images for a long time, the product temperature has risen.
(Database file error)
- The number of images exceeds that for which date management in a database file by the product is possible.
(Database file error)
- Unable to register to the database file. Import all the images to a computer and recover the memory card.
Image DataBase File error
- There is something wrong in the Image Database File. Select MENU → (Shooting) → [Media] → [Recover Image DB].
System Error
Camera Error. Turn power off then on.
- Remove the battery pack, and then re-insert it. If the message appears frequently, consult local authorized Sony service facility.
Unable to magnify.
Unable to rotate image.
- Images recorded with other products may not be enlarged or rotated.
Cannot create more folders.
- A folder in the memory card has the first three digits “999.” You cannot create any more folders on this camera.
