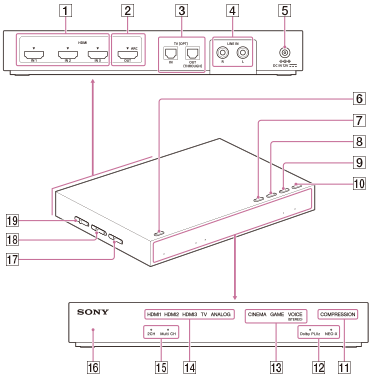
DP-HW700 Processor
Functions of buttons, indicators, and other parts on the processor are explained here.
Rear
-
HDMI IN jacks (IN 1/IN 2/IN 3)
These jacks input HDMI signals.
-
HDMI OUT jack
Outputs HDMI signals. This jack is compatible with ARC (Audio Return Channel)
[Details].
-
TV (OPT) IN/OUT (THROUGH) jacks
Inputs or outputs optical digital audio signals.
-
LINE IN (L/R) jacks
These jacks input analog audio signals.
-
DC IN 12V jack
Connect the AC adaptor supplied to this jack.
Top
-
 /
/ (power) button (power on [Details]/standby [Details]/power off [Details])
The processor turns on or enters standby mode alternately as you press the button. Hold the button down for 3 seconds or longer to turn off the processor completely (power off).
-
INPUT button
Allows you to select an input.
[Details]
-
EFFECT/ button
Allows you to select a sound field.
[Details]
Allows you to select one of the items below the current item (
) on the menu.
[Details]
-
MATRIX/ button
Allows you to select a matrix decoder*.
[Details]
Allows you to select one of the items above the current item (
) on the menu.
[Details]
* You can select a matrix decoder when the sound field mode is “CINEMA” or “GAME.” The matrix decoder function expands an audio input signal format up to 9.1-channel surround format.
-
COMPRESSION/MENU/ENTER button
Allows you to select a dynamic range.
[Details]
Hold this button down for about 2 seconds to display the menu on the screen of a TV connected to the processor. When you are using the menu, press this button to enter the selection.
[Details]
Front
-
COMPRESSION indicator
The indicator lights up when the compression function is set to on.
[Details]
-
MATRIX indicators
The indicator of the matrix decoder selected lights up (or flashes).
[Details]
-
EFFECT indicators
The indicator of the sound field mode selected lights up.
[Details]
-
INPUT indicators
The indicator of the input selected lights up.
-
2CH/Multi CH indicators
2CH or Multi CH lights up according to the input signal (stereo or multi-channel).
-
Power indicator
This indicator lights up in green when the power is turned on, in orange in standby mode, and goes off when the power is turned off.
Left
-
CONTROL FOR HDMI switch
Set this switch to accommodate the type of HDMI devices you want to connect to the processor.
Notes
-
WIRELESS BAND switch [Details]
Selects the frequency band you want to use. When you select AUTO, an optimum frequency band is selected automatically (default setting).
Note
-
ATT (LINE IN) switch
Set this switch to “0dB” if the volume is too low for analog output.
[Details]