Getting Started
- Using the Help Guide
- Remote control
- Connecting terminal
- Using voice recognition features
- Keeping the TV updated (Only on limited region/country/TV model)
- Introducing Android TV™
- Basic Operations
- Accessibility features
- Support Site
- Trademark information
Using the Help Guide
This Help Guide explains how to use this TV. You can also refer to the Setup Guide for descriptions about TV installation, and the Reference Guide for parts descriptions, specifications, and wall mounting of this TV.
In this Help Guide, you can read the desired information in order or search for it directly. To search, select  at the top of the screen.
Note
- To use the latest features described in the Help Guide, you may need to update the TV’s software. For details about software updates, see the Software updates page.
- The names of settings in the Help Guide may differ from those displayed on the TV depending on the TV’s release date or your model/country/region.
- The images and illustrations used in the Help Guide may differ depending on your TV model.
- Design and specifications are subject to change without notice.
Hint
- To see if your TV is equipped with one of the functions described in the Help Guide, refer to the paper manual or a Sony product catalog.
- This Help Guide is written for all regions/countries. Some descriptions contained in this Help Guide do not apply to some regions and countries.
Remote control
- Using the remote control
- Functions of the remote control buttons
Using the remote control
You can operate many of the TV’s features by using the ![]() /
/ ![]() /
/ ![]() /
/ ![]() and
and ![]() buttons.
buttons.
The included remote control varies depending on your model. For descriptions of the remote control buttons, refer to the Functions of the remote control buttons.
- Use the
 ,
,  ,
,  and
and  buttons to “focus” on the desired item.
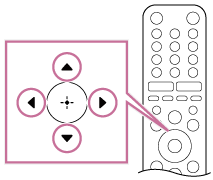
- Press the center of the
 button to select the item currently in focus.
To return to the previous screen
Press the BACK button.
Functions of the remote control buttons
The included remote control, as well as the arrangement of the buttons and the button names, vary depending on your model/country/region.

 MIC
MIC- For voice search, refer to the Using the remote control microphone page.
 (TV standby)
- Turn on or turn off the TV (standby mode).
- Number Button
 Use with the 0-9 buttons to select digital channels.
- APPS
- Access various services and applications.
- Google Play
- Access the “Google Play” online service. For details, refer to the Installing apps from the Google Play Store page.
- NETFLIX (Only on limited region/country/TV model)
- Access the “Netflix” online service.
- Color buttons
- Execute corresponding function at that time.
- GUIDE
- Display the digital program guide. For details, refer to the Using the program guide page.
 (Google Assistant) /
  (Microphone)
- Use the Google Assistant (only on limited region/country/language/TV model) or Voice search. (e.g., Search various content by voice.) For details, refer to the Using the remote control microphone page.
- DVR (Only on limited region/country/TV model)
- Display the DVR’s list of recorded programs.
- INPUT
- Display and select the input source. For details, refer to the Selecting inputs page.
 (Quick Settings)
- Display Quick Settings. For details, refer to the Using the Quick Settings page.
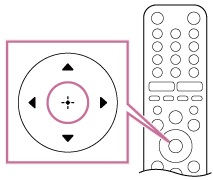
- (Up) / (Down) / (Left) / (Right) / (Enter) (Navigation D-Pad)
- On screen menu navigation and selection.
- BACK
- Return to the previous screen.
- TV
- Switch to a TV channel or input. For details, refer to the Selecting inputs page.
- HOME
- Display the TV Home Menu. For details, refer to the Home menu page.
- VOL +/− (Volume)
- Adjust the volume.
- JUMP
- Jump back and forth between two channels. The TV alternates between the current channel and the last channel that was selected.
- MUTE
- Mute the sound. Press again to restore the sound.
- CH +/− (Channel)
- Select the channel.
- AUDIO
- Select the sound of multilingual source or dual sound for the program currently being viewed (depend on program source).
- SUBTITLE/CC
- Display CC (Closed Captions) settings menu to change captions for broadcast, AV, and supported apps (when the feature is available).
- HELP
- Display the Help menu. Help Guide can be accessed from here.
 (Fast rewind) /
  (Play) /
  (Fast forward) /
  (Pause)
- Operate media contents on the TV and connected CEC-compatible device.
- ● REC (Only on limited region/country/TV model)
- Record the current program with the DVR.
- DISPLAY
- Display information about the channel/program/input you are viewing.
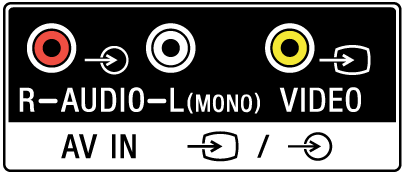
Connecting terminal
The types and shapes of connectors available vary depending on your TV.
For the location of the connectors, refer to the Setup Guide (printed manual).
| Terminal | Description |
|---|---|
 |
|
 |
|
 |
|
 |
|
 |
|
 |
|
 |
|
 |
|

Using voice recognition features
- Using the remote control microphone This feature is available for TVs in which the included remote control has a button or button.
Using the remote control microphone
Remote controls that support Voice search have a ![]() button or button, and a built-in microphone. By speaking into the microphone, you can search for various content.
button or button, and a built-in microphone. By speaking into the microphone, you can search for various content.
- Press the button or button.
The LED on the remote control will light up.
- Speak into the microphone.
Speech examples may be displayed depending on your model.

Search results are displayed when you speak into the microphone.
Hint
- Depending on the search results, if you press on the remote control, more search results will be displayed.
When you cannot search using your voice
Register the voice remote control that has the ![]() button or button to the TV again by pressing the HOME button and selecting [Settings] — [Remotes & Accessories] — [Remote control] — [Connect via Bluetooth].
button or button to the TV again by pressing the HOME button and selecting [Settings] — [Remotes & Accessories] — [Remote control] — [Connect via Bluetooth].
Note
- An Internet connection and Google account are required to use Voice search.
- The type of remote control supplied with the TV, and the availability of a remote control with a built-in microphone varies depending on your model/region/country. An optional remote control is available in some models/regions/countries.
Keeping the TV updated(Only on limited region/country/TV model)
The TV acquires data such as program guides while it is in standby mode. To keep your TV updated, we recommend that you turn off the TV normally by using the power button on the remote control or TV.
Introducing Android TV™
- Installing apps from the Google Play Store
- Viewing Internet media
- Enjoying safe apps and video streaming services (Security & restrictions)
Installing apps from the Google Play Store
You can install apps from the Google Play Store to the TV, just like you do with smartphones and tablets.
Note
- You can only install apps that are compatible with TVs. They may differ from apps for smartphones/tablets.
- An Internet connection and Google account are required to install apps from the Google Play Store.
Hint
- If you do not have a Google account or want to create a shared account, create a new account by accessing the following website.
https://accounts.google.com/signup https://accounts.google.com/signup
The website above may vary depending on your region/country. It is also subject to change without notice. For details, refer to the Google homepage.
- We recommend that you create a Google account on a computer or mobile device.
- Press the HOME button, select
 (Apps icon) from the Home menu, and select Google Play Store from the apps list.
If the supplied remote control has an APPS button, you can press the APPS button to display the apps list.
- Select an app to install.
After downloading, the app is automatically installed and added. Its icon appears in the list of installed apps, allowing you to launch it.
About paid apps
There are free apps and paid apps in the Google Play Store. To purchase a paid app, a prepaid Google Play gift card code or credit card information is required. You can purchase a Google Play gift card from various retailers.
To delete an app
- Press the HOME button, select (Apps icon) from the Home menu, select Google Play Store from the apps list, and select My Apps.
If the supplied remote control has an APPS button, you can press the APPS button to display the apps list.
- Select an app to be deleted, and then uninstall the app.
Viewing Internet media
You can use video streaming services such as YouTube and Netflix to watch Internet content. The available services vary depending on your country and region. You can launch these services by selecting their tiles in the Home Menu.
Note
- An Internet connection is required to watch Internet content.
Enjoying safe apps and video streaming services (Security & restrictions)
You can ensure safe use of the TV by setting installation restrictions on apps that are downloaded from unknown sources, or age restrictions on programs and videos.
- Press the HOME button, then select [Settings] — [Apps] — [Security & restrictions].
Note
- If you change the [Security & restrictions] settings, your device and personal data are more vulnerable to attack by unknown apps from sources other than Play Store. You agree that you are solely responsible for any damage to your device or loss of data that may result from using these apps.
Hint
- Other separate restrictions may be available depending on the app. For details, refer to the app’s Help.
Basic Operations
- Home menu
- Using the Quick Settings
- Selecting inputs
- How the LED lights up
Home menu
The screen displayed when you press the HOME button on the remote control is called the Home Menu. From the Home Menu, you can search for content and select recommended content, apps, and settings.
Search, Notifications, Inputs, Timer, and Settings (A)
 /
/  :
: - Use the microphone on the remote control or the on-screen keyboard displayed on the TV to input keywords and search for various content.
 (Notifications):
 - Displayed when there are notifications such as when there is a connection issue or software update. The number indicates the number of notifications.
 (Inputs):
- Switches the input device connected to the TV.
 (Timer):
- Configure the [Sleep timer].
For details, refer to the [Timer] page.  (Settings):
 - Configure various TV-related settings.
Apps (B)
Display your favorite apps.
- If you select [Apps], a list of installed apps is displayed.
- Select [Add app to favorites] to add an app to favorites.
- If you select an added app and press and hold the button on the remote control, you can change the sort order or remove a favorite.
Play Next (C)
Displays what you can watch next depending on the content.
Note
- If there is no applicable content, [Play Next] may not be displayed.
Channels (D)
The rows under Apps (B) / Play Next (C) are called “Channels”. Here, you can watch content from broadcast, or video streaming services.
Hint
- The recent history of channels watched is displayed in [TV].
- You can add content to Play Next by selecting content on any channel and pressing and holding the button on the remote control.
- In the Home Menu, you can sort the rows from “Channels (D)” and below. Use the / buttons to move the focus to the round icon of the row you want to move, and press to be able to move the row up or down by pressing the / buttons.
Customize channels (E)
[Customize channels] is used to display or hide the selected channels.
Using the Quick Settings
If you press the ![]() (Quick Settings) button on the remote control, you can quickly access features such as [Picture mode], [Sleep timer], and [Picture Off] on the current screen, and settings such as [Speakers] depending on the connected devices. You can also display [Settings] from [Quick Settings].
(Quick Settings) button on the remote control, you can quickly access features such as [Picture mode], [Sleep timer], and [Picture Off] on the current screen, and settings such as [Speakers] depending on the connected devices. You can also display [Settings] from [Quick Settings].
Note
- The menus displayed in the TV settings vary depending on your model/region/country.

- Press the (Quick Settings) button on the remote control.
- Move the focus to change a setting or select it.
Selecting inputs
To use devices (such as a Blu-ray/DVD player or USB flash drive) connected to the TV, or to watch TV after such use, you will need to switch the input.
- Press the INPUT button repeatedly to select the connected device.
Alternatively, press the INPUT button, use the / buttons to select a connected device, and then press the button.
Note
- If there are no devices connected to an HDMI input, the HDMI input may not be displayed in the [Input menu].
To edit the input items
- Press the INPUT button.
- Press the button and select
 (Edit).
 - Select the input/device you want to show or hide.
- Select [Close].
Hint
- To change the order or hide a displayed item, press and hold the button on the remote control with that item highlighted, and [Move] and [Hide] will be displayed. If you select [Move], use / on the remote control to move the item to the desired position, and then press the button on the remote control.
- You can switch to TV broadcasting by simply pressing the TV button on the remote control.
Switching from the Home Menu
- Press the HOME button, then select the input source from [Inputs].
How the LED lights up
Certain colors will appear at the bottom center of your TV indicating a certain activity or status.
Illumination LED

White “on” or “blinking” |
|
Accessibility features
This TV has accessibility features in [Accessibility] such as a text-to-speech function for on-screen text, zooming to make text easier to read, and subtitles/captions.
Press the HOME button, then select [Settings] — [Device Preferences] — [Accessibility] to configure the user assistive features.
[Accessibility] has a shortcut function so you can turn it on or off by pressing and holding the AUDIO button on the remote control for 3 seconds.
Hint
- The default setting for the function that operates when you press and hold the AUDIO button on the remote control for 3 seconds is [TalkBack]. Enable the function using [Accessibility shortcut] in [Accessibility], and change the assigned feature using [Shortcut service].
- To use text-to-speech with the Help Guide, view the Help Guide in the Sony support website using a computer or smartphone.
- USA:
http://www.sony.com/tvsupport
 http://www.sony.com/tvsupport
- Canada:
http://www.sony.ca/support
 http://www.sony.ca/support
- USA:
Support Site
For the latest information and Online Help Guide, please visit the Sony support website:
- USA:
http://www.sony.com/tvsupport
http://www.sony.com/tvsupport
- Canada:
http://www.sony.ca/support
http://www.sony.ca/support
Trademark information
![]()
- Vewd® Core. Copyright 1995-2020 Vewd Software AS. All rights reserved.
![]()
- The Bluetooth® word mark and logos are registered trademarks owned by the Bluetooth SIG, Inc. and any use of such marks by Sony Corporation is under license. Other trademarks and trade names are those of their respective owners.
- Wi-Fi® and Wi-Fi Alliance® are registered trademarks of Wi-Fi Alliance.
- The Wi-Fi CERTIFIED™ Logo is a certification mark of Wi-Fi Alliance.
- “BRAVIA”,
 and BRAVIA Sync are trademarks or registered marks of Sony Corporation.
- All other trademarks are the property of their respective owners.
Watching TV
- Watching TV programs
Watching TV programs
- Using the program guide
Using the program guide
You can quickly find your preferred programs.
- Press the GUIDE button to display the program guide of a related channels service while it is running, for example digital TV (broadcast).
Using the TV with Other Devices
- USB devices
- Blu-ray and DVD players
- Set-top box (cable/satellite box)
- Enjoying content from your mobile device on the TV with Google Cast
- Computers, cameras, and camcorders
- Audio system
- Bluetooth devices
- CEC-compatible devices
- Viewing pictures in 4K from compatible devices
USB devices
- Playing content stored on a USB device
- Information about USB devices used for storing photos and music
- Supported files and formats
Playing content stored on a USB device
Connecting a USB device
Connect a USB storage device to the USB port of the TV to enjoy photo, music, and video files stored on the device.

- USB storage device
Enjoy photos/music/movies stored on a USB device
You can enjoy photos/music/movies stored on a USB device on the TV screen.
- If the USB device connected to the TV has a power switch, turn it on.
- Press the HOME button, select (Apps icon) from the Home menu, and select [Media Player] to view photos [Album], play music [Music], or play movies [Video].
If the supplied remote control has an APPS button, you can press the APPS button to display the apps list.
- Select the USB device and browse the list of folders and files, then select the desired file.
To check the supported file formats
- Supported files and formats
Note
- Depending on the image dimension, file size, and number of files in a folder, some photo images or folders take time to display.
- Displaying the USB device may take some time because the TV accesses the USB device every time the USB device is connected.
- All USB ports on the TV support Hi-Speed USB. USB hubs are not supported.
- While accessing the USB device, do not turn off the TV or USB device, and do not disconnect the USB cable. Otherwise, data stored on the USB device may be corrupted.
- Depending on the file, playback may not be possible, even when using the supported formats.
Information about USB devices used for storing photos and music
- The USB ports on the TV support FAT16, FAT32, exFAT, and NTFS file systems.
- When connecting a Sony digital still camera to the TV with a USB cable, USB connection settings on your camera need to be set to “Auto” or “Mass Storage” mode.
- If your digital still camera does not work with your TV, try the following:
- Set the USB connection settings on your camera to “Mass Storage”.
- Copy the files from the camera to a USB flash drive, then connect the drive to the TV.
- Some photos and movies may be magnified, resulting in low picture quality. Depending on the size and aspect ratio, images may not be displayed in full screen.
- It may take a long time to display a photo, depending on the file or settings.
- In no event shall Sony be liable for recording failure or any damage or loss of recorded contents caused or associated with the TV’s malfunction, the USB device’s malfunction, or any other problem.
Supported files and formats
- Photos
- Music
- Videos
- Audio sampling rates (for videos)
- External subtitles
Photos
Use case : USB
| File Format | Extension |
|---|---|
| JPEG | *.jpg |
| BMP | *.bmp |
| PNG | *.png |
| GIF | *.gif |
| TIFF | *.tiff |
Other supported files and formats
- Music
- Videos
- Audio sampling rates (for videos)
- External subtitles
Music
Use case : USB
Extension: *.mp3
| Description | Sampling Rate |
|---|---|
| MP1L1 / MP1L2 / MP1L3 / MP2L1 / MP2L2 | 32k / 44.1k / 48k |
| MP2L3 | 16k / 22.05k / 24k |
| MP2.5L3 | 8k / 11.025k / 12k |
Other supported files and formats
- Photos
- Videos
- Audio sampling rates (for videos)
- External subtitles
Videos
Use case : USB
AVI (*.avi, *.xvid)
Subtitle Type : External
| Video Codec (Profile@Level) | Audio Codec | Max. / Min. Resolution | Max. Frame Rate |
|---|---|---|---|
| XviD | PCM, ADPCM, MPEG, Dolby AC3, DTS, AAC, WMA, VORBIS | 1920x1080 / – | 1920x1080@60fps |
| MPEG1 | PCM, ADPCM, MPEG, Dolby AC3, DTS, WMA, VORBIS | 1920x1080 / – | 1920x1080@60fps |
| MPEG2 MP@HL | PCM, MPEG, Dolby AC3, AAC, WMA | 1920x1080 / – | 1920x1080@60fps |
| H.264 MP LV 4.0 | MPEG, AAC, WMA, VORBIS | 1920x1080 / – | 1920x1080@60fps |
| H.264 HP LV 4.0 | MPEG, Dolby AC3, AAC, WMA, VORBIS | 1920x1080 / – | 1920x1080@60fps |
| MPEG-4 SP@HL 3.0 | MPEG, Dolby AC3, WMA, VORBIS | 1920x1080 / – | 1920x1080@60fps |
| MPEG-4 ASP@HL 4.0 | MPEG, Dolby AC3, VORBIS | 1920x1080 / – | 1920x1080@60fps |
| Motion JPEG | PCM, ADPCM, MPEG, Dolby AC3, AAC | 1920x1080 / – | 1920x1080@60fps |
| H.264 BP LV 4.0 | PCM, Dolby AC3, AAC, WMA, VORBIS | 1920x1080 / – | 1920x1080@30fps |
ASF (*.wmv, *.asf)
Subtitle Type : External
| Video Codec (Profile@Level) | Audio Codec | Max. / Min. Resolution | Max. Frame Rate |
|---|---|---|---|
| Window Media Video v9 | WMA | 1920x1080 / – | 1920x1080@60fps |
| MPEG-4 SP@HL 3.0 | MPEG | 1920x1080 / – | 1920x1080@60fps |
| VC-1 | WMA | 1920x1080 / – | 1920x1080@60fps |
MP4 (*.mp4, *.mov, *.3gp)
Subtitle Type : External
| Video Codec (Profile@Level) | Audio Codec | Max. / Min. Resolution | Max. Frame Rate |
|---|---|---|---|
| H.264 BP LV 4.0 | AAC, MPEG Layer 3 | 1920x1080 / – | 1920x1080@30fps |
| H.264 MP LV 4.0 | AAC | 1920x1080 / – | 1920x1080@60fps |
| H.264 HP LV 4.0 | AAC, MPEG Layer 3 | 1920x1080 / – | 1920x1080@60fps |
| H.265 Main profile @ Level 4.1 | AAC, DTS, Dolby AC3, MPEG Layer 3 | 1920x1080 / – | 1920x1080@60fps |
| MPEG-4 SP@HL 3.0 | AAC, MPEG Layer 3 | 1920x1080 / – | 1920x1080@60fps |
| MPEG-4 ASP@HL 4.0 | AAC, Dolby AC3, MPEG Layer 3 | 1920x1080 / – | 1920x1080@60fps |
| H.264 HP LV 5.1 | AAC | 4096x2160 / – | 4096x2160@30fps |
| H.265 Main10 profile @ Level 5.1 | AAC, Dolby AC3, MPEG Layer 3 | 4096x2160 / – | 4096x2160@60fps |
| H.264 HP LV 4.1 | AAC, MPEG Layer 3 | – | – |
| H.264 HP LV 4.2 | AAC, Dolby AC3, MPEG Layer 3 | – | – |
PS (Program Stream) (*.mpg, *.mpeg, *.vob)
Subtitle Type : External
| Video Codec (Profile@Level) | Audio Codec | Max. / Min. Resolution | Max. Frame Rate |
|---|---|---|---|
| MPEG1 | MPEG Layer 1/2, MP3, AC3 [Dolby Digital], E-AC3 [Dolby Digital Plus], DTS | 1920x1080 / – | 1920x1080@60fps |
| MPEG2 MP@HL | MPEG Layer 1/2, MP3, AC3 [Dolby Digital], E-AC3 [Dolby Digital Plus], DTS | 1920x1080 / – | 1920x1080@60fps |
TS (Transport Stream) (Others (*.ts))
Subtitle Type : External
| Video Codec (Profile@Level) | Audio Codec | Max. / Min. Resolution | Max. Frame Rate |
|---|---|---|---|
| MPEG2 MP@HL | Dolby AC3, MPEG, DTS, AAC | 1920x1080 / – | 1920x1080@60fps |
| VC-1 | DTS | 1920x1080 / – | 1920x1080@60fps |
| H.264 MP LV 4.0 | MPEG, DTS, AAC | 1920x1080 / – | 1920x1080@60fps |
| H.264 HP LV 4.0 | Dolby AC3, MPEG, DTS, AAC | 1920x1080 / – | 1920x1080@60fps |
| H.264 MVC | Dolby AC3, MPEG, DTS, AAC | 1920x1080 / – | 1920x1080@60fps |
| H.264 BP LV 4.0 | Dolby AC3, MPEG | 1920x1080 / – | 1920x1080@30fps |
| H.264 HP LV 5.1 | MPEG | 4096x2304 / – | 4096x2304@30fps |
FLV (*.FLV)
Subtitle Type : External
| Video Codec (Profile@Level) | Audio Codec | Max. / Min. Resolution | Max. Frame Rate |
|---|---|---|---|
| Sorenson | PCM, MPEG, AAC | 352x288 / – | 352x288@30fps |
| H.264 BP LV 4.0 | PCM, MPEG, AAC | 1920x1080 / – | 1920x1080@30fps |
| H.264 MP LV 4.0 | MPEG, AAC | 1920x1080 / – | 1920x1080@60fps |
| H.264 HP LV 4.0 | PCM, MPEG, AAC | 1920x1080 / – | 1920x1080@60fps |
TS (*.VP9)
Subtitle Type : External
| Video Codec (Profile@Level) | Audio Codec | Max. / Min. Resolution | Max. Frame Rate |
|---|---|---|---|
| VP9 | VORBIS | 4196x2160 / – | 4196x2160@60fps |
MKV (*.mkv)
Subtitle Type : External
| Video Codec (Profile@Level) | Audio Codec | Max. / Min. Resolution | Max. Frame Rate |
|---|---|---|---|
| MPEG4*3 | PCM, MPEG1 Layer1/2, MPEG4 HE-AAC, AC3 [Dolby Digital], DTS, FLAC | 1920x1080 / – | 1920x1080@60fps |
| H.264*1 | PCM, MPEG1 Layer1/2, MP3, MPEG2 AAC, MPEG4 AAC, MPEG4 HE-AAC, AC3 [Dolby Digital], DTS | 1920x1080 / – | 1920x1080@60fps |
| VC-1 | PCM, MPEG1 Layer1/2, MP3, MPEG4 AAC, MPEG4 HE-AAC, DTS | 1920x1080 / – | 1920x1080@60fps |
| VP8 | VORBIS | 4196x2160 / – | 4196x2160@60fps |
| H.264 HP LV 4.2 | MP3, MPEG2 AAC, AC3 [Dolby Digital] | 1920x1080 / – | 1920x1080@60fps |
| H.265 Main10 profile @ Level 5.1 | MP3, MPEG2 AAC, AC3 [Dolby Digital] | 4196x2160 | 4096x2160@60fps |
Other supported files and formats
- Photos
- Music
- Audio sampling rates (for videos)
- External subtitles
Audio sampling rates (for videos)
| Audio Codec | Sampling Rate |
|---|---|
| MPEG-1/MPEG-2 Layer I | 48 kHz, 448 kbit/s |
| MPEG-1/MPEG-2 Layer II | 48 kHz, 384 kbit/s |
| MPEG-1/MPEG-2 Layer III | 48 kHz, 320 kbit/s |
| WMA 2/3/4/5/6/7/8/9 | 48 kHz, 320 kbps, 5.1ch |
| WMA 10 Pro M0 | 48 kHz, 192 kbps, 2ch |
| WMA 10 Pro M01 | 48 kHz, 384 kbps, 2ch |
| WMA 10 Pro M02 | 440 kbps, 96 kHz, 2ch, 24 bit |
| AAC | 96 kHz, 6ch |
| RAAC | 96 kHz, 6ch |
| HEAAC | 96 kHz, 6ch |
| (MPEG4) AAC | 96 kHz, 6ch |
| AMR | 8 kHz, 1ch |
| DTS | DTS-M6 |
| DTS LBR | DTS-M6 |
| DTS XLL | DTS-M6 |
| AC3/AC3+ | MS12 |
| AC4 | MS12 |
| EAC3 | MS12 |
| PCM | 8ch, 192 kHz |
| PCM_S8 | 8ch, 192 kHz |
| PCM_U8 | 8ch, 192 kHz |
| LPCM | 8ch, 192 kHz |
| PCM_S16BE | 8ch, 192 kHz |
| PCM_U16LE | 8ch, 192 kHz |
| PCM_U16BE | 8ch, 192 kHz |
| PCM_S16LE | 8ch, 192 kHz |
| ADPCM | 2ch, 48k |
| ADPCM_IMA_QT | 2ch, 48k |
| ADPCM_IMA_WAV | 2ch, 48k |
| ADPCM_IMA_DK3 | – |
| ADPCM_IMA_DK4 | – |
| ADPCM_MS | 2ch, 48k |
| LBR (COOK) | 6ch, 44.1k |
| OPUS (HTML5 YouTube) | 6ch |
| FLAC | 96k, 6ch |
| VORBIS | 192 kHz, 6ch |
| DRA | 8ch |
| AMR_NB | 8 kHz, 1ch |
| AMR_WB | 16 kHz, 1ch |
| WAVEFORMATEX | 8ch, 192 kHz |
| G711 A/mu-law | 8ch |
Other supported files and formats
- Photos
- Music
- Videos
- External subtitles
External subtitles
Use case : USB
| File Format | Extension |
|---|---|
| SRT | *.srt |
| IdxSub | *.idx |
| PSB | *.psb |
| SMI | *.smi, *.sami |
| SSA | *.ssa, *.ass |
Other supported files and formats
- Photos
- Music
- Videos
- Audio sampling rates (for videos)
Blu-ray and DVD players
- Connecting a Blu-ray or DVD player
- Watching Blu-ray and DVD discs
Connecting a Blu-ray or DVD player
Connect a Blu-ray/DVD player to the TV.
Use a connection method below based on the terminals available on your TV.
Note
- The available terminals depend on your model/region/country.
Hint
- You can also connect a set-top box (cable/satellite box) in the same way as a Blu-ray/DVD player.
HDMI connection
For optimum picture quality, we recommend connecting your player to the TV using an HDMI cable. If your Blu-ray/DVD player has an HDMI jack (socket), connect it using an HDMI cable.
- Blu-ray/DVD player (same as connecting a set-top box)
- HDMI cable (not supplied)*
- Be sure to use an authorized HIGH SPEED HDMI cable bearing the HDMI logo.
Composite connection
If your Blu-ray/DVD player has composite jacks (sockets), connect them using a composite video/audio cable.
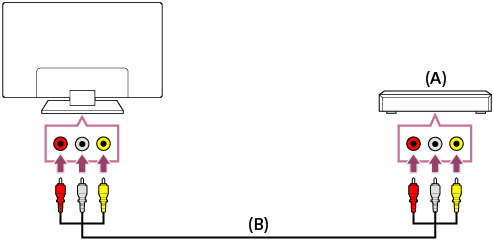
- Blu-ray/DVD player (same as connecting a set-top box)
- Composite video/audio cable (not supplied)
Watching Blu-ray and DVD discs
You can watch content from Blu-ray/DVD discs or other content supported by your player on the TV.
- Turn on the connected Blu-ray/DVD player.
- Press the INPUT button repeatedly to select the connected Blu-ray/DVD player.
- Start playback on the connected Blu-ray/DVD player.
Hint
- If you connect a CEC-compatible device with an HDMI connection, you can operate it by simply using the TV’s remote control.
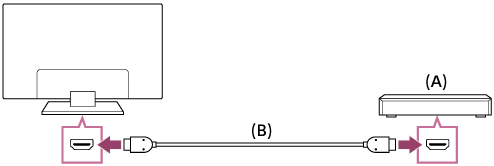
Set-top box (cable/satellite box)
- Connecting a Set-top box (cable/satellite box)
Connecting a Set-top box (cable/satellite box)
Connect the set-top box (cable/satellite box) to the TV as you would a Blu-ray or DVD player.
For details, refer to the Connecting a Blu-ray or DVD player page.
Enjoying content from your mobile device on the TV with Google Cast
Google Cast allows you to wirelessly cast content from your favorite websites and apps to your TV, directly from your computer or mobile device.
- Connect a mobile device such as a smartphone or tablet to the same network that the TV is connected to.
- Launch a Google Cast supported app on the mobile device.
- Select the
 (cast) icon in the app.
The screen of the mobile device is displayed on the TV.
Note
- An Internet connection is required to use Google Cast.
Computers, cameras, and camcorders
- Connecting a computer and viewing stored content
- Connecting a camera or camcorder and viewing stored content
- Computer video signal specifications
Connecting a computer and viewing stored content
To connect a computer
Use an HDMI cable to connect your computer to the TV.
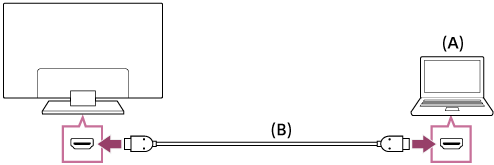
- Computer
- HDMI cable (not supplied)*
- Be sure to use an authorized HIGH SPEED HDMI cable bearing the HDMI logo.
To check the video signal specifications
- Computer video signal specifications
To view content stored on a computer
After connecting the computer, press the INPUT button, then select the input the computer is connected to.
To check the supported file formats
- Supported files and formats
Note
- For optimum picture quality, we recommend that you set your computer to output video signals according to one of the settings listed in “Computer video signal specifications”.
- Depending on the connection status, the image may be blurred or smeared. In this case, change the computer’s settings and select another input signal from the “Computer video signal specifications” list.
Connecting a camera or camcorder and viewing stored content
To connect a camera or camcorder
Connect your Sony digital still camera or camcorder using an HDMI cable. Use a cable that has an HDMI mini jack (socket) for the digital still camera/camcorder end, and a standard HDMI jack (socket) for the TV end.
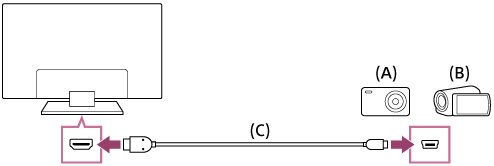
- Digital still camera
- Camcorder
- HDMI cable (not supplied)*
- Be sure to use an authorized HIGH SPEED HDMI cable bearing the HDMI logo.
To view content stored on a digital still camera/camcorder
- After connecting the digital still camera/camcorder, turn it on.
- Press the INPUT button repeatedly to select the connected digital still camera/camcorder.
- Start playback on the connected digital still camera/camcorder.
To check the supported file formats
- Supported files and formats
Hint
- If you connect a CEC-compatible device, you can operate it by simply using the TV’s remote control. Make sure that the device is CEC-compatible. Some devices may not be compatible with CEC even though they have an HDMI jack (socket).
Computer video signal specifications
(Resolution, Horizontal frequency/Vertical frequency)
- 640 x 480, 31.5 kHz/60 Hz
- 800 x 600, 37.9 kHz/60 Hz
- 1024 x 768, 48.4 kHz/60 Hz
- 1152 x 864, 67.5 kHz/75 Hz
- 1280 x 1024, 64.0 kHz/60 Hz
- 1600 x 900, 55.9 kHz/60 Hz
- 1680 x 1050, 65.3 kHz/60 Hz
- 1920 x 1080, 67.5 kHz/60 Hz*
- 1080p timing, when applied to the HDMI input, will be treated as video timing and not computer timing. This will affect the [Screen] settings in [Settings] — [BRAVIA Settings]. To view computer content, set [Wide mode] to [Full pixel].
Other video input signals
The following video formats can be displayed depending on specifications of your computer.
- 480p, 480i
- 576p*, 576i*
- 720/24p
- 720p/30 Hz, 720p/50 Hz*, 720p/60 Hz
- 1080i/50 Hz*, 1080i/60 Hz
- 1080/24p
- 1080p/30 Hz, 1080p/50 Hz*, 1080p/60 Hz
- 3840 x 2160p/24 Hz, 3840 x 2160p/25 Hz*, 3840 x 2160p/30 Hz (4K models only)
- 3840 x 2160p/50 Hz* (4K models only)
- 4096 x 2160p/50 Hz* (4K models only)
- Not supported depending on your region/country.
Note
- 1920 x 1080/60 Hz output may not be available, depending on your computer. Even if 1920 x 1080/60 Hz output is selected, the actual output signal may differ. In this case, change the computer’s settings, then set your computer to use a different video signal.
Audio system
- Outputting audio from an audio system
- Connecting an audio system
- Adjusting an audio system
Outputting audio from an audio system
You can connect audio systems such as AV receivers or sound bars to the TV. Select a connection method below according to the specifications of the audio system you want to connect.
- Connecting with an HDMI cable (For details, carefully read “Connection using an HDMI cable” below.)
- Connecting with a digital optical cable
For connection methods, refer to the Connecting an audio system page.
Note
- Refer to the instruction manual of the device to be connected.
Connection using an HDMI cable
This device supports Audio Return Channel (ARC). You can use an HDMI cable to output audio from audio systems that support ARC.
On TVs that support ARC, you can output (pass-through) audio signals from external input devices connected to the TV to ARC supported audio systems by using the HDMI terminal bearing the text “ARC”.
For connection methods, refer to the Connecting an audio system page.
Note
- The location of the HDMI terminal that supports ARC varies depending on the model. Refer to the included Setup Guide.
Connecting an audio system
See the illustrations below to connect an audio system such as an AV receiver or sound bar.
Note
- The available terminals depend on your model/region/country.
HDMI connection (ARC supported)
- Connect the TV and audio system with an HDMI cable.
Connect to the TV’s HDMI input terminal bearing the text “ARC”.
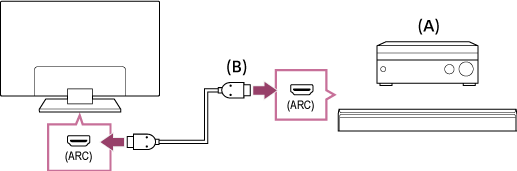
- AV receiver or sound bar
- HDMI cable (not supplied)*
- We recommend authorized Premium High Speed HDMI Cable(s) bearing the HDMI logo.
- Adjusting an audio system
Digital optical cable connection
- Connect the TV and audio system with a digital optical cable.
Connect to the audio system’s digital optical input terminal.
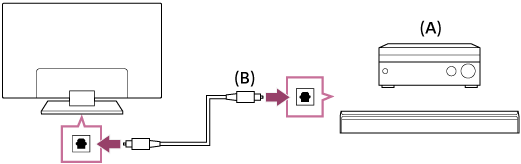
- AV receiver or sound bar
- Optical audio cable (not supplied)
- Adjusting an audio system
Hint
- For more information, please visit the Sony support website.
Adjusting an audio system
After connecting an audio system to the TV, adjust the TV’s audio output from the audio system.
Adjusting an audio system connected with an HDMI cable or digital optical cable
- After connecting the TV to your audio system, press the HOME button, and select the following in order.
- Turn on the connected audio system, then adjust the volume.
If you connect a CEC-compatible device with an HDMI connection, you can operate it by simply using the TV’s remote control.
Note
- You need to configure the [Digital Audio Out] settings according to your audio system. Press the HOME button, then select [Settings] — [BRAVIA Settings] — [Digital Audio Out].
- If the audio system is not compatible with Dolby Digital or DTS, set [Settings] — [BRAVIA Settings] — [Digital Audio Out] to [PCM].
Bluetooth devices
- Connecting a Bluetooth device
- Supported Bluetooth profiles
Connecting a Bluetooth device
To pair the TV with a Bluetooth device
- Turn the Bluetooth device on and put it in pairing mode.
- Press the HOME button, then select [Settings] — [Remotes & Accessories] — [Bluetooth settings] — [Add device] to put the TV in pairing mode.
- Select the desired device from the list, then follow the on-screen instructions.
Supported Bluetooth profiles
The TV supports the following profiles:
- HID (Human Interface Device Profile)
- HOGP (HID over GATT Profile)
CEC-compatible devices
- CEC overview
- Using features available for CEC-compatible devices
- Adjusting HDMI CEC settings
CEC overview
If a CEC-compatible device (e.g., Blu-ray player, AV receiver) is connected with an HDMI cable, you can operate the device with the TV’s remote control.
Using features available for CEC-compatible devices
Blu-ray/DVD player
- Automatically turns the Blu-ray/DVD player on and switches the input to the Blu-ray/DVD player when you select it from the input source.
- Automatically turns the TV on and switches the input to the connected Blu-ray/DVD player when the Blu-ray/DVD player starts to play.
- Automatically turns the connected Blu-ray/DVD player off when you turn the TV off.
- Controls menu operation ( / / / buttons), playback (e.g.,
 button), and channel selection of the connected Blu-ray/DVD player through the TV’s remote control.
AV receiver
- Automatically turns the connected AV receiver on and switches the sound output from the TV speaker to the audio system when you turn the TV on. This function is only available if you have previously used the AV receiver to output the TV’s sound.
- Automatically switches the sound output to the AV receiver by turning the AV receiver on when the TV is turned on.
- Automatically turns the connected AV receiver off when you turn the TV off.
- Adjusts the volume (VOL +/− buttons) and mutes the sound (MUTE button) of the connected AV receiver through the TV’s remote control.
Video camera
- Automatically turns the TV on and switches the input to the connected video camera when the camera is turned on.
- Automatically turns the connected video camera off when you turn the TV off.
- Controls menu operation ( / / / buttons), playback (e.g., button) of the connected video camera through the TV’s remote control.
Note
- “CEC” is only available for connected CEC-compatible devices.
- Behavior of the CEC devices may vary.
Adjusting HDMI CEC settings
- Turn on the connected device.
- To enable [HDMI CEC Settings], press the HOME button, then select [Settings] — [BRAVIA Settings] — [External inputs] — [HDMI CEC Settings] — [CEC].
- Activate HDMI CEC Settings on the connected device.
Available options
Available options are shown below. (Options vary depending on your model/region/country.)
- [Device auto power off]
- If disabled, the connected device does not turn off automatically when the TV is turned off.
- [TV auto power on]
- If disabled, the TV does not turn on automatically when the connected device is turned on.
Viewing pictures in 4K from compatible devices
- Viewing pictures in 4K resolution
- Settings for viewing pictures in 4K resolution with higher quality
Viewing pictures in 4K resolution
A picture with a 4K or higher resolution can be displayed in 4K resolution (3840×2160). You can connect a digital still camera/camcorder that supports HDMI 4K output to HDMI IN of the TV to display high resolution photos stored on the camera. You can also display high resolution photos stored in connected USB devices.
The availability of this function depends on your region/country.
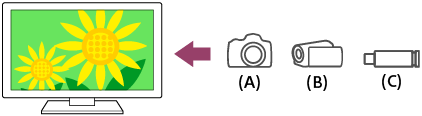
- Digital still camera
- Camcorder
- USB device
To view pictures stored on a USB device in 4K resolution
- Connect the USB device to the TV.
- Press the HOME button, select (Apps icon) from the Home menu, and select [Media Player] — [Album] — the USB device — the folder and/or file from the list.
If the supplied remote control has an APPS button, you can press the APPS button to display the apps list.
To view pictures stored on a digital still camera/camcorder
- Connect a digital still camera or camcorder that supports HDMI output to the HDMI IN jack (socket) of the TV, using an HDMI cable.
- Press the INPUT button repeatedly to select the connected device.
- Set the connected device to 4K output.
- Start playback on the connected device.
To check the supported file formats
- Supported files and formats
To view pictures in 4K resolution with higher quality
You can set the HDMI signal format to [Enhanced format] to view pictures in 4K resolution with higher quality.
For information about Enhanced format or changing the settings, refer to the Settings for viewing pictures in 4K resolution with higher quality page.
Note
- A 3D picture cannot be displayed.
- If you change the picture by pressing the / buttons, it may take time to display.
Settings for viewing pictures in 4K resolution with higher quality
When you display the High-Quality 4K format with the HDMI input, set [HDMI signal format] in [External inputs].
[HDMI signal format]
To change the HDMI signal format setting, press the HOME button, then select [Settings] — [BRAVIA Settings] — [External inputs] — [HDMI signal format] — the HDMI input you want to set.
- [Standard format]
- Standard HDMI format*1 for normal use.
- [Enhanced format]
- High-Quality HDMI format*1*2. Set only when using capable devices.
- HDR included (HDR models only).
- 4K 60p 4:2:0 10 bit, 4:4:4, 4:2:2 etc.
Note
- When using [Enhanced format], picture and sound may not be output correctly. In this case, connect the device to an HDMI IN that is in [Standard format], or change the HDMI signal format of HDMI IN to [Standard format].
- Set to [Enhanced format] only when using compatible devices.
- When you watch 4K picture with High-Quality, use a Premium High Speed HDMI Cable(s) that supports speeds of 18 Gbps. For details on a Premium High Speed HDMI Cable(s) that supports 18 Gbps, refer to the cable specifications.
Connecting to a Network
- Connecting to a network using a LAN cable
- Connecting to a network using a wireless connection
Connecting to a network using a LAN cable
Connecting to a network using a LAN cable
A wired LAN connection allows you to access the Internet.
Make sure to connect to the Internet via a router.
Hint
- If you are using a modem with router functions, you do not need to prepare a separate router. Ask your service provider for information about your modem’s specifications.
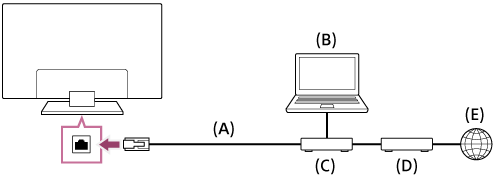
- LAN cable
- Computer
- Router
- Modem
- Internet
- Set up your LAN router.
For details, refer to the instruction manual of your LAN router, or contact the person who set up the network (network administrator).
- Once a LAN cable is connected, the TV will automatically connect to the network.
You can check your status in [Settings] — [Network & Internet] under Ethernet.
Note
- It is strongly recommended for security purposes to connect your TV to the Internet via a router/modem that includes router functionality. Direct connection of your TV to the Internet may expose your TV to a security threat such as extraction or tampering of content or personal information.
Contact your service provider or network administrator to confirm your network includes router functionality. - The network-related settings that are required may vary depending on the Internet service provider or router. For details, refer to the instruction manuals provided by the Internet service provider or those supplied with the router. You can also contact the person who set up the network (network administrator).
Connecting to a network using a wireless connection
- Using Wi-Fi to connect the TV to the Internet/Network
Using Wi-Fi to connect the TV to the Internet/Network
The built-in wireless LAN device allows you to access the Internet and enjoy the benefits of networking in a cable-free environment.
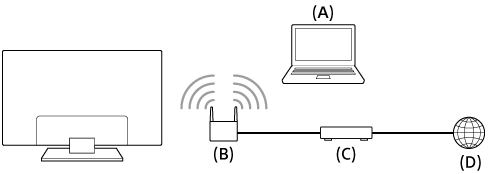
- Computer
- Wireless router
- Modem
- Internet
- Set up your wireless router.
For details, refer to the instruction manual of your wireless router, or contact the person who set up the network (network administrator).
- Press the HOME button, then select [Settings] — [Network & Internet].
- Select a network you want to connect and set a password.
If your TV can not connect to the Internet/Network, refer to the The TV cannot connect to the Internet/Network. page.
To turn off the built-in wireless LAN
- To disable [Wi-Fi], press the HOME button, then select [Settings] — [Network & Internet] — [Wi-Fi].
Hint
- For smooth video streaming:
- Change the setting of your wireless router to a high-speed networking standard such as 802.11n if possible.
- If the above procedure does not deliver any improvement, change the setting of your wireless router to 5 GHz, which may help improve the video streaming quality.
- The 5 GHz band may not be supported depending on your region/country. If the 5 GHz band is not supported, the TV can only connect to a wireless router using the 2.4 GHz band.
- To use WEP security with a wireless router, select [Settings] — [Network & Internet] — [Wi-Fi].
Note
- The network-related settings that are required may vary depending on the Internet service provider or router. For details, refer to the instruction manuals provided by the Internet service provider or those supplied with the router. You can also contact the person who set up the network (network administrator).
- If you select the [Hide password] option in the password entry screen, the password can be hidden from being viewed by other individuals.
Configuring the TV
- [Settings]
[Settings]
The menus displayed in the TV settings vary depending on your model/region/country.
- [Network & Internet]
- [Accounts & Sign In]
- [Apps]
- [Device Preferences]
- [Remotes & Accessories]
- [BRAVIA Settings]
- [Timer]
[Network & Internet]
Configures settings such as for wireless LANs and wired LANs.
[Accounts & Sign In]
Allows you to Sign In to your Google account. After the Sign In is successful, below options will be available:
- [Google]
- Syncs the registered Google account or removes the account.
- [Add account]
- Adds a Google account. You can add multiple Google accounts and switch between them depending on the app.
[Apps]
Allows you to configure or delete apps.
[Device Preferences]
- Press the HOME button, then select [Settings] — [Device Preferences] — the desired option.
Available options
- [About]
- Displays the information about the TV.
- [Date & time]
- Adjusts the current time.
- [Language]
- Selects the menu language. The selected menu language will also set the voice recognition language.
- [Keyboard]
- Configures the settings of the on-screen keyboard.
- [Sound]
- Configures the [System sounds] setting.
- [Storage]
- Changes the settings related to data storage.
- [Home screen]
- Customizes channels displayed in the [Home screen] and sorts apps.
- [Google Assistant]
- Configures the search settings.
- [Chromecast Android Shell]
- Allows to stream your favorite entertainment and apps from your phone, tablet or laptop right to your TV.
- [Screen saver]
- Configures the settings of the screen saver.
- [Location]
- Configures the location settings to acquire the user location.
- [Usage & Diagnostics]
- Automatically send diagnostic information to Google, like crash reports and usage data from your device, apps, and Chromecast built-in.
- [Accessibility]
- Configures the settings of accessibility features and services for helping users navigate their devices more easily.
You can turn on captions for streaming apps here (for supported apps only), and customize the appearance of captions (limited to captions of certain TV features only). - [Restart]
- Restart the TV without changing the user settings.
[Remotes & Accessories]
Available options
- [Bluetooth settings]
- Enables [On] or disables [Off] Bluetooth function on the TV. Setup for registering/deregistering Bluetooth devices.
- Press the HOME button, then select [Settings] — [Remotes & Accessories] — [Bluetooth settings].
For details, refer to the Supported Bluetooth profiles page.
- [Remote control]
- Setup for pairing the Voice Remote Control.
- Press the HOME button, then select [Settings] — [Remotes & Accessories] — [Remote control].
[BRAVIA Settings]
- [Channel setup]
- [Picture adjustments]
- [Sound adjustments]
- [Screen]
- [Remote start]
- [Speakers]
- [TV position]
- [Digital Audio Out]
- [External inputs]
- [Parental controls]
- [Eco]
- [IP control]
[Channel setup]
Configures the settings related to receiving broadcast programming.
- Press the HOME button, then select [Settings] — [BRAVIA Settings] — [Channel setup] — the desired option.
Available options
- [Signal type]
- Select [Cable] or [Antenna]. For details, refer to the You cannot receive or select channels. page.
- [Auto program]
- Auto program will scan for available channels. Please check the CABLE/ANTENNA connection, and select [Yes] to continue.
- [Analog setup]
- Select to customize and receive analog channels.
- [Digital setup]
- Select to customize and receive digital broadcast services.
- [Shown channels]
- Select which channels are available for channel surfing.
- [Captions]
- Display close captions and customize their appearance.
- [Preferred language]
- Select the default language for audio and subtitles/captions.
[Picture adjustments]
Adjust the picture settings such as Brightness, Color, and Hue.
![Illustration of [Standard] picture mode](images/picturemode_standard_400px.png)
![Illustration of [Vivid] picture mode](images/picturemode_vivid_400px.png)
- Press the HOME button, then select [Settings] — [BRAVIA Settings] — [Picture adjustments] — the desired option.
Available options
- [Picture mode]
- Change the picture quality according to the content you are watching such as movies or sports.
- [Brightness]
- Adjust the backlight to display the brightest whites and deepest blacks.
- [Color]
- Adjust the color saturation level.
- [Advanced]
- Access advanced picture enhancing options.
Hint
- You can also display [Picture adjustments] by pressing the (Quick Settings) button while watching TV, then selecting [Picture settings].
“Picture adjustments” advanced settings
This page introduces various settings for the features you can configure in [Picture mode] and [Advanced].
Note
- The actual display may vary or some settings may not be available depending on your model/country/region and the content you are watching.
[Picture mode]
| Setting | Description |
|---|---|
| Vivid | Picture with enhanced edges and contrast. |
| Standard | Suitable picture for basic home use. |
| Cinema | Suitable picture for watching movies. |
| Game | Suitable picture for playing video games. |
| Graphics | Suitable picture for watching tables and characters. |
| Photo | Suitable picture for photo viewing. |
| Custom | Customize picture settings. |
[Advanced]
[Brightness] settings
| Setting | Description |
|---|---|
| Brightness | Adjust the luminance level of the screen. |
| Contrast | Adjust the picture white level. |
| Gamma | Adjust the light and dark balance. Brighten or darken the brightness between white and black. |
| Black level | Adjust the picture black level. |
| Black adjust | Enhance the black in images for stronger contrast. |
| Adv. contrast enhancer | Automatically adjusts the contrast based on picture brightness. |
[Color] settings
| Setting | Description |
|---|---|
| Color | Adjust the color saturation level. |
| Hue | Adjust the green and red tones. |
| Color temperature | Adjust the color temperature. |
| Adv. color temperature | Adjust the color temperature in detail. |
| Live Color | Improve the vividness of colors. |
[Clarity] settings
| Setting | Description |
|---|---|
| Sharpness | Adjust the picture detail. |
| Reality Creation | Adjusts fineness and noise for realistic picture. |
| Random noise reduction | Reduce repetitive random noise. |
| Digital noise reduction | Reduce video compression noise. |
[Motion] settings
| Setting | Description |
|---|---|
| Motionflow | Refines moving images. Increases the number of image frames to display videos smoothly. If you select [Custom], you can manually adjust [Smoothness] and [Clearness]. |
| CineMotion | Optimizes picture quality based on video content, such as movies and computer graphics. Smoothly reproduces the motion of filmed images (images recorded at 24 frames per second) such as movies. |
[Video options] settings
| Setting | Description |
|---|---|
| HDMI video range | Select the signal range for HDMI input. |
[Reset] settings
| Setting | Description |
|---|---|
| Reset | Return all advanced picture settings to factory default. |
[Sound adjustments]
You can configure various settings related to the TV’s sound such as sound quality and sound mode.

- Press the HOME button, then select [Settings] — [BRAVIA Settings] — [Sound adjustments] — the desired option.
Available options
- [Dialog enhancer]
- Emphasizes voice.
- [Surround]
- Virtually reproduces realistic surround sound.
- [Advanced]
- Access advanced sound enhancing options.
Hint
- You can also display [Sound adjustments] by pressing the (Quick Settings) button while watching TV, then selecting [Sound settings].
“Sound adjustments” advanced settings
This page introduces various settings for the features you can configure in [Sound adjustments] — [Advanced].
Note
- The actual display may vary or some settings may not be available depending on your model/country/region and the connected device.
[Advanced]
| Setting | Description |
|---|---|
| Common | Adjust [Auto Volume], [Balance], and [Digital audio out volume]*.
|
| Input related | Adjust [Volume offset] and [Dynamic range]. |
| Reset | Return all sound settings to factory default. |
[Screen]
Adjust the aspect ratio and viewable screen area.
- Press the HOME button, then select [Settings] — [BRAVIA Settings] — [Screen] — the desired option.
Available options
- [Wide mode]
- Adjust the picture size.
- [4:3 default]
- Automatic sizing for 4:3 pictures.
[Remote start]
Enables [On] or disables [Off] a mobile device connected on the same network to power on the TV from standby mode.
- Press the HOME button, then select [Settings] — [BRAVIA Settings] — [Remote start].
[Speakers]
Selects TV speakers or Audio system.
- Press the HOME button, then select [Settings] — [BRAVIA Settings] — [Speakers].
[TV position]
Choose optimal TV sound based on the position of your TV.
- Press the HOME button, then select [Settings] — [BRAVIA Settings] — [TV position].
[Digital Audio Out]
Configure the output method when outputting digital audio. This setting is not available when [Speakers] is set to [TV speakers].
- Press the HOME button, then select [Settings] — [BRAVIA Settings] — [Digital Audio Out].
[External inputs]
Configures the settings of the external inputs.
- Press the HOME button, then select [Settings] — [BRAVIA Settings] — [External inputs] — the desired option.
Available options
- [Manage inputs]
- Choose to show or hide inputs, and label the inputs according to their connected devices.
- [HDMI CEC Settings]
- Set up CEC compatible devices for streamlined control.
- [Customize TV key]
- Set the TV button on the remote control to switch to your preferred input.
- [HDMI signal format]
- Enhance 4K HDMI signal format.
[Parental controls]
Configures the parental control settings.
- Press the HOME button, then select [Settings] — [BRAVIA Settings] — [Parental controls] — the desired option.
Available options
- [Off] / [On]
- Disables [Off] or enables [On] parental control on the TV.
- [External input block]
- Blocks inputs from being watched.
- [Channels blocked]
- Blocks channels from being watched.
- [Program restrictions]
- Blocks programs based on the rating of your selected country (available for certain countries only).
- [Change PIN]
- Change PIN code for access to parental controls settings.
[Eco]
Changes the settings related to power consumption.
- Press the HOME button, then select [Settings] — [BRAVIA Settings] — [Eco] — the desired option.
Available options
- [Power saving]
- Reduces power consumption of the TV by adjusting the backlight. Select [Off] to disable this function.
- [Idle TV standby]
- Turns the TV off after it has been kept idle for the preset length of time. Select [Off] to disable this function.
- [Auto shut-off]
- TV automatically turns off if no signal is detected for 15 minutes. Select [Off] to disable this function.
[IP control]
You can adjust the following settings to enable other device to communicate with the TV.
- Press the HOME button, then select [Settings] — [BRAVIA Settings] — [IP control] — the desired option.
Available options
- [Control remotely]
- Let registered remote devices control this TV.
- [Authentication]
- Select the authentication method to allow other device to communicate with the TV (None/Pre-Shared Key).
- [Pre-Shared Key]
- Allows you to set a secret string for accessing the TV’s IP control.
[Timer]
To set the sleep timer
Sleep timer automatically turns off the TV after a preset time.
- Press the HOME button, and select (Timer icon) — [Sleep timer] — the desired option.
Note
- When you turn off the TV and turn it on again, [Sleep timer] is reset to [Off].
Troubleshooting
- Start here Experiencing trouble? Start here.
- Picture (quality)/screen
- Keyboard
- Broadcast reception
- Sound
- Network (Internet)/apps
- Remote control/accessories
- Power
- Connected devices
- LED
Start here
- Software updates
- If a full reset (restart) of the TV is required
Software updates
Sony will provide software updates from time to time in order to enhance functionality and provide users with the latest TV experience. The easiest way to receive software updates is via an internet connection to the TV.
If you want to check if your software is up-to-date, select [System update] from [Settings] — [Device Preferences] — [About].
Updating software via USB storage device
If you do not have a network connection, you can also update the software by using a USB storage device. Use your computer to download the latest software from the Sony support website onto a USB storage device. Insert the USB storage device to a USB port on the TV and the software update will start automatically.
If you will update the TV software by using a USB storage device, you should read the cautions for update by USB storage device on the website.
For more information about the support site, please see the Support Site page.
If a full reset (restart) of the TV is required
If you have trouble such as the picture not displaying on the screen or the remote control not working, reset the TV with the following procedure.
If an external USB device is connected to the TV, disconnect the USB device from the TV before resetting.
Power Reset
- Restart the TV with the remote control.
Press and hold the power button on the remote control and select [Restart].
- Unplug the AC power cord (mains lead).
If the problem persists after step 1, unplug the TV power cord (mains lead) from the electrical outlet and wait for 2 minutes. Then plug the power cord (mains lead) back into the electrical outlet.
Hint
Your personal settings and data will not be lost after the TV restarts.
Factory data reset
If the problem persists after a power reset, try a factory data reset.
Note
Performing a factory reset will delete all of the TV’s data and settings (such as Wi-Fi and wired network setting information, Google account and other login information, Google Play and other installed apps).
- Press the HOME button, then select [Settings] — [Device Preferences] — [About] — [Factory data reset] — [Factory data reset].
- Select [Erase everything].
After the factory reset process completes successfully, the TV will proceed into the Initial Setup wizard. You must agree to the Google Terms of Service and Google Privacy Policy.
Picture (quality)/screen
- No color/Dark picture/Color is not correct/Picture is too bright.
- Distorted picture./The screen flickers.
- Picture size/Screen format/Wide mode changes automatically.
- A black box appears on the screen.
- High resolution HDR pictures are not displayed.
- A message about an app asking for permission to access a TV function is displayed.
No color/Dark picture/Color is not correct/Picture is too bright.
Adjust color tone, brightness, picture quality on your TV from [Picture adjustments].
- Press the (Quick Settings) button, then select [Picture settings] to make adjustments.
- If you want to reset the [Picture adjustments] settings, press the (Quick Settings) button, and select [Picture settings] — [Advanced] — [Reset].
- If you set [Power saving] to [Low] or [High], the black level will be enhanced. Press the HOME button, then select [Settings] — [BRAVIA Settings] — [Eco] — [Power saving] to [Off] to brighten the screen.
Note
- Picture quality depends on the signal and content.
- The picture quality may improve if you change it in [Picture adjustments].
Press the (Quick Settings) button, select [Picture settings] — [Advanced] — [Brightness], and adjust [Brightness] or [Contrast].
Distorted picture./The screen flickers.
Check the connection and position of the antenna and peripheral devices
- Check the antenna/cable connection.
- Keep the antenna/cable away from other connecting cables.
- When installing an optional device, leave some space between the device and the TV.
- Make sure that the antenna is connected using a high quality 75-ohm coaxial cable.
Check the [Motion] setting
- Press the (Quick Settings) button, and select [Picture settings] — [Advanced] — [Motion] — [Motionflow] — [Off].
(For [Motionflow] compatible models only)
[Motionflow] compatible models have [Motionflow] in [Picture settings] — [Advanced] — [Motion].
- Change the current setting of [CineMotion] to [Off].
Press the (Quick Settings) button, and select [Picture settings] — [Advanced] — [Motion] — [CineMotion].
Picture size/Screen format/Wide mode changes automatically.
You can adjust the picture size from [Screen].
Press the HOME button, then select [Settings] — [BRAVIA Settings] — [Screen].
- You can manually adjust the picture size from [Wide mode].
Example of setting [Wide mode] (when the aspect ratio of the original picture is 4:3)
- [Auto]
When changing the channel or video input, if [Auto] in [Wide mode] is selected, the current [Wide mode] setting is automatically changed according to the input signal. To lock the [Wide mode] setting, choose other than [Auto] in [Wide mode].
- [Wide zoom]
Enlarges the picture, preserving the original picture as much as possible.

- [Normal]
Displays the original picture as is. Sidebars that fill in the difference with the 4:3 picture are displayed on the left and right sides of the screen.

- [Full]
Enlarges the picture (with overscan) fit to panel, without preserving the original aspect ratio.

- [Full pixel]
Enlarges the picture (without overscan) fit to panel, without preserving the original aspect ratio.

- [Zoom]
Displays a 16:9 picture that has been converted into 4:3 letter box format, in the correct aspect ratio.

- [14:9]
Displays a 14:9 picture in its original size. Sidebars are shown to fill the 16:9 screen.

[Wide mode] (when the aspect ratio of the original picture is 16:9)
The picture may not be displayed as intended even if it has an aspect ratio of 16:9. Change the settings to switch to the desired display.
- [Auto]
When changing the channel or video input, if [Auto] in [Wide mode] is selected, the current [Wide mode] setting is automatically changed according to the input signal. To lock the [Wide mode] setting, choose other than [Auto] in [Wide mode].
- [Wide zoom]
Enlarges the picture, preserving the original picture as much as possible.

- [Normal]
Displays a 4:3 picture that was expanded horizontally into 16:9, in the correct aspect ratio.

- [Full]
Enlarges the picture (with overscan) fit to panel, without preserving the original aspect ratio.

- [Full pixel]
Enlarges the picture (without overscan) fit to panel, without preserving the original aspect ratio.

- [Zoom]
Displays a 16:9 picture that has been converted into 4:3 letter box format, in the correct aspect ratio.

- [14:9]
Displays a 14:9 picture in its original size. Sidebars are shown to fill the 16:9 screen.

Note
- [Auto] in [Wide mode] will not expand the picture while the content switches since the content information is regulated by the channel signal provider. You can manually change the [Wide mode] setting if desired, which will remain in effect until you change the channel/input or manually change the [Wide mode] setting again.
- The Picture size depends on the signal content.
- The picture becomes smaller during commercials due to the method used by the provider to broadcast content. When HD content channels switch to SD content (commercials), the picture may become small with a black border.
- Some wide screen programs are filmed in aspect ratios that are greater than 16:9 (this is especially common with theatrical releases). Your TV will show these programs with black bands at the top and bottom of the screen. For more details, check the documentation that came with your BD/DVD (or contact your program provider).
- Programs broadcast in HD formats (720p and 1080i) with 4:3 content will commonly have black bands on the left and right sides of the screen which are added by the broadcaster.
Hint
Some cable and satellite set-top boxes can also control the size of the picture. If you are using a set-top box, refer to the manufacturer of the set-top box for more information.
A black box appears on the screen.
- A text option is selected although no text is available. Check the [Captions] settings in [Accessibility], or [Captions] in [Channel setup]. (Option name differs depending on your region/country.) You can select a different option from the current option.
High resolution HDR pictures are not displayed.
The following are required to watch high resolution HDR pictures such as 4K (50p/60p)*.
- Connect the 4K (50p/60p)* playable device.
- Use a Premium High Speed HDMI Cable(s) that supports 18 Gbps.
- Set [HDMI signal format] to [Enhanced format] by selecting [Settings] — [BRAVIA Settings] — [External inputs] — [HDMI signal format] — the HDMI terminal you want to set.
- Check whether the connected device has the latest settings or firmware.
- Availability depends on your model/region/country.
A message about an app asking for permission to access a TV function is displayed.
- Select whether to allow or deny the app access to the displayed function.
- You can check the list of app permissions categorized by TV function and change permission settings for each app. Press the HOME button, select [Settings] — [Apps] — [App permissions] — the desired TV function.
Keyboard
You cannot operate the current screen after the on-screen keyboard is displayed.
- To return to operation of the screen behind the on-screen keyboard, press the BACK button on the remote control.
Broadcast reception
- Check these things first to troubleshoot your TV reception.
- Block noise or an error message appears and you cannot watch broadcasts.
- Ghosting or double images appear.
- Only snow noise or a black picture appears on the screen.
- There is picture or sound noise when viewing an analog TV channel.
- Some channels are blank.
- Poor reception or poor picture quality with digital broadcasts.
- You cannot view digital channels.
- You cannot receive or select channels.
- Some digital cable channels are not displayed.
- Broadcast HD formats have poor quality.
Check these things first to troubleshoot your TV reception.
- Make sure that the antenna cable is firmly connected to the TV.
- Make sure that the antenna cable is not loose or disconnected.
- Make sure that the cable or cable connector of antenna is not damaged.
- To watch streaming content, connect the TV to the Internet.
Hint
- For more information, please visit the Sony support website.
Block noise or an error message appears and you cannot watch broadcasts.
- Make sure that the antenna cable is connected to the correct ports (at the TV/connected devices/wall).
- Make sure that the cable is not old or that the inside of the connector is not short-circuited.
Ghosting or double images appear.
- Check cable or antenna connections.
- Check the antenna location and direction.
- Press the (Quick Settings) button, and select [Picture settings] — [Advanced] — [Motion] — [Motionflow] — [Off].
(For [Motionflow] compatible models only)
[Motionflow] compatible models have [Motionflow] in [Picture settings] — [Advanced] — [Motion].
Only snow noise or a black picture appears on the screen.
- Check if auto tuning is performed.
- Check if the antenna is broken or bent.
- Check if the antenna has reached the end of its serviceable life (3-5 years for normal use, 1-2 years at a seaside location).
There is picture or sound noise when viewing an analog TV channel.
- Make sure that the antenna is connected using a high quality 75-ohm coaxial cable.
- Keep the antenna cable away from other connecting cables.
Some channels are blank.
- The channel is for scrambled/subscription service only. Subscribe to a pay TV service.
- The channel is used only for data (no picture or sound).
- Contact the broadcaster for transmission details.
Poor reception or poor picture quality with digital broadcasts.
- Change the position, direction and angle of the terrestrial television antenna to maximize the antenna signal level. Make sure that the direction of the antenna is not changed unintentionally (such as by wind).
- If you are using a TV signal booster, adjust its signal gain.
- If equipment (such as a TV signal distributor) is connected between the antenna and the TV, it may affect the TV reception. Directly connect the antenna and the TV to check if the reception is improved.
You cannot view digital channels.
- Ask a local installer if digital transmissions are provided in your area.
- Upgrade to a higher gain antenna.
You cannot receive or select channels.
- Perform [Analog auto tuning] / [Digital auto tuning] to add receivable channels that are not present in the TV memory.
You may tune Analog or Digital service to check the available channel.
Press the HOME button, then select [Settings] — [BRAVIA Settings] — [Channel setup] — [Analog setup] / [Digital setup] — [Analog auto tuning] / [Digital auto tuning].
- Check that [Signal type] is set correctly.
You may try to setup Cable or Antenna to check the available signal.
Press the HOME button, then select [Settings] — [BRAVIA Settings] — [Channel setup] — [Signal type].
- [Cable]
- Set to receive and select cable channels.
- [Antenna]
- Set to receive and select antenna channels.
Some digital cable channels are not displayed.
- Certain cable companies have limitations on the broadcast of digital cable channels. Check with your cable company for more information.
- The digital cable channel may be hidden under [Shown channels] under [Channel setup].
Broadcast HD formats have poor quality.
- Content and signal quality are regulated by the signal provider. Many HD channels and content are actually upscaled versions of standard-definition broadcasts. The picture is affected by the quality of the signal received, which varies between channel and program.
Sound
- No sound but good picture.
- Audio noise.
- No audio or low audio with a home theater system.
- Distorted sound.
- You are concerned about a delay between the picture and sound.
No sound but good picture.
- Check the volume control.
- Press the MUTE or VOL + button to cancel muting.
- Press the (Quick Settings) button, then select [Speakers] — [TV speakers].
Press the HOME button, and select the following in order.
[Settings] — [BRAVIA Settings] — [Speakers] — [TV speakers]
- If headphones are connected, sound is not output from the TV speakers or audio system connected via ARC. Remove the headphones.
Audio noise.
- Make sure that the antenna is connected using a high quality 75-ohm coaxial cable.
- Keep the antenna cable away from other connecting cables.
- To avoid TV interference, make sure to use an undamaged antenna cable.
No audio or low audio with a home theater system.
- Press the (Quick Settings) button, then select [Speakers] — [Audio system].
- If the audio system is not compatible with Dolby Digital or DTS, set [Settings] — [BRAVIA Settings] — [Digital Audio Out] to [PCM].
- Check if the [Digital audio out volume] setting of the TV is at maximum.
Press the
(Quick Settings) button, then select [Sound settings] — [Advanced] — [Common] — [Digital audio out volume]. - When using HDMI input with Super Audio CD or DVD-Audio, DIGITAL AUDIO OUT (OPTICAL) may not provide an audio signal.
Distorted sound.
- Check the antenna/cable connection.
- Keep the antenna/cable away from other connecting cables.
- Keep the TV away from electrical noise sources such as cars, hair-dryers, Wi-Fi units, mobile phones, or optical devices.
- When installing an optional device, leave some space between the device and the TV.
- Set [Audio filter] to [Low] or [High] to improve sound for analog reception. ([Audio filter] may not be available depending on your region/country.)
You are concerned about a delay between the picture and sound.
If a specific audio system is connected with an HDMI cable
You can adjust the output timing of the picture and sound. For details about supported models, refer to the support site.
- Support Site
Network (Internet)/apps
- The TV cannot connect to the Internet/Network.
- The picture and/or sound quality from streaming apps is poor.
- You can connect to the Internet, but not to certain apps and services.
The TV cannot connect to the Internet/Network.
If the wireless network does not connect or disconnects, try the following.
- Press the HOME button and check that the following setting is enabled.
[Settings] — [Network & Internet] — [Wi-Fi]
- Check the installation location of the TV and wireless router. Signal condition may be affected by the following:
- Other wireless devices, microwaves, fluorescent lights, etc., are placed nearby.
- There are floors or walls between the wireless router and TV.
- Turn the wireless router off and then on again.
- If the network name (SSID) of the wireless router to which you want to connect is not displayed, select [Add new network] under [Other options] to enter a network name (SSID).
If the problem is not resolved even after the procedures above or if you cannot connect even with a wired network, check the status of the network connection.
Checking the status of the network connection
- LAN: Press the HOME button, then select [Settings] — [Network & Internet] under Ethernet.
- Wi-Fi: Press the HOME button, then select [Settings] — [Network & Internet] under [Available networks] — [(Connected SSID)].
Check your network connections and/or server’s instruction manual for connection information, or contact the person who set up the network (network administrator).
Note
- If the LAN cable is connected to an active server and the TV has acquired an IP address, check your server’s connections and configurations.
LAN: Press the HOME button, then select [Settings] — [Network & Internet] under Ethernet.
Wi-Fi: Press the HOME button, then select [Settings] — [Network & Internet] under [Available networks] — [(Connected SSID)].
The picture and/or sound quality from streaming apps is poor.
- Quality depends on the original video provided by the video content provider and your connection bandwidth.
- To enjoy watching Internet streaming videos, a network with a fast and stable line speed is necessary. In general, speeds that resemble the following are necessary:
- Streaming standard definition (SD) Internet video: 2.5 Mbps
- Streaming high definition (HD) Internet video: 10 Mbps
- Streaming Ultra HD (4K) Internet video: 25 Mbps
- The wireless network connection quality varies depending on the distance or obstacles (e.g., wall) between the TV and the wireless router, environmental interference, and the quality of the wireless router. In this case, use a wired connection for the Internet, or try the 5 GHz band.
- The 5 GHz band may not be supported depending on your region/country. If the 5 GHz band is not supported, the TV can only connect to a wireless router using the 2.4 GHz band.
- When using a wireless network, keep wireless devices close together or avoid obstacles.
- Keep devices that emit RF interference (such as microwaves) away from the TV and wireless router, or turn off such devices.
- Audio is not output for videos without audio.
Hint
- For more information, please visit the Sony support website.
You can connect to the Internet, but not to certain apps and services.
- The date and time settings of this TV may be incorrect. Depending on certain apps and services, you may not be able to connect to those apps and services if the time is incorrect.
- Check that the LAN cable and AC power cord (mains lead) of the router/modem* has been properly connected.
- Your router/modem must first be setup to connect to the Internet. Contact your Internet service provider for router/modem settings.
- Try using the apps later. The app content provider’s server may be out of service.
Hint
- For more information, please visit the Sony support website.
Remote control/accessories
- The remote control does not operate.
The remote control does not operate.
Check if the TV is working properly
- Press the power button on the TV to determine if the problem is with the remote control or not. For the location of the power button, refer to the Reference Guide supplied with the TV.
- If the TV is not working, try resetting it.
Check if the remote control is working properly
- Point the remote control at the remote control sensor located at the front of the TV.
- Keep the remote control sensor area clear from obstacles.
- Fluorescent light can interfere with remote control operation; try turning off any fluorescent light.
- Check that the orientation of each battery matches the positive (+) and negative (−) symbols in the battery compartment.
- Battery power may be low. Remove the remote control cover and replace the batteries with new ones.

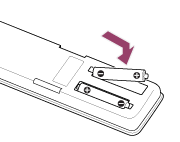
Reset the remote control
If the remote control does not operate correctly due to poor battery contact or static electricity, the problem may be resolved by resetting the remote control.
- Remove the batteries from the remote control.
- Press the power button on the remote control for three seconds.
- Install new batteries into the remote control.
If the problem persists, refer to the If a full reset (restart) of the TV is required page.
Note
- When you unplug the TV and plug it in again, the TV may not be able to turn on for a while, even if you press the power button on the remote control or the TV. This is because it takes time to initialize the system. Wait for about 10 to 20 seconds, then try again.
- When you cannot search using your voice, activate the button or button by pressing the HOME button and selecting [Settings] — [Remotes & Accessories] — [Remote control] — [Connect via Bluetooth].
Power
- The TV turns off automatically.
- The TV turns on automatically.
- The TV does not turn on.
The TV turns off automatically.
- The screen may have been turned off due to [Sleep timer] settings.
- Check if [Idle TV standby]/[Auto shut-off] in [Eco] is activated.
The TV turns on automatically.
- Disable the [TV auto power on] setting in [HDMI CEC Settings].
The TV does not turn on.
Perform the procedures in the order below until the problem is solved.
Check if the TV turns on with the remote control.
Point the remote control at the sensor on the front of the TV and press the power button on the remote control.
Check if the TV turns on or if the illumination LED lights up.
If the illumination LED lights up but the TV does not turn on, try resetting (restarting) the TV.
- If a full reset (restart) of the TV is required
Check if the TV turns on with the power button on the TV.
Press the power button on the TV and check if the TV turns on. The power button is on the side or back of the TV.
For details, refer to the Reference Guide of the TV.
If the TV turns on with this procedure, there may be a problem with the remote control. Refer to the following topic.
- The remote control does not operate.
Unplug the AC power cord (mains lead) and wait for 2 minutes.
Unplug the TV power cord (mains lead) from the electrical outlet and wait for 2 minutes. Then plug the power cord (mains lead) back into the electrical outlet. After 20 seconds, press the power button on the remote control or TV.
Hint
- When you unplug the TV and plug it in again, the TV may not be able to turn on for a while, even if you press the power button on the remote control or the TV. This is because it takes time to initialize the system. Wait for about 10 to 20 seconds, then try again.
Connected devices
- No picture from a connected device.
- Certain programs on digital sources display a loss of detail.
- Photo images or folders take time to display.
- You cannot find a connected HDMI CEC device.
- Some media files in the USB device are not displayed.
- Operation cuts out, or a device does not work.
- Some paid content cannot be played.
No picture from a connected device.
- Turn the connected device on.
- Check the cable connection between the device and TV.
- Press the INPUT button to display the list of inputs, then select the desired input.
- Correctly insert the USB device.
- Make sure that the USB device has been properly formatted.
- Operation is not guaranteed for all USB devices. Also, operations differ depending on the USB device features or the video files being played.
- Change the HDMI signal format of the HDMI input that does not display a picture to standard format. Press the HOME button, then select [Settings] — [BRAVIA Settings] — [External inputs] — [HDMI signal format] — the HDMI input you want to set.
Certain programs on digital sources display a loss of detail.
- Less detail than usual or artifacts (small blocks, dots or pixelation) may appear on the screen, due to the digital compression of the source content used by certain digital broadcasts and DVDs. The degree of visible artifacts depends on the clarity and resolution of the TV.
Photo images or folders take time to display.
- Depending on the image dimension, file size, and number of files in a folder, some photo images or folders take time to display.
- Each time a USB device is connected to the TV, it may take up to a couple of minutes for the photos to display.
You cannot find a connected HDMI CEC device.
- Check that your device is CEC-compatible.
- Make sure that CEC is enabled on the CEC-compatible device, and [Settings] — [BRAVIA Settings] — [External inputs] — [HDMI CEC Settings] — [CEC] is set up on the TV.
Some media files in the USB device are not displayed.
- Unsupported files may not be displayed.
Operation cuts out, or a device does not work.
- Check if the device is turned on.
- Replace the batteries of the device.
- Re-register the device.
- Bluetooth devices use the 2.4 GHz band, therefore communication speed may deteriorate or cut out occasionally due to wireless LAN interference.
- The TV or device may not work on a metal rack due to wireless communication interference.
- For usable communication distances between the TV and other devices, refer to the instruction manuals of the devices.
- When multiple Bluetooth devices are connected to the TV, the quality of Bluetooth communication may deteriorate.
Some paid content cannot be played.
- The source device needs to meet HDCP (High-bandwidth Digital Content Protection) 2.3 standards.
LED
- The illumination LED sometimes lights up.
The illumination LED sometimes lights up.
The illumination LED lights up at various times such as during software updates using a USB storage device.
Refer to How the LED lights up for details.
Index
TV programs
- GUIDE
- Channel setup
- Parental controls
Picture/display
- 4K pictures
- HOME
- Picture adjustments
- Date & time
- Language
Sound/voice
- Voice search, using
- Sound adjustments
- Speech recognition
Remote control
- Remote control, using
- Voice search
- HOME
- Quick Settings
- Inputs
Connections
- Bluetooth
- Google Cast
- CEC
- Internet
External devices
- Blu-ray/DVD players, connecting
- USB memory devices, etc.
- Computers
- Digital cameras, camcorders
- Audio systems
Apps
- Google Play Store
- YouTube
- Netflix
File playback
- Computers
- Digital cameras, camcorders
- Supported files and formats
Other
- Restart
- System software update