

Connecting an audio system
To close this screen and jump to the Settings screen, select the following link.
![]() Jump to the Settings screen
Jump to the Settings screen

See the illustrations below to connect an audio system such as an AV receiver or sound bar.
To pair the TV with a Bluetooth device such as Bluetooth headphones, refer to Connecting a Bluetooth device (such as Bluetooth headphones).
Note
- The available terminals depend on your model/region/country.
Sound bar connection
We recommend connecting the TV's HDMI input terminal (eARC or ARC) to the sound bar's HDMI output terminal (eARC or ARC) with an HDMI cable.
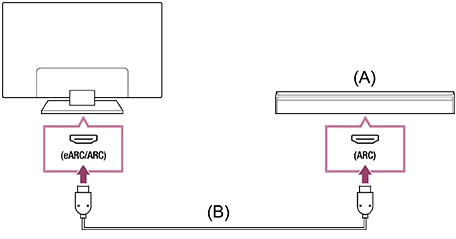
(A) Sound bar
(B) HDMI cable (not supplied)*
* We recommend an authorised Premium High Speed HDMI™ Cable(s).
To connect a sound bar via HDMI, see “HDMI connection”.
If you connect the TV to a sound bar via HDMI, you can use the following features.
- Link the power state of the sound bar and TV
- Display and configure the sound bar settings on the TV (depends on your model)
Note
- The available functions depend on the sound bar.
- Depending on the sound bar, “eARC” or “ARC” may not be indicated on the HDMI terminal. For details on how to connect, refer to the sound bar manual.
Hint
There may be three tactile dots, next to the HDMI input terminal depending on your model. Use them as a guide during installation.
Audio amp connection
We recommend connecting the TV's HDMI input terminal (eARC or ARC) to the sound bar's HDMI output terminal (eARC or ARC) via HDMI. Depending on your audio system, you can also connect with a digital optical cable.
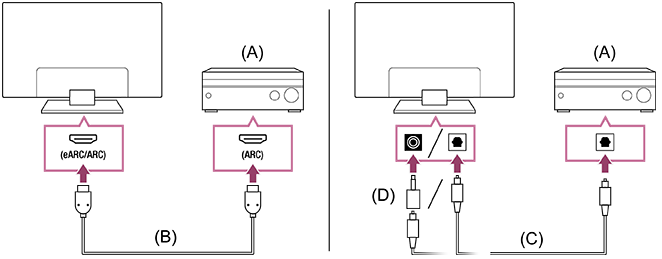
(A) Audio amp
(B) HDMI cable (not supplied)*
(C) Digital optical cable (not supplied)
(D) Digital audio connector adapter (only supplied with compatible models)
* We recommend an authorised Premium High Speed HDMI™ Cable(s).
To connect an audio amp via HDMI, see “HDMI connection”. To connect an audio amp with a digital optical cable, see “Digital optical cable connection”.
Note
- ALWAYS keep small accessories out of the reach of children, so that they are not mistakenly swallowed.
HDMI connection (eARC supported)
-
Connect the external input device and TV with an HDMI cable. Connect the TV and audio system with another HDMI cable.
Connect the audio system to the TV’s HDMI input terminal bearing the text “ARC” or “eARC/ARC”.
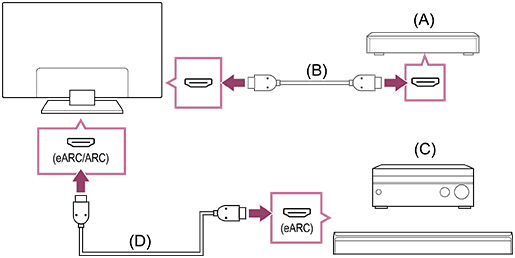
(A) External input device (such as a Blu-ray/DVD recorder)
(B) HDMI cable (not supplied)
(C) AV receiver or sound bar
(D) HDMI cable with Ethernet (not supplied)*
* We recommend authorised Premium High Speed HDMI™ Cable(s) bearing the HDMI logo.
-
Press the
 (Quick Settings) button on the remote control, then select [Settings] — [Display & Sound] — [Audio output] — [Audio system settings] — [eARC setting] — [Auto].
 -
Select [Audio output] — [Speakers] — [Audio system].
-
Enable the audio system’s eARC feature.
Refer to the instruction manual of the device.
Note
- If [Digital audio output] is set to [Prioritise pass through], the TV operates as follows for some audio signal:
- audio from system sounds and audio responses is not output, and
- the voice recognition performance of the built-in MIC may degrade (only TVs with a built-in MIC).
Hint
There may be three tactile dots next to the HDMI input terminal depending on your model. Use them as a guide during installation.
HDMI connection (ARC supported)
-
Connect the TV and audio system with an HDMI cable.
Connect to the TV’s HDMI input terminal bearing the text “ARC” or “eARC/ARC”.

(A) AV receiver or sound bar
(B) HDMI cable (not supplied)*
* We recommend authorised Premium High Speed HDMI™ Cable(s) bearing the HDMI logo.
Note
- For ARC connections, voice recognition performance may degrade (only TVs with a built-in MIC).
- If [Digital audio output] is set to [Prioritise pass through], the TV operates as follows for some audio signal:
- audio from system sounds and audio responses is not output, and
- the voice recognition performance of the built-in MIC may degrade (only TVs with a built-in MIC).
Hint
There may be three tactile dots next to the HDMI input terminal depending on your model. Use them as a guide during installation.
Digital optical cable connection
-
Connect the TV and audio system with a digital optical cable.
Connect to the audio system’s digital optical input terminal.
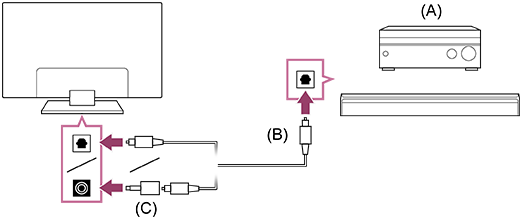
(A) AV receiver or Sound bar
(B) Optical audio cable (not supplied)
(C) Digital audio connector adapter (only supplied with compatible models)
-
To enable [Optical digital audio output], press the
(Quick Settings) button on the remote control, then select [Settings] — [Display & Sound] — [Audio output] — [Optical digital audio output settings] — [Optical digital audio output].
Note
- ALWAYS keep small accessories out of the reach of children, so that they are not mistakenly swallowed.
Hint
HDMI connection centred on an audio system (eARC supported)
You can make connections centred on an audio system as follows.
For TV settings, refer to HDMI connection (eARC supported). For the audio system settings, refer to your device manual.
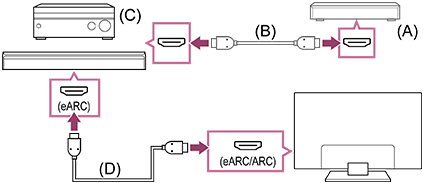
(A) External input device (such as a Blu-ray/DVD recorder)
(B) HDMI cable (not supplied)
(C) AV receiver or sound bar
(D) HDMI cable with Ethernet (not supplied)*
* We recommend authorised Premium High Speed HDMI™ Cable(s) bearing the HDMI logo.