
Getting Started
Home Screen
Setting Up
Remote Control
- Key Overview [8]
- Pair Your Remote Control with the TV [9]
- IR Sensor [10]
- Batteries [11]
- Cleaning [12]
- About Remote Control [13]
Switching On and Off
Useful features
Watching TV
Channel Installation
Watching Channels
Channel Lists
EPG
Watching TV
Connecting Devices
About Connections
Home Theatre System (HTS)
Video Device
Audio Device
USB Storage Device
Videos, Photos, Music & Text
Available devices and settings
Connecting to a Network
Connecting your Google TV
Google Cast
Apps
Settings
Dashboard
Picture Settings
Sound Settings
System Settings
Accessibility Settings
Remote and Accessories
Available Settings
Software & Specifications
Software Updates
Software Version
Operating System
Connectivity
Help and Support
Troubleshooting
- Switch On and Remote Control [38]
- Channels [39]
- Picture [40]
- Sound [41]
- HDMI and USB [42]
- Network [43]
- Bluetooth [44]
Support Site
Copyrights
Disclaimer
Index
[1] Getting StartedHome ScreenHome and Channels
The Home launcher
Press HOME on your remote control to get your new Google TV Home screen. From here you can decide what to watch by browsing entertainment options from app and live TV. Your Home has channels to let you discover great contents from your favourite apps. You can also add additional channels or find new apps to get more contents.
With multiple tabs like Search, Home, Apps and Library, you can discover movies and shows from your services and popular apps. Sign in to your Google Account to get personalised recommendations from your streaming services based on what you have watched and what interests you. You can also trigger Google search with voice or text input in Search tab.
Accessing settings from Home
You can access All settings menu via the icon at the top right corner.
Apps
The Apps tab of Home screen contains all installed Apps that come with the TV and the Apps you have installed from Google Play™ Store. You can also install and add more apps as favourite from the Apps tab.
Navigation
Decide what to watch next with easy-to-use navigation. Browse your personalised recommendations, pick up where you left off, or quickly find a certain app using the new tab system.
Discover personalised recommendations
Browse shows and movies that you will love on all your favourite media services. Sign in to your Google Account to get started.
Get recommendations across Google
Your services are saved to your Google Account so you can get better recommendations across Google.
[2] Getting StartedHome ScreenDashboard
The Dashboard is a side panel in Google TV that provides access to Settings, device controls, notifications and more. Dashboard can be accessed by pressing the Dashboard key on the remote control or long press the HOME key on the remote control.
The Dashboard contains following features.
- Account: To display current user account icon, switch to other account or add new user account.
- [All settings]: To access all setting menus for adjusting the TV settings.
- Clock and [Screensaver]: To indicate the system clock and press to activate screen saver immediately.
- [Inputs]: To launch the input source list for switching to any of the connected devices.
- [Display] / [Sound] / [Wi-Fi] / [Bluetooth] / [Accessibility]: Quick link to adjust frequent settings.
- [Notification]: To provide you the messages about the Google TV system. Press [Clear all] to dismiss all notifications.
[3] Getting StartedSetting UpTV Stand
You can find the instructions for mounting the TV stand in the Reference Guide that came with the TV. In case you lost this guide, you can download it from the website.
Use the model number of the TV to look for the Reference Guide to download.
[4] Getting StartedSetting UpWall Mounting
Your TV is also prepared for a VESA-compliant wall mount bracket (sold separately).
Use the following VESA code when purchasing the wall mount.
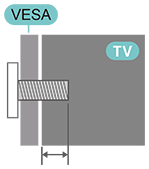
- Wall Mount Bracket SU-WL450, M6 (Minimum 14 mm (9/16 inches), Maximum 16 mm (5/8 inches))
Caution
Wall mounting the TV requires special skills and should only be performed by qualified personnel. The TV wall mounting should meet safety standards according to the TV’s weight. Also read the safety precautions before positioning the TV.
Sony bears no responsibility for improper mounting or any mounting that results in accident or injury.
[5] Getting StartedSetting UpTips on Placement
- Position the TV where light does not shine directly on the screen.
- The ideal distance to watch TV is 2 to 5 times its diagonal screen size. When seated, your eyes should be level with the centre of the screen.
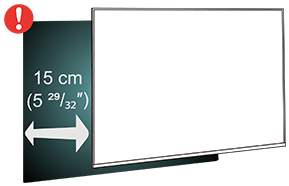
- When wall mounted, position the TV up to 15 cm (5 29/32 inches) away from the wall.
Note
- Please keep the TV away from dust-producing sources such as stoves. It is suggested to clean the dust regularly to avoid getting dust into the TV.
[6] Getting StartedSetting UpPower Cable
- Insert the AC power cord (mains lead) into the POWER connector on the back of the TV.
- Make sure the AC power cord (mains lead) is securely inserted in the connector.
- Make sure that the AC power (mains) plug, in the wall socket, is accessible at all times.
- When you unplug the AC power cord (mains lead), always pull the plug, never pull the cord.
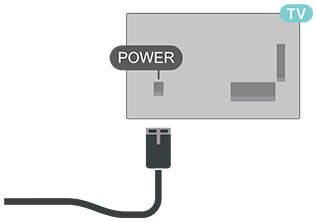
Although this TV has a very low standby power consumption, unplug the AC power cord (mains lead) to save energy if you do not use the TV for a long period of time.
[7] Getting StartedSetting UpAntenna Cable
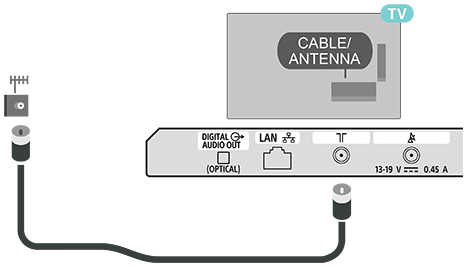
Insert the antenna plug firmly into the CABLE/ANTENNA socket at the back of the TV.
You can connect your own antenna or an antenna signal from an antenna distribution system. Use an IEC Coax 75 Ohm RF antenna connector.
Use this antenna connection for Antenna and Cable input signals.
[8] Getting StartedRemote ControlKey Overview
The supplied remote control, button layout, button names and available features vary depending on your region/country/TV model.
Top
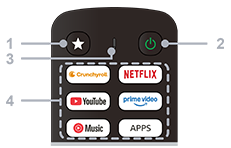
1 - Customisable button
Launches a preferred app assigned by the user.
2 - Power (Standby / On)
Turns the TV on or switches it to standby mode.
3 - MIC
Used for voice search.
4 - Apps buttons
Accesses apps and online services.
Middle
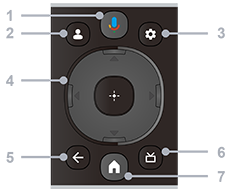
1 - Microphone/Google Assistant
Use Google Assistant*1 or voice search*1. For hints on how to control your TV, press the microphone button on the remote control and say “voice hints”.
*1 Google Assistant or voice search requires an Internet connection.
2 - Profile
Manages user profiles.
3 - Dashboard
Displays the Dashboard.
4 - Navigation (up/down/left/right) / OK (Enter)
Navigates and selects items on the on-screen menu.
In TV mode: Displays and selects programmes on other channels while watching TV (Digital/Analogue).
5 - BACK
Returns to the previous screen.
6 - EPG
Displays the digital programme guide.
7 - HOME
Displays the TV Home screen.
Bottom
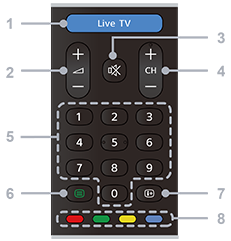
1 - Live TV / Free TV
Provides a wide range of Live TV options, including local news, popular shows, and movies.
2 - Volume + / −
Adjusts the volume.
3 - Mute
Mutes the sound. Press again to restore the sound.
4 - CH + / − (Channel)
In TV mode: Selects the next or previous channel.
In Text mode: Selects the + (Next) or − (Previous) page.
5 - Number buttons
Selects digital channels.
6 - Text
Displays text information and interactive services.
7 - Info
Displays information about the channel, programme, or input source you are viewing.
8 - Colour buttons
Executes the corresponding function on the screen.
[9] Getting StartedRemote ControlPair Your Remote Control with the TV
When you start the initial TV setup, you will be prompted to pair the remote control by pressing the HOME and BACK buttons on the remote control simultaneously. It is suggested to complete the pairing during the first TV installation.
Note
- Once the remote control has entered pairing mode successfully, the LED indicator of the remote control starts blinking.
- The remote control must be kept close to the TV (within 1 meter distance) during pairing in order to ensure success.
- If the TV does not launch the voice control field when Google Assistant button on the remote control is pressed, pairing was unsuccessful.
- It is advisable to wait until the set has fully started up and launched all background processes before pairing mode is entered as the message containing further instructions may appear too late, thereby negatively impacting the pairing procedure.
Pairing or pairing again
If the pairing with the remote control was lost, you can pair the TV with the remote control again.
You can press HOME + BACK keys (for approximately 3 seconds) for pairing.
Alternatively, go to [Dashboard] — [All settings] — [Remotes and accessories], then follow the on-screen instructions.
A message appears when the pairing is successful.
[10] Getting StartedRemote ControlIR Sensor
The TV can receive commands from a remote control that uses IR (infrared) to send commands. If you use such a remote control, always make sure you point the remote control at the infrared sensor on the front of the TV.
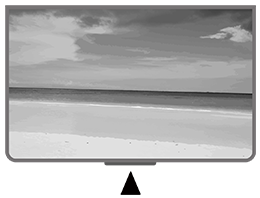
Warning
Do not put any objects in front of IR sensor of the TV. It may block the IR signal.
[11] Getting StartedRemote ControlBatteries
If the TV does not react on a key press on the remote control, the batteries might be empty.
To replace the batteries, open the battery compartment on the back-bottom of the remote control.
- Slide the battery door in the direction shown by the arrow.
- Replace the old batteries with 2 type AAA 1.5 V batteries. Make sure the + and the − ends of the batteries line up correctly.
- Reposition the battery door and slide it back until it clicks.
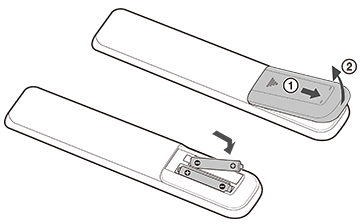
Remove the batteries if you are not using the remote control for a long time.
Safely dispose of your old batteries according to the end of use directions.
[12] Getting StartedRemote ControlCleaning
Your remote control is treated with a scratch-resistant coating.
To clean the remote control, use a soft damp cloth. Never use substances such as alcohol, chemicals or household cleaners on the remote control.
[13] Getting StartedRemote ControlAbout Remote Control
[14] Getting StartedSwitching On and Off
Make sure the TV is connected to the AC power (mains). The indicator light at the bottom of the TV lights up.
Switch on
Press Power on the remote control to switch the TV on. You can also press the power button on the bottom of the TV to switch the TV on in case you cannot find the remote control or its batteries are empty.
Switch to standby mode
To switch the TV to standby mode, press Power on the remote control. You can also press the power button on the bottom of the TV.
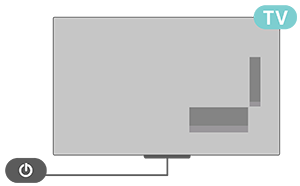
In standby mode, the TV is still connected to the AC power (mains) but consumes very little energy.
To switch off the TV completely, disconnect the AC power (mains) plug.
When disconnecting the AC power (mains) plug, always pull the plug, never the cord. Ensure that you have full access to the AC power (mains) plug, AC power cord (mains lead) and outlet socket at all times.
Useful features
[16] Watching TVChannel Installation
To search and install TV channels
- Make sure the Antenna/Cable connector is correctly plugged.
- Go to [Dashboard] — [All settings] — [Channels & inputs] — [Channels].
- Select a channel type and press OK on the remote control.
- TV will start to search and install available channels.
- Wait for few minutes to complete the channel installation and start to watch TV channels.
[17] Watching TVWatching Channels
To watch TV channels
- Press Live TV / Free TV on the remote control.
- Press Dashboard on the remote control, go to Inputs and select a TV type.
- If you know the channel number, enter it using the number keys on the remote control. Press OK on the remote control after you entered the number to switch channels.
[18] Watching TVChannel Lists
To switch to a channel from a channel list
- While watching a TV channel, press OK on the remote control to open the channel lists.
- The channel list can have several pages with channels. To view the next or previous page, follow the on-screen instruction.
- To close the channel lists without switching channels, press BACK on the remote control.
To get more channel list
- While watching TV, press OK on the remote control to open the current channel list.
- Press Navigation key left on the remote control to get more channel lists sorted by All, Recent, Favourite lists and all channel types.
- Select a channel list for your need.
To add a channel to the favourite list
In a favourite channel list, you can collect the channels you like. You can create different lists of favourite channels for easy channel zapping. With a Favourites List selected, press the Navigation keys on the remote control to select a channel, then press OK on the remote control to watch the selected channel.
- While watching TV, press OK on the remote control to open the current channel list.
- Select a channel and press Navigation key right on the remote control to get the channel information.
- Press Navigation key right on the remote control again to move to [Add to favourites] and press OK on the remote control to confirm.
- Select one of the favourite lists and press OK on the remote control to add the channel to the list.
- Press BACK on the remote control to close the menu.
To remove a channel from the favourites list
- Select a channel which is already added on favourite list.
- Press Navigation key right on the remote control to move to [Edit favourites] and press OK on the remote control to confirm.
- The channel is now removed from the favourite list.
[19] Watching TVEPG
With the digital programme guide, you can view a list of the current and scheduled TV programmes of your channels. Depending on where the EPG information (data) is coming from, analogue and digital channels or only digital channels are shown. Not all channels offer EPG information.
The TV can collect EPG information for the channels that are installed on the TV.
[20] Watching TVWatching TV
[21] Connecting DevicesAbout ConnectionsConnectivity Guide
Always connect a device to the TV with the highest quality connection available. Also, use good quality cables to ensure a good transfer of picture and sound.
When you connect a device, the TV recognises its type and gives each device a correct type name. You can change the type name if you wish. If a correct type name for a device is set, the TV automatically switches to the ideal TV settings when you switch to this device in the Sources menu.
[22] Connecting DevicesAbout ConnectionsAntenna Port
If you have a Set-top box (a digital receiver) or Recorder, connect the antenna cables to run the antenna signal through the Set-top box and/or Recorder first before it enters the TV. In this way, the antenna and the Set-top box can send possible additional channels to the Recorder to record.
[23] Connecting DevicesAbout ConnectionsHDMI Ports
HDMI Quality
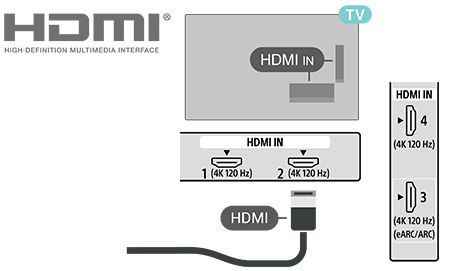
An HDMI connection has the best picture and sound quality. One HDMI cable combines video and audio signals. Use an HDMI cable for High Definition (HD) TV signals.
For best signal quality transfer, use a High speed HDMI cable and do not use an HDMI cable longer than 5 meters.
Copy protection
HDMI ports support HDCP 2.3 (High-bandwidth Digital Content Protection). HDCP is a copy protection signal that prevents copying content from a DVD disc or a Blu-ray Disc. Also referred to as DRM (Digital Rights Management).
HDMI eARC/ARC
Only HDMI 3 on the TV supports HDMI ARC (Audio Return Channel) and HDMI eARC.
If the device, typically a Home Theatre System (HTS), soundbar or AV receiver, also has the HDMI ARC connection, connect it to HDMI 3 on this TV. With the HDMI ARC connection, you do not need to connect the extra audio cable that sends the sound of the TV picture to the HTS. The HDMI ARC connection combines both signals.
HDMI eARC (Enhanced Audio Return Channel) is an advancement over the previous ARC. It covers all ARC features but with higher bandwidth and speed. eARC supports high quality audio transmission up to 192 kHz, 24-bit, uncompressed 5.1 and 7.1, and 32-channel uncompressed audio.
Note
- HDMI eARC is only available on HDMI 3.
Use Ultra High Speed HDMI Cable for eARC. Only one eARC device is available at a time.
HDMI CEC
Connect HDMI CEC-compatible devices to your TV. You can operate them with the TV remote control.
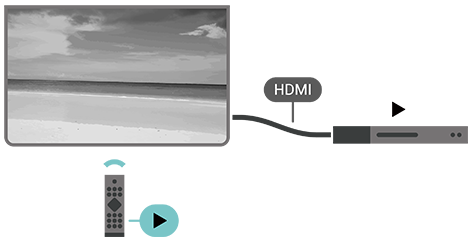
HDMI CEC (Consumer Electronic Control) must be enabled on both the TV and the connected device.
Enable CEC control
Press Dashboard on the remote control, go to [Inputs], scroll down to select [Input settings] and enable [Global CEC control] to allow the TV to control HDMI device.
Device auto power off
Go to [Input settings] and enable [Allow TV to turn off connected devices] to turn off the HDMI devices with the TV.
TV auto power on
Go to [Input settings] and enable [Allow connected devices to turn on TV] to power on the TV with HDMI devices.
Note
- HDMI CEC might not work with devices from other brands.
- The HDMI CEC functionality has different names on different brands. Some examples are: Anynet, Aquos Link, Bravia Theatre Sync, Kuro Link, Simplink and Viera Link. Not all brands are fully compatible. The HDMI CEC branding name examples are property of their respective owners.
[24] Connecting DevicesHome Theatre System (HTS)Connect with HDMI eARC/ARC
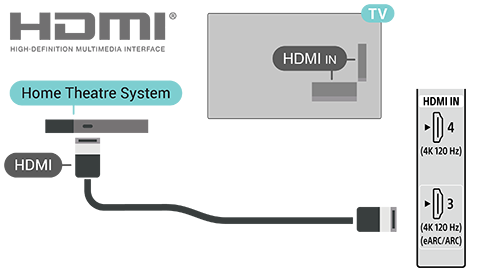
Use an HDMI cable to connect a Home Theatre System (HTS) to the TV. You can connect a Sony Soundbar or an HTS with a built-in disc player.
HDMI eARC/ARC
If your Home Theatre System has an HDMI eARC/ARC connection, you can use HDMI eARC/ARC connection on the TV to connect. With HDMI eARC/ARC, you do not need to connect the extra audio cable. The HDMI eARC/ARC connection combines both signals.
Since HDMI IN 3 (eARC/ARC) on the TV can offer the Audio Return Channel (ARC) signal, the TV can only send the ARC signal to this HDMI connection.
Audio to video synchronisation (sync)
If the sound does not match the video on the screen, you can set a delay on most Home Theatre Systems with a disc player to match the sound with the video.
[25] Connecting DevicesHome Theatre System (HTS)Connect with HDMI
Use an HDMI cable to connect a Home Theatre System (HTS) to the TV. You can connect a Sony Soundbar or an HTS with a built-in disc player.
If the Home Theatre System has no HDMI eARC/ARC connection, add an optical audio cable to send the sound of the TV picture to the Home Theatre System.
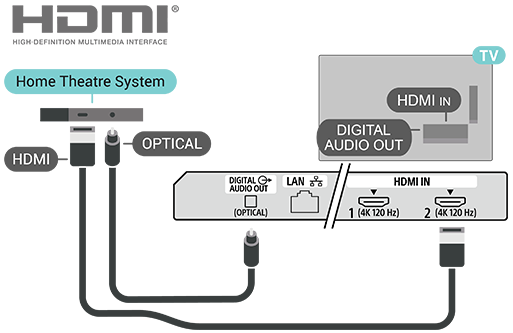
Audio to video synchronisation (sync)
If the sound does not match the video on the screen, you can set a delay on most Home Theatre Systems with a disc player to match the sound with the video.
[26] Connecting DevicesVideo DeviceHDMI
Use a High Speed HDMI Cable for the best picture and sound quality.
For the best signal transfer quality, use a High Speed HDMI Cable not longer than 5 meters, and connect devices supporting HDR to any of the HDMI connections.
Copy protection
HDMI ports support HDCP 2.3 (High-bandwidth Digital Content Protection). HDCP is a copy protection signal that prevents copying content from a DVD disc or a Blu-ray Disc. Also referred to as DRM (Digital Rights Management).
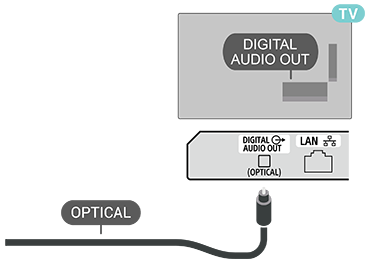
[27] Connecting DevicesAudio DeviceDigital Audio Out - Optical
Audio Out - Optical is a high quality sound connection.
This optical connection can carry 5.1 audio channels. If your device, typically a Home Theatre System (HTS), has no HDMI ARC connection, you can use this connection with the Audio In - Optical connection on the HTS. The DIGITAL AUDIO OUT (OPTICAL) connection sends the sound from the TV to the HTS.
[28] Connecting DevicesUSB Storage Device
You can view photos or play your music and videos from a connected USB flash drive or USB hard drive.
Insert a USB storage device in one of the USB connections on the TV while the TV is switched on.
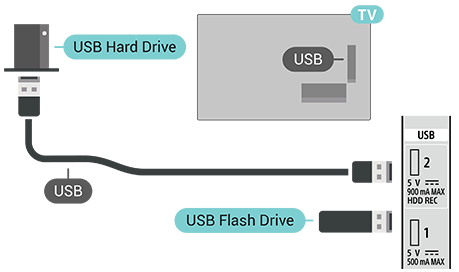
To view files from the USB storage device, you need to add the MMP (MultiMediaPlayer) app to the Home screen first. Press HOME on the remote control, select the Apps icon at the right end of the Apps row. You can also add the MMP app from the Apps page.
To stop watching the USB storage device content, press BACK on the remote control or select another activity. Exit the MMP app before you disconnect the device.
To remove the USB storage device safely
- Press Dashboard on the remote control.
- Scroll down to select your USB storage device and press OK on the remote control.
- Select Eject and press OK on the remote control.
- Wait until the eject procedure is finished and then pull out the flash drive.
Ultra HD on USB
You can view photos in Ultra HD resolution from a connected USB storage device. The TV will downscale the resolution to Ultra HD if the resolution of the photo is higher.
[29] Connecting DevicesVideos, Photos, Music & Text
You can view your photos or play your music and videos from a connected USB storage device.
With the TV switched on, plug in a USB storage device to one of the USB connections.
- Press HOME on the remote control, select MMP (MultiMediaPlayer) from the Apps list and press OK on the remote control.
- Use the Navigation keys on the remote control to select the file type.
- Follow the on-screen instructions to play the files.
[30] Connecting DevicesAvailable devices and settings
HDMI
Video Device
Audio Device
[31] Connecting to a NetworkConnecting your Google TVNetwork and Internet
Home Network
To enjoy the full capabilities of your Google TV, your TV must be connected to the Internet.
Connect the TV to a home network with a high-speed Internet connection. You can connect your TV wirelessly or wired to your network router.
Connect to Network
Wireless Connection
What You Need
To connect the TV to the Internet wirelessly, you need a Wi-Fi router with a connection to the Internet.
Use a high-speed (broadband) connection to the Internet.
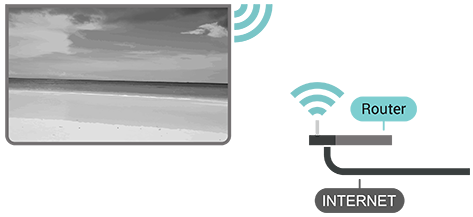
Turn Wi-Fi On or Off
Go to [Dashboard] — [All settings] — [Network and Internet] — [Wi-Fi] to turn on or off.
Make the Connection
Go to [Dashboard] — [All settings] — [Network and Internet] and press OK on the remote control.
- In the list of found networks, select your wireless network. If your network is not in the list because the network name is hidden (you switched off the SSID broadcast of the router), select [Add new network] to enter the network name yourself.
- Follow the on-screen instruction.
- A message will be shown when the connection is successful.
Quick connect to your Wi-Fi
Quick connect helps you to quickly connect to your Wi-Fi by scanning a QR code on your TV screen.
Join a Wi-Fi by scanning the QR code with a mobile device and follow the instructions. Your TV will join the Wi-Fi quickly by the assistance from your mobile device.
Problems
Wireless network not found or distorted
- Microwave ovens, DECT phones or other Wi-Fi 802.11b/g/n devices in your proximity might disturb the wireless network.
- Make sure that the firewalls in your network allow access to the TV’s wireless connection.
- If the wireless network does not work properly in your home, try the wired network installation.
Internet does not work
- If the connection to the router is OK, check the router connection to the Internet.
The PC and Internet connection are slow
- Look in your wireless router’s user manual for information on indoor range, transfer rate and other factors of signal quality.
- Use a high-speed (broadband) Internet connection for your router.
DHCP
- If the connection fails, you can check the DHCP (Dynamic Host Configuration Protocol) setting of the router. DHCP should be switched on.
Wired Connection
What You Need
To connect the TV to the Internet, you need a network router with a connection to the Internet. Use a high-speed (broadband) connection to the Internet.
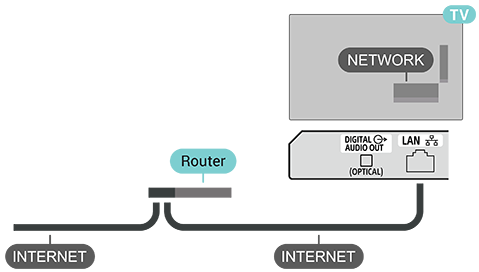
Make the Connection
- Connect the router to the TV with a network cable (Ethernet cable**).
- Make sure that the router is switched on.
- The TV constantly searches for the network connection.
- A message will be shown when the connection is successful.
If the connection fails, you can check the DHCP setting of the router. DHCP should be switched on.
** To fulfill EMC regulations, use a shielded FTP Cat. 5E Ethernet cable.
Other Network Settings
Hotspot & tethering
Go to [Dashboard] — [All settings] — [Network and Internet] — [Hotspot and tethering].
Adjust the Hotspot settings and set the Hotspot password.
Network Priority
Go to [Dashboard] — [All settings] — [Network and Internet] — [Network priority].
Select Ethernet or Wi-Fi for the priority of network connection.
Note
- It is strongly recommended for security purposes to connect your TV to the Internet via a router/modem that includes router functionality. Direct connection of your TV to the Internet may expose your TV to a security threat such as extraction or tampering of content or personal information.
Contact your service provider or network administrator to confirm your network includes router functionality.
[32] Connecting to a NetworkConnecting your Google TVGoogle Account and Profiles
Sign In
To enjoy the full capabilities of your Google TV, you can sign in to Google with your Google Account.
By signing in you will be able to play your favourite games across smartphone, tablet and TV. You will also get customised video and music recommendations on your TV home screen as well as access to YouTube, Google Play and other apps.
Use your existing Google Account to sign in to Google on your TV. A Google Account consists of an email address and a password. If you do not have a Google Account yet, use your computer or tablet to create one (accounts.google.com). To play games with Google Play, you need a Google+ profile. If you did not sign in during the first TV installation, you can always sign in later.
To sign in or manage your Google Accounts after you did the TV installation
- Go to [Dashboard] — [All settings].
- Select [Accounts and profiles] and press OK on the remote control.
- Follow the on-screen instruction to add or manage the accounts.
Kids Profile
Once you have signed a Google Account, you may create a Kids profile for your kids. Kids Profile allows parents to grant their kids access to both general audience TV apps and apps intended for kids. Parents select which apps to install, and can configure bedtime reminders and screen time limits.
Under Kids profile, only granted apps can be accessed and only HDMI connections are allowed to be selected as external sources.
Create a Kids profile
You may use your existing Google Account to sign in to your TV or add an account to create Kids profile.
- Go to [Dashboard] — [All settings].
- Select [Accounts and profiles] and press OK on the remote control.
- Select + [Add a kid] to create a personalised space for your kid.
- During the on boarding process into Kids Profiles, parents may select which apps to install in Kids Profile from the apps on the Play Store that are rated for all ages.
[33] Connecting to a NetworkGoogle CastWhat You Need
If an app on your mobile device has Google Cast, you can cast your app on this TV. On the mobile app, look for the Google Cast icon. You can use your mobile device to control what is on TV. Google Cast works on Android and iOS.
Note
- The Google Cast functionality works only in Google TV Mode and not in Basic TV mode.
Your mobile device must be connected to the same Wi-Fi home network as your TV.
Apps with Google Cast
New Google Cast apps come available every day. You can try it with YouTube, Chrome, Netflix, Photowall… or Big Web Quiz for Chromecast. See also google.com/cast.
Some Google Play products and features are not available in all countries.
Find more information on www.support.google.com/googletv.
[34] Connecting to a NetworkGoogle CastCast to Your TV
To cast an app to the TV screen
- On your smartphone or tablet, open an app that supports Google Cast.
- Select the Google Cast icon.
- Select the TV you would like to cast to.
- Press Play on your smartphone or tablet. What you selected should start playing on the TV.
[35] Connecting to a NetworkAppsAbout Apps
You can find your favourite Apps on the Apps row in the Home menu.
Similar to apps on your smartphone or tablet, the apps in your TV offer specific functions for an enriched TV experience such as YouTube, games, video stores or weather forecasts.
Apps can come from the Google Play™ Store. To get you started, some practical apps are pre-installed on your TV.
To install apps from the Google Play™ Store, the TV must be connected to the Internet. You must sign in with a Google Account to use the Google Play apps and Google Play™ Store.
[36] Connecting to a NetworkAppsStart or Stop an App
You can start an app from the Home screen.
To start an app
- Press HOME on the remote control.
- Move to Apps tab or Your apps row, select the app you want and press OK on the remote control.
- To stop an app, press BACK on the remote control or stop the app with its dedicated exit/stop button.
[37] Connecting to a NetworkAppsManage Apps
If you stop an app and return to the Home menu, the app is not really stopped. The app is still running in the background to be readily available when you start it again. To run fluently, most apps need to save some data in the cache memory of the TV. It might be good to stop an app completely or clear the cache data of a particular app to optimise the overall performance of apps and to keep memory usage low on your TV. Also, it is best to uninstall apps that you are not using anymore. You can go to [Dashboard] — [All settings] — [Apps] — [See all apps] or [Unused apps] to list your installed or used apps.
For each installed app, you can also set the permissions for Manage updates, App permissions, Special app access and Security.
Find more information on www.support.google.com/googletv
[38] SettingsDashboard
Press Dashboard on the remote control to select one of the menus below, then press OK on the remote control.
[All settings]
Opens the full settings menu to customise your TV experience.
[Screensaver]
Starts the screensaver immediately to protect or personalise your screen.
[Inputs]
Changes the video input source (e.g., HDMI devices, cable box).
[Display]
Adjusts the picture mode, aspect ratio, and screen brightness.
[Sound]
Adjusts audio output, sound modes, and volume preferences.
[Wi-Fi]
Manages internet connections and network status.
[Bluetooth]
Pairs or manages accessories like headphones, soundbars, or controllers.
[Accessibility]
Enables assistive features like subtitles, voice guides, or high contrast.
[39] SettingsPicture SettingsPicture Mode
To select a picture mode
Go to [Dashboard] — [All settings] — [Display & Sound] — [Display] — [Picture mode].
For easy picture adjustment, you can select a preset picture mode.
- [User] – The picture preference you set during the previous setup.
- [Standard] – The most energy-saving setting. This is the factory setting.
- [Vivid] – Ideal for daylight viewing.
- [Cinema] – Ideal for watching movies.
- [Game] – Ideal for playing games.
- [Energy saving] – Ideal for saving energy.
[40] SettingsPicture SettingsOther Picture Settings
Go to [Dashboard] — [All settings] — [Display & Sound] — [Display] — [Picture mode], and scroll down to customise advanced settings for the selected picture mode.
[Auto Brightness]
Optimises screen brightness automatically according to ambient light conditions to comfort your eyes.
[Brightness]
Adjusts the overall picture brightness according to your preference.
[Black Level]
Adjusts the black level of the picture to enhance dark scenes and shadow details.
[Contrast]
Adjusts the contrast level to make the picture colours more vivid and lifelike.
[Colour]
Adjusts the colour intensity to make the picture colours richer or more natural.
[HUE]
Adjusts the colour tones between green and red phases to achieve accurate skin tones.
[Sharpness]
Adjusts the picture detail and clarity to make fine lines and edges look sharper.
[OLED]
Accesses settings related to the OLED panel.
-
[OLED Compensation]:
Performs OLED panel noise cleaning to maintain screen uniformity. This operation takes approximately 1.5 hours, and the TV must remain in standby mode during the process.
-
[Manual OFF-RS Compensation]:
Calibrates the screen to maximise picture quality and extend panel lifespan. The process takes about 15 minutes to complete after the TV enters standby mode.
-
[Pixel shift]:
Shifts the pixel positions periodically to reduce pixel stress and protect the OLED screen from image retention (burn-in) caused by displaying still images.
Advanced video
Select [Advance settings] to access additional video options.
-
[Picture off]:
Turns off the TV screen while keeping the audio playback active. Press any button on the remote control to wake up the screen and resume normal viewing.
-
[Colour temperature]:
Adjusts the colour tones of the picture. You can select a preset option or customise the settings to your preference.
-
[Dolby Vision notification]:
Enables or disables on-screen notifications when Dolby Vision content is detected.
-
[DNR]:
Digital Noise Reduction. Filters out and reduces unwanted image noise for a cleaner picture.
-
[MPEG NR]:
MPEG Noise Reduction. Improves picture quality by reducing block noise and mosquito noise without compromising the picture resolution.
-
[Adaptive Luma control]:
Enhances contrast dynamically by automatically adjusting the luminance levels of the picture signal.
Note
- This feature is unavailable when PC Mode is turned on.
-
[Local contrast control]:
Enhances contrast levels in specific localised areas of the image for greater depth.
-
[Dynamic colour booster]:
Optimises colour levels automatically based on the content, delivering a more realistic and vivid visual experience.
-
[DI film mode]:
Automatically detects interlaced, film-based sources, analysing the content to reconstruct each original frame for smoother, more natural motion playback.
-
[Blue stretch]:
Adjusts the colour temperature by brightening white areas, making whites appear more brilliant and cooler.
-
[Gamma]:
Adjusts the light and dark balance of the picture. (Recommended for expert users.)
-
[Game]:
Optimises screen settings and reduces input lag for a highly responsive gaming experience.
-
[ALLM]:
Auto Low Latency Mode. Automatically switches to low-latency mode when gaming content is detected, ensuring smooth and uninterrupted gameplay.
-
[PC Mode]:
Displays the original picture with pixel-to-pixel precision, ideal for using the TV as a computer monitor.
-
[MJC]:
Motion Judder Cancellation. Estimates and inserts missing frames into video playback, delivering a significantly smoother and fluid moving image.
-
[HDMI RGB range]:
The full RGB range allows for true black and true white in images. The limited RGB offers a narrower 16-235 range which results in a slight reduction in image quality, video levels and output range.
-
[Colour space]:
Changes the range of colours reproduced on the screen to match the source video signal.
-
[AISR]:
AI Super Resolution. Uses intelligent processing to upscale lower-resolution content into sharp, near-4K picture quality.
-
[De-contour]:
Smooths out colour banding and removes harsh contour lines to create seamless colour gradients.
-
[11-point white balance correction]:
Fine-tunes the white balance with high precision across 11 different levels based on the selected colour temperature.
-
[AI contrast]:
Enhances contrast dynamically by analysing the bright and dark areas of each scene using artificial intelligence.
[Reset to default]
Resets all current picture settings back to their factory default values.
[41] SettingsPicture SettingsScreen
If the picture is not filling the entire screen and black bars appear at the top, bottom or sides of the screen, you can adjust the picture to fill the screen completely.
To select one of the basic settings to fill the screen
Go to [Dashboard] — [All settings] — [Display & Sound] — [Screen].
[Automatic]
Automatically zooms in the picture to fit the screen with original aspect ratio. No visible content will be lost.
There are more setting options that only available with specific input source or video format.
[Super zoom]
Remove the black bars on the sides of 4:3 broadcasts. Not recommended for HD or PC.
[4:3]
Display the classic 4:3 format.
[Movie expand 14:9]
Scale 4:3 format to 14:9. Not recommended for HD or PC.
[Movie expand 16:9]
Scale 4:3 format to 16:9. Not recommended for HD or PC.
[Wide screen]
Stretches the picture to a 16:9 format.
[Full]
Automatically enlarges the picture to fill the screen. Picture distortion is minimal, subtitles remain visible. Not suitable for PC input. Some extreme picture content can still show black bars. Picture content aspect ratio may change.
[Unscaled]
Provide maximum detail for PC.
[42] SettingsSound SettingsBasic Settings
Go to [Dashboard] — [All settings] — [Display & Sound] — [Sound] — [Basic settings] and press OK on the remote control.
[Balance]
Adjust the sound balance according to your personal preference.
[Surround sound]
Switch on or off the surround sound.
[Equaliser detail]
Adjust the level of equaliser for your preference.
[Auto volume control]
Enable to adjust large sound level differences between channels and inputs automatically.
[43] SettingsSound SettingsOther Sound Settings
Go to [Dashboard] — [All settings] — [Display & Sound] — [Sound] and press OK on the remote control.
[Dolby Audio processing] and settings
When [Dolby Audio processing] is turned on, the related [Dolby Audio processing settings] will be available to adjust. You can switch [Volume leveler], [Surround virtualiser] or [Dolby Atmos] on or off.
[DTS Virtual:X] and settings
When [DTS Virtual:X] is turned on, the related [DTS Virtual:X settings] will be available to adjust. You can switch [TruVolumeHd] and [Dialogue clarity] on or off.
[DTS DRC]
Turn on the dynamic rage control for the sound volume.
[Speakers]
Turn on or off the sound output through TV’s speakers.
[eARC]
Turn off or set to automatically turn on the eARC connections functions.
[Downmix mode]
Select the mode that converts multichannel audio into a lower number of channels.
[Dialog enhancer]
Turn off or set the level of boosting the volume and clarity of the dialogue contents.
[Reset to Default]
Reset the current sound settings to default.
[44] SettingsSound SettingsAudio Output
Go to [Dashboard] — [All settings] — [Display & Sound] — [Audio output] and press OK on the remote control.
[Digital output]
Digital output settings are available for optical and HDMI ARC/eARC sound signals.
Set the audio out signal of the TV to fit the sound capabilities of the connected Home Theatre System.
[Digital output delay]
For some Home Theatre Systems you might need to adjust the audio sync delay to synchronise the audio to the video. Select 0 if a sound delay is set on your Home Theatre System.
[Bluetooth delay]
To adjust the audio sync delay to synchronise the audio to the video for Bluetooth devices.
[Audio output device]
Set the TV to play the sound on TV or on the connected audio system.
You can select where you want to hear the TV sound and how you want to control it.
- Select [Auto] to automatically apply the audio output devices.
- If you select [TV speaker], the TV speakers are always on.
- Select [HDMI ARC], [HDMI eARC], [BT], [HP], [SPDIF] to set the audio output to connected devices.
- If you select [SPK + BT], [SPK + HP] or [SPK + SPDIF], the remote control volume keys adjust the volume of external devices, and the TV volume is adjusted in the TV Speaker Volume module. The [MultiOutput Spk Volume] setting is also available to adjust the mixed volume.
[45] SettingsSystem SettingsPower and Energy Settings
Go to [Dashboard] — [All settings] — [System] — [Power and energy].
[Shut-off timer]
Set the time to turn off TV display automatically to save energy. The time setting can be set for [When inactive], [When watching] or [Countdown from now].
[Power on behavior]
Set the TV to stay on the [Google TV home screen] or [Last used input] when the TV is powered on.
[Scheduled power on/off]
Set the type and time to automatically turn on or turn off the TV.
[Advanced settings]
Turn on/off the [Standby light] or set the [Power LED brightness].
[46] SettingsSystem SettingsOther System Settings
Go to [Dashboard] — [All settings] — [System].
[Ambient Screensaver]
To display a slideshow of Google-provided photos or images from Google Photos when the TV is idle. This feature can be activated manually by pressing the BACK key on the remote control in the home launcher, or it can be initiated automatically after the TV has been idle for a certain period.
[About]
Displays information about the TV.
Here, you can reset your TV.
[Date and time]
Configures the current time and auto clock display.
[Language]
Selects the menu language. The selected menu language will also set the voice recognition language.
[Keyboard]
Configures the settings of the on-screen keyboard.
[Storage]
Changes the settings related to data storage.
[System sounds]
Configures the system sounds.
[Restart]
Restarts the TV.
[47] SettingsAccessibility Settings
Go to [Dashboard] — [All settings] — [Accessibility].
With the help of Accessibility functions, the TV is prepared for use by deaf, hard-of-hearing, blind or partially sighted people.
[Text to speech]
Set to convert text into speech for blind or partially sighted people.
[Captions]
Change the settings used to display captions.
[High contrast text]
Turn on to display text with higher contrast for easier reading.
[Accessibility shortcut]
Quick access to Accessibility settings.
There are more services provided by Google, such as [TalkBack (Screen reader)], [Text scaling], [Colour correction], [Key repeat delay], [Switch Access] to help make your TV become more accessible. To find more information about the services, please visit www.support.google.com/googletv.
[48] SettingsRemote and AccessoriesBluetooth Devices
Pair Accessory
Position the Bluetooth device within a distance of 5 meters from the TV. Read the user manual of the device for specific information on pairing and on wireless range. Make sure the Bluetooth setting on TV is switched on.
Once a Bluetooth device is paired, you can select it to play the TV sound. When a device is paired, you do not need to pair it again unless you remove the device.
To pair a Bluetooth device with the TV
- Switch on the Bluetooth device and place it within range of the TV.
- Go to [Dashboard] — [All settings] — [Remotes and accessories] — [Pair accessory].
- Follow the instructions on the screen. You will pair the device with the TV and the TV will store the connection. You might need to unpair a paired device first if the maximum number of paired devices was reached.
- Press ❮ (left) on the remote control repeatedly if necessary to close the menu.
Device Operation
To connect or disconnect a Bluetooth device
- Go to [Dashboard] — [All settings] — [Remotes and accessories].
- In the list, select a Bluetooth device.
- Select [Connect] or [Disconnect] to connect or disconnect a Bluetooth device.
- Press ❮ (left) on the remote control repeatedly if necessary to close the menu.
To rename a Bluetooth device
- Go to [Dashboard] — [All settings] — [Remotes and accessories].
- In the list, select a Bluetooth device.
- Select [Rename] to rename a Bluetooth device.
- Press ❮ (left) on the remote control repeatedly if necessary to close the menu.
You can connect or disconnect a wireless Bluetooth device. You can also remove a Bluetooth device further. If you remove a Bluetooth device, the device will be unpaired.
To remove a Bluetooth device
- Go to [Dashboard] — [All settings] — [Remotes and accessories].
- In the list, select a Bluetooth device.
- Select [Forget] to remove the Bluetooth device.
- Press ❮ (left) on the remote control repeatedly if necessary to close the menu.
To view information about a Bluetooth device
- Go to [Dashboard] — [All settings] — [Remotes and accessories].
- In the list, select a Bluetooth device.
- The information of the Bluetooth device is listed on the bottom.
- Press ❮ (left) on the remote control repeatedly if necessary to close the menu.
[49] SettingsRemote and AccessoriesRemote Control Settings
Pairing the Remote Control
Pairing or pairing again
When you start the initial TV setup, you will be prompted to pair the remote control by pressing the HOME and BACK buttons on the remote control simultaneously. A confirmation message will appear when the pairing is successful.
If the pairing is lost, you can pair it again by pressing the HOME and BACK buttons on the remote control at the same time again.
Customisable Button
Set up customisable button
You can assign or re-assign a feature to the button:
- Make sure the remote control is paired with the TV.
- Go to [Dashboard] — [All settings] — [Remotes and accessories].
- Select [Set up customisable button] and press OK on the remote control.
- You can select a favourite app from the available list and assign it to the customisable button.
- Alternatively, you can assign the Device input menu to the customisable button.
- Press ❮ (left) on the remote control repeatedly if necessary to close the menu.
[50] SettingsAvailable Settings
Dashboard
Accessibility
[51] Software & SpecificationsSoftware Updates
Update from Internet
If the TV is connected to the Internet, you may receive a message to update the TV software. You need a high-speed (broadband) Internet connection. If you receive this message, we recommend you to carry out the update.
- Go to [Dashboard] — [All settings] — [System] — [About] — [System update] and press OK on the remote control.
- Follow the instructions on screen.
Check from the Home page
- Press HOME on the remote control.
- Select the [Notification] icon from the top-right corner and press OK on the remote control.
[52] Software & SpecificationsSoftware Version
To view the current TV software version
- Go to [Dashboard] — [All settings] — [System] — [About].
- The version, release notes and creation date are shown. Also, the Netflix ESN Number is shown if available.
- Press BACK on the remote control to close the menu.
[53] Software & SpecificationsOperating System
Google TV OS version:
Android 14
[54] Software & SpecificationsConnectivity
TV Side
- USB 2 - USB 3.2 Gen 1
- USB 1 - USB 2.0
- HDMI 4 input - 4K 120 Hz
- HDMI 3 input - 4K 120 Hz - ARC/eARC
TV Bottom
- DIGITAL AUDIO OUT (OPTICAL)
- LAN (10BASE-T/100BASE-TX)
- Antenna (aerial)/cable
- HDMI 1 input - 4K 120 Hz
- HDMI 2 input - 4K 120 Hz
[55] Help and SupportTroubleshootingSwitch On and Remote Control
The TV does not switch on
- Disconnect the AC power cord (mains lead) from the power outlet. Wait for one minute then reconnect it.
- Make sure that the AC power cord (mains lead) is securely connected.
Creaking sound when starting up or switching off
When you are switching the TV on, off or to standby mode, you hear a creaking sound from the TV chassis. The creaking sound is due to the normal expansion and contraction of the TV as it cools and warms up. This does not affect the TV’s performance.
TV does not respond to the remote control
The TV requires some time to start up. During this time, the TV does not respond to the remote control or TV controls. This is normal behaviour.
If the TV continues to be unresponsive to the remote control, you can check if the remote control is working by means of a mobile phone camera. Put the phone in camera mode and point the remote control to the camera lens. If you press any key on the remote control and you notice the infra red LED flicker through the camera, the remote control is working. The TV needs to be checked.
If you do not notice the flickering, the remote control might be broken or its batteries are low.
This method of checking the remote control is not possible with remote controls which are wirelessly paired with the TV.
The TV returns to standby mode after displaying the Sony startup screen
When the TV is in standby mode, a Sony startup screen is displayed, then the TV returns to standby mode. This is normal behaviour. When the TV is disconnected from and reconnected to the power supply, the startup screen is displayed at the next startup. To switch on the TV from standby mode, press the power button on the remote control or on the TV.
The standby light keeps on blinking
Disconnect the AC power cord (mains lead) from the power outlet. Wait 5 minutes before you reconnect the AC power cord (mains lead). For troubleshooting information, you can also refer to “Frequently Asked Questions” in our support site below.
[56] Help and SupportTroubleshootingChannels
No digital channels found during the installation
See the technical specifications to make sure that your TV supports the digital broadcast system used in your country. Make sure that all cables are properly connected and that the correct network is selected.
Previously installed channels are not in the channel list
Make sure that the correct channel list is selected.
[57] Help and SupportTroubleshootingPicture
No picture / distorted picture
- Make sure that the antenna is properly connected to the TV.
- Make sure that the correct device is selected as the display source.
- Make sure that the external device or source is properly connected.
Sound but no picture
- Change to other video sources and then change back to current source, then do picture style restore in Picture settings. You may also perform Factory reset in General settings option.
Poor antenna reception
- Make sure that the antenna is properly connected to the TV.
- Loud speakers, unearthed audio devices, neon lights, high buildings and other large objects can influence reception quality. If possible, try to improve the reception quality by changing the antenna direction or moving devices away from the TV.
- If reception on only one channel is poor, fine-tune this channel with Manual Installation.
Poor picture from a device
- Make sure that the device is connected properly. Make sure the device’s output video setting is the highest possible resolution if applicable.
- Restore picture style or change to other picture styles.
Picture does not fit the screen
- Change to a different picture format.
- Change the [Screen] setting to [Automatic].
Picture position is incorrect
- Picture signals from some devices may not fit the screen correctly. Check the signal output of the connected device.
- Change the [Screen] setting to [Automatic].
Computer picture is not stable
- Make sure that your PC uses the supported resolution and refresh rate.
- Make sure that the HDMI video source is not HDR content.
[58] Help and SupportTroubleshootingSound
No sound or poor sound quality
If no audio signal is detected, the TV automatically switches the audio output off. This is not a malfunction.
- Make sure that the sound settings are correctly set.
- Make sure that all cables are properly connected.
- Make sure that the volume is not muted or set to zero.
- Make sure that the TV audio output is connected to the audio input on the Home Theatre System. Sound should be heard from the Home Theatre System speakers.
- Some devices may require you to manually enable the HDMI audio output. If HDMI audio is already enabled, but you still do not hear any audio, try changing the digital audio format of the device to PCM (Pulse Code Modulation). Refer to the documentation accompanying your device for instructions.
[59] Help and SupportTroubleshootingHDMI and USB
HDMI
- Note that the HDCP (High-bandwidth Digital Content Protection) support can delay the time taken for a TV to display content from an HDMI device.
- If the TV does not recognise the HDMI device and no picture is displayed, switch the source from one device to another and back again.
- If the picture and sound of a device connected to HDMI is distorted, connect the device to another HDMI port on TV and restart your source device.
- If there are intermittent sound disruptions, make sure that output settings from the HDMI device are correct.
- If you use an HDMI-to-DVI adapter or an HDMI-to-DVI cable, make sure that an additional audio cable is connected to AUDIO IN (mini-jack only), if available.
Photos, videos and music from a USB device are not displayed/detected
- Make sure that the USB storage device is set to Mass Storage Class compliant, as described in the storage device’s documentation.
- Make sure that the USB storage device is compatible with the TV.
- Make sure that the audio and picture file formats are supported by the TV.
Glitchy playback of USB files
- The transfer performance of the USB storage device may limit the data transfer rate to the TV which causes poor playback.
[60] Help and SupportTroubleshootingNetwork
Wi-Fi network is not found or distorted
- Microwave ovens, DECT phones or other Wi-Fi 802.11b/g/n devices in your proximity might disturb the wireless network. Move the devices away from the TV.
- Make sure that the firewalls in your network allow access to the TV’s wireless connection.
- If the wireless network does not work properly in your home, try the wired network installation.
The Internet is not working
- If the connection to the router is OK, check the router connection to the Internet.
- Your router (broadband router) may be incorrectly setup to connect to your Internet service provider (such as an incorrect PPPoE setting). To setup your router correctly, refer to the router’s instruction manual or website, or consult the router’s manufacturer. If you are uncertain about the setup information of your provider (such as your account name and password), consult your provider.
- The TV may also be unable to connect to the Internet if the time on your TV is incorrect. Check the time settings and update them if necessary.
The PC and Internet connections are slow
- Look in your wireless router’s user manual for information on indoor range, transfer rate and other factors of signal quality.
- Use a high-speed (broadband) Internet connection for your router.
DHCP
- If the connection fails, you can check the DHCP (Dynamic Host Configuration Protocol) setting of the router. DHCP should be switched on.
[61] Help and SupportTroubleshootingBluetooth
Unable to pair
- Make sure that the device is in pairing mode. Read the user manual of the device.
- Keep the wireless speaker as close to the TV as possible.
- Trying to pair several devices with the TV at the same time may not work.
Bluetooth lost connection
- Always position the wireless speaker within a range of 5 meters from the TV.
Bluetooth Audio and Video synchronisation
- Before you purchase a wireless Bluetooth speaker, check about its Audio to Video synchronisation quality, commonly known as “lip sync”. Not all Bluetooth devices perform correctly. Ask your dealer for advice.
[62] Help and SupportSupport Site
For the latest information and Online Help Guide, please visit the Sony support website:
[63] Help and SupportCopyrights

-
The terms HDMI, HDMI High-Definition Multimedia Interface, HDMI trade dress and the HDMI Logos are trademarks or registered trademarks of HDMI Licensing Administrator, Inc.

-
The Bluetooth® word mark and logos are registered trademarks owned by Bluetooth SIG, Inc. and any use of such marks by Sony Group Corporation and its subsidiaries is under license.

-
For DTS patents, see https://xperi.com/dts-patents/. Manufactured under license from DTS, Inc. and its affiliates. DTS, DTS:X, the DTS:X logo, Virtual:X, and the DTS Virtual:X logo are registered trademarks or trademarks of DTS, Inc. and its affiliates in the United States and/or other countries. © DTS, Inc. and its affiliates. ALL RIGHTS RESERVED.

-
Dolby, Dolby Vision, Dolby Atmos, Dolby Audio, and the double-D symbol are trademarks of Dolby Laboratories Licensing Corporation. Manufactured under license from Dolby Laboratories. Confidential unpublished works. Copyright © 1992-2024 Dolby Laboratories. All rights reserved.
-
Wi-Fi CERTIFIED™ are registered trademarks or trademarks of Wi-Fi Alliance.
-
Google TV is the name of this device's software experience and a trademark of Google LLC. Google, YouTube, Google Cast, Google Play, and other marks are trademarks of Google LLC.
-
BRAVIA and
 logo are trademarks or registered marks of Sony Group Corporation or its affiliates.
-
All other trademarks are the property of their respective owners.
Note
- The availability of each service depends on your region/country.
[64] Help and SupportDisclaimer
Disclaimer regarding services and/or software offered by third parties
Services and/or software offered by third parties may be changed, suspended, or terminated without prior notice. Sony does not bear any responsibility in these sorts of situations.