Getting Started
About the Help Guide
Installation
Connecting terminal
How the LEDs light up
Remote control
Using the LCD Monitor/LCD Display with Other Devices
Connecting a Bluetooth device (such as Bluetooth headphones)
Connecting to a Network
Connecting to a network using a LAN cable
Connecting to a network using Wi-Fi
Pro mode
Settings
Using the Quick Settings
Using the Eco Dashboard
Inputs
Display & Sound
Network & Internet
Privacy
Apps
System
Accessibility
Remotes & accessories
Available Settings
Pro settings
Control functions
Software
HTML5 Application
RS-232C
IP
Troubleshooting
Reset (restart) your LCD Monitor/LCD Display
Others
Support Site
Factory data reset
Specifications
Trademark information
[1] Getting StartedAbout the Help Guide
This Help Guide explains how to use this LCD Monitor/LCD Display. You can also refer to the Setup Guide for descriptions about LCD Monitor/LCD Display installation, and the Reference Guide for information such as specifications, and wall mounting of this LCD Monitor/LCD Display.
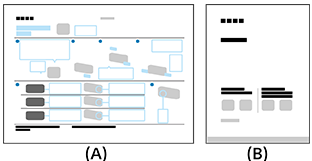
(A) Setup Guide
(B) Reference Guide
[2] Getting StartedInstallation
Refer to the paper manuals supplied with your LCD Monitor/LCD Display for installation, terminal, and wall mounting information.
Manuals are available on the support site.
[3] Getting StartedConnecting terminal
The availability of terminals and types or shapes of connectors may vary depending on your LCD Monitor/LCD Display.
| Terminal label | Description |
|---|---|
|
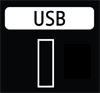
USB Connects to Digital still camera/Camcorder/USB storage media. Note
|
|
Connects to the headphone jack to listen to sound from the LCD Monitor/LCD Display. Note
|
|
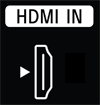
HDMI IN Connects to the HDMI device/PC. The HDMI interface can transfer the digital video and audio on a single cable. To enjoy high quality 4K contents, connect a Premium High Speed HDMI™ Cable(s) and follow the instructions displayed on the screen to set the [HDMI signal format] of the HDMI IN port. (HDCP 2.3-compatible) |
|
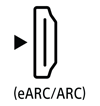
HDMI IN (eARC/ARC) Connects to an audio system with eARC/ARC/HDMI device. To connect an audio system that supports eARC (Enhanced Audio Return Channel) or ARC (Audio Return Channel), connect to the HDMI port labeled “eARC/ARC” on the LCD Monitor/LCD Display. It is a feature that sends audio to an audio system that supports eARC/ARC through an HDMI cable. Use the HDMI cable with Ethernet to connect audio system with eARC. HintThere may be three tactile dots, next to the HDMI input terminal depending on your model. Use them as a guide during installation. |
|
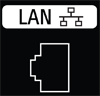
LAN Connect to a Router. |
|
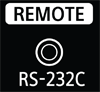
REMOTE RS-232C Connects to a Home Controller. Terminal for serial communication. For details, see “RS-232C”.
|


[4] Getting StartedHow the LEDs light up

(A) Operational response LED (At the left side of the LCD Monitor/LCD Display.)
Operational response LED
-
Turns “on” in white
- When the LCD Monitor/LCD Display is turning on.
- When receiving signals from the remote control.
-
“Blinks” slowly in white
- When updating the software using a USB storage device.
- When pressing the Power button on the remote control while the LCD Monitor/LCD Display is starting up.
To turn off the white operational response LED
- Press the OPTIONS button on the remote control, then select [Settings] — [System] — [LED indicator], disable [Operational response].
Remote control
The included remote control, as well as the layout of the buttons and the button names, vary depending on your model/country/region.
Upper buttons on the remote control
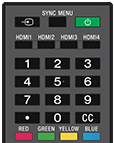
![]() (Input)
(Input)
Display and select the input source, etc.
SYNC MENU
Display the BRAVIA Sync Menu.
![]() (Power)
(Power)
Turns on or switches to standby/networked standby mode.
HDMI 1/2/3/4
Switch to the HDMI input.
Number Button/・(Dot)
Use with the 0-9 buttons to select digital channels.
CC
Turn subtitles on or off (when the feature is available).
Color buttons
Execute corresponding function at that time.
Lower buttons on the remote control
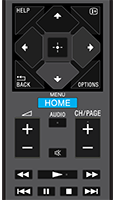
HELP
Display the Help menu.
![]() (Info/Text reveal)
(Info/Text reveal)
Display information.
 /BACK
/BACK
Return to the previous screen.
OPTIONS
Displays a list of functions that can be used at that time.
![]() (Up) /
(Up) / ![]() (Down) /
(Down) / ![]() (Left) /
(Left) / ![]() (Right) /
(Right) / ![]() (Enter) (Navigation D-Pad)
(Enter) (Navigation D-Pad)
On screen menu navigation and selection.
HOME/MENU
Display the Home menu.
![]() +/- (Volume)
+/- (Volume)
Adjust the volume.
AUDIO
Select multilingual source sound or dual sound for the program currently being viewed (depending on program source).
![]() (Mute)
(Mute)
Mute the sound. Press again to restore the sound.
Hint
- The accessibility shortcut service can be turned on or off by pressing and holding
 (Mute) for 3 seconds.
CH/PAGE +/-
Press to change a channel or a page.
 (Fast rewind) /
  (Play) /
  (Fast forward) /
  (Previous search) /
  (Pause) /
  (Stop) /
  (Next search)
Operate media contents on the LCD Monitor/LCD Display and connected BRAVIA Sync-compatible device.
[6] Using the LCD Monitor/LCD Display with Other DevicesConnecting a Bluetooth device (such as Bluetooth headphones)
To pair the LCD Monitor/LCD Display with a Bluetooth device
-
Turn the Bluetooth device such as Bluetooth headphones on and put it in pairing mode.
To put your Bluetooth device in pairing mode, refer to the instruction manual of the device.
-
Press the OPTIONS button on the remote control, then select [Settings] — [Remotes & accessories] — [Pair accessory] to put the LCD Monitor/LCD Display in pairing mode.
Available Bluetooth devices will be displayed.
-
Select the desired device, then follow the on-screen instructions.
If you are prompted to enter a passcode, refer to the instruction manual of the device.
After pairing is completed, the device connects to the LCD Monitor/LCD Display.
Hint
-
To output sound from the LCD Monitor/LCD Display speakers and Bluetooth headphones or speakers simultaneously, press the OPTIONS button on the remote control and select [Audio output] while the Bluetooth headphones or speakers are paired. Then, set the following functions from the items that are displayed.
- For [Speakers], select [Built-in speakers].
- For [Bluetooth device], select the paired Bluetooth device from which you want to output sound.
Note
- When sound is output from the LCD Monitor/LCD Display speakers and Bluetooth headphones or speakers simultaneously, [Voice Zoom] will not be available.
To connect to a paired Bluetooth device
-
Press the OPTIONS button on the remote control, then select [Settings] — [Remotes & accessories].
-
Select a paired but unconnected device.
-
Select [Connect].
Note
- When a sound bar and the LCD Monitor/LCD Display are connected through Bluetooth, connect the external input device such as a Blu-ray/DVD recorder to the LCD Monitor/LCD Display.
[7] Connecting to a NetworkConnecting to a network using a LAN cable
A wired LAN connection allows you to access the Internet and your home network.
Make sure to connect to the Internet or home network via a router.
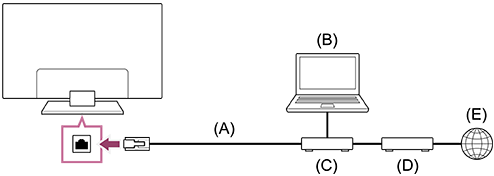
(A) LAN cable
(B) Computer
(C) Router
(D) Modem
(E) Internet
-
Set up your LAN router.
For details, refer to the instruction manual of your LAN router, or contact the person who set up the network (network administrator).
Note
- It is strongly recommended for security purposes to connect your LCD Monitor/LCD Display to the Internet via a router/modem that includes router functionality. Direct connection of your LCD Monitor/LCD Display to the Internet may expose your LCD Monitor/LCD Display to a security threat such as extraction or tampering of content or personal information.
Contact your service provider or network administrator to confirm your network includes router functionality. - The network-related settings that are required may vary depending on the Internet service provider or router. For details, refer to the instruction manuals provided by the Internet service provider or those supplied with the router. You can also contact the person who set up the network (network administrator).
- Depending on the operating environment of the network, connection speed may differ. The communication rate and quality are not guaranteed.
[8] Connecting to a NetworkConnecting to a network using Wi-Fi
The built-in wireless LAN device allows you to access the Internet and enjoy the benefits of networking in a cable-free environment.
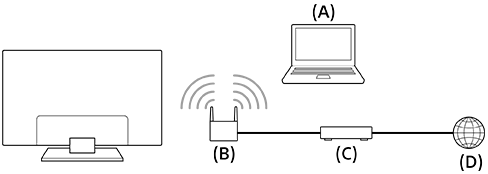
(A) Computer
(B) Wireless router
(C) Modem
(D) Internet
-
Set up your wireless router.
For details, refer to the instruction manual of your wireless router, or contact the person who set up the network (network administrator).
-
Press the OPTIONS button on the remote control, then select [Settings] — [Network & Internet].
- Select a network you want to connect to and set the password.
To turn off the built-in wireless LAN
-
To disable [Wi-Fi], press the OPTIONS button on the remote control, then select [Settings] — [Network & Internet] — [Wi-Fi].
Hint
- For smooth video streaming:
- Change the setting of your wireless router to a high-speed networking standard such as 802.11n, 802.11ac or 802.11ax if possible.
For details on how to change the setting, refer to the instruction manual of your wireless router, or contact the person who set up the network (network administrator). - If the above procedure does not deliver any improvement, change the setting of your wireless router to 5GHz, which may help improve the video streaming quality.
- The 5GHz band may not be supported depending on your region/country. If the 5GHz band is not supported, the LCD Monitor/LCD Display can only connect to a wireless router using the 2.4GHz band.
- Change the setting of your wireless router to a high-speed networking standard such as 802.11n, 802.11ac or 802.11ax if possible.
Note
- It is strongly recommended for security purposes to connect your LCD Monitor/LCD Display to the Internet via a router/modem that includes router functionality. Direct connection of your LCD Monitor/LCD Display to the Internet may expose your LCD Monitor/LCD Display to a security threat such as extraction or tampering of content or personal information.
Contact your service provider or network administrator to confirm your network includes router functionality. - The network-related settings that are required may vary depending on the Internet service provider or router. For details, refer to the instruction manuals provided by the Internet service provider or those supplied with the router. You can also contact the person who set up the network (network administrator).
- If you select the [Show password] option in the password entry screen, the exposed password may be seen by other individuals.
Pro mode
In [Pro mode], you can use various convenient functions for professional use. Here, we introduce how to change to [Pro mode] and typical functions of [Pro mode].
Modes
Normal mode: This is the mode to configure [Settings], [Pro settings], and install software.
Pro mode: This is the operation mode for professional use where you can use the [Pro mode] functions.
How to change the mode
When the LCD Monitor/LCD Display is in Normal mode
Go to [Home] → [Pro settings], then select [Start Pro mode].
When the LCD Monitor/LCD Display is in the Pro mode
Initially, you cannot change the mode from [Pro settings] while the LCD Monitor/LCD Display is in Pro mode. If you want to change the mode from [Pro settings], go to [Pro settings] → [Apps] and set [Pro settings] to [Enable] under Normal mode.
[10] SettingsUsing the Quick Settings
If you press the OPTIONS button on the remote control, you can quickly access features such as [Picture & Sound], [Content type], [Picture mode], [Sleep timer], and [Picture Off] on the current screen, and settings such as [Speakers] depending on the connected devices. You can also display [Settings] from [Quick Settings].
Note
- The menus displayed in the LCD Monitor/LCD Display settings vary depending on your model/region/country.

- Press the OPTIONS button on the remote control.
- Move the focus to change a setting or select it.
To change the settings that are displayed
- Press the OPTIONS button on the remote control.
- Move the focus left or right, and select
 (Edit).
 - Select the desired setting.
- Select [Close].
Hint
- To change the order or hide a displayed item, press and hold the
 (Enter) button on the remote control with that item highlighted, and [Move] and [Hide] will be displayed. If you select [Move], use
  (Left) /
 (Right) on the remote control to move the item to the desired position, and then press the (Enter) button on the remote control.
 - With [BRAVIA notifications] in Quick Settings, you can check if there are notifications such as software updates.
[11] SettingsUsing the Eco Dashboard
You can configure various settings to reduce power consumption, such as Power saving.
You can also check descriptions for features while setting them.
Note
- The menus displayed in the LCD Monitor/LCD Display settings vary depending on your model/region/country.
-
Press the OPTIONS button on the remote control, and select [Eco Dashboard].
-
In the displayed menu, move the focus left or right and select the desired setting.

[12] SettingsInputs
The number of terminals may differ depending on the model. For details, refer to the specifications of each model.
You can display information about HDMI input, change the name, and set the signal format.
[External inputs]
You can specify the HDMI input name and display/hide settings for the information displayed on the display when you operate [Input select] with the remote control. If you select disable when a specific device is always connected, the user will not be able to switch.

[BRAVIA Sync settings]
You can turn the power of a Sony BRAVIA Sync device connected via HDMI on or off in conjunction with the power operation of the remote control.
About BRAVIA Sync
![]()
BRAVIA Sync is a Sony interlocking function that allows you to control HDMI connected devices with the LCD Monitor/LCD Display remote control.
Devices bearing the logo, such as Blu-ray recorders and audio systems, are compatible.
[HDMI signal format]
The display has multiple HDMI input jacks. You can specify the video signal format according to the following setting.
[HDMI 1] / [HDMI 2] / [HDMI 3 (eARC/ARC)] / [HDMI 4]
There are two choices. [Standard format] prioritizes compatibility with the connected device, and [Enhanced format] prioritizes video quality on 4K devices.
Note
- Support for the display of 4K 60Hz picture depends on your model/region/country.
- When using Enhanced format, picture and sound may not be output correctly. In this case, connect the device to an HDMI IN that is in [Standard format], or change the HDMI signal format of HDMI IN to [Standard format].
- Only set to Enhanced format when using compatible devices.
- When you watch 4K picture with High-Quality, use a Premium High Speed HDMI™ Cable(s) that supports speeds of 18 Gbps. For details on a Premium High Speed HDMI™ Cable(s) that supports 18 Gbps, refer to the cable specifications.
[13] SettingsDisplay & Sound
[Picture & Sound]
You can set the image quality, select the output speakers, and adjust the sound quality according to your application.
- Press the OPTIONS button on the remote control and select [Picture & Sound].
Note
- The menus displayed in the LCD Monitor/LCD Display settings vary depending on your model/region/country.
[Content type]
Select [Video/Images], [Game], or [PC] to apply the image quality and sound quality that suit your application. After specifying your application, adjust the following image quality and sound quality settings.
[Picture]
You can adjust LCD Monitor/LCD Display display such as color and brightness for better picture quality, or desired screen size.
[Sound (***)]
You can adjust LCD Monitor/LCD Display’s sound for optimal sound quality and perfect sound mode.
Detailed Picture Settings
[Picture mode]
You can select one of the following image quality modes. This setting is available only when [Video/Images] is selected for [Content type].
- [Standard] The image quality is suitable for everyday use.
- [Professional] Emphasizes true reproduction of the original signal.
- [Photo] Image quality suitable for photo viewing.
- [Vivid] Image quality with clear colors and contours, as well as enhanced contrast.
[Brightness]
You can adjust brightness, contrast, gamma correction (tone correction), advanced black level, black enhancement (auto dark area correction), and the intensity of auto contrast correction.
Color
Adjust the color saturation level and Hue.
-
Advanced color adjustment (***)
You can set the following.
-
Adv. color temperature: Basic
Finely adjust the color temperature for each color.
-
Adv. color temperature: Multi point (***p)
Professional calibrator settings. When adjusting, we recommend using a color analyzer.
-
Clarity
Adjust the picture clarity and reduce roughness.
Motion
You can set the following.
-
Motionflow
Refines moving images. Increases the number of image frames to display videos smoothly. If you select [Custom], you can adjust [Smoothness (Camera)], [Smoothness (Film)] and [Clearness].
-
CineMotion
Optimizes picture quality based on video content, such as movies and computer graphics. Smoothly reproduces the motion of filmed images (images recorded at 24 frames per second) such as movies.
-
Motion blur reduction
Adjustment is similar to that of [Clearness] in [Motionflow].
To enable [Motion blur reduction], set [Content type] to [Game].
[Motionflow] and [CineMotion] will be disabled.
SETTINGS FOR CURRENT INPUT OR APP
Color space
Change the color reproduction range.
[HDR mode]
You can set the HDR mode (High Dynamic Range, a technology that enhances the contrast of images) to suit the environment. Normally, we recommend leaving this setting as [Auto].
Detailed Sound (Built-in speakers) Settings
-
Surround
Virtually reproduce realistic surround sound.
-
Surround effect
Adjust the surround sound effect.
-
Voice Zoom
Emphasize voice.
Displayed when [Post-processing] is set to [Standard].
When [Voice Zoom] is enabled, if sound is changed to output from the LCD Monitor/LCD Display speakers and Bluetooth headphones or speakers simultaneously, [Voice Zoom] will be disabled automatically. If the simultaneous sound output stops, the [Voice Zoom] will be enabled again.
-
Equalizer
Adjust sound based on different frequencies.
-
Reset
Return all sound settings to factory default.
VOLUME SETTINGS
-
Balance
Adjust the speaker balance.
-
Advanced auto volume
Keeps the volume level consistent for all programs and inputs.
-
Dolby AC-4 Dialog level
Adjusts dynamic range of Dolby AC 4 signal.
Dynamic range settings
You can change the following settings.
-
Dynamic range
Compensates for audio level difference between input sources (for Dolby Digital audio and HE AAC audio).
Displayed only when [Inputs] is HDMI or during [Media Player] playback.
-
DTS Dynamic range
Adjusts dynamic range of DTS signal.
General
You can change the following settings.
-
Post-processing
Select [Standard] (Sony), audio processed by Dolby technology or audio processed by DTS technology.
[Adjust only for HDMI 1]
Enable this setting to set the HDMI 1 quality and sound quality.
When [On], the picture and sound quality is adjusted for the currently selected video input or app. When [Off], the picture and sound quality is adjusted for all inputs and apps.
Prioritize HDMI signal information
Automatically sets the content type based on the Content Type information in the HDMI signal. If it does not set automatically, set this to [Off].
[Audio output]
[Speakers]
Selects the audio output destination, whether the unit's speakers or the audio system.
[Audio system settings]
Configure various sync settings with a Sony audio system connected via HDMI.
-
Audio system prioritization
When enabled, this automatically switches the audio output to a BRAVIA Sync-compatible audio system when the LCD Monitor/LCD Display is turned on.
-
A/V sync
Adjusts output timing to reduce delay between video and audio when using certain audio systems connected via HDMI.
-
Digital audio output
Configure the output method when outputting digital audio. This setting is available when [Speakers] is set to [Built-in speakers] and [Audio system].
Hint
- There is less deterioration and noise from signal transmission, and the sound quality is superior compared to analog connections.
-
eARC setting
If [Auto] is selected, high quality audio is output when an eARC supported device is connected to an HDMI port labeled “eARC/ARC”.
eARC is an enhanced version of ARC and stands for Enhanced Audio Return Channel. By connecting an eARC supported device, you can enjoy uncompressed, high-quality audio formats and newer surround audio formats in addition to the audio formats supported by ARC.
To connect the LCD Monitor/LCD Display and an eARC supported device, use an eARC-supporting HDMI cable*.
* An authorized Premium High Speed HDMI™ Cable(s) is recommended.
Bluetooth device settings
Settings for devices connected via Bluetooth.
-
A/V sync
When using a Bluetooth audio device (A2DP supported), the output timing is adjusted to minimize the delay between video and audio.
-
Bluetooth settings
Enables/disables Bluetooth.
-
3D surround device settings
Virtually reproduce realistic surround sound.
[Optical digital audio output settings]
You can adjust the output settings and output levels for the optical digital audio output, as well as digital audio formats such as PCM and pass-through.
-
Optical digital audio output
Outputs the audio signal to the device connected to the optical digital audio output terminal.
-
Digital audio output
Configure the output method when outputting digital audio. This setting is available only when [Speakers] is set to [Audio system].
Select [Digital audio output] from the following options.
-
[Auto]
Outputs compressed audio.
-
[Prioritize pass through]
Automatically detects the audio signal and the status of the audio output unit, and performs pass-through output. When enabled, audio is output even when the power is turned off by the remote control, and the format is transmitted without decoding.
Note
- When viewing HDMI input with eARC, audio signals are passed through, so the [Digital audio output] setting in [Audio system settings] is disabled.
- The system sound and voice response sound are not output during pass-through audio output.
-
[PCM]
Set this option if your audio system does not support Dolby Digital or DTS.
-
-
Optical digital audio output volume
Adjusts the digital audio output level. Only valid for the PCM sound source. The volume levels between the PCM sound source and the compressed sound source will differ.
[Ambient Optimization]
You can adjust your preferred picture and sound quality settings according to the LCD Monitor’s/LCD Display’s installation environment.
Adjusting the picture/sound quality automatically
[Auto luminance level]
Enables automatic adjustment of the display according to ambient light.
- Press the OPTIONS button on the remote control, then select [Picture & Sound] — [Ambient Optimization] — [Advanced settings].
[Auto tone curve]
Automatically adjusts the balance of light and dark to make it easier to see the image in the dark even in a well-lit room.
- Press the OPTIONS button on the remote control, then select [Picture & Sound] — [Ambient Optimization] — [Advanced settings].
[14] SettingsNetwork & Internet
- Press the OPTIONS button on the remote control, then select [Settings] — [Network] — [Network & Internet] list.
[Wi-Fi]
You can turn the built-in Wi-Fi on or off and choose which Wi-Fi networks you want to connect to. You can also add private Wi-Fi networks if you want to connect to them.
[Scanning always available]
Set this to enable Google's location services and other apps to scan your network when Wi-Fi is off.
[ETHERNET]
Displays “Connected” and the MAC address when the connection is successful.
[Proxy settings]
Specify the server name and port number manually when using a proxy server.
Note
- HTTP proxy only applies to web browsers, not other apps.
[IP settings]
You can select how the IP address is obtained. For manual settings, select [Static] and enter a valid IP address. At this time, you can set the DNS server. For automatic settings, enable [DHCP].
[Network status]
Displays the current network status. You can perform connection diagnosis by pressing ![]() (Enter) button on the remote control.
(Enter) button on the remote control.
[Remote device settings]
Configure settings to enable display control via apps on mobile devices.
[Local network]
To control the display from an external device on the local network, make the following settings.
[Server diagnostics]
Diagnoses whether the device can connect to a server on the local network.
[DLNA player]
If this is enabled, you can play back recorded data or music data saved on other devices in the local network.
[IP control]
Specify the settings required to connect the display and external applications or software to the same network and control them using APIs and protocols provided by BRAVIA Professional Display.
[Authentication]
You can select the authentication method. You can enhance security by allowing access only from specified devices to prevent unauthorized access. The following types of authentication methods are available. Typically, Pre-Shared Key is used for commercial displays and None for use within a managed network.
[None]
No authentication.
[Normal]
Permits access by PIN code authentication. To set the PIN code, follow the procedure below.
- [Pro settings] → [Pro mode lock]
- [Pro settings] → [HTML5 platform]
If [Pro mode lock] is enabled, set the setting to require PIN entry when starting the web application.
[Pre-Shared Key]
A pre-shared key. A user-defined private key that allows a fixed string authentication method. When enabled, pre-shared keys private (highest authentication level) and generic (intermediate authentication level) are available.
[Normal and Pre-Shared Key]
Corresponds to PIN code and Pre-Shared Key input and allows access with either authentication.
[Pre-Shared Key]
When Authentication is set to Pre-Shared Key or Normal and Pre-Shared Key, you can set the Key.
[Simple IP control]
Simple IP control is a TCP-based SSIP (BRAVIA Professional Display proprietary protocol). You can use this to remotely control the display on the local network.
For information about Simple IP control, refer to the following:
https://pro-BRAVIA.sony.net/ja/remote-display-control/simple-ip-control/

https://pro-BRAVIA.sony.net/ja/remote-display-control/simple-ip-control/
Hint
If you plan to use REST API or IRCC-IP and you want to disable the suspend state of the display, enable [Simple IP control].
For details on the suspend state when using REST API, refer to the following:
https://pro-BRAVIA.sony.net/remote-display-control/rest-api/guide/

https://pro-BRAVIA.sony.net/remote-display-control/rest-api/guide/
For details on the suspend state when using IRCC-IP, refer to the following:
https://pro-BRAVIA.sony.net/remote-display-control/ircc-ip/

https://pro-BRAVIA.sony.net/remote-display-control/ircc-ip/
[Control4®]
The BRAVIA Professional Display is compatible with the integrated control platform “Control4”, allowing you to operate the display and link with other smart home devices from the system. Please enable it if you want to use it.
[15] SettingsPrivacy
Configure the security of device, account and app settings.
[Location]
You can configure Google Location Services settings for obtaining your current location via Wi-Fi and always-on scanning. You can also view apps that have requested location access.
[Microphone]
You can set all apps or specific apps to allow microphone access.
[App permissions]
For each app installed, you can set permissions to access functions and information on the LCD Monitor/LCD Display.
[Special app access]
You can set the following advanced settings for the functions and information that apps can access.
-
[Energy optimization]
Optimize your app's electricity usage.
-
[Usage access]
Allows specified apps to track other app usage, frequency, carrier, language preferences, and more.
-
[Notification access]
Allows specified apps to read all notification content, including personal information such as contact names and message text. Apps can also dismiss notifications or activate action buttons they contain.
-
[All files access]
Allows specified apps to read, modify, and delete all files in the display or in connected storage. This setting may allow files to be accessed without explicit user interaction.
-
[Display over other apps]
Allows other apps to overlay on top of the app you're using. This can make other apps harder to see or can change how they look or behave.
-
[Media management apps]
If allowed, this app can change or delete media files created by other apps without asking for confirmation. To use this feature, you must enable access to all files in Special app access for the app.
-
[Modify system settings]
This feature allows only specified apps to change display system settings. For security, only apps that you explicitly approve can change settings.
-
[Alarms & reminders]
You can specify apps and set alarms and time-based actions. This setting allows apps to run in the background, which can increase power consumption. If you disable this permission, existing alarms and time-based events will also stop working.
-
[Turn screen on]
Allows specified apps, such as alarm or call apps, to turn on the screen of the display. This allows the app to wake the display at its discretion without requiring the user to press the power button.
Note
When the display is suspended, the target app may also be stopped and the screen may not turn on.
How to disable the suspended state:
https://pro-BRAVIA.sony.net/ja/setup/disable-suspend/

https://pro-BRAVIA.sony.net/ja/setup/disable-suspend/
[Security & Restrictions]
You can set permissions to install applications (such as HTML5 applications) that do not use Google Play. Enable this if you need to install BRAVIA Signage (paid version) or custom apps. However, for security reasons, we recommend disabling this setting after installation.
[16] SettingsApps
View details of recently used applications. Select [See all apps] to view a list of all installed applications, including usage information and version for each app. At the bottom, select [Show system apps] to view system applications as well.
In addition, in the [Settings] → [Privacy] list, [App permissions], [Special app access], and [Security & Restrictions] are extracted, and you can set them from here.
[17] SettingsSystem
Press the OPTIONS button on the remote control, then select [Settings] — [System] — the desired option.
[Screen saver]
To prevent burn-in of the screen, you can set the screen saver image and the amount of inactivity time before starting up.
[Power & Energy]
Configures the settings related to saving energy and the startup LCD Monitor/LCD Display screen.
[About]
You can check the device name and operation status of the display, as well as Android TV OS information (Versions, security patches, etc.). You can also set notifications for software updates over the network and when new versions are released.
[Date & Time]
Configures the current time and auto clock display.
[Language]
Selects the menu language.
[Keyboard]
Configures the settings of the on-screen keyboard.
[Storage]
Changes the settings related to data storage.
[Developer options]
Select [Enable developer options]. When enabled, the following settings become available.
To enable [Developer options]
-
Press the OPTIONS button on the remote control, and then select the following in order.
[Settings] — [About] — [Android TV OS build], then press
(Enter) button on the remote control 10 times.
-
[Stay awake]
Keeps the screen on while charging.
-
[HDCP checking]
Configure HDCP checking behavior. Select from the following:
-
[Never check]
HDCP checking is disabled.
-
[Check for DRM content only]
Performs HDCP checking only for DRM-protected content.
-
[Always check]
Performs HDCP checking for all content.
-
[Bluetooth HCI snoop log]
Enables Bluetooth packet capture. After changing this setting, turn Bluetooth setting OFF then ON.
[OEM unlock]
Allows unlocking the bootloader. Required for advanced development work such as installing custom ROMs. Enable OEM unlock after verifying your internet connection.
[Picture color mode]
When enabled, displays image colors in sRGB.
DEBUGGING
[USB debugging]
Enables debugging via USB connection using development tools such as ADB (Android Debug Bridge).
[Wireless debugging]
Enables debugging over Wi-Fi. Development tools such as ADB (Android Debug Bridge) can be used wirelessly.
[Select mock location app]
Specify a mock location app for testing purposes. Configure after installing the app.
[Enable view attribute inspection]
Allows developers to inspect attribute information for UI elements in apps. Used for debugging during app development.
[Select debug app]
Set the debug application.
[Wait for debugger]
When enabled, the LCD Monitor/LCD Display waits for the debugger to connect before starting the app. Used to debug processes immediately after app launch.
[Verify apps over USB]
When enabled, verifies apps installed via ADB (Android Debug Bridge)/ADT (Android Development Tools) for malicious behavior.
[Logger buffer sizes]
Sets the size of the memory area where logs are temporarily stored.
[Store logger data persistently on device]
Select which log buffer contents to store persistently: [Off], [All], [All but Radio], or [Kernel Only].
Network
[Wireless display certification]
Displays a confirmation screen when a connection request is received.
[Enable Wi-Fi verbose logging]
Increases Wi-Fi log level to display SSID (network name) and RSSI (received signal strength) in the Wi-Fi picker. Used to debug Wi-Fi connection issues.
[Mobile data always active]
Keeps mobile data connection active even when Wi-Fi is connected.
[Select USB configuration]
Select the operation mode when USB is connected. Choose from: [Charging], [MTP (Media Transfer Protocol)], [PTP (Picture Transfer Protocol)], [RNDIS (USB Ethernet)], or [MIDI].
INPUT
[Show taps]
When enabled, displays a circle or dot at the tap location, making it easy to see where the screen is being touched.
[Pointer location]
When enabled, overlays detailed touch information such as touch coordinates and touch pressure on the screen.
DRAWING
[Show surface updates]
When enabled, flashes the updated portion each time the screen is refreshed.
[Show layout bounds]
Displays clip boundaries and margins.
[Force RTL layout direction]
Forces screen layout direction to RTL (right-to-left) for all languages or regions. Used to test layouts for right-to-left languages such as Arabic and Hebrew.
[Window animation scale]
Adjusts animation speed when apps start and close. Select from 7 levels: [Animation Off] (0×) to maximum 10×.
[Transition animation scale]
Adjusts animation speed for screen transitions within apps. Select from 7 levels: [Animation Off] (0×) to maximum 10×.
[Animator duration scale]
Adjusts animation speed for fine UI elements within apps. Select from 7 levels: [Animation Off] (0×) to maximum 10×.
[Simulate secondary displays]
When enabled, simulates a virtual external display on the LCD Monitor/LCD Display screen. Allows testing multi-display environments without physically connecting an external display.
HARDWARE ACCELERATED RENDERING
[Show screen updates]
Highlights updated areas during screen rendering.
[Show hardware layers updates]
Displays UI elements using hardware layers in green when updated.
[Debug GPU overdraw]
Color-codes areas where the same pixel is drawn multiple times.
[Debug non-rectangular clip operations]
Visualizes clipping operations in non-rectangular areas.
[Force 4× MSAA]
Forces multi-sample anti-aliasing (MSAA) to be enabled in OpenGL ES 2.0 apps.
[Disable HW overlays]
Disables hardware overlays and always uses GPU compositing.
[Simulate color space]
Simulates color vision deficiencies to verify app appearance.
MEDIA
[Disable USB audio routing]
Disables automatic switching to USB audio devices.
AUDIO
[Record Audio]
Enables audio recording functionality during debugging.
MONITORING
[Enable strict mode]
Warns by flashing the screen when time-consuming operations are performed on the main thread.
[Profile HWUI rendering]
Displays a drawing performance graph on the screen.
[Enable OpenGL traces]
Enables OpenGL tracing for debugging graphics performance.
APPS
[Don't Keep Activities]
Destroys apps immediately when moved to background. Simulates low-memory conditions.
[Background Process Limit]
Limits the number of background processes that can run simultaneously.
[Show All ANRs]
Displays notifications when background apps become unresponsive (ANR).
[Standby Apps]
Sets apps to standby mode and restricts background activity. Select an app from the list to configure.
[Force allow apps on external]
When enabled, allows all apps to write to external storage regardless of manifest values.
[Force activities to be resizable]
When enabled, allows all activities to be resized in multi-window mode regardless of manifest values.
[System sounds]
Configures the system sounds.
[Parental controls]
Enables/disables use of external inputs and apps.
[LED indicator]
Enables/disables the lamp (LED) that fires when operating the display.
[Apple AirPlay & HomeKit]
Configures the settings for Apple AirPlay & HomeKit.
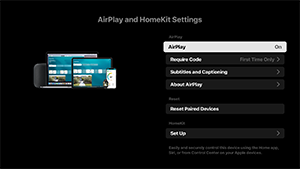
[AirPlay]
[ON] (enabled) or [OFF] (disabled) connections.
[Require Code]
You can choose how often to require a passcode.
[Subtitles and Captioning]
You can choose to enable or disable subtitles, and set subtitle size, color, and more.
Note
- If you're using AirPlay in Pro mode, we recommend using Restore AirPlay Settings.
[Reset Paired Devices]
You can reset the paired devices.
HomeKit Settings
You can set the room, name, notifications, and more.
[Initial setup]
Sets up the basic features such as network and channels for first time use.
[Restart]
Restarts the LCD Monitor/LCD Display.
[18] SettingsAccessibility
This LCD Monitor/LCD Display has accessibility features in [Accessibility] such as the following:
- Text scaling that enlarges all text on the screen
- Text magnification that enlarges the text at the currently focused location and displays it in a separate window
- Bold text and High contrast text
- Color settings such as Color correction and Color inversion
- Subtitle settings such as SUBTITLE button
- Accessibility shortcut
- Keyboard accessibility
- Power-on volume
Note
- Some features do not apply depending on your model/region/country.
Press the OPTIONS button on the remote control, then select [Accessibility] to configure the user assistive features.
[Accessibility] has a shortcut function so you can turn it on or off by pressing and holding the ![]() (Mute) button on the remote control for 3 seconds.
(Mute) button on the remote control for 3 seconds.
Hint
- To change the shortcut function, select [Accessibility shortcut] in [Accessibility], enable [Enable accessibility shortcut], and change the function in [Shortcut service].
[19] SettingsRemotes & accessories
You can pair Bluetooth devices and enable/disable Bluetooth.
Note
- The menus displayed in the LCD Monitor/LCD Display settings vary depending on your model/region/country.

- Press the OPTIONS button on the remote control, then select [Settings] — [Remotes & accessories] — the desired option.
Available options
You can enable or disable Bluetooth, or register Bluetooth devices.
[Bluetooth]
Enables or disables Bluetooth.
[RS232C control]
This setting is used to control the display from an external device via serial communication (RS-232C).
For more details, refer to the following.
https://pro-BRAVIA.sony.net/remote-display-control/serial-control/

https://pro-BRAVIA.sony.net/remote-display-control/serial-control/
[20] SettingsAvailable Settings
Pro settings
For the LCD Monitor/LCD Display, you configure basic items in [Home] and customize settings through [Pro settings].
Note
- The options you can adjust vary depending on the situation. Unavailable options are greyed out or not displayed.
Settings: Configure basic items such as picture and sound quality.
Pro settings: Customize settings according to your commercial environment.
Pro settings are a suite of features for customizing LCD Monitor/LCD Display operation based on your environment and use case. They include power control, startup settings, security, and automatic app installation from USB drives. Configure as needed to simplify installation and operation.
Actions
[Start Pro mode]
Move from the Normal mode to the Pro mode.
Hint
- If you use Pro mode, we recommend enabling PIN code protection in [Pro mode lock] under Pro settings.
[Initialize Pro settings]
Select [Initialize Pro settings] to display a confirmation screen. Select [OK] to reset only the Pro settings to default values.
[Current settings]
You can view a list of the current values for each Pro settings item.
[Export Pro settings]
You can use a USB drive to export Settings and Pro settings and apply them to other LCD Monitors/LCD Displays. [Export Pro settings] can be executed only between the same region, same product model, and same firmware version.
Exportable items are limited.
Note
-
To install the exported settings on another LCD Monitor/LCD Display, enable [Import settings] on the destination LCD Monitor/LCD Display.
Procedure: [Pro settings] → [USB drive auto run] → [Import settings]
-
If a network connection is available, you can also use [BRAVIA Web Control UI].
Refer to the following:
https://pro-bravia.sony.net/software-solutions/bravia-webcontrol-ui/

https://pro-bravia.sony.net/software-solutions/bravia-webcontrol-ui/
[Startup services]
The Startup services (built-in application) can be installed as needed. Since it is built into the LCD Monitor/LCD Display, no internet connection is required for installation.
How to install
- Select the app from the list and enable Use.
- Click [Enable] and [Install] to start the installation.
- When the installation is complete, the display restarts automatically.
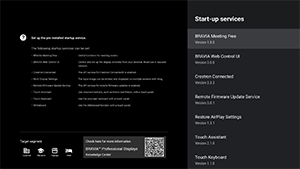
The following startup services are available.
Refer to the following: https://pro-bravia.sony.net/software-solutions/

https://pro-bravia.sony.net/software-solutions/
-
BRAVIA Meeting Free
Meeting support software that enables you to start meetings smoothly with simple connectivity.
-
BRAVIA Web Control UI
A convenient management tool for remotely controlling the LCD Monitor/LCD Display and changing settings via a browser.
-
Crestron Connected
Enables the API service for Crestron Connected. Provides extended connectivity for integrating the LCD Monitor/LCD Display with external applications and systems.
-
Remote Firmware Update Service
A service that enables firmware updates over the network from an app.
-
Restore AirPlay Settings
This function automatically restores the AirPlay settings pre-configured in Pro settings when the display is turned on in the Pro mode.
-
Touch Assistant
An app that enables touch control of the LCD Monitor/LCD Display without using a remote control. Displays
/BACK and HOME buttons when drawing or operating on the screen. An external keyboard or input device may be required depending on the character input environment.
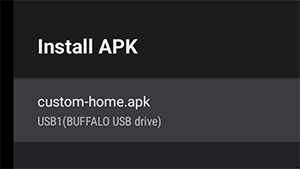
[Install APK]
You can install Android apps (.apk) on the LCD Monitor/LCD Display using a USB drive.
How to install
- Insert the USB drive containing the APK file into the LCD Monitor/LCD Display.
- Confirm that [Install APK] can be selected. If the APK file is not saved on the USB drive or the USB drive is not inserted correctly into the display, the option cannot be selected.
- Select [Install APK] to choose the APK file to install.
Settings
[AC power on]
Configure the startup state when the LCD Monitor’s/LCD Display’s main power is turned on in conjunction with a linked system such as a hotel room key or store system. Select from the following options:
-
[Standard]
If the screen is on when you turn off the main power of the linked system, the screen will automatically turn on the next time the main power is turned on. However, if you turn off the LCD Monitor/LCD Display before turning off the main power, the screen will remain off when the main power is turned on.
-
[Always on]
When the linked system's main power is turned off and back on, the screen always turns on.
-
[Off]
When the main power is turned off and back on, the screen always remains off.
[Wake-up on signal]
A function that automatically turns on the LCD Monitor/LCD Display and switches the input when HDMI is connected. You can also configure the LCD Monitor/LCD Display to turn off when HDMI is disconnected. This setting can be enabled individually for each HDMI input.
[Home key behavior]
You can assign a specific background image or app to the HOME button on the remote control.
The following options are available:
-
[Home menu]
Displays the default home screen.
-
[Web app]
You can assign a specific background image or web app-based content to the HOME button. For web app-based content, you can specify either content hosted on an external server or a web app installed on the display.
-
[Web app/Home menu]
Alternately displays the [Home] screen and the specified web app on the LCD Monitor/LCD Display.
-
[Android home app]
You can assign an installed Android home app or a custom app compatible with Android Home to the HOME button.
[NTP server]
You can set the NTP server IP address or hostname on the LCD Monitor/LCD Display to synchronize the system and apps with the LCD Monitor’s/LCD Display’s time.
[Pro mode lock]
When enabled, you can specify a 4-digit PIN code. Once set, you will be prompted to enter the PIN code when switching from Pro mode to Normal mode. If you forget the PIN code, you will not be able to change the operating mode. Please keep the PIN code in a safe place.

[Charge USB during Standby mode / Networked standby mode]
Enables charging of USB-connected devices even when the LCD Monitor/LCD Display is turned off. This setting disables the LCD Monitor’s/LCD Display’s suspend mode.
[Restore picture and sound adjustments]
When operating in Pro mode, you can configure the LCD Monitor/LCD Display to restore picture and sound quality settings changed by guests to their original values when the LCD Monitor’s/LCD Display’s main power is turned off and back on. The default value is [OFF]. Change this setting as needed.
-
[ON]
Restores picture and sound quality to their original settings when the LCD Monitor/LCD Display is turned off and back on.
-
[OFF]
Disables the feature.
[Developer options]
The following settings are available for Android apps.
To enable [Developer options]
-
Press the OPTIONS button on the remote control, and then select the following in order.
[Settings] — [About] — [Android TV OS build], then press
(Enter) button on the remote control 10 times.
-
[Power state control by apps]
This function allows you to control the LCD Monitor’s/LCD Display’s power state by sending a broadcast intent.
Available Controls
- Restart
- Power OFF (Screen OFF)
- Power ON (Screen ON)
Example: Restart
“com.sony.dtv.b2b.intent.action.REBOOT”
Intent intent = new Intent(“com.sony.dtv.b2b.intent.action.REBOOT”); sendBroadcast(intent):
Example: Power OFF (Screen OFF)
“com.sony.dtv.b2b.intent.action.POWER_OFF”
Intent intent = new Intent("com.sony.dtv.b2b.intent.action.POWER_OFF"); sendBroadcast(intent):
Example: Power ON (Screen ON)
“com.sony.dtv.b2b.intent.action.POWER_ON”
Intent intent = new Intent("com.sony.dtv.b2b.intent.action.POWER_ON"); sendBroadcast(intent);
[Wi-Fi access point]
You can configure the following Wi-Fi access point settings.
-
[Wi-Fi access point]
Set whether to use Wi-Fi.
-
[SSID]
Set the SSID.
-
[Security]
Select either [WPA2-PSK (AES)] or [Open network].
-
[Password (WPA key)]
Set the WPA key (8-63 characters).
[Admin password]
Sets the password for remote administration authentication. Must be 8-32 characters and include both letters and numbers.
[USB drive auto run]
You can configure installation and automatic execution permissions when a USB drive is inserted into the LCD Monitor/LCD Display. This can be used as a security measure to prevent unintended operations and execution of unauthorized content.
-
[Import settings]
Allows automatic import of Settings and Pro settings from a USB drive.
-
[Install BPK]
Allows automatic installation when a USB drive containing BPK (BRAVIA Professional Display Package) is inserted into the LCD Monitor/LCD Display.
-
[Launch web app]
Allows automatic launch of web apps. Enable this setting to launch HTML5 apps from a USB drive or to transfer content from a USB drive to the LCD Monitor’s/LCD Display’s internal storage.
-
[Install web app]
Allows automatic installation of web apps.
[HTML5 platform]
The HTML5 platform is a dedicated runtime environment for running and managing HTML5 apps on the LCD Monitor/LCD Display. After installing, you can configure the following settings:
Note
-
HTML5 app configuration varies by installation environment.
Refer to the following.
https://pro-bravia.sony.net/software-solutions/building-html5-apps/

https://pro-bravia.sony.net/software-solutions/building-html5-apps/
Certificate
-
[Root certificates]
Register the root certificate for SSL/TLS communication.
-
[Client certificates]
Configure the certificate for client authentication.
-
[Confirm server certificates]
Configure whether to verify server certificates.
Permissions
-
[Web permissions]
Manages permissions for each web app. This setting also manages permissions for USB cameras and microphones.
Related Functions
-
[Auto recovery]
Enable automatic recovery when a web app encounters an error.
-
[Require PIN to launch a web app when using Pro mode lock]
When Pro mode lock is enabled and a PIN code is set, enabling this setting causes a PIN input dialog to be displayed when launching or installing a web app from a USB drive.
-
[Web app orientation]
Configure web app display orientation. Can be set to prioritize manifest settings or fixed orientation.
[DHCP hostname]
You can set sending the device's host name to the DHCP server on or off.
When it is turned on, you can also edit the host name that will be sent.
Initial source and volume
[Initial input source]
Set the screen displayed when the LCD Monitor/LCD Display is powered on. Select the primary source from the following.
The number of available terminals and default settings may vary by firmware version.
Available initial input options vary by model and region.
-
[Default]
Displays [Home] when the LCD Monitor/LCD Display is turned on.
-
[External input]
To display an external input, select the desired input (e.g., HDMI 1).
-
[Startup app]
If you specify an HTML5 app URL, that URL is displayed when the LCD Monitor/LCD Display is turned on.
-
[Android app]
Displays the specified Android app.
Note
-
Android apps set to [Enabled with restrictions] in [Apps] under Pro settings cannot be set as the initial input.
To set an Android app as the initial input, set the app to [Use].
Hint
-
To specify an app on a USB drive, you need to specify the “auid” in manifest.json separately. Save the HTML5 app on a USB drive and power on the LCD Monitor/LCD Display.
Refer to the following.
https://pro-bravia.sony.net/software-solutions/building-html5-apps/
https://pro-bravia.sony.net/software-solutions/building-html5-apps/
[Initial and maximum volume]
You can specify the initial volume when the LCD Monitor/LCD Display is turned on and the maximum volume during usage. The volume is always set to the specified value on startup, regardless of the user's previous settings.
[Timers]
Configure the time for the display to automatically turn on, turn off, or restart. Schedule by day of the week and time for regular operation. By scheduling regular restarts with this function, you can help ensure stable operation even during long-term use.
Function restrictions
[Display/Remote controls]
You can disable the LCD Monitor’s/LCD Display’s main unit keys and remote control operations in Pro mode. This prevents unexpected operations by unauthorized users.
[External input]
In Pro mode, you can restrict the display and use of information related to [Inputs] → [External inputs] under Settings. Configure separately for each HDMI input while connected. Select from the following options:
-
[Use with labels]
All input information is displayed and available for use by default.
-
[Use without labels]
The specified input is hidden but remains available for use.
-
[Not use]
Both the display of input information and the use of the external input are disabled.
[Apps]
You can enable or disable the settings for functions such as Pro settings, Language settings, and Date & time settings in Pro mode. Select an app from the list to configure its settings.
Note
- Android app installation may be possible in Pro mode depending on your configuration. However, to use the app in Pro mode, switch to Normal mode first and enable it in the [Apps] settings.
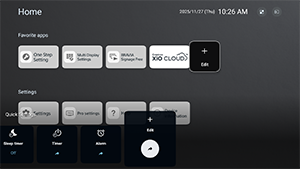
[Input]
Configure the input selection menu display in Pro mode. To edit the input names displayed in the menu (e.g., HDMI 1), press the ![]() (Input) button on the remote control to show the input list, then select [Edit].
(Input) button on the remote control to show the input list, then select [Edit].
-
[Default view]
When you press the
 (Input) button on the remote control in Pro mode, the standard input selection menu is displayed.
 -
[Basic view]
When you press the
(Input) button on the remote control in Pro mode, a simplified input selection menu is displayed. -
[Inputs menu customization]
Customize what is displayed when you press the
(Input) button on the remote control in Pro mode. You can enable or disable external inputs, AirPlay, apps, and more.
Hint
- To control input switching from a web app, select [Basic view].
Note
- Editing the input selection menu is enabled only in [Default view]. It cannot be edited in [Basic view].
[Quick Settings]
Settings that can be changed via the [Quick Settings] menu in Pro mode. Users can adjust settings such as picture quality while watching videos.
-
[Default view]
Pressing the OPTIONS button on the remote control in Pro mode displays the same [Quick Settings] menu as in Normal mode. Users can modify the [Quick Settings] menu in Pro mode.
-
[Basic view]
Pressing the OPTIONS button on the remote control in Pro mode displays a simplified [Quick Settings] menu. The menu has no edit buttons, and settings cannot be changed in Pro mode.
-
[Off]
The OPTIONS button on the remote control does not work in Pro mode.
Note
- Some Quick Settings features may not function correctly in the Pro mode environment. We recommend using the [Basic view] when operating in Pro mode.
[22] Control functionsSoftware
We have pre-installed software and software requiring a separate contract.
Pre-installed Software:
These are applications available from [Home] or from [Startup services] within [Pro settings].
Paid Software:
These are solutions that require a separate contract or download.
For details on functions and settings, refer to the BRAVIA Knowledge Center.

https://pro-BRAVIA.sony.net/
[23] Control functionsHTML5 Application
Development and Implementation
We support HTML5-based application development. Backward compatibility ensures no modifications are required during Android TV OS updates, and we support video streaming formats not available in standard web browsers.
For information on specifications, basic structure, and samples, refer to the BRAVIA Knowledge Center.
https://pro-BRAVIA.sony.net/
[24] Control functionsRS-232C
You can control the LCD Monitor/LCD Display from an external service via RS-232C. The RS-232C connection is briefly explained in this page.
Settings
To establish the connection, please set [RS232C control] to On.
Go to [Home] → [Settings] → [Remotes & accessories] → [RS232C control].
Interface
Establish the RS-232C connection to the LCD Monitor/LCD Display by using a 3.5 mm stereo mini plug (supplied).
3.5 mm Stereo mini plug

(A) TIP: LCD Monitor/LCD Display → Controller
(B) RING: Controller → LCD Monitor/LCD Display
(C) SLEEVE: GND
Connection settings
When establishing the RS-232C connection, make connection settings as below.
| Baud rate | 9600 bps |
| Data | 8 bit |
| Parity | None |
| Start bit | 1 bit |
| Stop bit | 1 bit |
| Flow control | None |
Data format
For information on specifications and basic structure, refer to the BRAVIA Knowledge Center.
https://pro-BRAVIA.sony.net/
[25] Control functionsIP
You can control the LCD Monitor/LCD Display via IP from an HTML5/Android application on the LCD Monitor/LCD Display or on the external device. You can manage and monitor information of input/power, start and terminate applications, control the display such as input source and volume. You can also restrict commands by the authentication function.
Supported IP protocol
For information on specifications, basic structure, and samples, refer to the BRAVIA Knowledge Center.
https://pro-BRAVIA.sony.net/
| Protocol name | Layer | Format | Authentication | Explanation |
|---|---|---|---|---|
| REST API | HTTP | JSON-RPC | Yes | The APIs whose purpose is device control. |
| IRCC-IP | HTTP | SOAP | Yes | Infrared Compatible Control over Internet Protocol. The technology and formats to transmit remote control commands via the Internet. |
| Simple IP control | TCP | Byte stream | N/A | Only typical functions are supported. |
LCD Monitor/LCD Display settings
When using [IP control], set the LCD Monitor/LCD Display as follows first.
Go to [Settings] → [Network & Internet] → [Local network] → [IP control].
For REST API and IRCC-IP,
- Select [Authentication].
- Set [Pre-Shared Key] if needed.
For Simple IP control,
- Enable [Simple IP control].
For Control4®,
- Enable [Control4®].
[26] TroubleshootingReset (restart) your LCD Monitor/LCD Display
In most cases when you are using the LCD Monitor/LCD Display and an issue occurs such as the picture not displaying on the screen or the remote control not working, resetting the LCD Monitor/LCD Display may resolve the issue. Reset the LCD Monitor/LCD Display with the following procedure.
Power Reset
-
Restart the LCD Monitor/LCD Display with the remote control.
Press and continue holding the Power button on the remote control for about 5 seconds until the LCD Monitor/LCD Display restarts (a shutting down message will appear).

-
Unplug the AC power cord (mains lead).
If the problem persists after step 1, unplug the LCD Monitor/LCD Display power cord (mains lead) from the electrical outlet. Then press the Power button on the LCD Monitor/LCD Display once, and release it. Wait for 2 minutes, and plug the power cord (mains lead) back into the electrical outlet. Depending on the model, you can press and hold the Power button on the LCD Monitor/LCD Display (40 seconds or longer) until it turns off and restarts.
Hint
- LCD Monitor/LCD Display models with 1 button on the LCD Monitor/LCD Display (Power button only) can also be restarted using the Power button. Press the Power button on the LCD Monitor/LCD Display to display the operation menu, select [Restart] in the menu, and then press and hold the Power button to restart the LCD Monitor/LCD Display.
- Your personal settings and data will not be lost after the LCD Monitor/LCD Display restarts.
Factory data reset
If the problem persists after a power reset, try a factory data reset.
If an external USB device is connected to the LCD Monitor/LCD Display, disconnect the USB device from the LCD Monitor/LCD Display before resetting.
For details, refer to Factory data reset.
[27] OthersSupport Site
For the latest information and Online Help Guide, please visit the Sony support website:
https://www.sony.com/am/support

https://www.sony.com/am/support
[28] OthersFactory data reset
You can perform the Factory data reset. If an external USB device is connected to the LCD Monitor/LCD Display, disconnect the USB device from the LCD Monitor/LCD Display before resetting.
Note
Performing a factory reset will delete all of the LCD Monitor’s/LCD Display’s data and settings (such as Wi-Fi and wired network setting information, account and other login information, and installed apps).
- Press the OPTIONS button on the remote control, then select [Settings] — [System] — [About] — [Reset] — [Factory data reset].
- Select [Erase everything].
If you have set a PIN code on your LCD Monitor/LCD Display, you will be prompted to input it.
After the factory reset process completes successfully, the LCD Monitor/LCD Display will start the Initial Setup wizard.
[29] OthersSpecifications Specifications
You can find the specification information on the Sony support website:
Please visit the product page of your LCD Monitor/LCD Display and refer to Specifications. For more about the support website, see the Support Site page.
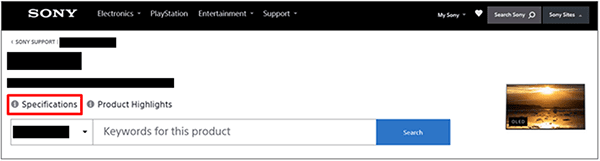
Note
- A Specifications page may not be available depending on your model. In such cases, please refer to the Reference Guide.
[30] OthersSpecificationsAudio formats
HDMI IN 1/2/3/4
In eARC (Enhanced Audio Return Channel) mode
- 7.1 channel linear PCM: 32/44.1/48/88.2/96/176.4/192 kHz
- Dolby Audio
- Dolby Atmos
- DTS
- DTS Express
- DTS-HD Master Audio
- DTS-HD High Resolution Audio
- DTS:X
Except eARC mode
- 7.1 channel linear PCM: 32/44.1/48/88.2/96/176.4/192 kHz
- Dolby Audio
- Dolby Atmos
- DTS
- DTS Express
- DTS-HD Master Audio
- DTS-HD High Resolution Audio
- DTS:X
eARC/ARC (Enhanced Audio Return Channel/Audio Return Channel) (HDMI IN 3 only)
In eARC mode
- 7.1 channel linear PCM: 32/44.1/48/88.2/96/176.4/192 kHz
- Dolby Audio
- Dolby Atmos
- DTS
- DTS-HD Master Audio
- DTS-HD High Resolution Audio
- DTS:X
In ARC mode
- Two channel linear PCM: 48 kHz 16 bits
- Dolby Audio
- Dolby Atmos
- DTS
[31] OthersTrademark information
-
Wi-Fi®, Wi-Fi Alliance®, Wi-Fi CERTIFIED™ and Wi-Fi CERTIFIED 6® are registered trademarks or trademarks of Wi-Fi Alliance.
-
Wi-Fi CERTIFIED™ logo and Wi-Fi CERTIFIED 6® logo are registered trademarks of Wi-Fi Alliance.
![]()
-
Manufactured under license from DTS, Inc. and/or its affiliates. For patents, see https://xperi.com/dts-patents/. DTS, the DTS logo, DTS:X, the DTS:X logo, Virtual:X, and the DTS Virtual:X logo are trademarks or registered trademarks of DTS, Inc. and/or its affiliates in the U.S. and/or other countries. © DTS, Inc. and/or its affiliates. All rights reserved.
-
Apple, Apple Home, AirPlay and HomeKit are trademarks of Apple Inc., registered in the U.S. and other countries and regions.
To use AirPlay and Apple HomeKit with this product, the latest version of iOS, iPadOS, or macOS is recommended.
![]()
-
Covered by one or more claims of the HEVC patents listed at patentlist.accessadvance.com.
-
All other trademarks are the property of their respective owners.
Note
- The availability of each service depends on your region/country.