Setting the clock (Date&Time)
You can set the clock of your IC recorder. Be sure to set it before you start recording.
-
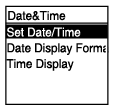
Select “
 Settings” - “Common Settings” - “Date&Time” - “Set Date/Time” from the HOME menu, and then press
 .
.
-
Set the current date and time.
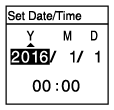
Press
 or
or to set an item, and then press.
Repeat the actions to set all items.
To move the focus backward or forward, press
 or
or . You can also press BACK/HOME to move the focus to the previous item.
 When you are finished with the last item, press
to apply the settings to the clock. - Press and hold BACK/HOME to return to the HOME menu.
To display the current time, place your IC recorder into the HOLD state.
Note
-
Once you have removed the batteries from the compartment and inserted them back in or you have replaced the batteries with new ones, the Set Date/Time screen appears on the display widow. On this screen, you see the date and time of the last operation you made with your IC recorder before you removed the batteries. Be sure to change the date and time to the current ones.
-
The clock may tell the time either in 12-Hour format with “AM” or “PM” or in the 24-Hour format, depending on the selected clock display format (Time Display) on the Settings menu. In addition, the default clock display format depends on the country or region of your purchase.
-
The default date display format depends on the country or region of your purchase.