Using “Custom Gridline Generator”
You can use “Custom Gridline Generator” to create a PNG file suitable for custom grid lines.
In advance, download “Custom Gridline Generator” from the URL below and install it on your computer.
https://support.d-imaging.sony.co.jp/app/cggenerator/
- “Custom Gridline Generator” is for Windows® 11 only.
- Launch “Custom Gridline Generator.”
- On the home screen, select the aspect ratio and orientation you want to use for shooting, and then click [Create New Gridline].
A canvas with a resolution appropriate for the custom grid lines will be generated based on the aspect ratio and orientation, and the drawing screen will be displayed.
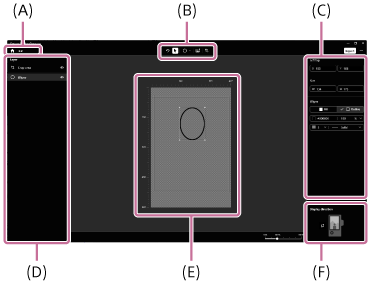
(A) Home button
Discards any edits being made and returns to the home screen. The current aspect ratio is displayed to the right of the button.
(B) Layer panel
Displays the layer structure of placed objects. You can make object layers visible or invisible, or right-click on an object to duplicate/delete it.
- The order of the layers cannot be changed.
- A newly placed object is added to a new layer above the existing layers.
- The cropping area is always placed on the topmost layer.
- Objects on layers set as hidden will not be included in the created PNG file.
(C) Toolbar
You can select and use various tools.
-
 (Undo): Undo the last action.
 -
 (Select): Select a placed object by clicking it on the canvas. Press the [Delete] key to delete the selected object.
 -
 (Shapes): Select the type of shape you want to draw.
 -
 (Image import): Import and insert images.
 -
 (Crop line): Position the cropping area.
 -
 (Center guide): Displays the center guide of the canvas.
(D) Editing panel
- Displays information such as the coordinates and size of the selected object. You can fine-tune the selected object by entering values for each field.
- For the selected shape, you can change the color/transparency of the lines/fill as well as the line type/weight. Select a color from the color palette or specify the color code. Transparency can be set in 10% increments from 10% to 100%. Full transparency can be set as a color by selecting it from the color palette or leaving the color code blank.
- For curved shapes, the coordinates reflect the position of the path without the line weight. For other shapes, the coordinates reflect the position of the outer perimeter including the line weight.
- It is recommended that the line weight be 5 pixels or more. Lines with a weight of 1 pixel may not be rendered in the correct color on the camera.
(E) Menu button
Displays a list of shortcut keys, license information, and the software version.
(F) Reference image
You can set a reference image using the [+] button. The reference image will be displayed on the bottom layer and can be used as a guide when you draw grid lines.
- Right click to replace/delete the image.
- The reference image will not be output to the generated PNG file.
(G) Canvas
You can use various tools to arrange, move, resize, delete, etc. objects.
You can use the following shortcut keys:
- [Ctrl] + [Z]: Undo
- [Ctrl] + [C]: Copy
- [Ctrl] + [V]: Paste
- Selecting an object and pressing [Delete]: Deleting the object
- Selecting an object and pressing [Ctrl] + [E]: Centering the object
- Selecting an object and pressing the up/down/left/right keys: Adjusting the object’s position
- Holding down the [Shift] key while drawing a line: Drawing a horizontal/vertical line
- Holding down the [Shift] key while resizing an object: Resizing while maintaining the aspect ratio
(H) Display direction
Sets the orientation of the grid lines relative to the camera. This can only be set when creating vertical grid lines.
- Draw grid lines on the drawing screen.
- Optionally, select (Crop line) from the toolbar and drag it onto the canvas to set the cropping area.
- When you set a cropping area, information about the cropping area is written to the meta information of the PNG file.
- The outer perimeter of the cropping area is reflected in the coordinates.
- By activating “In-camera Photo Cropping Upgrade License” on your camera, you can save both the original image and a cropped image at the same time when shooting. For more information about the “In-camera Photo Cropping Upgrade License,” refer to the “Help Guide” below.
https://helpguide.sony.net/di/volumephoto/v1/h_zz/index.html
- Click [Export] to open the output panel and set the save destination and file name.
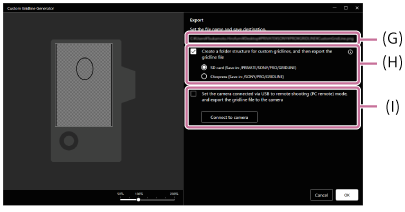
(I) Save destination input field
Click to manually enter a destination and file name.
(J) Automatic folder settings
The folder structure can be automatically set to suit the conditions for importing to the camera.
Check [Create a folder structure for custom gridlines, and then export the gridline file] and select the type of memory card to use for saving.
(K) Connected camera settings
You can save a PNG file directly to a memory card inserted into the connected camera.
Set [USB Connection Mode] to [PC Remote] or [Remote Shooting] on the camera, connect the camera and computer via USB, and click [Connect to camera]. While the computer is connected to the camera, a check mark is automatically added to [Set the camera connected via USB to remote shooting (PC remote) mode, and export the gridline file to the camera]. The check mark is removed when the connection is lost.
- If no memory card is inserted into the camera, an error will occur.
- Click [Export].
A PNG file will be created in the specified save destination.
To link “Custom Gridline Generator” with your camera
By linking “Custom Gridline Generator” with your camera, you can save a PNG file directly to a memory card inserted into the connected camera.
Some camera models may not support this function. For details, refer to the “Custom Grid Line License” website below.
- On the camera, set [USB Connection Mode] to [PC Remote] or [Remote Shooting].
- Connect the camera and the computer via USB.
- In the output panel of “Custom Gridline Generator,” click [Connect to camera].
Note
- The maximum number of objects that can be placed on the drawing screen is 50.
- Grid lines created in the portrait orientation will appear as landscape images but will be displayed correctly as grid lines when the camera is held vertically. If you want to import and use the grid lines as a portrait image, rotate them in other application beforehand.
- If you shoot images while the camera is connected to a computer, the images may be saved on the computer instead of the camera.
- Camera connection with “Custom Gridline Generator” may fail if the camera has been used by another application or software.
- If the cropping function is running on your camera, you may not be able to import PNG files.
- The file names for grid lines have the following restrictions:
- You can use alphanumeric characters (single-byte code) and the following symbols.
# $ % & ' ( ) + , - . ; = @ [ ] ^ _ ` { } space - For the first character of the file name, “.” (period) is not available.
- The extension should be “.PNG”. Either uppercase or lowercase letters are acceptable.
- The number of characters should be 63 or less, including the extension “.PNG”.
- You can use alphanumeric characters (single-byte code) and the following symbols.
- When you initialize the camera, the registered custom grid lines are also deleted.