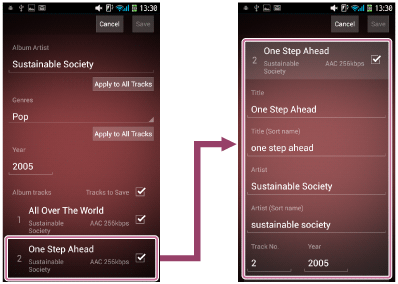
Editing the music information of the current track
You can manually edit the music information such as the track name, artist name or album name of the track you have selected.
Note
- The music information edit screen differs depending on the screen in which the Options menu or context menu is displayed.
- Display the Options menu or context menu.
To display the Options menu:
Tap
 (Options) (Android devices) /
  (Options) (iPhone/iPad/iPod touch) at the top right of the screen.
To display the context menu:
Tap and hold a desired item in the list display of your smartphone/tablet.
- Tap [Edit music info].
A screen to edit the music information appears.
For smartphones:

For tablets:

- Edit the information.
When you select an item you want to edit, the key pad of your smartphone/tablet appears on the display and text can be entered.
If you tap the album art display area, you can register an image to the album art by the operation below.
Android devices: Tap and hold an image you want to register to the album art from the displayed result of an image search.
iPhone/iPad/iPod touch: Select an image you want to use from the album art stored in your device's photo library.
- Add a check mark to each track for which you want to save edited music information when you have finished editing, and then tap [Save].
The edited music information will not be saved to the track if you do not add a check mark.
Hint
- The manually edited information will be used for the display on the HDD AUDIO PLAYER and in HDD Audio Remote. This operation does not change the original information of the track.
- If you perform the Rescan HDD function on the HDD AUDIO PLAYER, the music information of both the HDD AUDIO PLAYER and the HDD Audio Remote will be cleared.
- Tap [Cancel] to cancel editing and to return to the previous screen.
- If you tap one of the list items of the track in step 2, the details of the selected track, such as track name, artist name, album name, track number, year of release and genre name, will be displayed below the item.
You can also select a genre name from the list of genre names registered in the database. - If you tap the [Apply to All Tracks] button in the item [Album Artist] or [Genres] in step 3, you can change [Artist] or [Genre] of all tracks in same album to the same content at once.
- If you want to divide an album into two albums, edit [Album] or [Album Artist] in step 3, add a check mark to each track that you want to include to same album, and then tap [Save]. The tracks that you added a check mark will be belonging to different albums than the tracks that you did not added a check mark.
- With Android devices, you can choose how to select album art in step 3. Tap the album art display area, and then select [Search for album art on Google] or [Search for images on the mobile device].


