- Top Page
- >
- Keypad/Parts & Controls
- >
- NSX-32GT1/NSX-40GT1/NSX-46GT1
NSX-32GT1/NSX-40GT1/NSX-46GT1
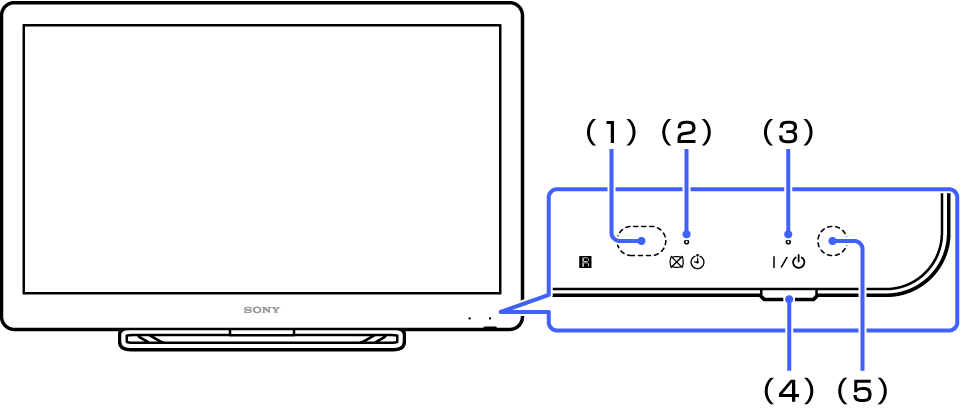
Front
-
(1) Remote control sensor
Receives signals from the remote control. Do not put anything near the sensor, doing so may affect its function.
-
(2)
 (PIC OFF/TIMER) indicator
-
- Green:
- Picture off.
-
- Orange:
- Timer
-
- Orange (on and/or blinking):
- Software upgrade in process
-
-
(3)
 (ON/STNDBY) indicator
-
- Red:
- Standby
-
- Green:
- Power on
-
-
(4)
(ON/STNDBY) buttonPress to turn the TV on. The TV goes to standby mode when you press this button to turn off the TV.
-
(5) Ambient sensor
Senses the room light level and adjusts the screen brightness accordingly. Do not put anything near the sensor, doing so may affect its function.
See Eco.
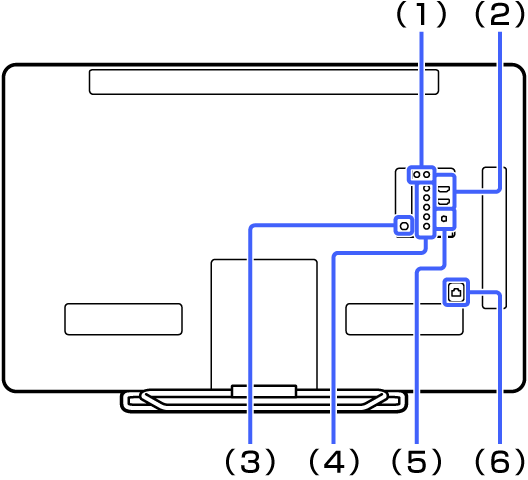
Rear
-
(1) IR BLASTER jack
Connect an IR Blaster cable to control other devices.
See Preparing to Control an AV Receiver. -
(2) HDMI IN 1/4 jacks
Connect an HDMI cable.
HDMI (High-Definition Multimedia Interface) provides an uncompressed all-digital audio/video interface between the TV and any HDMI-equipment.
See HDMI settings.Tip
- The TV supports ARC (Audio Return Channel). ARC enables the TV to send audio via HDMI.
-
(3) CABLE/ANTENNA jack
Connect a coaxial cable for your cable service interconnection or a broadcast antenna.
-
(4) VIDEO IN, COMPONENT IN, R-AUDIO-L jacks
Connect a composite video cable or component video cable.
For a composite connection, connect a cable to VIDEO IN (Y) for video signals and to R-AUDIO-L for audio signals.
For a component connection, connect a cable to Y, PB, and PR for video signals and to R-AUDIO-L for audio signals.
See Video/Component selection. -
(5) DIGITAL AUDIO OUT (OPTICAL) jack
Connect a digital optical cable.
When connecting digital audio equipment such as AV Receiver that is PCM/Dolby Digital compatible to the TV, you can enjoy high quality sound. -
(6) LAN terminal
Connect a network cable to use the wired network.
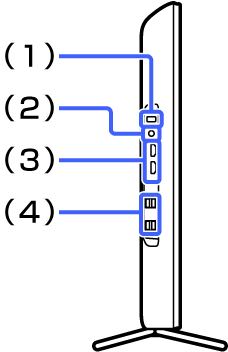
Left
-
(1) CONNECT button
Press for two seconds or more to pair with the Keypad.
-
(2)
 (Headphones) jack
Connect headphones.
-
(3) HDMI IN 2/3 jacks
Connect an HDMI cable.
HDMI (High-Definition Multimedia Interface) provides an uncompressed all-digital audio/video interface between the TV and any HDMI-equipment.
See HDMI settings.Tip
- The TV supports ARC (Audio Return Channel). ARC enables the TV to either send or receive audio via HDMI.
-
(4)
 (USB) jack
Connect a USB device.