

Video game consoles
To close this screen and jump to the Settings screen, select the following link.
![]() Jump to the Settings screen
Jump to the Settings screen
Connecting
Connect an HDMI-supported video game console to your TV with an HDMI cable.
To connect an audio amp or sound bar at the same time, refer to HDMI connection (eARC supported) in Connecting an audio system.
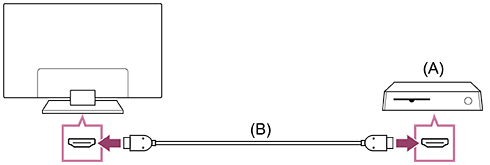
(A) Video game console
(B) HDMI cable (sold separately)
Hint
- A Premium High Speed HDMI™ Cable(s) is fine for general purposes, but if you want to connect a video game console that supports 4K 120Hz, use the HDMI cable included with the game console, or an Ultra High Speed HDMI™ Cable.
- The type and position of the HDMI port differs depending on your TV. Refer to the documentation provided with the TV.
Changing HDMI input settings
After connecting, set the connected HDMI input port.
To maximize the performance of your TV and video game console, set the [HDMI signal format/VRR].
Auto setup
-
With the video game console turned on, connect it to the TV with an HDMI cable.
Set by following the instructions on the TV screen.
Manual setup
-
Press the
 (Quick Settings) button on the remote control, and select the following in order.
[Settings] — [Channels & Inputs] — [External inputs] — [HDMI signal format/VRR]
Select the optimal format for your video game console.
Hint
- If you connect a video game console that supports 4K 120 Hz video output, set to [Enhanced format (Advanced)].
- If you connect a video game console that supports VRR, enable [VRR (Variable Refresh Rate)].
Note
-
When connecting a video game console that supports 4K 120Hz and VRR, check the label of the HDMI input ports on the TV and connect to the HDMI input port that is labeled 4K 120Hz or connect to the HDMI input port that is displayed as [VRR (Variable Refresh Rate)] for [HDMI signal format].
The available [HDMI signal format] depends on the model. Some HDMI formats may also not be supported depending on the model/region/country.
- If [VRR (Variable Refresh Rate)] is enabled, slight brightness fluctuations (flicker) may occur on the TV screen depending on the frequency of the content output from the connected video game console.
Viewing the Gaming multi view
-
In the Game Menu, select [Gaming multi view on YouTube] or playback a video searched with [YouTube quick search].
HDMI content will be displayed on the left side and YouTube content will be displayed on the right side.
Use the remote control to operate YouTube content.
Hint
-
Multi view screen will only be displayed when input is HDMI and [Content type] in [Settings] is set to [Game].
Available settings in Gaming multi view
-
Press the MENU button on the remote control to change the settings.
-
Press the
 (Left) or
 (Right) buttons on the remote control to switch between screens.
The selected screen will have a white frame, and menu will be displayed at the bottom of the screen.
-
Press the
 (Down) button on the remote control to transition to menu selection and select the menu with the
(Left) or
(Right) buttons on the remote control.
(Down) button on the remote control to transition to menu selection and select the menu with the
(Left) or
(Right) buttons on the remote control.Audio mix
You can change the percentage of sound output from the left and right screens.
Change screen size
You can choose the size of the left and right screens.
Full screen
Return to Full screen.
-
Press the
 (Enter) button on the remote control when the selected screen has a white frame. The menu will disappear and you can operate within the selected screen.
Hint
- Other methods to return to Full screen.
-
When the Gaming multi view menu is displayed, press the
 (BACK) button or the MENU button to hide the menu.
Press the
(BACK) button again to display the Exit menu.Select Exit in the Exit menu to return to Full screen.
-
Perform input switching by pressing the
 (Input) button on the remote control.
-
Note
- When Gaming multi view is displayed, the delay in the game increases.
- Specifications may be subject to change without notice.