Recording with manual volume adjustment (manual recording)
You can manually select the optimum recording volume level for the sound source.
Note
- If you accidentally touch your linear PCM recorder or let an object come in contact with it while recording is in progress, rustling or scratching noises may be recorded.
Hint
- Before you start recording, we recommend you first make a trial recording or monitor the recording. For instructions on monitoring the recording, see Monitoring the recording audio.
- Recorded files are stored in [FOLDER01] under [
 Recorded Files] by default. To store recorded files in a folder other than [FOLDER01], see Changing the memory storage and the storage folder for recorded files.
- Select [
 Record] on the HOME menu, and then press
 .
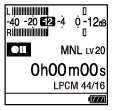
.The recording standby screen is displayed on the display window.
- Select the memory storage (the built-in memory or the SD card) and the storage folder where you want to store recorded files.
To store recorded files on the microSD card, you need to change the memory storage. Select [Recording Folder] on the HOME menu while recording is on standby, and then select [SD Card] on the Memory Selection screen before you start recording.
- Change the angle of your linear PCM recorder's built-in microphones (
 ) to adjust the directivity of the microphones.You can change the angle with your fingertip.
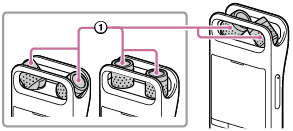
- Turn the linear PCM recorder so that its built-in microphones point in the direction of the target sound source.
- Press and hold
 REC/PAUSE.
The recording indicator on the linear PCM recorder flashes in red and the recorder pauses for recording. When the built-in microphones pick up sounds, the peak level meter bars change in length to indicate the recording volume levels.
- Press
 or
or  to select the optimum recording volume level for the sound source.
You can check the current recording volume level on the peak level meters. Adjust the recording volume so that the recording volume level stays around -12 dB, which fits within the optimum range (
).If too loud sounds are detected during recording, [OVER] (
 ) appears on the display window and the peak indicator (
 ) lights. In such a case, turn down the recording volume by pressing until [OVER] disappears and the peak indicator goes out to avoid sound distortion.
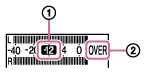
If you can check the recording volume in advance, it will be easier to use the Rehearsal function for adjusting the recording volume level.
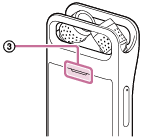
- PressREC/PAUSE.
 appears on the display window to indicate that recording has started, and the recording indicator () lights in red.
- To stop recording, press
 STOP.
STOP.[Saving...] and then the recording standby screen appear.
Now you can press
to play the file you have just recorded.
Note
- During manual recording, the VOR function does not work.
Hint
-
We recommend that you monitor the ongoing recording by connecting headphones (not supplied) to the
 (headphones) jack. However, you cannot monitor the recording with the Bluetooth headphones.
 -
You can still press
REC/PAUSE to start recording while playback is in progress or a menu is on the display window. -
You can still press
REC/PAUSE to pause the ongoing recording while a menu is on the display window. -
Recorded files are named as [(recording date)_(recording time).(file format)] (e.g. 181010_1010.wav).
-
If the file size reaches the maximum limit (4 GB for an LPCM file, and 1 GB for an MP3 file) during recording, the file will be divided and some of the recording may be lost around the divided point.
For the maximum recording time for a single file, see Maximum recording time.
The contents of the Help Guide may be subject to change without notice due to updates to the product's specifications.