

Switching shooting modes
Switch the shooting mode by pressing the UP/DOWN button on the Live-View display of this unit during single connection.
- Some shooting modes cannot be set depending on the connected camera. Refer to the instruction manual of the connected camera.
- The shooting mode icon is displayed on the upper left side of the display.
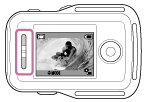
The shooting modes are as follows.
 Movie mode: Shooting movies.
 Photo mode: Shooting still images.
 Interval photo recording mode: Shooting still images at regular intervals until you stop shooting.
 Loop recording mode: When the memory card capacity decreases, the camera deletes older memory and keeps recording.
 Audio recording mode: Recording sound.
Hint
- You can also switch the shooting mode via MENU items on the remote control. The procedure for switching via MENU items is as follows.
- Press the MENU button to select
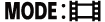 (Shooting mode) in the setting items. Press the UP button or DOWN button to select the shooting mode and press the REC/ENTER button.
 - If you connect to a Lens-style Camera (QX series), press the UP or Down button to operate the camera zoom in the Live-View display.
- Press the MENU button to select