Connecting to a wired network
This section explains how to connect the home audio system to a wireless router with a LAN cable (not supplied), then how to connect the router to the PC.
Usually the DHCP setting is set to ON when you connect your PC to the network.
Do the following before starting.
- Set the DHCP setting of your PC to ON.
- Check that your PC and wireless router are turned on.
- Connect the wireless router to the LAN port of the home audio system with a LAN cable (not supplied).
- Connect the wireless router to your PC using another LAN cable (not supplied), or a Wi-Fi connection.

- Turn the home audio system on.
The power indicator lights up in green, then the NETWORK indicator begins to flash in white. Wait about 2 minutes (in some cases, 4 or 5 minutes) until
 lights up on the display. When the connection is completed, the NETWORK indicator changes from flashing to staying lit in white.
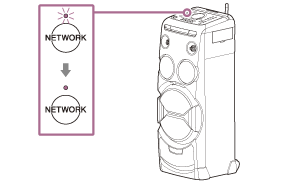
Hint
- When you connect the home audio system to a PC for the first time, it takes about four or five minutes until the NETWORK indicator stops flashing and stays lit in white.
Note
- When you connect the home audio system to a network for the first time after purchase, or after you reset the home audio system, the BLUETOOTH/Network standby mode is turned on automatically.