


Mounting the Center Speaker and Front Speakers on a Wall
Mount the center speaker and front speakers under the TV mounted on a wall.
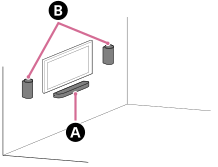
 Center speaker
 Front speakers
Note
- Hang the center speaker and front speakers horizontally on the reinforced wall.
- Ask a Sony dealer or licensed contractor to install the center speaker and front speakers securely with full consideration of safety.
- Sony shall not be held responsible for accidents or damage caused by improper installation, lack of installation strength, misuse, or natural disaster.
- Two or more persons are required to hang the center speaker and front speakers for safety.
Mounting the center speaker on a wall
-
Prepare two screws (not supplied) that are suitable for the holes on the wall mounting bracket (supplied).
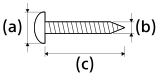
(a) 6 mm to 9.5 mm (1/4 in to 3/8 in)
(b) 4 mm (3/16 in)
(c) 30 mm (1 3/16 in) or longer (Approx.)
Reference: Hole on the wall mounting bracket
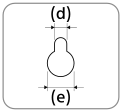
(d) Approx. 5.0 mm (13/64 in)
(e) Approx. 10 mm (25/64 in)
Note
- Prepare screws (not supplied) that are suitable for the wall material and stability. The screw may damage the wall depending on the wall material.
-
Measure the depth of the mounted TV (f) and find out the required space between the bottom of the TV and the top of the center speaker (g).
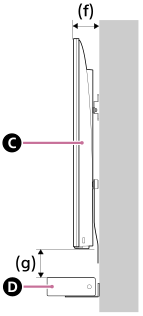
 TV
TV
 Center speaker
Depth of the mounted TV (f) Required space between the bottom of the TV and the top of the center speaker (g) Shorter than 85 mm (3 3/8 in) 120 mm (4 3/4 in) or longer 85 mm (3 3/8 in) or longer 200 mm (7 7/8 in) or longer -
Align the vertical line above the “
 ” printed on the WALL MOUNT TEMPLATE (Paper) for the center speaker (supplied) with the center of the width of your TV.
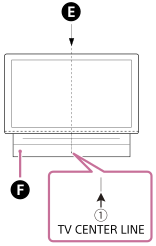
 Center of the TV
 WALL MOUNT TEMPLATE (Paper) for the center speaker
-
Align the “
 ” mark printed on the WALL MOUNT TEMPLATE for the center speaker with the bottom of the required space between the bottom of TV and the top of the center speaker (g) measured in step 2, then adhere the WALL MOUNT TEMPLATE for the center speaker on the wall with a commercially available adhesive tape, etc.
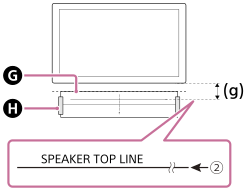
 WALL MOUNT TEMPLATE (Paper) for the center speaker
 Adhesive tape, etc.
Note
- When adhering the WALL MOUNT TEMPLATE for the center speaker on the wall, smooth it out fully.
-
Fasten the screws prepared in step 1 securely into the screw marks on the “
 ” printed on the WALL MOUNT TEMPLATE for the center speaker.
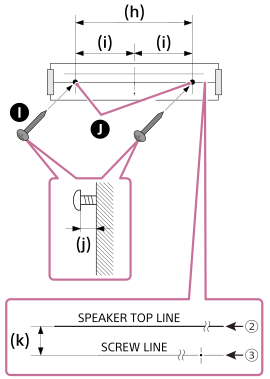
 Screws
 Marks
Marks
(h) 334 mm (13 1/8 in)
(i) 167 mm (6 37/64 in)
(j) 3.5 mm to 4.5 mm (5/32 in to 3/16 in)
(k) 30 mm (1 3/16 in)
Note
- Fasten the screws securely in the wall beam.
-
Remove the WALL MOUNT TEMPLATE for the center speaker.
-
Hang the wall mounting brackets (supplied) on the screws, then fasten the screws to fix the wall mounting brackets to the wall.
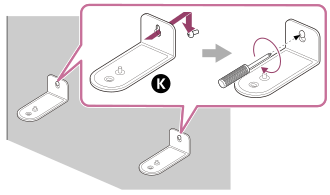
 Wall mounting bracket
-
Connect cables to the center speaker.
Connect the HDMI cable (supplied) to the HDMI OUT (TV (eARC/ARC)) jack on the center speaker and the AC power cord (mains lead) for the center speaker (supplied) to the AC inlet on the center speaker.
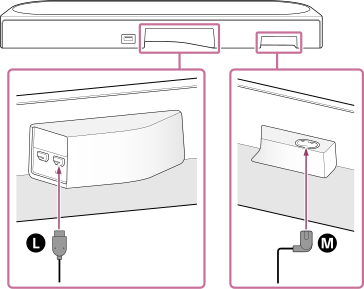
 HDMI cable
 AC power cord (mains lead) for the center speaker
-
Put the center speaker on the wall mounting brackets.
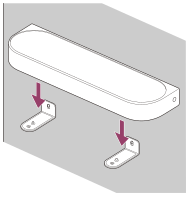
-
Align the positions of the screw holes on the bottom of the center speaker and holes of the wall mounting brackets, then fix the center speaker to the wall mounting brackets by fastening the screws (supplied) securely.
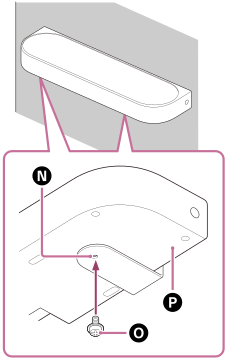
 Wall mounting bracket
 Screw
Screw
 Bottom of the center speaker
- Connect the HDMI cable (supplied) connected to the center speaker to the eARC/ARC HDMI input jack on the TV.
- Connect the AC power cord (mains lead) for the center speaker connected to the center speaker to the AC outlet (mains).
Mounting the front speakers on a wall
-
Prepare two screws (not supplied) that are suitable for the wall mounting holes on the front speakers.
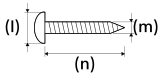
(l) 6 mm to 9.5 mm (1/4 in to 3/8 in)
(m) 4 mm (3/16 in)
(n) 30 mm (1 3/16 in) or longer (Approx.)
Reference: Wall mounting hole on the front speaker
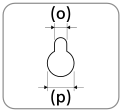
(o) Approx. 4.5 mm (3/16 in)
(p) Approx. 10 mm (13/32 in)
Note
- Prepare screws (not supplied) that are suitable for the wall material and stability. The screw may damage the wall depending on the wall material.
-
Align the horizontal line of the “
 ” mark printed on the WALL MOUNT TEMPLATE for the front speaker (supplied) with the center of the TV’s height, then adhere the WALL MOUNT TEMPLATE for the front speaker on the wall with a commercially available adhesive tape, etc. leaving a gap (q) between the TV.
Make sure the gap between the TV is the same on both sides.
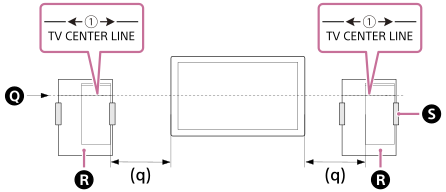
 Center of the TV
 WALL MOUNT TEMPLATE (Paper) for the front speaker
 Adhesive tape, etc.
-
Fasten the screw prepared in step 1 securely into the screw mark printed on the WALL MOUNT TEMPLATE for the front speaker.
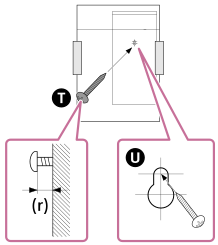
 Screw
Screw
 Mark
Mark
(r) Approx. 11 mm (7/16 in)
Note
- Fasten the screw securely in the wall beam.
-
Remove the WALL MOUNT TEMPLATE for the front speaker.
-
Remove the cover on the rear of the front speaker by inserting a flathead screwdriver, etc. into the lower side of the cover.
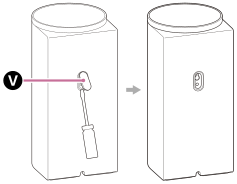
 Cover
Cover
-
Check the labels on the bottom of the front speakers to identify the left and right speakers, and hang the hole on the rear of the front speaker on the screw.
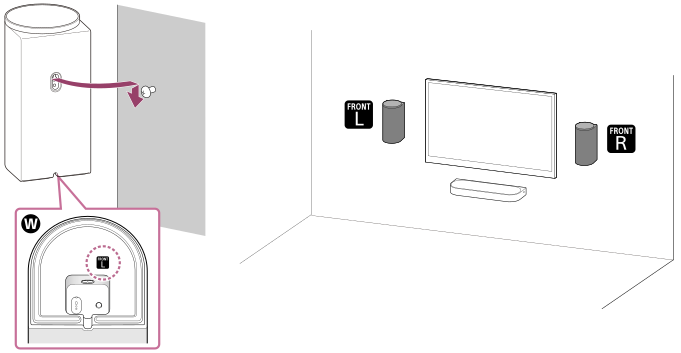
 Bottom of the front speaker
-
 : Left
 -
 : Right
-
Note
- Keep the cover that is removed in step 5 for covering the screw hole when you do not mount the front speaker on a wall.
About the sound field optimization
Perform [Sound Field Optimization](*) on the app in the following cases.- Changing the position and installation method of the speaker system as well as the optional rear speakers and subwoofer
- Connecting the optional rear speakers and/or subwoofer for the first time
- When changing the viewing environment, such as changing the layout of furniture
Using the calibration microphone allows for more accurate measurements.
* Displayed by tapping [Settings] - [Sound Settings] - [Sound Field Optimization] on the remote control screen on the app.
Mounting the optional speakers on a wall
Refer to the operating instructions/Help Guide of the optional speakers.