安裝Sound Organizer 2(僅限Windows)
在電腦上安裝Sound Organizer 2。
注意
- 務必安裝Sound Organizer 2,即使電腦已經安裝Sound Organizer 1.6也不例外。
-
安裝Sound Organizer 2時,請以具有系統管理員權限的帳戶進行登入。
此外,如果出現[使用者帳戶控制]視窗,請確認視窗內容,然後按[是]。
- 安裝Sound Organizer 2會新增Windows Media Format Runtime模組。如果解除安裝Sound Organizer 2,新增的Windows Media Format Runtime模組將會保留。如果已預先安裝Windows Media Format Runtime,則可能無法安裝此模組。
- 解除安裝Sound Organizer 2不會刪除內容儲存資料夾中的資料。
- 如果您的電腦安裝多個Windows作業系統,請勿在每個作業系統上皆安裝Sound Organizer 2,以避免發生資料不一致情況。
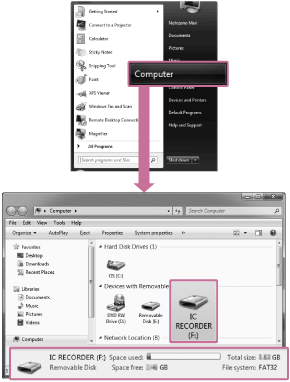
- 將IC錄音機連接到電腦。
- 前往[開始]選單,按一下[電腦],然後按兩下[IC RECORDER] - [FOR WINDOWS]。

電腦螢幕上的Windows外觀可能根據作業系統的版本而有不同。本說明指南使用Windows 7為範例。
-
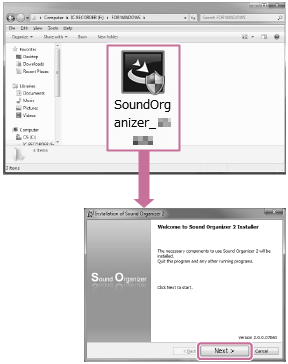
按兩下[SoundOrganizer_V2001](或[SoundOrganizer_V2001.exe])。

視您使用的作業系統版本而定,很可能螢幕上未顯示任何通知,安裝準備程序(檔案擷取)即自動開始。
在此情況下,請依照螢幕上的指示進行操作。
-
接受授權合約的條文後,請務必選取[I accept the terms in the license agreement],然後按一下[Next]。
-
出現[Setup Type]視窗時,請選取[Standard]或[Custom],然後按一下[Next]。如果您選取[Custom],請依照螢幕上的指示進行操作。
- 出現[Ready to Install the Program]畫面時,請按一下[Install]。安裝會隨即開始。
- 出現[Sound Organizer 2 has been installed successfully.]視窗時,請勾選[Launch Sound Organizer 2 Now],然後按一下[Finish]。
注意
- 安裝Sound Organizer 2後,您可能需要重新啟動電腦。

