


Location and function of parts
Left unit
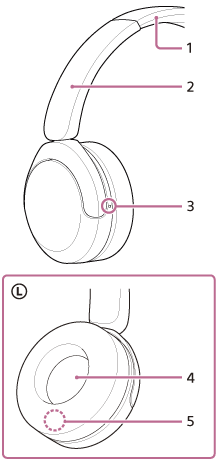
-
Headband
-
Headband sliders
Slide to adjust the length of the headband. -
Tactile dot
There is a tactile dot on the left unit. -
L (left) mark
-
Serial number
Located inside the unit.
See “To check the serial number" below.
Right unit
3 series of buttons: The volume up/next button, the play/call/power/BLUETOOTH button, and the volume down/previous button.
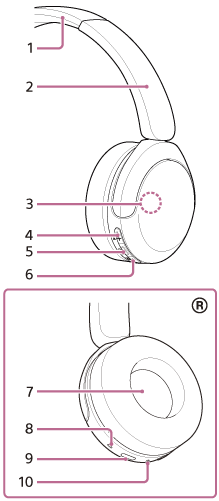
-
Headband
-
Headband sliders
-
Built-in antenna
A BLUETOOTH antenna is built into the headset.
-
Volume up/next button
There is a tactile dot on the button.
Press briefly to increase the volume. Press and hold to skip to the beginning of the next track.
+: Plus mark
 : Next mark
 -
Play/call/power/BLUETOOTH button
There is a raised tactile bar on the button. This button is located in the center of the 3 series of buttons.
Press and hold for more than 2 seconds to turn the headset on or off.
Press once during playback or pause to pause or resume playback.
Press and hold for more than 5 seconds to manually set the headset to pairing mode.
 : Play/call mark
 : Power mark
 : BLUETOOTH mark
 -
Volume down/previous button
The button is located opposite the volume up/next button in the 3 series of buttons. There is no tactile dot on the button.
Press briefly to lower the volume. Press and hold to skip to the beginning of the previous track or the current track during playback.
–: Minus mark
 : Previous mark
 -
R (right) mark
-
Microphone
-
USB Type-C port
Connects the headset to an AC outlet with a USB AC adaptor or to a computer with a USB Type-C cable to charge the headset.
-
Indicator (blue/orange)
Lights up in blue or orange to indicate the power or communication status of the headset.
To check the serial number
- Make sure the headset is turned off and the USB Type-C cable is not connected.
- Pinch the inside of the left earpad and pull it to remove it.
The serial number is located on the lower center of the left unit.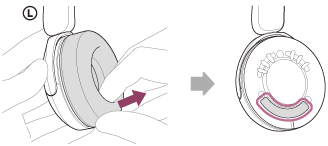
- Attach the removed earpad to the left unit.
Align the notch in the earpad with the step indicated by the arrow on the inside of the unit, and insert the earpad into the groove.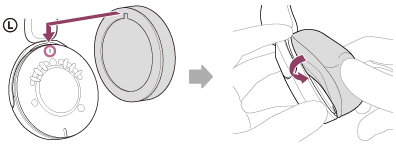
Note
- Do not remove the earpad unless necessary.
- Before removing the earpad, make sure the headset is turned off and the USB Type-C cable is not connected.
- Do not push into the interior or remove other internal parts. Doing so may damage the headset.
- Do not remove earpad in the presence of iron sand or other metal objects. Iron sand or other metal objects may adhere to the magnet inside the headset, causing the headset to malfunction.
- Be sure to attach the earpad in the correct direction. If the earpad is not attached in the correct direction, you may not get the desired acoustic performance.
- Any defects caused by failure to follow the above precautions are not covered by the product warranty.