

Pro settings
For the LCD Monitor/LCD Display, you configure basic items in [Home] and customize settings through [Pro settings].
Note
- The options you can adjust vary depending on the situation. Unavailable options are greyed out or not displayed.
Settings: Configure basic items such as picture and sound quality.
Pro settings: Customize settings according to your commercial environment.
Pro settings are a suite of features for customizing LCD Monitor/LCD Display operation based on your environment and use case. They include power control, startup settings, security, and automatic app installation from USB drives. Configure as needed to simplify installation and operation.
Actions
[Start Pro mode]
Move from the Normal mode to the Pro mode.
Hint
- If you use Pro mode, we recommend enabling PIN code protection in [Pro mode lock] under Pro settings.
[Initialize Pro settings]
Select [Initialize Pro settings] to display a confirmation screen. Select [OK] to reset only the Pro settings to default values.
[Current settings]
You can view a list of the current values for each Pro settings item.
[Export Pro settings]
You can use a USB drive to export Settings and Pro settings and apply them to other LCD Monitors/LCD Displays. [Export Pro settings] can be executed only between the same region, same product model, and same firmware version.
Exportable items are limited.
Note
-
To install the exported settings on another LCD Monitor/LCD Display, enable [Import settings] on the destination LCD Monitor/LCD Display.
Procedure: [Pro settings] → [USB drive auto run] → [Import settings]
-
If a network connection is available, you can also use [BRAVIA Web Control UI].
Refer to the following:
https://pro-bravia.sony.net/software-solutions/bravia-webcontrol-ui/

https://pro-bravia.sony.net/software-solutions/bravia-webcontrol-ui/
[Startup services]
The Startup services (built-in application) can be installed as needed. Since it is built into the LCD Monitor/LCD Display, no internet connection is required for installation.
How to install
- Select the app from the list and enable Use.
- Click [Enable] and [Install] to start the installation.
- When the installation is complete, the display restarts automatically.
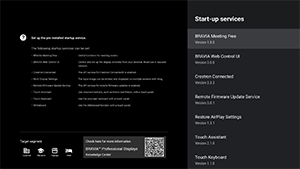
The following startup services are available.
Refer to the following: https://pro-bravia.sony.net/software-solutions/

https://pro-bravia.sony.net/software-solutions/
-
BRAVIA Meeting Free
Meeting support software that enables you to start meetings smoothly with simple connectivity.
-
BRAVIA Web Control UI
A convenient management tool for remotely controlling the LCD Monitor/LCD Display and changing settings via a browser.
-
Crestron Connected
Enables the API service for Crestron Connected. Provides extended connectivity for integrating the LCD Monitor/LCD Display with external applications and systems.
-
Remote Firmware Update Service
A service that enables firmware updates over the network from an app.
-
Restore AirPlay Settings
This function automatically restores the AirPlay settings pre-configured in Pro settings when the display is turned on in the Pro mode.
-
Touch Assistant
An app that enables touch control of the LCD Monitor/LCD Display without using a remote control. Displays
 /BACK and HOME buttons when drawing or operating on the screen. An external keyboard or input device may be required depending on the character input environment.
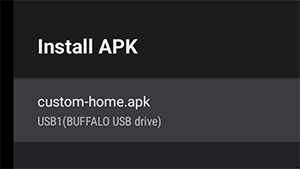
[Install APK]
You can install Android apps (.apk) on the LCD Monitor/LCD Display using a USB drive.
How to install
- Insert the USB drive containing the APK file into the LCD Monitor/LCD Display.
- Confirm that [Install APK] can be selected. If the APK file is not saved on the USB drive or the USB drive is not inserted correctly into the display, the option cannot be selected.
- Select [Install APK] to choose the APK file to install.
Settings
[AC power on]
Configure the startup state when the LCD Monitor’s/LCD Display’s main power is turned on in conjunction with a linked system such as a hotel room key or store system. Select from the following options:
-
[Standard]
If the screen is on when you turn off the main power of the linked system, the screen will automatically turn on the next time the main power is turned on. However, if you turn off the LCD Monitor/LCD Display before turning off the main power, the screen will remain off when the main power is turned on.
-
[Always on]
When the linked system's main power is turned off and back on, the screen always turns on.
-
[Off]
When the main power is turned off and back on, the screen always remains off.
[Wake-up on signal]
A function that automatically turns on the LCD Monitor/LCD Display and switches the input when HDMI is connected. You can also configure the LCD Monitor/LCD Display to turn off when HDMI is disconnected. This setting can be enabled individually for each HDMI input.
[Home key behavior]
You can assign a specific background image or app to the HOME button on the remote control.
The following options are available:
-
[Home menu]
Displays the default home screen.
-
[Web app]
You can assign a specific background image or web app-based content to the HOME button. For web app-based content, you can specify either content hosted on an external server or a web app installed on the display.
-
[Web app/Home menu]
Alternately displays the [Home] screen and the specified web app on the LCD Monitor/LCD Display.
-
[Android home app]
You can assign an installed Android home app or a custom app compatible with Android Home to the HOME button.
[NTP server]
You can set the NTP server IP address or hostname on the LCD Monitor/LCD Display to synchronize the system and apps with the LCD Monitor’s/LCD Display’s time.
[Pro mode lock]
When enabled, you can specify a 4-digit PIN code. Once set, you will be prompted to enter the PIN code when switching from Pro mode to Normal mode. If you forget the PIN code, you will not be able to change the operating mode. Please keep the PIN code in a safe place.

[Charge USB during Standby mode / Networked standby mode]
Enables charging of USB-connected devices even when the LCD Monitor/LCD Display is turned off. This setting disables the LCD Monitor’s/LCD Display’s suspend mode.
[Restore picture and sound adjustments]
When operating in Pro mode, you can configure the LCD Monitor/LCD Display to restore picture and sound quality settings changed by guests to their original values when the LCD Monitor’s/LCD Display’s main power is turned off and back on. The default value is [OFF]. Change this setting as needed.
-
[ON]
Restores picture and sound quality to their original settings when the LCD Monitor/LCD Display is turned off and back on.
-
[OFF]
Disables the feature.
[Developer options]
The following settings are available for Android apps.
To enable [Developer options]
-
Press the OPTIONS button on the remote control, and then select the following in order.
[Settings] — [About] — [Android TV OS build], then press
 (Enter) button on the remote control 10 times.
-
[Power state control by apps]
This function allows you to control the LCD Monitor’s/LCD Display’s power state by sending a broadcast intent.
Available Controls
- Restart
- Power OFF (Screen OFF)
- Power ON (Screen ON)
Example: Restart
“com.sony.dtv.b2b.intent.action.REBOOT”
Intent intent = new Intent(“com.sony.dtv.b2b.intent.action.REBOOT”); sendBroadcast(intent):
Example: Power OFF (Screen OFF)
“com.sony.dtv.b2b.intent.action.POWER_OFF”
Intent intent = new Intent("com.sony.dtv.b2b.intent.action.POWER_OFF"); sendBroadcast(intent):
Example: Power ON (Screen ON)
“com.sony.dtv.b2b.intent.action.POWER_ON”
Intent intent = new Intent("com.sony.dtv.b2b.intent.action.POWER_ON"); sendBroadcast(intent);
[Wi-Fi access point]
You can configure the following Wi-Fi access point settings.
-
[Wi-Fi access point]
Set whether to use Wi-Fi.
-
[SSID]
Set the SSID.
-
[Security]
Select either [WPA2-PSK (AES)] or [Open network].
-
[Password (WPA key)]
Set the WPA key (8-63 characters).
[Admin password]
Sets the password for remote administration authentication. Must be 8-32 characters and include both letters and numbers.
[USB drive auto run]
You can configure installation and automatic execution permissions when a USB drive is inserted into the LCD Monitor/LCD Display. This can be used as a security measure to prevent unintended operations and execution of unauthorized content.
-
[Import settings]
Allows automatic import of Settings and Pro settings from a USB drive.
-
[Install BPK]
Allows automatic installation when a USB drive containing BPK (BRAVIA Professional Display Package) is inserted into the LCD Monitor/LCD Display.
-
[Launch web app]
Allows automatic launch of web apps. Enable this setting to launch HTML5 apps from a USB drive or to transfer content from a USB drive to the LCD Monitor’s/LCD Display’s internal storage.
-
[Install web app]
Allows automatic installation of web apps.
[HTML5 platform]
The HTML5 platform is a dedicated runtime environment for running and managing HTML5 apps on the LCD Monitor/LCD Display. After installing, you can configure the following settings:
Note
-
HTML5 app configuration varies by installation environment.
Refer to the following.
https://pro-bravia.sony.net/software-solutions/building-html5-apps/

https://pro-bravia.sony.net/software-solutions/building-html5-apps/
Certificate
-
[Root certificates]
Register the root certificate for SSL/TLS communication.
-
[Client certificates]
Configure the certificate for client authentication.
-
[Confirm server certificates]
Configure whether to verify server certificates.
Permissions
-
[Web permissions]
Manages permissions for each web app. This setting also manages permissions for USB cameras and microphones.
Related Functions
-
[Auto recovery]
Enable automatic recovery when a web app encounters an error.
-
[Require PIN to launch a web app when using Pro mode lock]
When Pro mode lock is enabled and a PIN code is set, enabling this setting causes a PIN input dialog to be displayed when launching or installing a web app from a USB drive.
-
[Web app orientation]
Configure web app display orientation. Can be set to prioritize manifest settings or fixed orientation.
[DHCP hostname]
You can set sending the device's host name to the DHCP server on or off.
When it is turned on, you can also edit the host name that will be sent.
Initial source and volume
[Initial input source]
Set the screen displayed when the LCD Monitor/LCD Display is powered on. Select the primary source from the following.
The number of available terminals and default settings may vary by firmware version.
Available initial input options vary by model and region.
-
[Default]
Displays [Home] when the LCD Monitor/LCD Display is turned on.
-
[External input]
To display an external input, select the desired input (e.g., HDMI 1).
-
[Startup app]
If you specify an HTML5 app URL, that URL is displayed when the LCD Monitor/LCD Display is turned on.
-
[Android app]
Displays the specified Android app.
Note
-
Android apps set to [Enabled with restrictions] in [Apps] under Pro settings cannot be set as the initial input.
To set an Android app as the initial input, set the app to [Use].
Hint
-
To specify an app on a USB drive, you need to specify the “auid” in manifest.json separately. Save the HTML5 app on a USB drive and power on the LCD Monitor/LCD Display.
Refer to the following.
https://pro-bravia.sony.net/software-solutions/building-html5-apps/
https://pro-bravia.sony.net/software-solutions/building-html5-apps/
[Initial and maximum volume]
You can specify the initial volume when the LCD Monitor/LCD Display is turned on and the maximum volume during usage. The volume is always set to the specified value on startup, regardless of the user's previous settings.
[Timers]
Configure the time for the display to automatically turn on, turn off, or restart. Schedule by day of the week and time for regular operation. By scheduling regular restarts with this function, you can help ensure stable operation even during long-term use.
Function restrictions
[Display/Remote controls]
You can disable the LCD Monitor’s/LCD Display’s main unit keys and remote control operations in Pro mode. This prevents unexpected operations by unauthorized users.
[External input]
In Pro mode, you can restrict the display and use of information related to [Inputs] → [External inputs] under Settings. Configure separately for each HDMI input while connected. Select from the following options:
-
[Use with labels]
All input information is displayed and available for use by default.
-
[Use without labels]
The specified input is hidden but remains available for use.
-
[Not use]
Both the display of input information and the use of the external input are disabled.
[Apps]
You can enable or disable the settings for functions such as Pro settings, Language settings, and Date & time settings in Pro mode. Select an app from the list to configure its settings.
Note
- Android app installation may be possible in Pro mode depending on your configuration. However, to use the app in Pro mode, switch to Normal mode first and enable it in the [Apps] settings.
[Input]
Configure the input selection menu display in Pro mode. To edit the input names displayed in the menu (e.g., HDMI 1), press the
![]() (Input) button on the remote control to show the input list, then select [Edit].
(Input) button on the remote control to show the input list, then select [Edit].
-
[Default view]
When you press the
 (Input) button on the remote control in Pro mode, the standard input selection menu is displayed.
 -
[Basic view]
When you press the
(Input) button on the remote control in Pro mode, a simplified input selection menu is displayed. -
[Inputs menu customization]
Customize what is displayed when you press the
(Input) button on the remote control in Pro mode. You can enable or disable external inputs, AirPlay, apps, and more.
Hint
- To control input switching from a web app, select [Basic view].
Note
- Editing the input selection menu is enabled only in [Default view]. It cannot be edited in [Basic view].
[Quick Settings]
Settings that can be changed via the [Quick Settings] menu in Pro mode. Users can adjust settings such as picture quality while watching videos.
-
[Default view]
Pressing the OPTIONS button on the remote control in Pro mode displays the same [Quick Settings] menu as in Normal mode. Users can modify the [Quick Settings] menu in Pro mode.
-
[Basic view]
Pressing the OPTIONS button on the remote control in Pro mode displays a simplified [Quick Settings] menu. The menu has no edit buttons, and settings cannot be changed in Pro mode.
-
[Off]
The OPTIONS button on the remote control does not work in Pro mode.
Note
- Some Quick Settings features may not function correctly in the Pro mode environment. We recommend using the [Basic view] when operating in Pro mode.