Adjusting contrast (Black Level/Black Gamma/Knee)
Available Picture Profile setting items and options may vary depending on camera specifications.
Black Level
This function adjusts the black level of the image.
| Parameters | Settings |
|---|---|
| Black Level | –15 to +15 |
As an image effect, you can emphasize the color black to create an image that gives a powerful impression, or you can weaken black to give the image a soft impression. Shifting Black Level in the minus direction emphasizes the black color in the image, while changing the level in the plus direction weakens the black color.
If you want to simulate an old film, or capture winter morning fog, the black level value should be increased. If you decrease the value, gradations in dark areas will be smoothed out, making the areas appear in crisp black.
When using multiple fixed cameras to shoot the same subject from different angles, the balance between subject and background often varies. This balance variation may cause the black color in the subject to appear different when cameras are switched. However, this is an optical illusion. If it occurs, you can correct it by adjusting Black Level to make the black color look the same.
Black Gamma
This function lets you alter the shape of the selected gamma curve and adjust gradations in dark image areas.
| Parameters | Settings |
|---|---|
| Black Gamma > Range | Wide / Middle / Narrow |
| Black Gamma > Level | –7 to +7 |
[Range] controls the luminance range that Black Gamma influences. The [Narrow] setting keeps the range close to black, while the [Wide] setting extends the range to gray. [Range] should be set narrower when you want to control the quality of dark areas. If you want to adjust the overall image tone, [Range] should be set wider. At first, it may be a good idea to start from the [Narrow] setting.
Increasing the [Level] value brightens the image, whereas decreasing the value makes the image darker. For example, if you set [Range] to [Narrow] and decrease the [Level] value, you can create an image with dark areas that are similar to the ones seen in films. Unlike Black Level, Black Gamma Level adjusts luminance subtly.
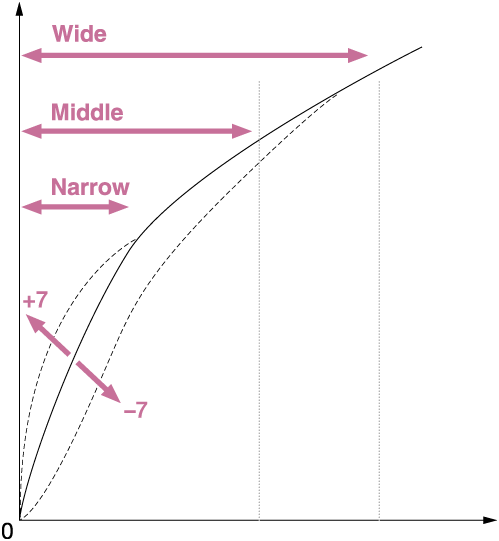
Black Gamma (+7)
Black Gamma (0)
Black Gamma (–7)
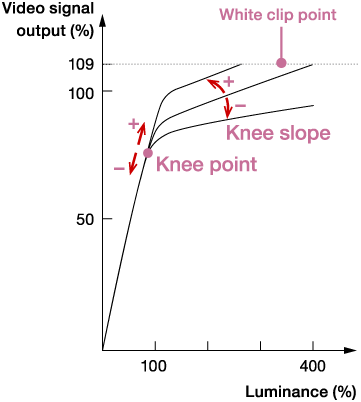
Knee
This function sets the knee point and slope for video signal compression to prevent over-exposure by limiting signals in high intensity areas of the subject to the dynamic range of your camera.
First, select whether to set the knee point and slope automatically or manually in [Mode], and then adjust each setting.
| Parameters | Settings |
|---|---|
| Knee > Mode | Auto / Manual |
| Knee > Auto Set > Max Point | 90% to 100% |
| Knee > Auto Set > Sensitivity | High / Mid / Low |
| Knee > Manual Set > Point | 75% to 105% |
| Knee > Manual Set > Slope | –5 to +5 |
Mode
- Auto:
- Automatically adjusts the knee based on what is selected in the following settings (when [Movie]* or [ITU709] is selected in [Gamma]).
- [Max Point] determines the maximum knee point level (white level). The knee slope is automatically adjusted according to the Max Point setting. The standard is to keep it at 100%. A lower setting will turn white grayish, while a higher setting will discard gradations in high luminance areas.
- [Sensitivity] changes the luminance level at which the knee’s automatic adjustment starts. When set to [High], the knee’s automatic adjustment starts at lower input signal levels than normal. When set to [Low], the knee’s automatic adjustment starts at higher input signal levels than normal.
- When a parameter other than [Movie]* or [ITU709] is selected in [Gamma], the gamma curve will not exceed the White clip point and over-exposure rarely occurs. When [Mode] is set to [Auto] with these settings, the Knee function is disabled. If you want to enable the Knee function, set [Mode] to [Manual].
*On some models, the [Movie] setting uses a gamma curve that does not exceed the White clip point. On these models, the Knee function is disabled in [Auto].
- Manual:
- Sticks to settings based on the following selections.
- [Point] sets the position of the knee point output level.
- [Slope] determines the inclination of the knee slope.
A negative slope setting results in a gentler knee slope angle. This expands the dynamic range, but reduces the ability to produce rich gradations. A positive slope setting makes the knee slope inclination steeper. This shrinks the dynamic range, but bolsters the ability to express gradations. When [Slope] is set to +5, the Knee function is disabled. - Set [Point] and [Slope] in [Manual Set] in combination. If you select a higher setting for [Point] and a gentler setting for [Slope], you can obtain video-like sharp highlight effects. If softer film-like highlight effects are desired, select a lower setting for [Point] and a steeper setting for [Slope]. In practical terms, move [Point] and [Slope] up and down in opposite directions while checking the gradations in high luminance areas until you find the ideal settings.