Turning on the power to the flash unit
-
Turn the power switch on this flash unit to “ON.”
The flash unit is powered.
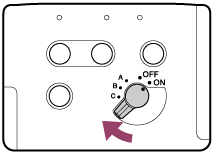
To configure the flash unit as the receiver unit, turn the power switch to “A,” “B,” or “C.”
When you turn on the power to the flash unit,
 (flash charge-up indicator) appears on the monitor screen of the camera attached with the flash unit.
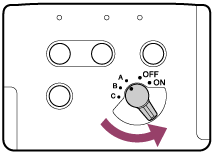
To turn off the power to the flash unit
Turn the power switch to “OFF.”

Flash charge-up
When you turn on the power to this flash unit, the flash unit starts charging up itself.
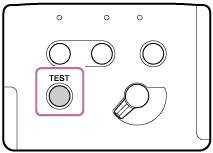
When the flash unit is fully charged up, the TEST button on the back of the flash unit lights in orange.
Power-saving mode
If this flash unit is left unused for 3 minutes or longer while it is removed from a camera or is attached to the camera in a power-saving state, the power to the flash unit will be automatically turned off to conserve the battery power.
-
During wireless flash photography with the flash unit being used as an off-camera flash unit, the flash unit goes into power-saving mode in 60 minutes.
-
Turning off the power switch on the connected camera (except for DSLR-A100) automatically places the flash unit in power-saving mode.
-
You can specify the power-saving timer for the flash unit by selecting [External Flash Set.] - [Ext. Flash Cust. Set.] - [Power Save] from the menu of the camera attached with this flash unit; or the power-saving timer during wireless flash photography by selecting [WL Power Save].
Checking the remaining battery power
When the batteries are running out of power, the TEST button on the back of this flash unit flashes in orange.
-
When flashing slowly
The batteries are running out of power. It is recommended that you replace the batteries.
The flash unit, however, is still capable of firing flashes in this state.
-
When flashing quickly
The flash unit is not capable of firing flashes. Replace the batteries.
Notes on continuous flash firing
-
If this flash unit fires flashes in quick succession for a short period of time, its built-in safety circuit will be triggered to suspend flash firing and the flash interval may be forced to extend.
In addition, if the temperature inside the flash unit rises further, the TEST button on the back of the flash unit flashes in red to indicate that flash firing is disabled for a while (overheated state). In such a case, make sure that you turn the power switch on the flash unit to “OFF” and leave the flash unit unused for about 20 minutes to let it cool down.
-
Continuous flash firing causes the batteries inside this flash unit to build up heat. Take sufficient care when you remove the batteries.