

Connecting a TV (for STR-ZA3000ES)
Connect a TV to the HDMI OUT or MONITOR VIDEO OUT jack. You can operate this receiver using a GUI (Graphical User Interface). GUI is used only for HDMI OUT A jack.
Be sure to disconnect the AC power cord (mains lead) before connecting cables.
To watch 4K resolution content
The HDMI jacks designated as being “HDCP 2.2” (HDMI IN 2/IN 3, HDMI OUT A/OUT B) support High-bandwidth Digital Content Protection System Revision 2.2 (HDCP 2.2). Connect these HDMI jacks to jacks that support HDCP 2.2 on a TV or a player. Refer to the operating instructions of the connected device for details.
Connecting a TV compatible with the Audio Return Channel (ARC) function via an HDMI connection
To use the ARC function, set [HDMI Out B Mode] to [Main] and [Control for HDMI] to [On].
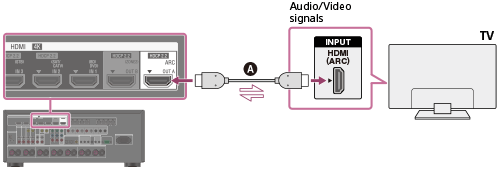
 HDMI cable (not supplied)
Sony recommends that you use an HDMI-authorized cable or HDMI cable made by Sony.
Connecting a TV and a projector
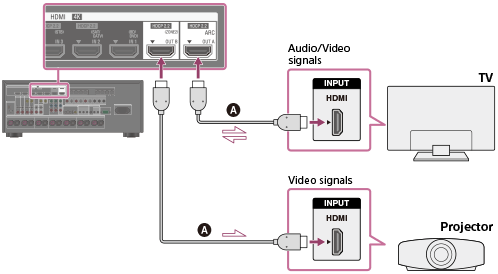
HDMI cable (not supplied)
Sony recommends that you use an HDMI-authorized cable or HDMI cable made by Sony.
Note
- For this connection, set [HDMI Out B Mode] in the HDMI Setup menu to [Main].
Connecting a TV incompatible with the Audio Return Channel (ARC) function via an HDMI connection
The solid lines show recommended connections and the dashed lines show alternative connections.

Audio cable (not supplied)
 Optical digital cable (not supplied)
 HDMI cable (not supplied)
Sony recommends that you use an HDMI-authorized cable or HDMI cable made by Sony.
Connecting a TV without HDMI jacks
The solid lines show recommended connections and the dashed lines show alternative connections.

Video cable (not supplied)
Component video cable (not supplied)
Optical digital cable (not supplied)
 Audio cable (not supplied)
Note
- Connect a TV monitor or a projector to the HDMI OUT or MONITOR VIDEO OUT jack on the receiver.
- Depending on the status of the connection between the TV and the antenna (aerial), the image on the TV screen may be distorted. If this is the case, place the antenna (aerial) farther away from the receiver.
- When connecting an optical digital cable, insert the plugs straight until they click into place.
- Do not bend or tie optical digital cables.
Hint
- All of the digital audio jacks are compatible with 32 kHz, 44.1 kHz, 48 kHz, and 96 kHz sampling frequencies.
- The receiver has a video conversion function. For details, see “Function for conversion of video signals.”
- When connecting a TV to the receiver via the TV IN jacks of the receiver, set the sound output jack of the TV to [Fixed] if it can be switched between either [Fixed] or [Variable].